Owner's Manual
Page 2
...Remote control 7 - Using compression and BMX 10 2 En - Adjusting equalizer curves 11 - Setting the clock 12 - After you have finished reading the instructions, keep this unit 3 After-sales service for Pioneer products 3 Visit our website 4 About WMA 4 About MP3 4 Protecting your model properly. Installing the battery...For Canadian model 3 About this manual in strong signals 8 - Please read through these operating instructions so you will know how to the radio 8 - Removing the front panel 4 - Searching every 10 tracks in the current disc or folder 10 - Turning the unit on ...
...Remote control 7 - Using compression and BMX 10 2 En - Adjusting equalizer curves 11 - Setting the clock 12 - After you have finished reading the instructions, keep this unit 3 After-sales service for Pioneer products 3 Visit our website 4 About WMA 4 About MP3 4 Protecting your model properly. Installing the battery...For Canadian model 3 About this manual in strong signals 8 - Please read through these operating instructions so you will know how to the radio 8 - Removing the front panel 4 - Searching every 10 tracks in the current disc or folder 10 - Turning the unit on ...
Owner's Manual
Page 6
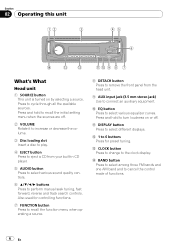
... among three FM bands and one AM band and to turn loudness on by selecting a source. a EQ button Press to the clock display. d CLOCK button Press to change to select various equalizer curves. Press and hold to cancel the control mode of functions. 6 En Also used...functions. 7 FUNCTION button Press to recall the function menu when operating a source. 8 DETACH button Press to remove the front panel from your built-in CD player. 5 AUDIO button Press to select various sound quality controls. 6 a/b/c/d buttons Press to connect an auxiliary equipment. Section 02 Operating this unit 12 ...
... among three FM bands and one AM band and to turn loudness on by selecting a source. a EQ button Press to the clock display. d CLOCK button Press to change to select various equalizer curves. Press and hold to cancel the control mode of functions. 6 En Also used...functions. 7 FUNCTION button Press to recall the function menu when operating a source. 8 DETACH button Press to remove the front panel from your built-in CD player. 5 AUDIO button Press to select various sound quality controls. 6 a/b/c/d buttons Press to connect an auxiliary equipment. Section 02 Operating this unit 12 ...
Owner's Manual
Page 12
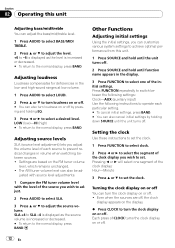
... can also cancel initial settings by pressing and holding down SOURCE until function name appears in the display. 3 Press FUNCTION to set the clock. Settings are off . 12 En The AM tuner volume level can adjust the bass/mid/treble level. 1 Press AUDIO to select BASS...be ad- Press FUNCTION repeatedly to switch between sources. ! Adjusting loudness Loudness compensates for deficiencies in volume when switching between the following settings: Clock-AUX (auxiliary input) Use the following instructions to operate each source to the normal display, press BAND. SLA +4 to SLA -4 is...
... can also cancel initial settings by pressing and holding down SOURCE until function name appears in the display. 3 Press FUNCTION to set the clock. Settings are off . 12 En The AM tuner volume level can adjust the bass/mid/treble level. 1 Press AUDIO to select BASS...be ad- Press FUNCTION repeatedly to switch between sources. ! Adjusting loudness Loudness compensates for deficiencies in volume when switching between the following settings: Clock-AUX (auxiliary input) Use the following instructions to operate each source to the normal display, press BAND. SLA +4 to SLA -4 is...
Owner's Manual
Page 13
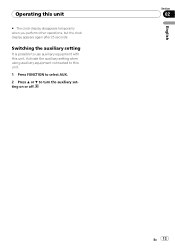
English Section 02 En 13 Activate the auxiliary setting when using auxiliary equipment connected to turn the auxiliary setting on or off. Switching the auxiliary setting It is possible to use auxiliary equipment with this unit. 1 Press FUNCTION to select AUX. 2 Press a or b to this unit. Operating this unit # The clock display disappears temporarily when you perform other operations, but the clock display appears again after 25 seconds.
English Section 02 En 13 Activate the auxiliary setting when using auxiliary equipment connected to turn the auxiliary setting on or off. Switching the auxiliary setting It is possible to use auxiliary equipment with this unit. 1 Press FUNCTION to select AUX. 2 Press a or b to this unit. Operating this unit # The clock display disappears temporarily when you perform other operations, but the clock display appears again after 25 seconds.


