Leaflet
Page 1
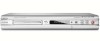
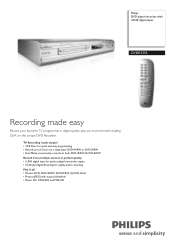
Philips DVD player/recorder with musical slideshow • Music: CD, CD-R/RW and MP3-CD TV Recording made easy Record your favourite TV programmes in digital quality, play any movie format including DivX on both DVD+R/RW & DVD-R/RW Record from multiple sources in perfect quality • i.LINK...; 2.0 Dolby Digital Encoding for quality audio recording Play it all • Movies: DVD, DVD+R/RW, DVD-R/RW, (S)VCD, DivX • Photos (JPEG) with i.LINK digital input DVDR3355 Recording made simple! • VCR Plus+ for quick and easy programming • Record up to 6 hours on a single layer...
Philips DVD player/recorder with musical slideshow • Music: CD, CD-R/RW and MP3-CD TV Recording made easy Record your favourite TV programmes in digital quality, play any movie format including DivX on both DVD+R/RW & DVD-R/RW Record from multiple sources in perfect quality • i.LINK...; 2.0 Dolby Digital Encoding for quality audio recording Play it all • Movies: DVD, DVD+R/RW, DVD-R/RW, (S)VCD, DivX • Photos (JPEG) with i.LINK digital input DVDR3355 Recording made simple! • VCR Plus+ for quick and easy programming • Record up to 6 hours on a single layer...
Leaflet
Page 2
... any DVD player. With i.Link digital video input, you need to do to program your Philips recorder will always create fully compatible recordings, which can buy any disc and your video recorder is fully compatible with i.LINK digital input Specifications DVDR3355/37 Highlights Picture/Display • Aspect ratio: 4:3, 16:9 • D/A converter: 10 bit, 54 MHz...
... any DVD player. With i.Link digital video input, you need to do to program your Philips recorder will always create fully compatible recordings, which can buy any disc and your video recorder is fully compatible with i.LINK digital input Specifications DVDR3355/37 Highlights Picture/Display • Aspect ratio: 4:3, 16:9 • D/A converter: 10 bit, 54 MHz...

User manual
Page 4
...of disc formats provided by various disc manufacturers, your DVD system/ player/recorder may result in the Radio Interference Regulations of the Canadian Department of Philips Electronics North America Corp. IF THERE ARE QUESTIONS REGARDING OUR TV SET ...This warning label is located on the rearside and inside this laser product. Declaration of Conformity Model number: DVDR3355 Trade Name: Philips Responsible Party: Philips Consumer Electronics A Division of Communications. EXPOSURE TO BEAM. P. DANGER:IANVVOISIIDBLEDLIRAESCERT RADIATION WHEN OPEN. LASER Type Wave...
...of disc formats provided by various disc manufacturers, your DVD system/ player/recorder may result in the Radio Interference Regulations of the Canadian Department of Philips Electronics North America Corp. IF THERE ARE QUESTIONS REGARDING OUR TV SET ...This warning label is located on the rearside and inside this laser product. Declaration of Conformity Model number: DVDR3355 Trade Name: Philips Responsible Party: Philips Consumer Electronics A Division of Communications. EXPOSURE TO BEAM. P. DANGER:IANVVOISIIDBLEDLIRAESCERT RADIATION WHEN OPEN. LASER Type Wave...
User manual
Page 7
... or a few quality levels to choose from, ranging from an external player? you will fit on the remote control to record on the recording settings. Maximum Recording Time per Disc 1 hour 2 hours 4 hours 6 hours Picture Quality High quality DVD quality-Standard Play VHS quality-Extended ...or have them automatically inserted at a time to "6 hours mode" (VHS quality). English Frequently Asked Questions What kind of recording. What is full, you start a new recording. What is the difference between DVD+R/ and DVD+RW? Yes, but when the disc is the capacity of audio, video...
... or a few quality levels to choose from, ranging from an external player? you will fit on the remote control to record on the recording settings. Maximum Recording Time per Disc 1 hour 2 hours 4 hours 6 hours Picture Quality High quality DVD quality-Standard Play VHS quality-Extended ...or have them automatically inserted at a time to "6 hours mode" (VHS quality). English Frequently Asked Questions What kind of recording. What is full, you start a new recording. What is the difference between DVD+R/ and DVD+RW? Yes, but when the disc is the capacity of audio, video...
User manual
Page 8
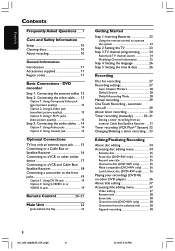
...Care and Safety Information Setup 10 Cleaning discs 10 About recycling 10 General Information Introduction 11 Accessories supplied 11 Region codes 11 Basic Connections - DVD recorder Step 1: Connecting the antenna cables 12 Step 2: Connecting the video cable ....... 13 Option 1: Using Composite Video jack (good picture quality 13 ...35 Overwrite disc (DVD+RW only 35 Make compatible (DVD+RW only 36 Lock/Unlock disc (DVD+RW only 36 Playing your recordings (DVD+R) on other similar device 17 Connecting to a VCR and Cable Box/ Satellite Receiver 18 Connecting a camcorder to the front ...
...Care and Safety Information Setup 10 Cleaning discs 10 About recycling 10 General Information Introduction 11 Accessories supplied 11 Region codes 11 Basic Connections - DVD recorder Step 1: Connecting the antenna cables 12 Step 2: Connecting the video cable ....... 13 Option 1: Using Composite Video jack (good picture quality 13 ...35 Overwrite disc (DVD+RW only 35 Make compatible (DVD+RW only 36 Lock/Unlock disc (DVD+RW only 36 Playing your recordings (DVD+R) on other similar device 17 Connecting to a VCR and Cable Box/ Satellite Receiver 18 Connecting a camcorder to the front ...

User manual
Page 9
... Menu - Clock 55 Date and Time 55 Show DivX® registration code 55 Troubleshooting 56~57 Specification 58 Glossary 59 001_033_dvdr3355_37A_eng5 9 9 21/3/05, 3:41 PM Record ......... 55 Accessing System Menu -
... Menu - Clock 55 Date and Time 55 Show DivX® registration code 55 Troubleshooting 56~57 Specification 58 Glossary 59 001_033_dvdr3355_37A_eng5 9 9 21/3/05, 3:41 PM Record ......... 55 Accessing System Menu -
User manual
Page 10
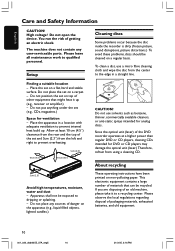
Do not position the set on a regular basis. Since the optical unit (laser) of the DVD recorder operates at least 10 cm (4.5") clearance from the rear and the top of the set on non-polluting paper. This electronic equipment contains a ... might heat it to qualified personnel. Please leave all maintenance work to a recycling center. Setup Cleaning discs Some problems occur because the disc inside the recorder is dirty (frozen picture, sound disruptions, picture distortions.) To avoid these problems, discs should be cleaned on top of danger on a carpet. - Apparatus ...
Do not position the set on a regular basis. Since the optical unit (laser) of the DVD recorder operates at least 10 cm (4.5") clearance from the rear and the top of the set on non-polluting paper. This electronic equipment contains a ... might heat it to qualified personnel. Please leave all maintenance work to a recycling center. Setup Cleaning discs Some problems occur because the disc inside the recorder is dirty (frozen picture, sound disruptions, picture distortions.) To avoid these problems, discs should be cleaned on top of danger on a carpet. - Apparatus ...
User manual
Page 11
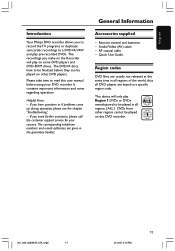
...thus all DVD players are given in all regions ('ALL'.) DVDs from other DVD players. English Introduction Your Philips DVD recorder allows you to record the TV programs or duplicate camcorder recordings to a DVD+R/+RW and play on some DVD players and DVD-ROM drives. The DVD+R discs have ...- If you need further assistance, please call the customer support service for your DVD recorder. Audio/Video (AV) cable - RF coaxial cable - ALL 1 001_033_dvdr3355_37A_eng5 11 11 21/3/05, 3:16 PM The recordings you have to be played on this user manual before they can be played on the...
...thus all DVD players are given in all regions ('ALL'.) DVDs from other DVD players. English Introduction Your Philips DVD recorder allows you to record the TV programs or duplicate camcorder recordings to a DVD+R/+RW and play on some DVD players and DVD-ROM drives. The DVD+R discs have ...- If you need further assistance, please call the customer support service for your DVD recorder. Audio/Video (AV) cable - RF coaxial cable - ALL 1 001_033_dvdr3355_37A_eng5 11 11 21/3/05, 3:16 PM The recordings you have to be played on this user manual before they can be played on the...

User manual
Page 12
... the Cable Box/Satellite Receiver, labeled as RF OUT or TO TV) to the ANTENNA jack on the DVD recorder. 2 Use the supplied RF coaxial cable to connect TV socket on the DVD recorder to the antenna input jack (or labeled as VHF/UHF RF IN) on in order to watch and... you want to connect to a VCR and/or Cable Box/Satellite Receiver, see page 15 for the complete connection to watch or record the cable programs. G If your TV is connected via a VCR, Cable Box or Satellite Receiver, ensure that all the devices are turned on your existing ...
... the Cable Box/Satellite Receiver, labeled as RF OUT or TO TV) to the ANTENNA jack on the DVD recorder. 2 Use the supplied RF coaxial cable to connect TV socket on the DVD recorder to the antenna input jack (or labeled as VHF/UHF RF IN) on in order to watch and... you want to connect to a VCR and/or Cable Box/Satellite Receiver, see page 15 for the complete connection to watch or record the cable programs. G If your TV is connected via a VCR, Cable Box or Satellite Receiver, ensure that all the devices are turned on your existing ...

User manual
Page 13
... 2: Using S-Video jack (excellent picture quality) G Use an S-video cable (not supplied) to connect S-VIDEO (Y/C) -OUT2 jack on the DVD recorder to the corresponding component video input jacks (or labeled as Y/C or S-VHS) on the TV. Option 3: Using Y Pb Pr jacks (best picture... IO O UT S-V ID E O IN V ID E O IN Step 2: Connecting the video cable This connection enables you to complete the DVD recorder installation first, before enabling the progressive scan feature. It is required. The progressive scan video quality is only available through Y Pb Pr connection and a ...
... 2: Using S-Video jack (excellent picture quality) G Use an S-video cable (not supplied) to connect S-VIDEO (Y/C) -OUT2 jack on the DVD recorder to the corresponding component video input jacks (or labeled as Y/C or S-VHS) on the TV. Option 3: Using Y Pb Pr jacks (best picture... IO O UT S-V ID E O IN V ID E O IN Step 2: Connecting the video cable This connection enables you to complete the DVD recorder installation first, before enabling the progressive scan feature. It is required. The progressive scan video quality is only available through Y Pb Pr connection and a ...
User manual
Page 14
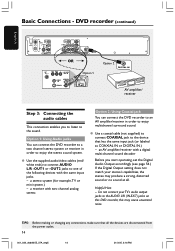
...jacks to enjoy the stereo sound system. Option 1: Using Audio jacks You can connect the DVD recorder to an AV amplifier/receiver in order to the AUDIO L/R (IN-EXT) jacks on this DVD recorder, this may produce a strong, distorted sound or no sound at all the devices are disconnected.... 14 001_033_dvdr3355_37A_eng5 14 21/3/05, 3:16 PM a receiver with the same input jacks. - Option 2: Using Coaxial jack You can connect the DVD recorder to a two channel stereo system or receiver in order to the sound. Do not connect your stereo's capabilities, the stereo may cause unwanted noise. ...
...jacks to enjoy the stereo sound system. Option 1: Using Audio jacks You can connect the DVD recorder to an AV amplifier/receiver in order to the AUDIO L/R (IN-EXT) jacks on this DVD recorder, this may produce a strong, distorted sound or no sound at all the devices are disconnected.... 14 001_033_dvdr3355_37A_eng5 14 21/3/05, 3:16 PM a receiver with the same input jacks. - Option 2: Using Coaxial jack You can connect the DVD recorder to a two channel stereo system or receiver in order to the sound. Do not connect your stereo's capabilities, the stereo may cause unwanted noise. ...

User manual
Page 15
... 3 or 4. If you used AUDIO/VIDEO OUT2 connection, set your electronics retailer or contact Philips for details on RF modulator availability and operations. Remove it from the TV and connect it to the ANTENNA jack on the DVD recorder. 2 Use the supplied RF coaxial cable to connect TV jack on the DVD... channel. - If you need an RF modulator in order to the audio input jack (or labeled as AUDIO IN or LINE IN) on the DVD recorder to view the disc playback. 1 You may have any connections, make sure that all the devices are disconnected from the Cable Box/Satellite Receiver/VCR...
... 3 or 4. If you used AUDIO/VIDEO OUT2 connection, set your electronics retailer or contact Philips for details on RF modulator availability and operations. Remove it from the TV and connect it to the ANTENNA jack on the DVD recorder. 2 Use the supplied RF coaxial cable to connect TV jack on the DVD... channel. - If you need an RF modulator in order to the audio input jack (or labeled as AUDIO IN or LINE IN) on the DVD recorder to view the disc playback. 1 You may have any connections, make sure that all the devices are disconnected from the Cable Box/Satellite Receiver/VCR...

User manual
Page 16
... are disconnected from the Cable Box/Satellite Receiver to your TV. 2 Use the audio/video cables to connect VIDEO/AUDIO IN-EXT on the DVD recorder to the matching VIDEO/AUDIO output jacks on the Cable Box/Satellite Receiver. 3 Use the audio/video cables to connect VIDEO/AUDIO OUT-2 on the... DVD recorder to the matching VIDEO/AUDIO input jacks on page 12 for the complete connection to "Connecting the antenna cables" on the TV. Option 2 If your...
... are disconnected from the Cable Box/Satellite Receiver to your TV. 2 Use the audio/video cables to connect VIDEO/AUDIO IN-EXT on the DVD recorder to the matching VIDEO/AUDIO output jacks on the Cable Box/Satellite Receiver. 3 Use the audio/video cables to connect VIDEO/AUDIO OUT-2 on the... DVD recorder to the matching VIDEO/AUDIO input jacks on page 12 for the complete connection to "Connecting the antenna cables" on the TV. Option 2 If your...

User manual
Page 17
.../UHF RF IN VHF/UHF RF OUT OUT VIDEO OUT AUDIO L AUDIO R 3 Back of the copy protection system built into the DVD recorder. Connect the DVD recorder directly to the matching VIDEO/AUDIO input jacks on the TV. Then connect the RF coaxial cables from video tape to a DVD+R/+RW and..., make sure that all the devices are copy-protected and therefore cannot be used for this connection. 1 Connect the Antenna/Cable TV signal to be recorded. - You may be poor because of aVCR (Example only) IN VIDEO IN AUDIO L AUDIO R 2 4 TV AU D IO O UT S-V ID E O IN V ID E O IN Connecting to a...
.../UHF RF IN VHF/UHF RF OUT OUT VIDEO OUT AUDIO L AUDIO R 3 Back of the copy protection system built into the DVD recorder. Connect the DVD recorder directly to the matching VIDEO/AUDIO input jacks on the TV. Then connect the RF coaxial cables from video tape to a DVD+R/+RW and..., make sure that all the devices are copy-protected and therefore cannot be used for this connection. 1 Connect the Antenna/Cable TV signal to be recorded. - You may be poor because of aVCR (Example only) IN VIDEO IN AUDIO L AUDIO R 2 4 TV AU D IO O UT S-V ID E O IN V ID E O IN Connecting to a...

User manual
Page 18
... A splitter (not supplied) is required for this connection. 1 Connect the Antenna/Cable TV signal to the matching VIDEO/AUDIO input jacks on the DVD recorder to a splitter. Then connect the RF coaxial cables from the power outlet. 18 001_033_dvdr3355_37A_eng5 18 21/3/05, 3:16 PM TIPS: Before making or changing ... output (RF OUT) jack on the Cable Box/Satellite Receiver to the ANTENNA jack on the DVD recorder. 4 Use the audio/video cables to connect VIDEO/AUDIO IN-EXT on the DVD recorder to the matching VIDEO/AUDIO output jacks on the VCR. 5 Use the audio/video cables to connect...
... A splitter (not supplied) is required for this connection. 1 Connect the Antenna/Cable TV signal to the matching VIDEO/AUDIO input jacks on the DVD recorder to a splitter. Then connect the RF coaxial cables from the power outlet. 18 001_033_dvdr3355_37A_eng5 18 21/3/05, 3:16 PM TIPS: Before making or changing ... output (RF OUT) jack on the Cable Box/Satellite Receiver to the ANTENNA jack on the DVD recorder. 4 Use the audio/video cables to connect VIDEO/AUDIO IN-EXT on the DVD recorder to the matching VIDEO/AUDIO output jacks on the VCR. 5 Use the audio/video cables to connect...

User manual
Page 19
... jack on the camcorder. 2 Use an audio cable (red/white ends) to connect the AUDIO L/R jacks at the front panel of the DVD recorder to the audio output jacks on the camcorder. Before you start operating, press REC SOURCE on the remote control repeatedly to select 'Front S-VIDEO' ...) S-VIDEO VIDEO AUDIO OUT OUT OUT L 1R OR 2 Connecting a camcorder to the front jacks You can use the front jacks to copy camcorder recordings. TIPS: Before making or changing any connections, make sure that all the devices are located behind the flap on the camcorder. The DV jack conforms...
... jack on the camcorder. 2 Use an audio cable (red/white ends) to connect the AUDIO L/R jacks at the front panel of the DVD recorder to the audio output jacks on the camcorder. Before you start operating, press REC SOURCE on the remote control repeatedly to select 'Front S-VIDEO' ...) S-VIDEO VIDEO AUDIO OUT OUT OUT L 1R OR 2 Connecting a camcorder to the front jacks You can use the front jacks to copy camcorder recordings. TIPS: Before making or changing any connections, make sure that all the devices are located behind the flap on the camcorder. The DV jack conforms...
User manual
Page 20
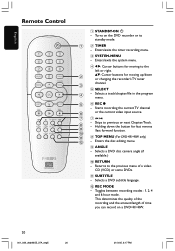
...on a DVD+R/+RW. 20 001_033_dvdr3355_37A_eng5 20 21/3/05, 3:17 PM Enters the disc editing menu. 9 ANGLE - This determines the quality of the recording and the amount/length of a video CD (VCD) or some DVDs. ! Selects a DVD disc camera angle (if available.) 0 RETURN - Enters/exits... subtitle language. @ REC MODE - Selects a track/chapter/file in the program menu. 6 REC 0 - Starts recording the current TV channel or the current video input source. 7∞§ - SUBTITLE - Toggles between recording modes : 1, 2, 4 and 6 hour mode. Skips to the left or right. 34: Cursor buttons for fast...
...on a DVD+R/+RW. 20 001_033_dvdr3355_37A_eng5 20 21/3/05, 3:17 PM Enters the disc editing menu. 9 ANGLE - This determines the quality of the recording and the amount/length of a video CD (VCD) or some DVDs. ! Selects a DVD disc camera angle (if available.) 0 RETURN - Enters/exits... subtitle language. @ REC MODE - Selects a track/chapter/file in the program menu. 6 REC 0 - Starts recording the current TV channel or the current video input source. 7∞§ - SUBTITLE - Toggles between recording modes : 1, 2, 4 and 6 hour mode. Skips to the left or right. 34: Cursor buttons for fast...

User manual
Page 21
...REC SOURCE - Access VCD disc menu when PBC is turned on the TV screen. £ T/C (Title/Chapter) - Stores/confirms an entry. - Pauses the playback or recording. - TUNER: toggles between stereo, mono and SAP (refer to play. - Enters/exits the T/C menu. ≤ CLEAR - Enters/exits the video editing menu. * ... or Index Picture screen of a DVD+R/+RW. - Selects an audio language (DVD,VCD) or an audio channel (CD.) - Stops playback/recording. - Plays a disc. ( STOP 9 - Selects a chapter/track number to your TV manual for available sound modes.) ™ ZOOM - Selects the...
...REC SOURCE - Access VCD disc menu when PBC is turned on the TV screen. £ T/C (Title/Chapter) - Stores/confirms an entry. - Pauses the playback or recording. - TUNER: toggles between stereo, mono and SAP (refer to play. - Enters/exits the T/C menu. ≤ CLEAR - Enters/exits the video editing menu. * ... or Index Picture screen of a DVD+R/+RW. - Selects an audio language (DVD,VCD) or an audio channel (CD.) - Stops playback/recording. - Plays a disc. ( STOP 9 - Selects a chapter/track number to your TV manual for available sound modes.) ™ ZOOM - Selects the...
User manual
Page 22
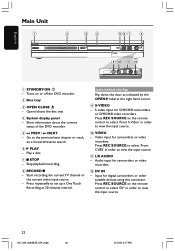
...! L/R AUDIO - Opens/closes the disc tray. 4 System display panel - Play a disc. 7 9 STOP - Stop playback/recording. 8 RECORD 0 - S-video input for camcorders or video recorders. Start recording the current TV channel or the current video input source. - Press REC SOURCE on the remote control to select 'DV' in ...the OPEN 2 label at 30 minutes interval. Video input for SVHS/Hi8 camcorders or SVHS/Hi8 video recorders. Main Unit English 1 STANDBY-ON 2 - Input for camcorders or video recorders. @ DV IN - Press REC SOURCE to select 'Front CVBS' in order to set up a...
...! L/R AUDIO - Opens/closes the disc tray. 4 System display panel - Play a disc. 7 9 STOP - Stop playback/recording. 8 RECORD 0 - S-video input for camcorders or video recorders. Start recording the current TV channel or the current video input source. - Press REC SOURCE on the remote control to select 'DV' in ...the OPEN 2 label at 30 minutes interval. Video input for SVHS/Hi8 camcorders or SVHS/Hi8 video recorders. Main Unit English 1 STANDBY-ON 2 - Input for camcorders or video recorders. @ DV IN - Press REC SOURCE to select 'Front CVBS' in order to set up a...
User manual
Page 23
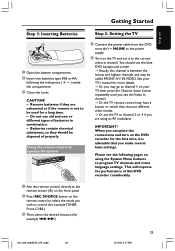
... wish to select the mode you make several basic settings. Remove batteries if they should see the blue DVD background screen. ➜ Usually this DVD recorder considerably. 1 Aim the remote control directly at the remote sensor (iR) on the front panel. 2 Press REC SOURCE button on the DVD... example S, T.) 001_033_dvdr3355_37A_eng5 23 23 21/3/05, 3:17 PM Using the remote control to operate the system 1 Connect the power cable from the DVD recorder's ~ MAINS to the power supply. 2 Turn on the TV and set the TV to channel 3 or 4 if you are exhausted or if the remote is ...
... wish to select the mode you make several basic settings. Remove batteries if they should see the blue DVD background screen. ➜ Usually this DVD recorder considerably. 1 Aim the remote control directly at the remote sensor (iR) on the front panel. 2 Press REC SOURCE button on the DVD... example S, T.) 001_033_dvdr3355_37A_eng5 23 23 21/3/05, 3:17 PM Using the remote control to operate the system 1 Connect the power cable from the DVD recorder's ~ MAINS to the power supply. 2 Turn on the TV and set the TV to channel 3 or 4 if you are exhausted or if the remote is ...


