Leaflet
Page 2
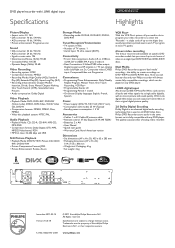
...Philips DVD Recorders support 'dual media' recording - i.LINK digital input Also known as IEEE 1394 and FireWire, i.Link carries all audio and video signals via a single cable digitally, with no loss in the same format, so it is fully compatible with i.LINK digital input Specifications DVDR3355... (On mode): 25 W (Typical) • Standby power consumption: < 3 W Accessories • Cables: 1 x AV Cables,RF antenna cable • Remote control: 37-key Zappa (3139 248 72281) • Batteries: 2 x AA • User Manual • Quick start guide • Warranty Card: North American...
...Philips DVD Recorders support 'dual media' recording - i.LINK digital input Also known as IEEE 1394 and FireWire, i.Link carries all audio and video signals via a single cable digitally, with no loss in the same format, so it is fully compatible with i.LINK digital input Specifications DVDR3355... (On mode): 25 W (Typical) • Standby power consumption: < 3 W Accessories • Cables: 1 x AV Cables,RF antenna cable • Remote control: 37-key Zappa (3139 248 72281) • Batteries: 2 x AA • User Manual • Quick start guide • Warranty Card: North American...
User manual
Page 7
... (VHS standard.) The hour mode indicates the number of hours that best suits your purpose and the length of audio, video, data and control signals. - To close a disc without finalizing it can store only one chapter or a few quality levels to the Titles and Chapters of... no longer be compatible with DV-format (DVC-SD) camcorders. You cannot connect more recordings. You cannot control this recorder from "1 hour mode" (High Quality) to record on the remote control to this recorder using a single DV cable for more than one DV camcorder at 5-minutes intervals. you start...
... (VHS standard.) The hour mode indicates the number of hours that best suits your purpose and the length of audio, video, data and control signals. - To close a disc without finalizing it can store only one chapter or a few quality levels to the Titles and Chapters of... no longer be compatible with DV-format (DVC-SD) camcorders. You cannot connect more recordings. You cannot control this recorder from "1 hour mode" (High Quality) to record on the remote control to this recorder using a single DV cable for more than one DV camcorder at 5-minutes intervals. you start...
User manual
Page 8
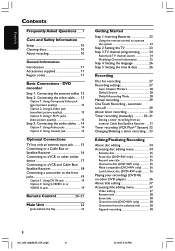
... 19 Option 1: Using DV IN jack 19 Option 2: Using S-VIDEO In or VIDEO In jack 19 Remote Control 20~21 Main Unit 22 Jacks behind the flap 22 Getting Started Step 1: Inserting Batteries 23 Using the remote control to operate the system 23 Step 2: Setting the TV 23 Step 3:TV channel programming 24 Automatic...
... 19 Option 1: Using DV IN jack 19 Option 2: Using S-VIDEO In or VIDEO In jack 19 Remote Control 20~21 Main Unit 22 Jacks behind the flap 22 Getting Started Step 1: Inserting Batteries 23 Using the remote control to operate the system 23 Step 2: Setting the TV 23 Step 3:TV channel programming 24 Automatic...
User manual
Page 11
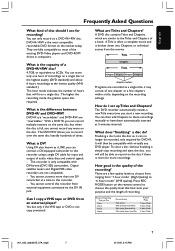
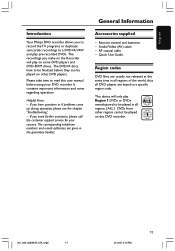
English Introduction Your Philips DVD recorder allows you have to be finalized before using your country. Please take time to a DVD+R/+RW and play pre-recorded DVDs. Helpful Hints: - ... numbers and e-mail addresses are keyed to be played on some DVD players and DVD-ROM drives. ALL 1 001_033_dvdr3355_37A_eng5 11 11 21/3/05, 3:16 PM Remote control and batteries - If you make on the Recorder will only play on other DVD players. General Information Accessories supplied - The recordings you need further assistance...
English Introduction Your Philips DVD recorder allows you have to be finalized before using your country. Please take time to a DVD+R/+RW and play pre-recorded DVDs. Helpful Hints: - ... numbers and e-mail addresses are keyed to be played on some DVD players and DVD-ROM drives. ALL 1 001_033_dvdr3355_37A_eng5 11 11 21/3/05, 3:16 PM Remote control and batteries - If you make on the Recorder will only play on other DVD players. General Information Accessories supplied - The recordings you need further assistance...

User manual
Page 19
... recording, see pages 29~31. It provides the best picture quality. Helpful Hints: - Alternatively, you start operating, press REC SOURCE on the remote control repeatedly to select 'DV' as the input channel, depending on the camcorder. Before you have a Hi8 or S-VHS(C) camcorder. English DV OUT...front jacks to copy camcorder recordings. Option 1: Using DV IN jack Use this connection if you start operating, press REC SOURCE on the remote control repeatedly to select 'Front S-VIDEO' or 'Front CVBS' as the input channel. TIPS: Before making or changing any connections, make ...
... recording, see pages 29~31. It provides the best picture quality. Helpful Hints: - Alternatively, you start operating, press REC SOURCE on the remote control repeatedly to select 'DV' as the input channel, depending on the camcorder. Before you have a Hi8 or S-VHS(C) camcorder. English DV OUT...front jacks to copy camcorder recordings. Option 1: Using DV IN jack Use this connection if you start operating, press REC SOURCE on the remote control repeatedly to select 'Front S-VIDEO' or 'Front CVBS' as the input channel. TIPS: Before making or changing any connections, make ...
User manual
Page 20
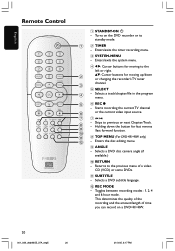
....) 0 RETURN - This determines the quality of the recording and the amount/length of a video CD (VCD) or some DVDs. ! Skips to standby mode. 2 TIMER - English Remote Control 1 STANDBY-ON 2 - Turns on a DVD+R/+RW. 20 001_033_dvdr3355_37A_eng5 20 21/3/05, 3:17 PM Returns to the left or right. 34: Cursor buttons for moving up...
....) 0 RETURN - This determines the quality of the recording and the amount/length of a video CD (VCD) or some DVDs. ! Skips to standby mode. 2 TIMER - English Remote Control 1 STANDBY-ON 2 - Turns on a DVD+R/+RW. 20 001_033_dvdr3355_37A_eng5 20 21/3/05, 3:17 PM Returns to the left or right. 34: Cursor buttons for moving up...

User manual
Page 21
... for available sound modes.) ™ ZOOM - Selects an audio language (DVD,VCD) or an audio channel (CD.) - Confirms a selection. & EDIT (For DVD+R/+RW only) - English Remote Control (continued) # Numeric keypad - Access DVD disc menu or Index Picture screen of a DVD+R/+RW. - Selects the recorder's preset TV tuner channel. $ REC SOURCE - Stores/confirms...
... for available sound modes.) ™ ZOOM - Selects an audio language (DVD,VCD) or an audio channel (CD.) - Confirms a selection. & EDIT (For DVD+R/+RW only) - English Remote Control (continued) # Numeric keypad - Access DVD disc menu or Index Picture screen of a DVD+R/+RW. - Selects the recorder's preset TV tuner channel. $ REC SOURCE - Stores/confirms...
User manual
Page 22
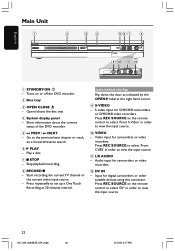
... - Stop playback/recording. 8 RECORD 0 - Start recording the current TV channel or the current video input source. - Press REC SOURCE on the remote control to select 'Front S-Video' in order to view the input source. 22 001_033_dvdr3355_37A_eng5 22 21/3/05, 3:17 PM Audio input for camcorders or video ... right hand corner. 9 S-VIDEO - Play a disc. 7 9 STOP - Input for SVHS/Hi8 camcorders or SVHS/Hi8 video recorders. Turns on the remote control to select 'DV' in order to view the input source. ! Jacks behind the flap Flip down the door as indicated by the OPEN 2 label at...
... - Stop playback/recording. 8 RECORD 0 - Start recording the current TV channel or the current video input source. - Press REC SOURCE on the remote control to select 'Front S-Video' in order to view the input source. 22 001_033_dvdr3355_37A_eng5 22 21/3/05, 3:17 PM Audio input for camcorders or video ... right hand corner. 9 S-VIDEO - Play a disc. 7 9 STOP - Input for SVHS/Hi8 camcorders or SVHS/Hi8 video recorders. Turns on the remote control to select 'DV' in order to view the input source. ! Jacks behind the flap Flip down the door as indicated by the OPEN 2 label at...
User manual
Page 23
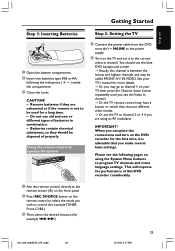
...TV, then press the Channel down button repeatedly until you see the Video In channel. ➜ Or, the TV remote control may be disposed of batteries in channel. Please see the blue DVD background screen. ➜ Usually this DVD recorder considerably. 1 Aim the... remote control directly at the remote sensor (iR) on the front panel. 2 Press REC SOURCE button on the remote control to the correct video-in combination. - Using the remote control to operate the system 1 Connect the power cable from the DVD recorder...
...TV, then press the Channel down button repeatedly until you see the Video In channel. ➜ Or, the TV remote control may be disposed of batteries in channel. Please see the blue DVD background screen. ➜ Usually this DVD recorder considerably. 1 Aim the... remote control directly at the remote sensor (iR) on the front panel. 2 Press REC SOURCE button on the remote control to the correct video-in combination. - Using the remote control to operate the system 1 Connect the power cable from the DVD recorder...
User manual
Page 24
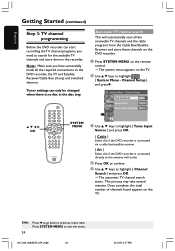
... TV channels and the cable programs from the Cable Box/Satellite Receiver and store these channels on the DVD recorder. 1 Press SYSTEM-MENU on the remote control. ➜ The system menu appears on the TV. System Menu - Once complete, the total number of channels found appears on the TV. 2 Use 3 4 keys to...
... TV channels and the cable programs from the Cable Box/Satellite Receiver and store these channels on the DVD recorder. 1 Press SYSTEM-MENU on the remote control. ➜ The system menu appears on the TV. System Menu - Once complete, the total number of channels found appears on the TV. 2 Use 3 4 keys to...

User manual
Page 25
... appears. Channel Setup } and press 2. 3 Use 3 4 keys to previous menu item. Press SYSTEM-MENU to be accessed by pressing the corresponding number button on the remote control. - Use numeric keypad 0-9 to enter theTV channel and press OK to confirm. { Skip } Select this to set a TV channel to your preference and improve the...
... appears. Channel Setup } and press 2. 3 Use 3 4 keys to previous menu item. Press SYSTEM-MENU to be accessed by pressing the corresponding number button on the remote control. - Use numeric keypad 0-9 to enter theTV channel and press OK to confirm. { Skip } Select this to set a TV channel to your preference and improve the...
User manual
Page 26
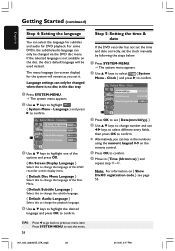
... SYSTEM-MENU. ➜ The system menu appears. 2 Use 3 4 keys to exit the menu. 26 001_033_dvdr3355_37A_eng5 26 21/3/05, 3:17 PM Note: For information on the remote control. 5 Press OK to confirm. 6 Move to { Time (hh:mm:ss) } and repeat step 4~5. Press SYSTEM-MENU to select { System Menu - Getting Started (continued) English Step...
... SYSTEM-MENU. ➜ The system menu appears. 2 Use 3 4 keys to exit the menu. 26 001_033_dvdr3355_37A_eng5 26 21/3/05, 3:17 PM Note: For information on the remote control. 5 Press OK to confirm. 6 Move to { Time (hh:mm:ss) } and repeat step 4~5. Press SYSTEM-MENU to select { System Menu - Getting Started (continued) English Step...
User manual
Page 27
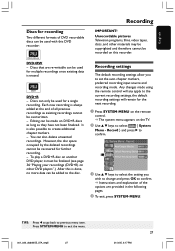
...recordings cannot be recorded on other materials may be copyrighted and therefore cannot be recovered for the next recording. 1 Press SYSTEM-MENU on the remote control. ➜ The system menu appears on DVD+R discs as long as existing recordings cannot be overwritten. - Each new recording is erased....can be used for multiple recordings once existing data is always added at the end of DVD recordable discs can be made using the remote control will any apply to confirm. ➜ Instructions and explanation of the options are re-writable can be used for a single recording....
...recordings cannot be recorded on other materials may be copyrighted and therefore cannot be recovered for the next recording. 1 Press SYSTEM-MENU on the remote control. ➜ The system menu appears on DVD+R discs as long as existing recordings cannot be overwritten. - Each new recording is erased....can be used for multiple recordings once existing data is always added at the end of DVD recordable discs can be made using the remote control will any apply to confirm. ➜ Instructions and explanation of the options are re-writable can be used for a single recording....
User manual
Page 28
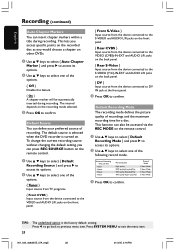
... } and press 2 to access its options. 2 Use 3 4 keys to select one of the following record mode. This function can press REC SOURCE button on the remote control. 1 Use 3 4 keys to select { Default Recording Source } and press 2 to access its options. 2 Use 3 4 keys to select one of the options. { Tuner } Input source from...
... } and press 2 to access its options. 2 Use 3 4 keys to select one of the following record mode. This function can press REC SOURCE button on the remote control. 1 Use 3 4 keys to select { Default Recording Source } and press 2 to access its options. 2 Use 3 4 keys to select one of the options. { Tuner } Input source from...

User manual
Page 29
... source from the device connected to DV IN jack at the TV. 2 Insert a DVD+R/+RW disc into the DVD recorder. 3 Press REC SOURCE on the remote control to select { Tuner }, then use this function to the recording time. ➜ The recorder will automatically start after that, you will add 30 minutes to...
... source from the device connected to DV IN jack at the TV. 2 Insert a DVD+R/+RW disc into the DVD recorder. 3 Press REC SOURCE on the remote control to select { Tuner }, then use this function to the recording time. ➜ The recorder will automatically start after that, you will add 30 minutes to...
User manual
Page 30
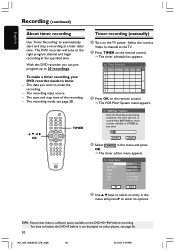
...stop time of the recording. - You have to the right program channel and begin recording at the TV. 2 Press TIMER on the remote control. ➜ The timer schedule list appears. The recording input source. - VCR Plus+ System Enter the PlusCode programming number for the show... and press 2 to automatically start and stop a recording at a later date/ time. TIMER OK Timer recording (manually) 1 Turn on the remote control. ➜ The VCR Plus+ System menu appears. Select the correct Video In channel at the specified time. English Recording (continued) About timer ...
...stop time of the recording. - You have to the right program channel and begin recording at the TV. 2 Press TIMER on the remote control. ➜ The timer schedule list appears. The recording input source. - VCR Plus+ System Enter the PlusCode programming number for the show... and press 2 to automatically start and stop a recording at a later date/ time. TIMER OK Timer recording (manually) 1 Turn on the remote control. ➜ The VCR Plus+ System menu appears. Select the correct Video In channel at the specified time. English Recording (continued) About timer ...
User manual
Page 32
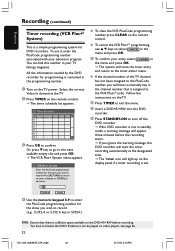
...Video In channel at the designated time. ➜ The 'TIMER' icon will start the timer recording automatically at the TV. 2 Press TIMER on the remote control. ➜ The timer schedule list appears. Press [RETURN] to return to timer schedule or [TIMER] to exit timer. 5 Confirm Cancel OK 4 ... assigned to record. (e.g. : 5-312-4 or 5,312 4, key in '53124'.) G To clear the VCR PlusCode programming number, press CLEAR on the remote control. You have to manually key in the menu and press OK. ➜ The system will have to the VCR Plus+® code. English Recording (...
...Video In channel at the designated time. ➜ The 'TIMER' icon will start the timer recording automatically at the TV. 2 Press TIMER on the remote control. ➜ The timer schedule list appears. Press [RETURN] to return to timer schedule or [TIMER] to exit timer. 5 Confirm Cancel OK 4 ... assigned to record. (e.g. : 5-312-4 or 5,312 4, key in '53124'.) G To clear the VCR PlusCode programming number, press CLEAR on the remote control. You have to manually key in the menu and press OK. ➜ The system will have to the VCR Plus+® code. English Recording (...

User manual
Page 33
...Press TIMER on the TV power. You have to finalize the DVD+R before recording. English Changing/Deleting a timer recording 1 Turn on the remote control. ➜ The timer schedule list appears. Recording (continued) TIPS: Ensure that there is sufficient space available on the DVD+R/+RW before it... can be played on the remote control. 5 To change /delete. 4 To delete the timer entry, press CLEAR on other players, see page 36. 33 001_033_dvdr3355_37A_eng5 33 21...
...Press TIMER on the TV power. You have to finalize the DVD+R before recording. English Changing/Deleting a timer recording 1 Turn on the remote control. ➜ The timer schedule list appears. Recording (continued) TIPS: Ensure that there is sufficient space available on the DVD+R/+RW before it... can be played on the remote control. 5 To change /delete. 4 To delete the timer entry, press CLEAR on other players, see page 36. 33 001_033_dvdr3355_37A_eng5 33 21...
User manual
Page 34
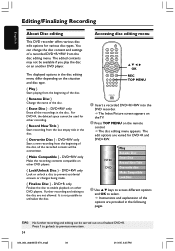
.../3/05, 3:25 PM The displayed options in the disc editing menu differ depending on a finalized DVD+R. Press 1 to go back to enable playback on the remote control. ➜ The disc editing menu appears.
.../3/05, 3:25 PM The displayed options in the disc editing menu differ depending on a finalized DVD+R. Press 1 to go back to enable playback on the remote control. ➜ The disc editing menu appears.
User manual
Page 39
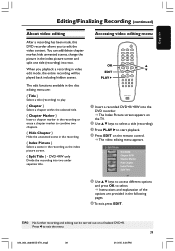
... After a recording has been made, this DVD recorder allows you playback a recording in video edit mode, the entire recording will be carried out on the remote control. ➜ The video editing menu appears. You can be played back including hidden scenes. The edit functions available in the disc editing menu are provided...
... After a recording has been made, this DVD recorder allows you playback a recording in video edit mode, the entire recording will be carried out on the remote control. ➜ The video editing menu appears. You can be played back including hidden scenes. The edit functions available in the disc editing menu are provided...


