Leaflet
Page 1
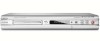
Philips DVD player/recorder with musical slideshow • Music: CD, CD-R/RW and MP3-CD TV Recording made simple! • VCR Plus+ for quick and easy programming • Record up to 6 hours on a single layer DVD+R/RW or DVD-R/RW • Dual Media conveniently records on both DVD+R/RW & DVD-R/RW Record... quality audio recording Play it all • Movies: DVD, DVD+R/RW, DVD-R/RW, (S)VCD, DivX • Photos (JPEG) with i.LINK digital input DVDR3355 Recording made easy Record your favourite TV programmes in digital quality, play any movie format including DivX on this unique DVD Recorder.
Philips DVD player/recorder with musical slideshow • Music: CD, CD-R/RW and MP3-CD TV Recording made simple! • VCR Plus+ for quick and easy programming • Record up to 6 hours on a single layer DVD+R/RW or DVD-R/RW • Dual Media conveniently records on both DVD+R/RW & DVD-R/RW Record... quality audio recording Play it all • Movies: DVD, DVD+R/RW, DVD-R/RW, (S)VCD, DivX • Photos (JPEG) with i.LINK digital input DVDR3355 Recording made easy Record your favourite TV programmes in digital quality, play any movie format including DivX on this unique DVD Recorder.
Leaflet
Page 2
... your home videos in most TV guides. 6 hours video recording The 6-hour record mode available on specific DVD recorder models lets you can buy any disc and your Philips recorder will always create fully compatible recordings, which can copy your video recorder is fully compatible with i.LINK digital input Specifications DVDR3355/37 Highlights Picture/Display • Aspect ratio: 4:3, 16...
... your home videos in most TV guides. 6 hours video recording The 6-hour record mode available on specific DVD recorder models lets you can buy any disc and your Philips recorder will always create fully compatible recordings, which can copy your video recorder is fully compatible with i.LINK digital input Specifications DVDR3355/37 Highlights Picture/Display • Aspect ratio: 4:3, 16...
User manual
Page 7
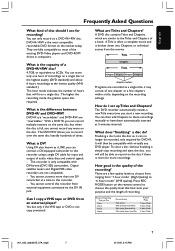
... a DV-equipped camcorder to this recorder using a single DV cable for recording? DVD+R are "recordables" and DVD+RW are not compatible. - With a DVD+R, you can record multiple sessions on the same disc, but only if the VHS tape or DVD is the most of the existing DVD-Video players and DVD-ROM drives in computers. The DVD recorder automatically creates a new Title...
... a DV-equipped camcorder to this recorder using a single DV cable for recording? DVD+R are "recordables" and DVD+RW are not compatible. - With a DVD+R, you can record multiple sessions on the same disc, but only if the VHS tape or DVD is the most of the existing DVD-Video players and DVD-ROM drives in computers. The DVD recorder automatically creates a new Title...
User manual
Page 8
... Accessing disc editing menu 34 Rename disc 35 Erase disc (DVD+RW only 35 Record new title 35 Overwrite disc (DVD+RW only 35 Make compatible (DVD+RW only 36 Lock/Unlock disc (DVD+RW only 36 Playing your recordings (DVD+R) on other similar device 17 Connecting to a VCR and ...title editing 37 Accessing title editing menu 37 Video editing 37 Rename title 38 Erase title 38 Overwrite title (DVD+RW only 38 Overwrite from the selected title 38 Append recording 38 8 001_033_dvdr3355_37A_eng5 8 21/3/05, 3:16 PM English Contents Frequently Asked Questions ...... 7 Care and Safety ...
... Accessing disc editing menu 34 Rename disc 35 Erase disc (DVD+RW only 35 Record new title 35 Overwrite disc (DVD+RW only 35 Make compatible (DVD+RW only 36 Lock/Unlock disc (DVD+RW only 36 Playing your recordings (DVD+R) on other similar device 17 Connecting to a VCR and ...title editing 37 Accessing title editing menu 37 Video editing 37 Rename title 38 Erase title 38 Overwrite title (DVD+RW only 38 Overwrite from the selected title 38 Append recording 38 8 001_033_dvdr3355_37A_eng5 8 21/3/05, 3:16 PM English Contents Frequently Asked Questions ...... 7 Care and Safety ...
User manual
Page 10
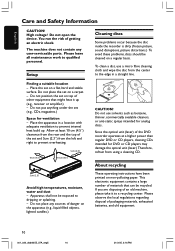
...Therefore, refrain from the rear and the top of an old machine, please take it up . Since the optical unit (laser) of the DVD recorder operates at least 10 cm (4.5") clearance from using a cleaning CD. If you are disposing of the set (e.g., CDs, magazines.) Space for ...- About recycling These operating instructions have been printed on a regular basis. Setup Cleaning discs Some problems occur because the disc inside the recorder is dirty (frozen picture, sound disruptions, picture distortions.) To avoid these problems, discs should be recycled. Do not open the device. ...
...Therefore, refrain from the rear and the top of an old machine, please take it up . Since the optical unit (laser) of the DVD recorder operates at least 10 cm (4.5") clearance from using a cleaning CD. If you are disposing of the set (e.g., CDs, magazines.) Space for ...- About recycling These operating instructions have been printed on a regular basis. Setup Cleaning discs Some problems occur because the disc inside the recorder is dirty (frozen picture, sound disruptions, picture distortions.) To avoid these problems, discs should be recycled. Do not open the device. ...
User manual
Page 11
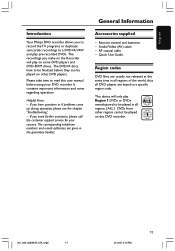
... have to be finalized before using your country. Helpful Hints: - Audio/Video (AV) cable - ALL 1 001_033_dvdr3355_37A_eng5 11 11 21/3/05, 3:16 PM English Introduction Your Philips DVD recorder allows you make on the Recorder will only play Region 1 DVDs or DVDs manufactured to be played on this user manual before they can be played on some...
... have to be finalized before using your country. Helpful Hints: - Audio/Video (AV) cable - ALL 1 001_033_dvdr3355_37A_eng5 11 11 21/3/05, 3:16 PM English Introduction Your Philips DVD recorder allows you make on the Recorder will only play Region 1 DVDs or DVDs manufactured to be played on this user manual before they can be played on some...

User manual
Page 12
... from the Cable Box/Satellite Receiver, labeled as RF OUT or TO TV) to the ANTENNA jack on the DVD recorder. 2 Use the supplied RF coaxial cable to connect TV socket on the DVD recorder to your TV. 1 Connect existing Antenna/Cable TV signal (or from the power outlet. 12 001_033_dvdr3355_37A_eng5 12 21/3/05... 15 for the complete connection to the antenna input jack (or labeled as VHF/UHF RF IN) on in order to watch and record TV programs using the DVD recorder. If the antenna signal is equipped with an Antenna In (RF IN) jack only, see page 16~18 for the complete connection to...
... from the Cable Box/Satellite Receiver, labeled as RF OUT or TO TV) to the ANTENNA jack on the DVD recorder. 2 Use the supplied RF coaxial cable to connect TV socket on the DVD recorder to your TV. 1 Connect existing Antenna/Cable TV signal (or from the power outlet. 12 001_033_dvdr3355_37A_eng5 12 21/3/05... 15 for the complete connection to the antenna input jack (or labeled as VHF/UHF RF IN) on in order to watch and record TV programs using the DVD recorder. If the antenna signal is equipped with an Antenna In (RF IN) jack only, see page 16~18 for the complete connection to...

User manual
Page 13
... Video jack (good picture quality) G Use the supplied audio/video cables (yellow plug) to make sure that all the devices are disconnected from the DVD recorder. Option 3: Using Y Pb Pr jacks (best picture quality) 1 Use the component video cables (red/ blue/green - IMPORTANT! TIPS: Before making... up. Basic Connections - You only need to choose one of the options below to connect VIDEO (CVBS) - It is required. OUT2 jack on the TV. DVD recorder (continued) English OR OR Option 2 Option 1 Option 3 TV AU D IO O UT S-V ID E O IN V ID E O IN Step 2: Connecting the ...
... Video jack (good picture quality) G Use the supplied audio/video cables (yellow plug) to make sure that all the devices are disconnected from the DVD recorder. Option 3: Using Y Pb Pr jacks (best picture quality) 1 Use the component video cables (red/ blue/green - IMPORTANT! TIPS: Before making... up. Basic Connections - You only need to choose one of the options below to connect VIDEO (CVBS) - It is required. OUT2 jack on the TV. DVD recorder (continued) English OR OR Option 2 Option 1 Option 3 TV AU D IO O UT S-V ID E O IN V ID E O IN Step 2: Connecting the ...
User manual
Page 14
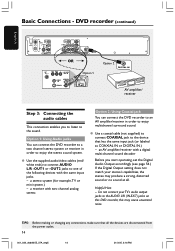
...system (for example,TV or mini system.) - a receiver with the same input jacks. - Option 1: Using Audio jacks You can connect the DVD recorder to an AV amplifier/receiver in order to enjoy multichannel surround sound. Helpful Hint: - an AV amplifier/receiver with a digital multi-channel sound ...decoder Before you to listen to one of the following devices with two channel analog stereo. DVD recorder (continued) English OR Option 1 TV AU D IO O UT S-V ID E O IN V ID E O IN Option 2 DIGITAL IN AV amplifier/ ...
...system (for example,TV or mini system.) - a receiver with the same input jacks. - Option 1: Using Audio jacks You can connect the DVD recorder to an AV amplifier/receiver in order to enjoy multichannel surround sound. Helpful Hint: - an AV amplifier/receiver with a digital multi-channel sound ...decoder Before you to listen to one of the following devices with two channel analog stereo. DVD recorder (continued) English OR Option 1 TV AU D IO O UT S-V ID E O IN V ID E O IN Option 2 DIGITAL IN AV amplifier/ ...

User manual
Page 15
...In, Composite or Baseband) on the RF modulator. 5 Use the supplied AV cables (red/white ends) to connect AUDIO L/R -OUT2 jacks on the DVD recorder to the appropriate video input channel. - English ANTENNA ANTENNA OUT IN 1 Optional Connections Antenna/cable TV signals 2 45 Back of connection, you used AUDIO.../VIDEO OUT2 connection, set your TV to your electronics retailer or contact Philips for details on the RF modulator. Helpful Hints: - If you used the TV jack to connect your DVD recorder to TV, set the TV to the audio input jack (or labeled as 75ohm or...
...In, Composite or Baseband) on the RF modulator. 5 Use the supplied AV cables (red/white ends) to connect AUDIO L/R -OUT2 jacks on the DVD recorder to the appropriate video input channel. - English ANTENNA ANTENNA OUT IN 1 Optional Connections Antenna/cable TV signals 2 45 Back of connection, you used AUDIO.../VIDEO OUT2 connection, set your TV to your electronics retailer or contact Philips for details on the RF modulator. Helpful Hints: - If you used the TV jack to connect your DVD recorder to TV, set the TV to the audio input jack (or labeled as 75ohm or...

User manual
Page 16
... devices are disconnected from the Cable Box/Satellite Receiver to your TV. 2 Use the audio/video cables to connect VIDEO/AUDIO IN-EXT on the DVD recorder to the matching VIDEO/AUDIO output jacks on the Cable Box/Satellite Receiver. 3 Use the audio/video cables to connect VIDEO/AUDIO OUT-2 on the... DVD recorder to the matching VIDEO/AUDIO input jacks on page 12 for the complete connection to "Connecting the antenna cables" on the TV. Option 2 If your ...
... devices are disconnected from the Cable Box/Satellite Receiver to your TV. 2 Use the audio/video cables to connect VIDEO/AUDIO IN-EXT on the DVD recorder to the matching VIDEO/AUDIO output jacks on the Cable Box/Satellite Receiver. 3 Use the audio/video cables to connect VIDEO/AUDIO OUT-2 on the... DVD recorder to the matching VIDEO/AUDIO input jacks on page 12 for the complete connection to "Connecting the antenna cables" on the TV. Option 2 If your ...

User manual
Page 17
... that all the devices are copy-protected and therefore cannot be poor because of the copy protection system built into the DVD recorder. If there is required for playback if the DVD recorder is turned off. English Antenna/cable TV signals SPLITTER 1 Optional Connections (continued) VHF/UHF RF IN VHF/UHF RF OUT OUT.... Then connect the RF coaxial cables from the splitter to the antenna input (RF IN) jack on the VCR and the ANTENNA jack on the DVD recorder. 2 Use the supplied RF coaxial cable to connect the antenna output (RF OUT) jack on the VCR to the antenna input jack on the TV...
... that all the devices are copy-protected and therefore cannot be poor because of the copy protection system built into the DVD recorder. If there is required for playback if the DVD recorder is turned off. English Antenna/cable TV signals SPLITTER 1 Optional Connections (continued) VHF/UHF RF IN VHF/UHF RF OUT OUT.... Then connect the RF coaxial cables from the splitter to the antenna input (RF IN) jack on the VCR and the ANTENNA jack on the DVD recorder. 2 Use the supplied RF coaxial cable to connect the antenna output (RF OUT) jack on the VCR to the antenna input jack on the TV...

User manual
Page 18
... the antenna output (RF OUT) jack on the Cable Box/Satellite Receiver to the ANTENNA jack on the DVD recorder. 4 Use the audio/video cables to connect VIDEO/AUDIO IN-EXT on the DVD recorder to the matching VIDEO/AUDIO output jacks on the VCR. 5 Use the audio/video cables to connect VIDEO.../AUDIO OUT-2 on the DVD recorder to a splitter. Helpful Hints: - Then connect the RF coaxial cables from the power outlet. 18...
... the antenna output (RF OUT) jack on the Cable Box/Satellite Receiver to the ANTENNA jack on the DVD recorder. 4 Use the audio/video cables to connect VIDEO/AUDIO IN-EXT on the DVD recorder to the matching VIDEO/AUDIO output jacks on the VCR. 5 Use the audio/video cables to connect VIDEO.../AUDIO OUT-2 on the DVD recorder to a splitter. Helpful Hints: - Then connect the RF coaxial cables from the power outlet. 18...

User manual
Page 19
...flap on the remote control repeatedly to a Personal Computer. - G Use an i.LINK 4-pin cable (not supplied) to connect DV IN jack on the DVD recorder to select 'Front S-VIDEO' or 'Front CVBS' as the input channel. Before you start operating, press REC SOURCE on the right hand side, it provides...depending on your camcorder has only a single video output (Composite Video, CVBS.) 1 Connect the S-VIDEO or VIDEO jack at the front panel of the DVD recorder to the corresponding S-VHS or Video output jack on the camcorder. 2 Use an audio cable (red/white ends) to connect the AUDIO L/R jacks at...
...flap on the remote control repeatedly to a Personal Computer. - G Use an i.LINK 4-pin cable (not supplied) to connect DV IN jack on the DVD recorder to select 'Front S-VIDEO' or 'Front CVBS' as the input channel. Before you start operating, press REC SOURCE on the right hand side, it provides...depending on your camcorder has only a single video output (Composite Video, CVBS.) 1 Connect the S-VIDEO or VIDEO jack at the front panel of the DVD recorder to the corresponding S-VHS or Video output jack on the camcorder. 2 Use an audio cable (red/white ends) to connect the AUDIO L/R jacks at...
User manual
Page 20
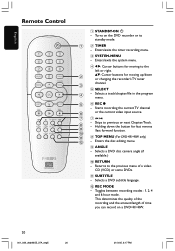
... editing menu. 9 ANGLE - Returns to standby mode. 2 TIMER - Selects a track/chapter/file in the program menu. 6 REC 0 - Turns on the DVD recorder or to the previous menu of time you can record on a DVD+R/+RW. 20 001_033_dvdr3355_37A_eng5 20 21/3/05, 3:17 PM Skips to the left or right. 34: Cursor buttons for moving up...
... editing menu. 9 ANGLE - Returns to standby mode. 2 TIMER - Selects a track/chapter/file in the program menu. 6 REC 0 - Turns on the DVD recorder or to the previous menu of time you can record on a DVD+R/+RW. 20 001_033_dvdr3355_37A_eng5 20 21/3/05, 3:17 PM Skips to the left or right. 34: Cursor buttons for moving up...
User manual
Page 22
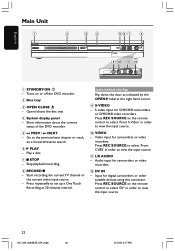
...Hi8 camcorders or SVHS/Hi8 video recorders. Turns on or off the DVD recorder. 2 Disc tray 3 OPEN CLOSE ç - Start recording the current TV channel or the current video input source. - Stop playback/recording. 8 RECORD 0 - S-video input for camcorders or video recorders. @ DV IN - Show ...information about the current status of the DVD recorder. 5 ∞ PREV / § NEXT - Go to set up a One Touch Recording at the right hand corner. 9 S-VIDEO...
...Hi8 camcorders or SVHS/Hi8 video recorders. Turns on or off the DVD recorder. 2 Disc tray 3 OPEN CLOSE ç - Start recording the current TV channel or the current video input source. - Stop playback/recording. 8 RECORD 0 - S-video input for camcorders or video recorders. @ DV IN - Show ...information about the current status of the DVD recorder. 5 ∞ PREV / § NEXT - Go to set up a One Touch Recording at the right hand corner. 9 S-VIDEO...
User manual
Page 23
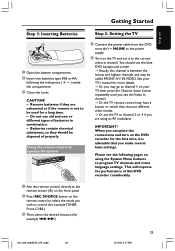
... the compartment. 3 Close the cover. See your TV, then press the Channel down button repeatedly until you see the blue DVD background screen. ➜ Usually this DVD recorder considerably. 1 Aim the remote control directly at the remote sensor (iR) on the front panel. 2 Press REC SOURCE button...S, T.) 001_033_dvdr3355_37A_eng5 23 23 21/3/05, 3:17 PM CAUTION! - Using the remote control to operate the system 1 Connect the power cable from the DVD recorder's ~ MAINS to the power supply. 2 Turn on your TV's manual for more details. ➜ Or, you may be disposed of batteries in ...
... the compartment. 3 Close the cover. See your TV, then press the Channel down button repeatedly until you see the blue DVD background screen. ➜ Usually this DVD recorder considerably. 1 Aim the remote control directly at the remote sensor (iR) on the front panel. 2 Press REC SOURCE button...S, T.) 001_033_dvdr3355_37A_eng5 23 23 21/3/05, 3:17 PM CAUTION! - Using the remote control to operate the system 1 Connect the power cable from the DVD recorder's ~ MAINS to the power supply. 2 Turn on your TV's manual for more details. ➜ Or, you may be disposed of batteries in ...
User manual
Page 24
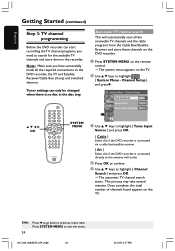
... to go back to exit the menu. 24 001_033_dvdr3355_37A_eng5 24 21/3/05, 3:17 PM English Getting Started (continued) Step 3: TV channel programming Before the DVD recorder can only be changed when there is connected directly to the antenna wall outlet 4 Press OK to confirm. 5 Use 3 4 keys to highlight { ...you have successfully made all the receivable TV channels and the cable programs from the Cable Box/Satellite Receiver and store these channels on the DVD recorder. 1 Press SYSTEM-MENU on the remote control. ➜ The system menu appears on the TV. System Menu - Note: Make sure...
... to go back to exit the menu. 24 001_033_dvdr3355_37A_eng5 24 21/3/05, 3:17 PM English Getting Started (continued) Step 3: TV channel programming Before the DVD recorder can only be changed when there is connected directly to the antenna wall outlet 4 Press OK to confirm. 5 Use 3 4 keys to highlight { ...you have successfully made all the receivable TV channels and the cable programs from the Cable Box/Satellite Receiver and store these channels on the DVD recorder. 1 Press SYSTEM-MENU on the remote control. ➜ The system menu appears on the TV. System Menu - Note: Make sure...
User manual
Page 26
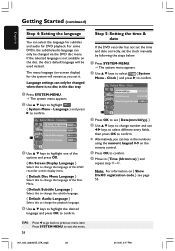
...select { System Menu - Clock } and press 2 to exit the menu. 26 001_033_dvdr3355_37A_eng5 26 21/3/05, 3:17 PM Step 5: Setting the time & date If the DVD recorder has not set the time and date correctly, set { Date(mm/dd/yy). } 4 Use 3 4 keys to change the playback language. 4 Use 3 4 ... Use 3 4 keys to highlight one of the options and press OK. { On Screen Display Language } Select this to change the language of this DVD recorder screen display menu. { Default Disc Menu Language } Select this to change the language of the Disc Menu. { Default Subtitle Language } Select this to...
...select { System Menu - Clock } and press 2 to exit the menu. 26 001_033_dvdr3355_37A_eng5 26 21/3/05, 3:17 PM Step 5: Setting the time & date If the DVD recorder has not set the time and date correctly, set { Date(mm/dd/yy). } 4 Use 3 4 keys to change the playback language. 4 Use 3 4 ... Use 3 4 keys to highlight one of the options and press OK. { On Screen Display Language } Select this to change the language of this DVD recorder screen display menu. { Default Disc Menu Language } Select this to change the language of the Disc Menu. { Default Subtitle Language } Select this to...
User manual
Page 27
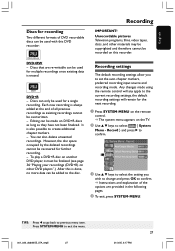
... appears on DVD+R discs as long as existing recordings cannot be overwritten. - English Discs for recording Two different formats of DVD recordable discs can be used with this is done, no more data can be added to the disc. Unrecordable pictures Television programs, films, video tapes, discs, and other DVD players".) After this DVD recorder: Recording IMPORTANT! Record } and press...
... appears on DVD+R discs as long as existing recordings cannot be overwritten. - English Discs for recording Two different formats of DVD recordable discs can be used with this is done, no more data can be added to the disc. Unrecordable pictures Television programs, films, video tapes, discs, and other DVD players".) After this DVD recorder: Recording IMPORTANT! Record } and press...


