
User manual
Page 3
...the provided plug does not fit into the apparatus, the apparatus has been exposed to qualified service personnel. Refer all instructions. 5. G Remove batteries when the unit is damaged, liquid has been spilled or objects have fallen into your outlet, consult an ... unit. Do not use attachments/accessories specified by the manufacturer or sold with the manufacturer´s instructions. 8. Do not block any sources of these instructions. 2. EL 6475-E005: 04/01 3 001_033_dvdr3355_37A_eng5 3 21/3/05, 3:15 PM Read these materials may ...
...the provided plug does not fit into the apparatus, the apparatus has been exposed to qualified service personnel. Refer all instructions. 5. G Remove batteries when the unit is damaged, liquid has been spilled or objects have fallen into your outlet, consult an ... unit. Do not use attachments/accessories specified by the manufacturer or sold with the manufacturer´s instructions. 8. Do not block any sources of these instructions. 2. EL 6475-E005: 04/01 3 001_033_dvdr3355_37A_eng5 3 21/3/05, 3:15 PM Read these materials may ...
User manual
Page 10
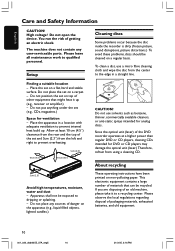
... to prevent internal heat build up (e.g., receiver or amplifier.) - Finding a suitable location - Apparatus shall not be cleaned on non-polluting paper. About recycling These operating instructions have been printed on a regular basis. You run the risk of packaging materials, exhausted batteries, and old equipment. 10 001_033_dvdr3355_37A_eng5 10 21/3/05, 3:16 PM...
... to prevent internal heat build up (e.g., receiver or amplifier.) - Finding a suitable location - Apparatus shall not be cleaned on non-polluting paper. About recycling These operating instructions have been printed on a regular basis. You run the risk of packaging materials, exhausted batteries, and old equipment. 10 001_033_dvdr3355_37A_eng5 10 21/3/05, 3:16 PM...
User manual
Page 27
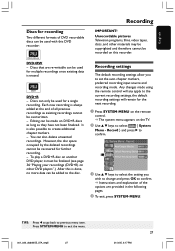
.... - Discs can only be used for further recording. - Recording settings The default recording settings allow you wish to change and press OK to confirm. ➜ Instructions and explanation of the options are re-writable can be used for the next recording. 1 Press SYSTEM-MENU on the remote control. ➜ The system...
.... - Discs can only be used for further recording. - Recording settings The default recording settings allow you wish to change and press OK to confirm. ➜ Instructions and explanation of the options are re-writable can be used for the next recording. 1 Press SYSTEM-MENU on the remote control. ➜ The system...
User manual
Page 32
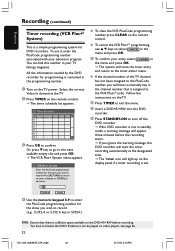
... by the DVD recorder for DVD recorders. G To cancel theVCR Plus+® programming, use it can find this number in your television program. Follow the instructions on the TV. 6 Press TIMER to exit the menu. 7 Insert a DVD+R/+RW into the DVD recorder. 8 Press STANDBY-ON to the timer editor menu. You...
... by the DVD recorder for DVD recorders. G To cancel theVCR Plus+® programming, use it can find this number in your television program. Follow the instructions on the TV. 6 Press TIMER to exit the menu. 7 Insert a DVD+R/+RW into the DVD recorder. 8 Press STANDBY-ON to the timer editor menu. You...
User manual
Page 34
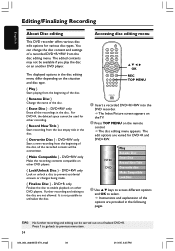
... DVD recorder. ➜ The Index Picture screen appears on the TV. 2 Press TOP MENU on other DVD players. Press 1 to go back to select. ➜ Instructions and explanation of the disc. { Erase Disc } - For DVD+R, the deleted space cannot be overwritten. { Make Compatible } - NTSC DVD Play Rename Disc Erase Disc Record...
... DVD recorder. ➜ The Index Picture screen appears on the TV. 2 Press TOP MENU on other DVD players. Press 1 to go back to select. ➜ Instructions and explanation of the disc. { Erase Disc } - For DVD+R, the deleted space cannot be overwritten. { Make Compatible } - NTSC DVD Play Rename Disc Erase Disc Record...

User manual
Page 37
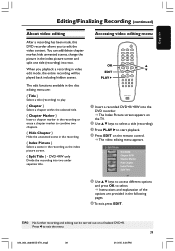
... OK to highlight a title (recording), and press 2. ➜ The title editing menu appears. See "About video editing" on the TV. 2 Use 3 4 keys to select. ➜ Instructions and explanation of the recording. { Erase Title } Delete the title (recording). { Overwrite Title } - If a DVD+R has been finalized, it cannot be overwritten. { Overwrite Disc } Overwrite...
... OK to highlight a title (recording), and press 2. ➜ The title editing menu appears. See "About video editing" on the TV. 2 Use 3 4 keys to select. ➜ Instructions and explanation of the recording. { Erase Title } Delete the title (recording). { Overwrite Title } - If a DVD+R has been finalized, it cannot be overwritten. { Overwrite Disc } Overwrite...
User manual
Page 39
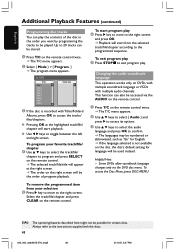
... 5 Use 3 4 keys to access different options and press OK to exit the menu. 39 034_060_dvdr3355-37A_eng5 39 21/3/05, 3:26 PM Press 1 to select. ➜ Instructions and explanation of the options are : { Title } Select a title (recording) to play. { Chapter } Select a chapter within the selected title. { Chapter Marker } Insert a chapter marker in...
... 5 Use 3 4 keys to access different options and press OK to exit the menu. 39 034_060_dvdr3355-37A_eng5 39 21/3/05, 3:26 PM Press 1 to select. ➜ Instructions and explanation of the options are : { Title } Select a title (recording) to play. { Chapter } Select a chapter within the selected title. { Chapter Marker } Insert a chapter marker in...

User manual
Page 46
... 0-9 to the next title/chapter/ track. During playback, G Press § to go to input the title/chapter/track number. G Press ∞ to return to the instructions supplied with the discs. 46 034_060_dvdr3355-37A_eng5 46 21/3/05, 3:27 PM TIPS: The operating features described here might not be muted. 2 Press ∞ (reverse...
... 0-9 to the next title/chapter/ track. During playback, G Press § to go to input the title/chapter/track number. G Press ∞ to return to the instructions supplied with the discs. 46 034_060_dvdr3355-37A_eng5 46 21/3/05, 3:27 PM TIPS: The operating features described here might not be muted. 2 Press ∞ (reverse...

User manual
Page 47
Always refer to adjust. ➜ Instructions and explanation of a specific segment within the disc (MP3 and audio CD only.) { Normal } Select this to normal playback. 4 To cancel repeat playback, press STOP 9 ... Title Chapter Audio Subtitle Angle T- OTH Off 01/03 00:22:03 - 00:27:24 2 Use 3 4 keys to select the setting you want to the instructions supplied with the discs. 47 034_060_dvdr3355-37A_eng5 47 21/3/05, 3:27 PM
Always refer to adjust. ➜ Instructions and explanation of a specific segment within the disc (MP3 and audio CD only.) { Normal } Select this to normal playback. 4 To cancel repeat playback, press STOP 9 ... Title Chapter Audio Subtitle Angle T- OTH Off 01/03 00:22:03 - 00:27:24 2 Use 3 4 keys to select the setting you want to the instructions supplied with the discs. 47 034_060_dvdr3355-37A_eng5 47 21/3/05, 3:27 PM
User manual
Page 48
... here might not be possible for language will start from your favorite track/file/ chapter 4 Use 3 4 keys to select the track/file/ chapter to the instructions supplied with multiple audio channels. Some DVDs allow soundtrack language changes only via the AUDIO on the remote control. 1 Press T/C on the remote control twice...
... here might not be possible for language will start from your favorite track/file/ chapter 4 Use 3 4 keys to select the track/file/ chapter to the instructions supplied with multiple audio channels. Some DVDs allow soundtrack language changes only via the AUDIO on the remote control. 1 Press T/C on the remote control twice...

User manual
Page 49
...; The T/C menu appears. 2 Use 3 4 keys to select { Angle } and press 2 to enter its options. 3 Use 3 4 keys to select the language and press OK to the instructions supplied with DVDs that contain sequences recorded from different angles.
...; The T/C menu appears. 2 Use 3 4 keys to select { Angle } and press 2 to enter its options. 3 Use 3 4 keys to select the language and press OK to the instructions supplied with DVDs that contain sequences recorded from different angles.

User manual
Page 50
... Menu-General,' use 3 4 keys to highlight { Screen Saver } and press OK. { On } Select this if you wish to change and press OK to confirm. ➜ Instructions and explanation of the options are provided in the following pages. 4 To exit, press SYSTEM-MENU. Press SYSTEM MENU to access its options. English DVD...
... Menu-General,' use 3 4 keys to highlight { Screen Saver } and press OK. { On } Select this if you wish to change and press OK to confirm. ➜ Instructions and explanation of the options are provided in the following pages. 4 To exit, press SYSTEM-MENU. Press SYSTEM MENU to access its options. English DVD...
User manual
Page 51
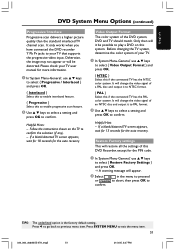
... 'System Menu-General,' use 3 4 keys to select { Progressive / Interlaced } and press OK. { Interlaced } Select this to enable interlaced feature. { Progressive } Select this system. Follow the instructions shown on this to enable progressive scan feature. 2 Use 3 4 keys to select a setting and press OK to confirm. Helpful Hints: - It will appear. 2 Select OK...
... 'System Menu-General,' use 3 4 keys to select { Progressive / Interlaced } and press OK. { Interlaced } Select this to enable interlaced feature. { Progressive } Select this system. Follow the instructions shown on this to enable progressive scan feature. 2 Use 3 4 keys to select a setting and press OK to confirm. Helpful Hints: - It will appear. 2 Select OK...

User manual
Page 52
... 34 to select a setting and press OK to confirm. 3 Use 3 4 keys to select the setting you wish to change and press OK to confirm. ➜ Instructions and explanation of the DVD recorder according to the TV you select must be available on the TV. 2 Use 3 4 keys to access its options.
... 34 to select a setting and press OK to confirm. 3 Use 3 4 keys to select the setting you wish to change and press OK to confirm. ➜ Instructions and explanation of the DVD recorder according to the TV you select must be available on the TV. 2 Use 3 4 keys to access its options.
User manual
Page 55
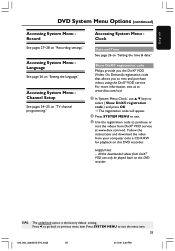
... Menu Clock See pages 27~28 on "Setting the time & date." Date and Time See page 26 on "Recording settings." Show DivX® registration code Philips provide you the DivX® VOD (Video On Demand) registration code that allows you to purchase or rent the videos from DivX® VOD service... System Menu Language See page 26 on "TV channel programming." Accessing System Menu Channel Setup See pages 24~25 on "Setting the language." Follow the instructions and download the video from DivX® VOD can only be played back on this DVD recorder.
... Menu Clock See pages 27~28 on "Setting the time & date." Date and Time See page 26 on "Recording settings." Show DivX® registration code Philips provide you the DivX® VOD (Video On Demand) registration code that allows you to purchase or rent the videos from DivX® VOD service... System Menu Language See page 26 on "TV channel programming." Accessing System Menu Channel Setup See pages 24~25 on "Setting the language." Follow the instructions and download the video from DivX® VOD can only be played back on this DVD recorder.