Leaflet
Page 2
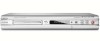
DVD player/recorder with i.LINK digital input Specifications DVDR3355/37 Highlights Picture/Display • Aspect ratio: 4:3, 16:9 ... coaxial out, RF antenna in their respective owners. 12 NC: 8622 810 12331 www.philips.com Philips DVD Recorders store audio in the same format, so it is to change without notice....Cables: 1 x AV Cables,RF antenna cable • Remote control: 37-key Zappa (3139 248 72281) • Batteries: 2 x AA • User Manual • Quick start guide • Warranty Card: North American version Dimensions • Set dimensions (W x H x D): 435 x 65 x 285 mm •...
DVD player/recorder with i.LINK digital input Specifications DVDR3355/37 Highlights Picture/Display • Aspect ratio: 4:3, 16:9 ... coaxial out, RF antenna in their respective owners. 12 NC: 8622 810 12331 www.philips.com Philips DVD Recorders store audio in the same format, so it is to change without notice....Cables: 1 x AV Cables,RF antenna cable • Remote control: 37-key Zappa (3139 248 72281) • Batteries: 2 x AA • User Manual • Quick start guide • Warranty Card: North American version Dimensions • Set dimensions (W x H x D): 435 x 65 x 285 mm •...
User manual
Page 7
... hour of recordings on the recording settings. You cannot control this recorder. - To close a disc without finalizing it can then add Chapters to these recordings manually or have them automatically inserted at a time to "6 hours mode" (VHS quality). What is only compatible with virtually any more recordings. This recorder is the...
... hour of recordings on the recording settings. You cannot control this recorder. - To close a disc without finalizing it can then add Chapters to these recordings manually or have them automatically inserted at a time to "6 hours mode" (VHS quality). What is only compatible with virtually any more recordings. This recorder is the...
User manual
Page 8
automatic turn-off 29 About timer recording 30 Timer recording (manually 30~31 Setting a timer recording from the selected title 38 Append recording 38 8 001_033_dvdr3355_37A_eng5 8 21/3/05, 3:16 PM DVD recorder Step 1: Connecting the ...Step 5: Setting the time & date 26 Recording Disc for recording 27 Recording settings 27 Auto Chapter Markers 28 Default Source 28 Default Recording Mode 28 Manual recording 29 One Touch Recording - English Contents Frequently Asked Questions ...... 7 Care and Safety Information Setup 10 Cleaning discs 10 About recycling 10 General ...
automatic turn-off 29 About timer recording 30 Timer recording (manually 30~31 Setting a timer recording from the selected title 38 Append recording 38 8 001_033_dvdr3355_37A_eng5 8 21/3/05, 3:16 PM DVD recorder Step 1: Connecting the ...Step 5: Setting the time & date 26 Recording Disc for recording 27 Recording settings 27 Auto Chapter Markers 28 Default Source 28 Default Recording Mode 28 Manual recording 29 One Touch Recording - English Contents Frequently Asked Questions ...... 7 Care and Safety Information Setup 10 Cleaning discs 10 About recycling 10 General ...
User manual
Page 11
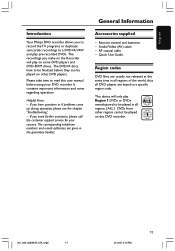
... all regions of the world, thus all DVD players are given in all regions ('ALL'.) DVDs from other DVD players. English Introduction Your Philips DVD recorder allows you to record the TV programs or duplicate camcorder recordings to a DVD+R/+RW and play on some DVD players and DVD-... DVD recorder. Remote control and batteries - ALL 1 001_033_dvdr3355_37A_eng5 11 11 21/3/05, 3:16 PM The recordings you have to read this user manual before they can be played on other regions cannot be finalized before using your country. This device will play pre-recorded DVDs. If you make...
... all regions of the world, thus all DVD players are given in all regions ('ALL'.) DVDs from other DVD players. English Introduction Your Philips DVD recorder allows you to record the TV programs or duplicate camcorder recordings to a DVD+R/+RW and play on some DVD players and DVD-... DVD recorder. Remote control and batteries - ALL 1 001_033_dvdr3355_37A_eng5 11 11 21/3/05, 3:16 PM The recordings you have to read this user manual before they can be played on other regions cannot be finalized before using your country. This device will play pre-recorded DVDs. If you make...

User manual
Page 21
... DVD+R/+RW only) - Holding down the button will open and close the disc tray. ); - Enters/exits the T/C menu. ≤ CLEAR - Press repeatedly to your TV manual for available sound modes.) ™ ZOOM - English Remote Control (continued) # Numeric keypad - Plays a disc. ( STOP 9 - Selects a chapter/track number to play. - Enters/exits the video...
... DVD+R/+RW only) - Holding down the button will open and close the disc tray. ); - Enters/exits the T/C menu. ≤ CLEAR - Press repeatedly to your TV manual for available sound modes.) ™ ZOOM - English Remote Control (continued) # Numeric keypad - Plays a disc. ( STOP 9 - Selects a chapter/track number to play. - Enters/exits the video...
User manual
Page 23
... see the following the indications (+-) inside the compartment. 3 Close the cover. Do not use old and new or different types of properly. See your TV's manual for more details. ➜ Or, you may go to channel 1 on your TV, then press the Channel down button repeatedly until you see the blue...
... see the following the indications (+-) inside the compartment. 3 Close the cover. Do not use old and new or different types of properly. See your TV's manual for more details. ➜ Or, you may go to channel 1 on your TV, then press the Channel down button repeatedly until you see the blue...

User manual
Page 25
... channel to be accessed by pressing the corresponding number button on the remote control. - TIPS: Press 1 to go back to fine-tune the TV channel manually if the reception is poor. - Use 1 2 keys to exit the menu. 001_033_dvdr3355_37A_eng5 25 25 21/3/05, 3:17 PM Press SYSTEM-MENU to adjust the frequency...
... channel to be accessed by pressing the corresponding number button on the remote control. - TIPS: Press 1 to go back to fine-tune the TV channel manually if the reception is poor. - Use 1 2 keys to exit the menu. 001_033_dvdr3355_37A_eng5 25 25 21/3/05, 3:17 PM Press SYSTEM-MENU to adjust the frequency...
User manual
Page 26
...(mm/dd/yy) 01 / 31 / 05 Time(hh:mm:ss) 10 : 33 : 57 AM Show DivX registration code: OK 3 Press OK to set the clock manually by following the steps below. 1 Press SYSTEM-MENU. ➜ The system menu appears. 2 Use 3 4 keys to { Time (hh:mm:ss) } and repeat step 4~5. Note: For...
...(mm/dd/yy) 01 / 31 / 05 Time(hh:mm:ss) 10 : 33 : 57 AM Show DivX registration code: OK 3 Press OK to set the clock manually by following the steps below. 1 Press SYSTEM-MENU. ➜ The system menu appears. 2 Use 3 4 keys to { Time (hh:mm:ss) } and repeat step 4~5. Note: For...

User manual
Page 29
...sufficient space available on the DVD+R/+RW before it can use 3 4 keys to select the TV channel you wish to record. English Recording (continued) Manual recording Use this function to avoid recording commercials. 2 To resume recording, press REC 0. G To record from an external device, press REC SOURCE repeatedly...after the last recording on the DVD+R/+RW. 5 To stop the recording. One Touch Recording automatic turn off 1 Follow the steps 1~3 of "Manual Recording" on the TV power. G Press STOP 9 if you will stop recording at the designated end time and turn -off automatically.
...sufficient space available on the DVD+R/+RW before it can use 3 4 keys to select the TV channel you wish to record. English Recording (continued) Manual recording Use this function to avoid recording commercials. 2 To resume recording, press REC 0. G To record from an external device, press REC SOURCE repeatedly...after the last recording on the DVD+R/+RW. 5 To stop the recording. One Touch Recording automatic turn off 1 Follow the steps 1~3 of "Manual Recording" on the TV power. G Press STOP 9 if you will stop recording at the designated end time and turn -off automatically.
User manual
Page 30
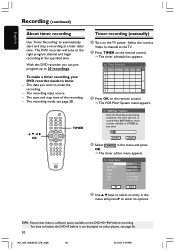
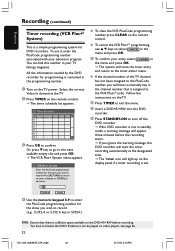
... entry in the menu and press OK. ➜ The timer editor menu appears. To make the recording. - The recording input source. - TIMER OK Timer recording (manually) 1 Turn on other players, see page 28. VCR Plus+ System Enter the PlusCode programming number for the show you can be played on the TV...
... entry in the menu and press OK. ➜ The timer editor menu appears. To make the recording. - The recording input source. - TIMER OK Timer recording (manually) 1 Turn on other players, see page 28. VCR Plus+ System Enter the PlusCode programming number for the show you can be played on the TV...

User manual
Page 31
... is set. Recording (continued) 9 Press STANDBY-ON to select the recording input source. { Rec Mode } - Set the timer recording one minute ahead of "Timer Recording (manually)" on the display panel if a timer recording is not in the menu and press OK. ➜ The system will light up on pages 30~31...
... is set. Recording (continued) 9 Press STANDBY-ON to select the recording input source. { Rec Mode } - Set the timer recording one minute ahead of "Timer Recording (manually)" on the display panel if a timer recording is not in the menu and press OK. ➜ The system will light up on pages 30~31...
User manual
Page 32
...'.) G To clear the VCR PlusCode programming number, press CLEAR on the remote control. To use 3 4 keys to the VCR Plus+® code. You have to manually key in the channel number that there is assigned to select CANCEL in the menu and press OK. 5 To confirm your entry, select CONFIRM in...
...'.) G To clear the VCR PlusCode programming number, press CLEAR on the remote control. To use 3 4 keys to the VCR Plus+® code. You have to manually key in the channel number that there is assigned to select CANCEL in the menu and press OK. 5 To confirm your entry, select CONFIRM in...
User manual
Page 51
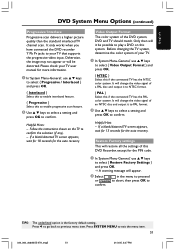
..., DVD and TV should match. It only works when you have connected the DVD recorder Y Pb Pr jacks to confirm. Please check your TV user manual for the PIN code. 1 In 'System Menu-General,' use 3 4 keys to confirm. Press SYSTEM MENU to confirm the selection (if any). - Follow the instructions shown...
..., DVD and TV should match. It only works when you have connected the DVD recorder Y Pb Pr jacks to confirm. Please check your TV user manual for the PIN code. 1 In 'System Menu-General,' use 3 4 keys to confirm. Press SYSTEM MENU to confirm the selection (if any). - Follow the instructions shown...

User manual
Page 58
... DV in (IEEE 1394 4-pin) • S-Video In • Video In • Audio left/right In Convenience • Programming/Timer Enhancements: Daily/Weekly, Repeat Program, Manual Timer, One Touch Recording,VCR Plus+ • Programmable events: 20 • Programming period: 1 month Power • Power supply: 110~130 VAC (120Vnom) • Consumption: 25...
... DV in (IEEE 1394 4-pin) • S-Video In • Video In • Audio left/right In Convenience • Programming/Timer Enhancements: Daily/Weekly, Repeat Program, Manual Timer, One Touch Recording,VCR Plus+ • Programmable events: 20 • Programming period: 1 month Power • Power supply: 110~130 VAC (120Vnom) • Consumption: 25...
Quick start guide
Page 1
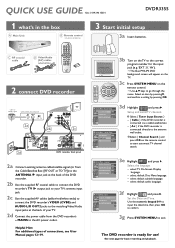
... the matching Video/Audio input jacks at the back of connections, see User Manual pages 12~19. 3b Turn on the TV to the correct program number for the input jack (e.g.'EXT','0','AV'). ➜ The blue PHILIPS DVD background screen will appear on the TV. 3c Press SYSTEM MENU on...) 01/31/05 Time (hh:mm:ss} 10:33:57AM ShowDivX®RegistrationCode OK 3f Highlight and press 2. QUICK USE GUIDE 12nc: 3139 246 15331 DVDR3355 1 what's in the box A Main Unit B Remote control includes 2x AA batteries 3 Start initial setup 3a Insert batteries. System Menu - select default audio...
... the matching Video/Audio input jacks at the back of connections, see User Manual pages 12~19. 3b Turn on the TV to the correct program number for the input jack (e.g.'EXT','0','AV'). ➜ The blue PHILIPS DVD background screen will appear on the TV. 3c Press SYSTEM MENU on...) 01/31/05 Time (hh:mm:ss} 10:33:57AM ShowDivX®RegistrationCode OK 3f Highlight and press 2. QUICK USE GUIDE 12nc: 3139 246 15331 DVDR3355 1 what's in the box A Main Unit B Remote control includes 2x AA batteries 3 Start initial setup 3a Insert batteries. System Menu - select default audio...
Quick start guide
Page 2
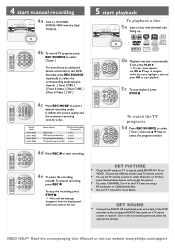
... mode. GET PICTURE • Check the AV mode on the connected system and select the appropriate channel. 4 start manual recording 4a Insert a recordable DVD+R/+RW with the label facing up. 5 start playback To playback a disc 5a Insert... stereo system or receiver. Choose the different modes using a RF modulator or Cable/Satellite Box. • See your TV manual for a disc. GET SOUND • Connect the AUDIO L/R (red/white) jacks at the back of the DVD recorder ... be called FRONT,A/V IN, or VIDEO. Read the accompanying User Manual or visit our website www.philips.com/support
... mode. GET PICTURE • Check the AV mode on the connected system and select the appropriate channel. 4 start manual recording 4a Insert a recordable DVD+R/+RW with the label facing up. 5 start playback To playback a disc 5a Insert... stereo system or receiver. Choose the different modes using a RF modulator or Cable/Satellite Box. • See your TV manual for a disc. GET SOUND • Connect the AUDIO L/R (red/white) jacks at the back of the DVD recorder ... be called FRONT,A/V IN, or VIDEO. Read the accompanying User Manual or visit our website www.philips.com/support

