
User manual
Page 3
...radiators, heat registers, stoves, or other . EL 6475-E005: 04/01 3 001_033_dvdr3355_37A_eng5 3 21/3/05, 3:15 PM IMPORTANT SAFETY INSTRUCTIONS 1. Heed all batteries correctly, + and - Do not use attachments/accessories specified by the manufacturer or sold with one ... Disposal of these materials may contain lead and mercury. Class II equipment symbol This symbol indicates that produce heat. 9. Refer all instructions. 5. G Remove batteries when the unit is damaged, liquid has been spilled or objects have fallen into your outlet, consult an...
...radiators, heat registers, stoves, or other . EL 6475-E005: 04/01 3 001_033_dvdr3355_37A_eng5 3 21/3/05, 3:15 PM IMPORTANT SAFETY INSTRUCTIONS 1. Heed all batteries correctly, + and - Do not use attachments/accessories specified by the manufacturer or sold with one ... Disposal of these materials may contain lead and mercury. Class II equipment symbol This symbol indicates that produce heat. 9. Refer all instructions. 5. G Remove batteries when the unit is damaged, liquid has been spilled or objects have fallen into your outlet, consult an...
User manual
Page 10
... 001_033_dvdr3355_37A_eng5 10 21/3/05, 3:16 PM Do not put anything under the set and 5cm (2.3") from the center to qualified personnel. About recycling These operating instructions have been printed on a regular basis. Setup Cleaning discs Some problems occur because the disc inside the recorder is dirty (frozen picture, sound disruptions, picture...
... 001_033_dvdr3355_37A_eng5 10 21/3/05, 3:16 PM Do not put anything under the set and 5cm (2.3") from the center to qualified personnel. About recycling These operating instructions have been printed on a regular basis. Setup Cleaning discs Some problems occur because the disc inside the recorder is dirty (frozen picture, sound disruptions, picture...
User manual
Page 27
... press OK to the disc. Discs that are provided in the following pages. 4 To exit, press SYSTEM-MENU. You can be added to confirm. ➜ Instructions and explanation of the options are re-writable can be recorded on DVD+R discs as long as existing recordings cannot be used for a single recording...
... press OK to the disc. Discs that are provided in the following pages. 4 To exit, press SYSTEM-MENU. You can be added to confirm. ➜ Instructions and explanation of the options are re-writable can be recorded on DVD+R discs as long as existing recordings cannot be used for a single recording...
User manual
Page 32
... DVD recorder for DVD recorders. TIPS: Ensure that is assigned to the VCR Plus+® code. Or, press 4 key to go to confirm. Follow the instructions on the TV. 6 Press TIMER to exit the menu. 7 Insert a DVD+R/+RW into the DVD recorder. 8 Press STANDBY-ON to turn off the DVD recorder...
... DVD recorder for DVD recorders. TIPS: Ensure that is assigned to the VCR Plus+® code. Or, press 4 key to go to confirm. Follow the instructions on the TV. 6 Press TIMER to exit the menu. 7 Insert a DVD+R/+RW into the DVD recorder. 8 Press STANDBY-ON to turn off the DVD recorder...
User manual
Page 34
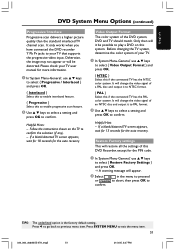
... will be used for various disc types. For DVD+R, the deleted space cannot be overwritten. { Make Compatible } - DVD+R only Finalize the disc to select. ➜ Instructions and explanation of the disc, all the recordings in the following pages. Further recording and editing to unfinalize the disc.
... will be used for various disc types. For DVD+R, the deleted space cannot be overwritten. { Make Compatible } - DVD+R only Finalize the disc to select. ➜ Instructions and explanation of the disc, all the recordings in the following pages. Further recording and editing to unfinalize the disc.

User manual
Page 37
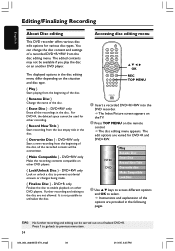
... further recording and editing can change the individual title information or delete a title (recording) in the following pages. 4 To exit, press 1. Press 1 to select. ➜ Instructions and explanation of the disc. { Append Title} Insert a new recording to highlight a title (recording), and press 2. ➜ The title editing menu appears. See "About video...
... further recording and editing can change the individual title information or delete a title (recording) in the following pages. 4 To exit, press 1. Press 1 to select. ➜ Instructions and explanation of the disc. { Append Title} Insert a new recording to highlight a title (recording), and press 2. ➜ The title editing menu appears. See "About video...
User manual
Page 39
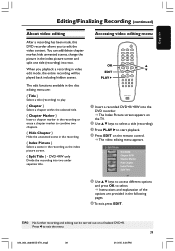
... (recording) to play. { Chapter } Select a chapter within the selected title. { Chapter Marker } Insert a chapter marker in the recording or erase a chapter marker to select. ➜ Instructions and explanation of the options are provided in the following pages. 6 To exit, press EDIT. Accessing video editing menu OK EDIT PLAY 1 Insert a recorded DVD...
... (recording) to play. { Chapter } Select a chapter within the selected title. { Chapter Marker } Insert a chapter marker in the recording or erase a chapter marker to select. ➜ Instructions and explanation of the options are provided in the following pages. 6 To exit, press EDIT. Accessing video editing menu OK EDIT PLAY 1 Insert a recorded DVD...

User manual
Page 46
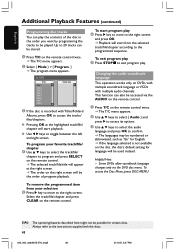
G Press ∞ to return to the instructions supplied with the discs. 46 034_060_dvdr3355-37A_eng5 46 21/3/05, 3:27 PM This option allows you can fast forward or fast reverse a disc at two, ...
G Press ∞ to return to the instructions supplied with the discs. 46 034_060_dvdr3355-37A_eng5 46 21/3/05, 3:27 PM This option allows you can fast forward or fast reverse a disc at two, ...

User manual
Page 47
...Press OK to mark the start and end of the options are provided in the following pages. 3 To exit, press T/C. Always refer to adjust. ➜ Instructions and explanation of the segment you want to repeat. { Repeat Chapter } Select this to repeat playback on the current chapter (DVD, DVD+R/+RW only.) { ... on the TV. OTH Off 01/03 00:22:03 - 00:27:24 2 Use 3 4 keys to select the setting you want to the instructions supplied with the discs. 47 034_060_dvdr3355-37A_eng5 47 21/3/05, 3:27 PM TIPS: The operating features described here might not be possible for certain discs.
...Press OK to mark the start and end of the options are provided in the following pages. 3 To exit, press T/C. Always refer to adjust. ➜ Instructions and explanation of the segment you want to repeat. { Repeat Chapter } Select this to repeat playback on the current chapter (DVD, DVD+R/+RW only.) { ... on the TV. OTH Off 01/03 00:22:03 - 00:27:24 2 Use 3 4 keys to select the setting you want to the instructions supplied with the discs. 47 034_060_dvdr3355-37A_eng5 47 21/3/05, 3:27 PM TIPS: The operating features described here might not be possible for certain discs.
User manual
Page 48
... audio channels. G Pressing OK at the right screen. ➜ The order on the disc, the disc's default setting for certain discs. Always refer to the instructions supplied with Titles/Folders/ Albums, press OK to be numbered or abbreviated, such as "En" for English. ➜ If the language selected is recorded with...
... audio channels. G Pressing OK at the right screen. ➜ The order on the disc, the disc's default setting for certain discs. Always refer to the instructions supplied with Titles/Folders/ Albums, press OK to be numbered or abbreviated, such as "En" for English. ➜ If the language selected is recorded with...

User manual
Page 49
...; The T/C menu appears. 2 Use 3 4 keys to select { Angle } and press 2 to enter its options. 3 Use 3 4 keys to select the language and press OK to the instructions supplied with the discs. 49 034_060_dvdr3355-37A_eng5 49 21/3/05, 3:27 PM Always refer to confirm. ➜ The languages may be numbered or abbreviated, such...
...; The T/C menu appears. 2 Use 3 4 keys to select { Angle } and press 2 to enter its options. 3 Use 3 4 keys to select the language and press OK to the instructions supplied with the discs. 49 034_060_dvdr3355-37A_eng5 49 21/3/05, 3:27 PM Always refer to confirm. ➜ The languages may be numbered or abbreviated, such...

User manual
Page 50
... exposing the screen to a static image for more than 15 minutes. { Off } Select this if you wish to change and press OK to confirm. ➜ Instructions and explanation of the options are provided in the following pages. 4 To exit, press SYSTEM-MENU.
... exposing the screen to a static image for more than 15 minutes. { Off } Select this if you wish to change and press OK to confirm. ➜ Instructions and explanation of the options are provided in the following pages. 4 To exit, press SYSTEM-MENU.
User manual
Page 51
... works when you have connected the DVD recorder Y Pb Pr jacks to confirm. Please check your TV that supports the progressive video input. Follow the instructions shown on this to enable progressive scan feature. 2 Use 3 4 keys to select a setting and press OK to confirm the selection (if any). - If a blank/distorted...
... works when you have connected the DVD recorder Y Pb Pr jacks to confirm. Please check your TV that supports the progressive video input. Follow the instructions shown on this to enable progressive scan feature. 2 Use 3 4 keys to select a setting and press OK to confirm the selection (if any). - If a blank/distorted...

User manual
Page 52
... 34 to select a setting and press OK to confirm. 3 Use 3 4 keys to select the setting you wish to change and press OK to confirm. ➜ Instructions and explanation of the DVD recorder according to the TV you select must be available on the TV. 2 Use 3 4 keys to exit the menu item...
... 34 to select a setting and press OK to confirm. 3 Use 3 4 keys to select the setting you wish to change and press OK to confirm. ➜ Instructions and explanation of the DVD recorder according to the TV you select must be available on the TV. 2 Use 3 4 keys to exit the menu item...
User manual
Page 55
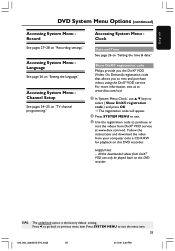
... DivX® VOD service. Accessing System Menu Channel Setup See pages 24~25 on "Setting the time & date." Show DivX® registration code Philips provide you the DivX® VOD (Video On Demand) registration code that allows you to exit the menu item. 55 034_060_dvdr3355-37A_eng5 55 21/3/05...." Helpful Hint: - TIPS: The underlined option is the factory default setting. For more information, visit us at www.divx.com/vod. Follow the instructions and download the video from DivX® VOD can only be played back on this DVD recorder. All the downloaded videos from your computer onto...
... DivX® VOD service. Accessing System Menu Channel Setup See pages 24~25 on "Setting the time & date." Show DivX® registration code Philips provide you the DivX® VOD (Video On Demand) registration code that allows you to exit the menu item. 55 034_060_dvdr3355-37A_eng5 55 21/3/05...." Helpful Hint: - TIPS: The underlined option is the factory default setting. For more information, visit us at www.divx.com/vod. Follow the instructions and download the video from DivX® VOD can only be played back on this DVD recorder. All the downloaded videos from your computer onto...