Leaflet
Page 2
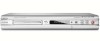
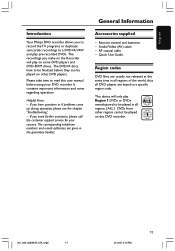
...8226; Consumption (On mode): 25 W (Typical) • Standby power consumption: < 3 W Accessories • Cables: 1 x AV Cables,RF antenna cable • Remote control: 37-key Zappa (3139 248 72281) • Batteries: 2 x AA • User Manual • Quick start guide • Warranty Card: North American ... system, all you need to do to program your Philips recorder will always create fully compatible recordings, which can buy any disc and your video recorder is fully compatible with i.LINK digital input Specifications DVDR3355/37 Highlights Picture/Display • Aspect ratio: 4:3, 16...
...8226; Consumption (On mode): 25 W (Typical) • Standby power consumption: < 3 W Accessories • Cables: 1 x AV Cables,RF antenna cable • Remote control: 37-key Zappa (3139 248 72281) • Batteries: 2 x AA • User Manual • Quick start guide • Warranty Card: North American ... system, all you need to do to program your Philips recorder will always create fully compatible recordings, which can buy any disc and your video recorder is fully compatible with i.LINK digital input Specifications DVDR3355/37 Highlights Picture/Display • Aspect ratio: 4:3, 16...
User manual
Page 7
... IN jack. The DVD+RW allows you start a new recording. This recorder is room for recording? What are a few chapters within a title, depending on the remote control to this recorder using a single DV cable for DVD+R. Finalizing a disc locks the disc so it can record multiple sessions on the same disc...
... IN jack. The DVD+RW allows you start a new recording. This recorder is room for recording? What are a few chapters within a title, depending on the remote control to this recorder using a single DV cable for DVD+R. Finalizing a disc locks the disc so it can record multiple sessions on the same disc...
User manual
Page 8
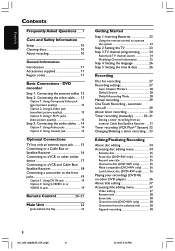
.../ Satellite Receiver 18 Connecting a camcorder to the front jacks 19 Option 1: Using DV IN jack 19 Option 2: Using S-VIDEO In or VIDEO In jack 19 Remote Control 20~21 Main Unit 22 Jacks behind the flap 22 Getting Started Step 1: Inserting Batteries 23 Using the... remote control to a VCR or other DVD players 36 About title editing 37 Accessing title editing menu 37 Video editing 37 Rename title 38 Erase title ...
.../ Satellite Receiver 18 Connecting a camcorder to the front jacks 19 Option 1: Using DV IN jack 19 Option 2: Using S-VIDEO In or VIDEO In jack 19 Remote Control 20~21 Main Unit 22 Jacks behind the flap 22 Getting Started Step 1: Inserting Batteries 23 Using the... remote control to a VCR or other DVD players 36 About title editing 37 Accessing title editing menu 37 Video editing 37 Rename title 38 Erase title ...
User manual
Page 11
... or if problems come up during operation, please see the chapter 'Troubleshooting'. - Helpful Hints: - Remote control and batteries - This device will play pre-recorded DVDs. ALL 1 001_033_dvdr3355_37A_eng5 11 11 21/3/05, 3:16 PM English Introduction Your Philips DVD recorder allows you need further assistance, please call the customer support service for your...
... or if problems come up during operation, please see the chapter 'Troubleshooting'. - Helpful Hints: - Remote control and batteries - This device will play pre-recorded DVDs. ALL 1 001_033_dvdr3355_37A_eng5 11 11 21/3/05, 3:16 PM English Introduction Your Philips DVD recorder allows you need further assistance, please call the customer support service for your...

User manual
Page 19
...In jack Use S-VIDEO connection if you have a Digital Video or Digital 8 camcorder. Alternatively, you start operating, press REC SOURCE on the remote control repeatedly to select 'DV' as the input channel, depending on your DVD recorder. These jacks are disconnected from the DVD recorder to select... 19 21/3/05, 3:16 PM Option 1: Using DV IN jack Use this connection if you start operating, press REC SOURCE on the remote control repeatedly to your camcorder via the DV IN jack on the right hand side, it provides convenient connections for a camcorder. It is...
...In jack Use S-VIDEO connection if you have a Digital Video or Digital 8 camcorder. Alternatively, you start operating, press REC SOURCE on the remote control repeatedly to select 'DV' as the input channel, depending on your DVD recorder. These jacks are disconnected from the DVD recorder to select... 19 21/3/05, 3:16 PM Option 1: Using DV IN jack Use this connection if you start operating, press REC SOURCE on the remote control repeatedly to your camcorder via the DV IN jack on the right hand side, it provides convenient connections for a camcorder. It is...
User manual
Page 20
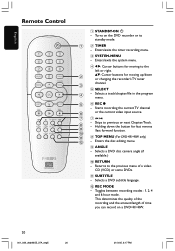
... DVDs. ! Holding down or changing the recorder's TV tuner channel. 5 SELECT - Toggles between recording modes : 1, 2, 4 and 6 hour mode. Enters the disc editing menu. 9 ANGLE - English Remote Control 1 STANDBY-ON 2 -
... DVDs. ! Holding down or changing the recorder's TV tuner channel. 5 SELECT - Toggles between recording modes : 1, 2, 4 and 6 hour mode. Enters the disc editing menu. 9 ANGLE - English Remote Control 1 STANDBY-ON 2 -

User manual
Page 21
Confirms a selection. & EDIT (For DVD+R/+RW only) - Enters/exits the T/C menu. ≤ CLEAR - English Remote Control (continued) # Numeric keypad - Stores/confirms an entry. - Enters/exits the video editing menu. * PLAY 2 - Plays a disc. ( STOP 9 - Enlarges a picture on . ^ OK - Clears a track/chapter/...
Confirms a selection. & EDIT (For DVD+R/+RW only) - Enters/exits the T/C menu. ≤ CLEAR - English Remote Control (continued) # Numeric keypad - Stores/confirms an entry. - Enters/exits the video editing menu. * PLAY 2 - Plays a disc. ( STOP 9 - Enlarges a picture on . ^ OK - Clears a track/chapter/...
User manual
Page 22
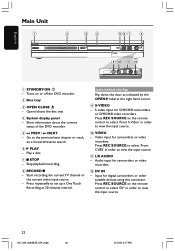
... current status of the DVD recorder. 5 ∞ PREV / § NEXT - Play a disc. 7 9 STOP - Press REC SOURCE on the remote control to select 'DV' in order to view the input source. 22 001_033_dvdr3355_37A_eng5 22 21/3/05, 3:17 PM Input for camcorders or video recorders. @... set up a One Touch Recording at the right hand corner. 9 S-VIDEO - Stop playback/recording. 8 RECORD 0 - L/R AUDIO - Press REC SOURCE on the remote control to select 'Front S-Video' in order to the previous/next chapter or track, do a forward/reverse search. 6 2 PLAY - Press repeatedly to view the input...
... current status of the DVD recorder. 5 ∞ PREV / § NEXT - Play a disc. 7 9 STOP - Press REC SOURCE on the remote control to select 'DV' in order to view the input source. 22 001_033_dvdr3355_37A_eng5 22 21/3/05, 3:17 PM Input for camcorders or video recorders. @... set up a One Touch Recording at the right hand corner. 9 S-VIDEO - Stop playback/recording. 8 RECORD 0 - L/R AUDIO - Press REC SOURCE on the remote control to select 'Front S-Video' in order to the previous/next chapter or track, do a forward/reverse search. 6 2 PLAY - Press repeatedly to view the input...
User manual
Page 23
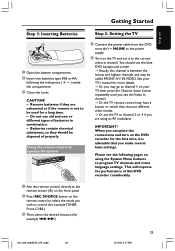
... are using the System Menu features to be used for a long time. - Please see the Video In channel. ➜ Or, the TV remote control may have a button or switch that you see the following the indications (+-) inside the compartment. 3 Close the cover. CAUTION! - Remove ...batteries if they should see the blue DVD background screen. ➜ Usually this DVD recorder considerably. 1 Aim the remote control directly at the remote sensor (iR) on the front panel. 2 Press REC SOURCE button on the DVD recorder for the first time, it to channel 3 ...
... are using the System Menu features to be used for a long time. - Please see the Video In channel. ➜ Or, the TV remote control may have a button or switch that you see the following the indications (+-) inside the compartment. 3 Close the cover. CAUTION! - Remove ...batteries if they should see the blue DVD background screen. ➜ Usually this DVD recorder considerably. 1 Aim the remote control directly at the remote sensor (iR) on the front panel. 2 Press REC SOURCE button on the DVD recorder for the first time, it to channel 3 ...
User manual
Page 24
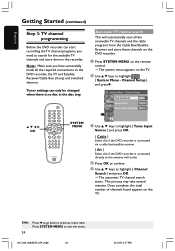
... TV channels and the cable programs from the Cable Box/Satellite Receiver and store these channels on the DVD recorder. 1 Press SYSTEM-MENU on the remote control. ➜ The system menu appears on the TV. 2 Use 3 4 keys to search for the available TV channels and store them on the TV. System...
... TV channels and the cable programs from the Cable Box/Satellite Receiver and store these channels on the DVD recorder. 1 Press SYSTEM-MENU on the remote control. ➜ The system menu appears on the TV. 2 Use 3 4 keys to search for the available TV channels and store them on the TV. System...

User manual
Page 25
... press 2. 3 Use 3 4 keys to highlight { System Menu - The skipped channels can set the channel to be accessed by pressing the corresponding number button on the remote control. -
... press 2. 3 Use 3 4 keys to highlight { System Menu - The skipped channels can set the channel to be accessed by pressing the corresponding number button on the remote control. -
User manual
Page 26
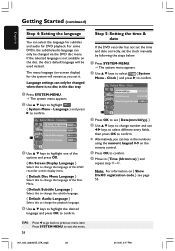
... tray. 1 Press SYSTEM-MENU. ➜ The system menu appears. 2 Use 3 4 keys to confirm. Press SYSTEM-MENU to previous menu item. The menu language (on the remote control. 5 Press OK to confirm. 6 Move to select { System Menu - Step 5: Setting the time & date If the DVD recorder has not set the time and...
... tray. 1 Press SYSTEM-MENU. ➜ The system menu appears. 2 Use 3 4 keys to confirm. Press SYSTEM-MENU to previous menu item. The menu language (on the remote control. 5 Press OK to confirm. 6 Move to select { System Menu - Step 5: Setting the time & date If the DVD recorder has not set the time and...
User manual
Page 27
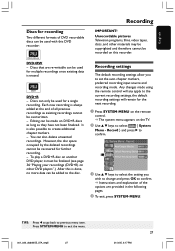
...it must be added to the current recording settings, the default recording settings will remain for the next recording. 1 Press SYSTEM-MENU on the remote control. ➜ The system menu appears on this DVD recorder: Recording IMPORTANT! Each new recording is done, no more data can be ...} and press 2 to exit the menu. 001_033_dvdr3355_37A_eng5 27 27 21/3/05, 3:17 PM System Menu - Editing can be made using the remote control will any apply to the disc. Any changes made on other materials may be copyrighted and therefore cannot be used with this recorder. Record...
...it must be added to the current recording settings, the default recording settings will remain for the next recording. 1 Press SYSTEM-MENU on the remote control. ➜ The system menu appears on this DVD recorder: Recording IMPORTANT! Each new recording is done, no more data can be ...} and press 2 to exit the menu. 001_033_dvdr3355_37A_eng5 27 27 21/3/05, 3:17 PM System Menu - Editing can be made using the remote control will any apply to the disc. Any changes made on other materials may be copyrighted and therefore cannot be used with this recorder. Record...
User manual
Page 28
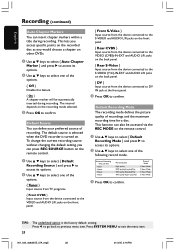
... MENU to confirm. This lets you access specific points on the recorded disc as you can also be accessed via the REC MODE on the remote control. 1 Use 3 4 keys to select { Default Recording Source } and press 2 to access its options. 2 Use 3 4 keys to confirm. TIPS: The ... to confirm. English Recording (continued) Auto Chapter Markers You can define your preferred source of recording. This function can press REC SOURCE button on the remote control. 1 Use 3 4 keys to select { Default Recording Mode } and press 2 to access its options. 2 Use 3 4 keys to previous menu item. Press 1...
... MENU to confirm. This lets you access specific points on the recorded disc as you can also be accessed via the REC MODE on the remote control. 1 Use 3 4 keys to select { Default Recording Source } and press 2 to access its options. 2 Use 3 4 keys to confirm. TIPS: The ... to confirm. English Recording (continued) Auto Chapter Markers You can define your preferred source of recording. This function can press REC SOURCE button on the remote control. 1 Use 3 4 keys to select { Default Recording Mode } and press 2 to access its options. 2 Use 3 4 keys to previous menu item. Press 1...

User manual
Page 29
Select the correct Video In channel at the TV. 2 Insert a DVD+R/+RW disc into the DVD recorder. 3 Press REC SOURCE on the remote control to select { Tuner }, then use this feature to start recording immediately (e.g., to record a TV show already in progress.) REC SOURCE STOP REC { Rear CVBS } ...
Select the correct Video In channel at the TV. 2 Insert a DVD+R/+RW disc into the DVD recorder. 3 Press REC SOURCE on the remote control to select { Tuner }, then use this feature to start recording immediately (e.g., to record a TV show already in progress.) REC SOURCE STOP REC { Rear CVBS } ...
User manual
Page 30
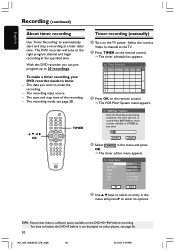
...on other players, see page 28. The start and stop time of the recording. - TIPS: Ensure that there is sufficient space available on the remote control. ➜ The timer schedule list appears. You have to finalize the DVD+R before recording. The date you wish to the right program ... Cancel OK 4 Select CANCEL in the menu and press OK. ➜ The timer editor menu appears. TIMER OK Timer recording (manually) 1 Turn on the remote control. ➜ The VCR Plus+ System menu appears. Select the correct Video In channel at the TV. 2 Press TIMER on the DVD+R/+RW before it...
...on other players, see page 28. The start and stop time of the recording. - TIPS: Ensure that there is sufficient space available on the remote control. ➜ The timer schedule list appears. You have to finalize the DVD+R before recording. The date you wish to the right program ... Cancel OK 4 Select CANCEL in the menu and press OK. ➜ The timer editor menu appears. TIMER OK Timer recording (manually) 1 Turn on the remote control. ➜ The VCR Plus+ System menu appears. Select the correct Video In channel at the TV. 2 Press TIMER on the DVD+R/+RW before it...
User manual
Page 32
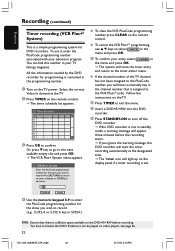
... the TV. 2 Press TIMER on the display panel if a timer recording is not in standby mode, a warning message will light up on the remote control. ➜ The timer schedule list appears. Or, press 4 key to go to confirm. VCR Plus+ System Enter the PlusCode programming number for... programming is sufficient space available on the remote control. English Recording (continued) Timer recording (VCR Plus+® System) This is assigned to the VCR Plus+® code. To use 3 4 ...
... the TV. 2 Press TIMER on the display panel if a timer recording is not in standby mode, a warning message will light up on the remote control. ➜ The timer schedule list appears. Or, press 4 key to go to confirm. VCR Plus+ System Enter the PlusCode programming number for... programming is sufficient space available on the remote control. English Recording (continued) Timer recording (VCR Plus+® System) This is assigned to the VCR Plus+® code. To use 3 4 ...

User manual
Page 33
.... 8 Press TIMER to finalize the DVD+R before it can be played on the DVD+R/+RW before recording. English Changing/Deleting a timer recording 1 Turn on the remote control. 5 To change /delete. 4 To delete the timer entry, press CLEAR on the TV power. Recording (continued) TIPS: Ensure that there is sufficient space available... 001_033_dvdr3355_37A_eng5 33 21/3/05, 3:19 PM You have to exit the menu. Select the correct Video In channel at the TV. 2 Press TIMER on the remote control. ➜ The timer schedule list appears.
.... 8 Press TIMER to finalize the DVD+R before it can be played on the DVD+R/+RW before recording. English Changing/Deleting a timer recording 1 Turn on the remote control. 5 To change /delete. 4 To delete the timer entry, press CLEAR on the TV power. Recording (continued) TIPS: Ensure that there is sufficient space available... 001_033_dvdr3355_37A_eng5 33 21/3/05, 3:19 PM You have to exit the menu. Select the correct Video In channel at the TV. 2 Press TIMER on the remote control. ➜ The timer schedule list appears.
User manual
Page 34
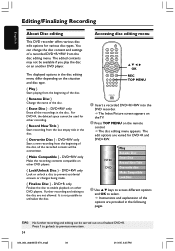
You can be available if you play the disc on the remote control. ➜ The disc editing menu appears. The edited contents may not be carried out on other DVD players. { Lock/Unlock Disc } - The edit options ...
You can be available if you play the disc on the remote control. ➜ The disc editing menu appears. The edited contents may not be carried out on other DVD players. { Lock/Unlock Disc } - The edit options ...
User manual
Page 39
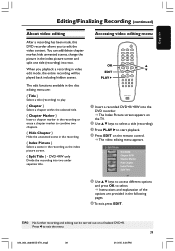
... After a recording has been made, this DVD recorder allows you playback a recording in video edit mode, the entire recording will be carried out on the remote control. ➜ The video editing menu appears. You can be played back including hidden scenes.
... After a recording has been made, this DVD recorder allows you playback a recording in video edit mode, the entire recording will be carried out on the remote control. ➜ The video editing menu appears. You can be played back including hidden scenes.


