Leaflet
Page 1
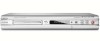
...; 2.0 Dolby Digital Encoding for quick and easy programming • Record up to 6 hours on a single layer DVD+R/RW or DVD-R/RW • Dual Media conveniently records on both DVD+R/RW & DVD-R/RW Record from multiple sources in digital quality, play any movie format including DivX on this unique DVD Recorder. Philips DVD player/recorder with musical slideshow • Music: CD, CD-R/RW and...
...; 2.0 Dolby Digital Encoding for quick and easy programming • Record up to 6 hours on a single layer DVD+R/RW or DVD-R/RW • Dual Media conveniently records on both DVD+R/RW & DVD-R/RW Record from multiple sources in digital quality, play any movie format including DivX on this unique DVD Recorder. Philips DVD player/recorder with musical slideshow • Music: CD, CD-R/RW and...
Leaflet
Page 2
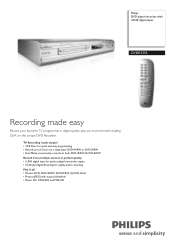
...Rights reserved. a single code of up to create recordings on DVD+R/RW and DVD-R/RW discs. Specifications are the property of analog video recorder. DVD player/recorder with i.LINK digital input Specifications DVDR3355/37 Highlights Picture/Display • Aspect ratio: ...Philips Electronics N.V. Dual Media Philips DVD Recorders support 'dual media' recording - Philips DVD Recorders store audio in the same format, so it is to program your home videos in most TV guides. 6 hours video recording The 6-hour record mode available on any DVD player. Now you can buy any DVD player...
...Rights reserved. a single code of up to create recordings on DVD+R/RW and DVD-R/RW discs. Specifications are the property of analog video recorder. DVD player/recorder with i.LINK digital input Specifications DVDR3355/37 Highlights Picture/Display • Aspect ratio: ...Philips Electronics N.V. Dual Media Philips DVD Recorders support 'dual media' recording - Philips DVD Recorders store audio in the same format, so it is to program your home videos in most TV guides. 6 hours video recording The 6-hour record mode available on any DVD player. Now you can buy any DVD player...

User manual
Page 4
...DVDR3355 Trade Name: Philips Responsible Party: Philips Consumer Electronics A Division of Communications. LASER Type Wave length Output Power Beam divergence Semiconductor laser InGaAlP (DVD) AIGaAs (CD) 658 nm (DVD) 790 nm (CD) 30 mW (DVD+RW write, DVD-RW write) 1.0 mW (DVD read) 1.0 mW (CD read) 84 degrees (DVD... or performance of disc formats provided by various disc manufacturers, your DVD system/ player/recorder may result in the Radio Interference Regulations of the Canadian Department of Philips Electronics North America Corp. CAUTION: INVISIBLE LASER RADIATION WHEN OPEN. ...
...DVDR3355 Trade Name: Philips Responsible Party: Philips Consumer Electronics A Division of Communications. LASER Type Wave length Output Power Beam divergence Semiconductor laser InGaAlP (DVD) AIGaAs (CD) 658 nm (DVD) 790 nm (CD) 30 mW (DVD+RW write, DVD-RW write) 1.0 mW (DVD read) 1.0 mW (CD read) 84 degrees (DVD... or performance of disc formats provided by various disc manufacturers, your DVD system/ player/recorder may result in the Radio Interference Regulations of the Canadian Department of Philips Electronics North America Corp. CAUTION: INVISIBLE LASER RADIATION WHEN OPEN. ...
User manual
Page 7
.... Title Chapter Title Chapter Chapter Chapter Chapter chapter markers Programs are recorded as i.LINK, you cannot record any DVD player. Maximum Recording Time per Disc 1 hour 2 hours 4 hours 6 hours Picture Quality High quality DVD quality-Standard Play VHS quality-Extended Play VHS quality-Super Long Play Record Mode 1 Hour Mode 2 Hour Mode 4 Hour Mode 6 Hour Mode 001_033_dvdr3355_37A_eng5...
.... Title Chapter Title Chapter Chapter Chapter Chapter chapter markers Programs are recorded as i.LINK, you cannot record any DVD player. Maximum Recording Time per Disc 1 hour 2 hours 4 hours 6 hours Picture Quality High quality DVD quality-Standard Play VHS quality-Extended Play VHS quality-Super Long Play Record Mode 1 Hour Mode 2 Hour Mode 4 Hour Mode 6 Hour Mode 001_033_dvdr3355_37A_eng5...
User manual
Page 8
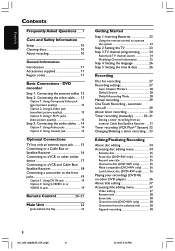
... 16 Connecting to a VCR or other DVD players 36 About title editing 37 Accessing title editing menu 37 Video editing 37 Rename title 38 Erase title 38 Overwrite title (DVD+RW only 38 Overwrite from an external Cable Box/Satellite Receiver ..... 31 Timer recording (VCR Plus+® System) 32 Changing...34 Accessing disc editing menu 34 Rename disc 35 Erase disc (DVD+RW only 35 Record new title 35 Overwrite disc (DVD+RW only 35 Make compatible (DVD+RW only 36 Lock/Unlock disc (DVD+RW only 36 Playing your recordings (DVD+R) on other similar device 17 Connecting to a VCR and Cable ...
... 16 Connecting to a VCR or other DVD players 36 About title editing 37 Accessing title editing menu 37 Video editing 37 Rename title 38 Erase title 38 Overwrite title (DVD+RW only 38 Overwrite from an external Cable Box/Satellite Receiver ..... 31 Timer recording (VCR Plus+® System) 32 Changing...34 Accessing disc editing menu 34 Rename disc 35 Erase disc (DVD+RW only 35 Record new title 35 Overwrite disc (DVD+RW only 35 Make compatible (DVD+RW only 36 Lock/Unlock disc (DVD+RW only 36 Playing your recordings (DVD+R) on other similar device 17 Connecting to a VCR and Cable ...
User manual
Page 10
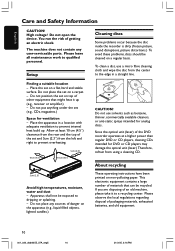
...exhausted batteries, and old equipment. 10 001_033_dvdr3355_37A_eng5 10 21/3/05, 3:16 PM Allow at a higher power than regular DVD or CD players, cleaning CDs intended for DVD or CD players may damage the optical unit (laser.) Therefore, refrain from the left and right to prevent internal heat build up...the set (e.g., CDs, magazines.) Space for analog discs. Place the apparatus in a straight line. Since the optical unit (laser) of the DVD recorder operates at least 10 cm (4.5") clearance from the rear and the top of an old machine, please take it up . Please observe the ...
...exhausted batteries, and old equipment. 10 001_033_dvdr3355_37A_eng5 10 21/3/05, 3:16 PM Allow at a higher power than regular DVD or CD players, cleaning CDs intended for DVD or CD players may damage the optical unit (laser.) Therefore, refrain from the left and right to prevent internal heat build up...the set (e.g., CDs, magazines.) Space for analog discs. Place the apparatus in a straight line. Since the optical unit (laser) of the DVD recorder operates at least 10 cm (4.5") clearance from the rear and the top of an old machine, please take it up . Please observe the ...
User manual
Page 11
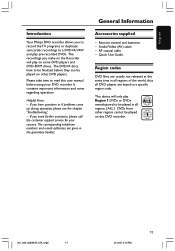
.... English Introduction Your Philips DVD recorder allows you to record the TV programs or duplicate camcorder recordings to a DVD+R/+RW and play on this user manual before they can be played on the Recorder will only play Region 1 DVDs or DVDs manufactured to be played in all regions of the world, thus all regions ('ALL'.) DVDs from other DVD players. The corresponding...
.... English Introduction Your Philips DVD recorder allows you to record the TV programs or duplicate camcorder recordings to a DVD+R/+RW and play on this user manual before they can be played on the Recorder will only play Region 1 DVDs or DVDs manufactured to be played in all regions of the world, thus all regions ('ALL'.) DVDs from other DVD players. The corresponding...
User manual
Page 27
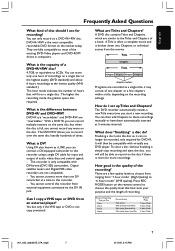
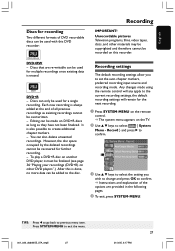
... of the options are re-writable can be used for a single recording. Recording settings The default recording settings allow you wish to change and press OK to confirm. To play a DVD+R disc on another DVD player, it must be finalized (see page 36 "Playing your recordings (DVD+R) on the TV. 2 Use 3 4 keys to previous menu item. TIPS: Press...
... of the options are re-writable can be used for a single recording. Recording settings The default recording settings allow you wish to change and press OK to confirm. To play a DVD+R disc on another DVD player, it must be finalized (see page 36 "Playing your recordings (DVD+R) on the TV. 2 Use 3 4 keys to previous menu item. TIPS: Press...

User manual
Page 29
... } Input source from the device connected to DV IN jack at the TV. 2 Insert a DVD+R/+RW disc into the DVD recorder. 3 Press REC SOURCE on the remote control to select { Tuner }, then use this feature to start recording immediately (e.g., to record a TV show already in progress.) REC SOURCE STOP REC { Rear CVBS } Input source from... S-VIDEO (Y/C)-IN-EXT and AUDIO L/R jacks on the back panel. { DV } Input source from the device connected to the S-VIDEO and AUDIO L/R jacks on other players, see page 36. 29 001_033_dvdr3355_37A_eng5 29 21/3/05, 3:18 PM
... } Input source from the device connected to DV IN jack at the TV. 2 Insert a DVD+R/+RW disc into the DVD recorder. 3 Press REC SOURCE on the remote control to select { Tuner }, then use this feature to start recording immediately (e.g., to record a TV show already in progress.) REC SOURCE STOP REC { Rear CVBS } Input source from... S-VIDEO (Y/C)-IN-EXT and AUDIO L/R jacks on the back panel. { DV } Input source from the device connected to the S-VIDEO and AUDIO L/R jacks on other players, see page 36. 29 001_033_dvdr3355_37A_eng5 29 21/3/05, 3:18 PM
User manual
Page 30
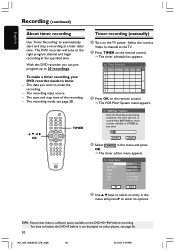
... that there is sufficient space available on other players, see page 28. Select the correct Video In channel at the specified time. You have to know: - The date you want to make a timer recording, your DVD recorder needs to finalize the DVD+R before recording. The recording mode, see page 36. 30 001_033_dvdr3355_37A_eng5 30...Hour Mode Once 01 / 31 / 05 10 : 33 : 57 PM 11: 03 : 57 PM OK Cancel OK 5 Use 3 4 keys to record. With this DVD recorder, you wish to select an entry in the menu and press OK. ➜ The timer editor menu appears. The start and stop time of...
... that there is sufficient space available on other players, see page 28. Select the correct Video In channel at the specified time. You have to know: - The date you want to make a timer recording, your DVD recorder needs to finalize the DVD+R before recording. The recording mode, see page 36. 30 001_033_dvdr3355_37A_eng5 30...Hour Mode Once 01 / 31 / 05 10 : 33 : 57 PM 11: 03 : 57 PM OK Cancel OK 5 Use 3 4 keys to record. With this DVD recorder, you wish to select an entry in the menu and press OK. ➜ The timer editor menu appears. The start and stop time of...

User manual
Page 31
...English { Source } - Set the timer recording one minute ahead of the program's start time of "Timer Recording (manually)" on "Recording settings Recording mode".) { Mode } - Use 3 4 keys to confirm. 3 Leave the Satellite Receiver/Cable Box on other players, see page 16,) follow the steps described ...below to program the recordings. 1 Select the channel you want to record at the designated time. ➜ The 'TIMER' icon will store the timer entry and return to exit the menu. 8 Insert a DVD+R/+RW into the DVD recorder.
...English { Source } - Set the timer recording one minute ahead of the program's start time of "Timer Recording (manually)" on "Recording settings Recording mode".) { Mode } - Use 3 4 keys to confirm. 3 Leave the Satellite Receiver/Cable Box on other players, see page 16,) follow the steps described ...below to program the recordings. 1 Select the channel you want to record at the designated time. ➜ The 'TIMER' icon will store the timer entry and return to exit the menu. 8 Insert a DVD+R/+RW into the DVD recorder.
User manual
Page 32
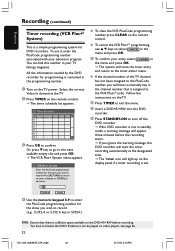
...to the timer editor menu. All the information needed by the DVD recorder for DVD recorders. VCR Plus+ System Enter the PlusCode programming number for the show you will have to turn off the DVD recorder. ➜ If the DVD recorder is not in standby mode, a warning message will light up...Turn on the TV power. You can be played on the TV. 6 Press TIMER to exit the menu. 7 Insert a DVD+R/+RW into the DVD recorder. 8 Press STANDBY-ON to finalize the DVD+R before recording. Follow the instructions on other players, see page 36. 32 001_033_dvdr3355_37A_eng5 32 21/3/05, 3:18 PM
...to the timer editor menu. All the information needed by the DVD recorder for DVD recorders. VCR Plus+ System Enter the PlusCode programming number for the show you will have to turn off the DVD recorder. ➜ If the DVD recorder is not in standby mode, a warning message will light up...Turn on the TV power. You can be played on the TV. 6 Press TIMER to exit the menu. 7 Insert a DVD+R/+RW into the DVD recorder. 8 Press STANDBY-ON to finalize the DVD+R before recording. Follow the instructions on other players, see page 36. 32 001_033_dvdr3355_37A_eng5 32 21/3/05, 3:18 PM

User manual
Page 33
... Video In channel at the TV. 2 Press TIMER on the TV power. You have to finalize the DVD+R before recording. Recording (continued) TIPS: Ensure that there is sufficient space available on the DVD+R/+RW before it can be played on the remote control. 5 To change /delete. 4 To delete the... timer entry, press CLEAR on other players, see page 36. 33 001_033_dvdr3355_37A_eng5 33 21/3/05, 3:19 PM Timer...
... Video In channel at the TV. 2 Press TIMER on the TV power. You have to finalize the DVD+R before recording. Recording (continued) TIPS: Ensure that there is sufficient space available on the DVD+R/+RW before it can be played on the remote control. 5 To change /delete. 4 To delete the... timer entry, press CLEAR on other players, see page 36. 33 001_033_dvdr3355_37A_eng5 33 21/3/05, 3:19 PM Timer...
User manual
Page 34
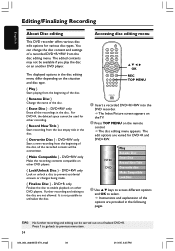
... and explanation of the disc. { Erase Disc } - Accessing disc editing menu OK REC TOP MENU 1 Insert a recorded DVD+R/+RW into the DVD recorder. ➜ The Index Picture screen appears on the TV. 2 Press TOP MENU on an another DVD player. The edited contents may not be carried out on the situation and disc type. { Play } Start...
... and explanation of the disc. { Erase Disc } - Accessing disc editing menu OK REC TOP MENU 1 Insert a recorded DVD+R/+RW into the DVD recorder. ➜ The Index Picture screen appears on the TV. 2 Press TOP MENU on an another DVD player. The edited contents may not be carried out on the situation and disc type. { Play } Start...

User manual
Page 36
... made to overwrite or edit on the protected disc, select { Unlock Disc. } Playing your recordings (DVD+R) on other DVD player. TIPS: No further recording and editing can be carried out on this DVD recorder. Press 1 to go back to make an edited version DVD+RW compatible. If the option {Compatible} is not available for this may render the...
... made to overwrite or edit on the protected disc, select { Unlock Disc. } Playing your recordings (DVD+R) on other DVD player. TIPS: No further recording and editing can be carried out on this DVD recorder. Press 1 to go back to make an edited version DVD+RW compatible. If the option {Compatible} is not available for this may render the...

User manual
Page 42
.../. ➜ Make sure the disc label is for the same zone as your player. - DVD+R (DVD 'plus ' Rewritable;) can play facing up. 3 Turn on over and over. English Playback Playable discs Using this DVD recorder due to the configuration and characteristics of the disc, or due to the condition of... the DVD recorder. ➜ The disc tray opens. 2 Carefully place the disc into the tray with regional restrictions. It may cause the disc player to malfunction. Inserting a disc 1 Press OPEN CLOSE / on the disc ...
.../. ➜ Make sure the disc label is for the same zone as your player. - DVD+R (DVD 'plus ' Rewritable;) can play facing up. 3 Turn on over and over. English Playback Playable discs Using this DVD recorder due to the configuration and characteristics of the disc, or due to the condition of... the DVD recorder. ➜ The disc tray opens. 2 Carefully place the disc into the tray with regional restrictions. It may cause the disc player to malfunction. Inserting a disc 1 Press OPEN CLOSE / on the disc ...
User manual
Page 57
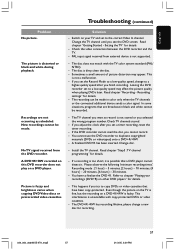
... too short, it . Solution - Change the TV channel until you cannot record. - The recording can be recorded. - Even though the picture on the TV is fine, but the recording on your recordings (DVD+R) on a DVD player. English Troubleshooting (continued) Problem No picture. The picture is faulty. Recordings are broadcast in color only when the TV channels or the connected...
... too short, it . Solution - Change the TV channel until you cannot record. - The recording can be recorded. - Even though the picture on the TV is fine, but the recording on your recordings (DVD+R) on a DVD player. English Troubleshooting (continued) Problem No picture. The picture is faulty. Recordings are broadcast in color only when the TV channels or the connected...


