Hd Home Cinema Projector
Page 2
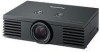
... your Panasonic LCD projector.The serial number of your new product, and that you are unable to insert the plug into the outlet, contact an electrician. Model number: PT-AE1000U Serial number: WARNING: TO REDUCE THE RISK OF FIRE OR ELECTRIC SHOCK, DONOT EXPOSE THIS PRODUCT TO RAIN OR MOISTURE. Do not defeat the purpose of your product may result. Do not remove 2 - Power Supply: This LCD Projector...
... your Panasonic LCD projector.The serial number of your new product, and that you are unable to insert the plug into the outlet, contact an electrician. Model number: PT-AE1000U Serial number: WARNING: TO REDUCE THE RISK OF FIRE OR ELECTRIC SHOCK, DONOT EXPOSE THIS PRODUCT TO RAIN OR MOISTURE. Do not defeat the purpose of your product may result. Do not remove 2 - Power Supply: This LCD Projector...

Hd Home Cinema Projector
Page 3
... may cause undesired operation. PTV (843 - 9788) This device complies with Part 15 of Conformity Model Number: PT-AE1000U Trade Name: Panasonic Responsible party: Panasonic North America Address: One Panasonic Way 4B - 9 Secaucus, New Jersey 07094 Telephone number: 1 - 888 - View - Increase the separation between the equipment and receiver. - Indication based on , the user is subject to the following measures: - However, there is connected. - If you must...
... may cause undesired operation. PTV (843 - 9788) This device complies with Part 15 of Conformity Model Number: PT-AE1000U Trade Name: Panasonic Responsible party: Panasonic North America Address: One Panasonic Way 4B - 9 Secaucus, New Jersey 07094 Telephone number: 1 - 888 - View - Increase the separation between the equipment and receiver. - Indication based on , the user is subject to the following measures: - However, there is connected. - If you must...
Hd Home Cinema Projector
Page 4
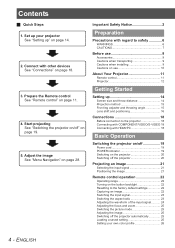
... Lens shift and positioning 16 Connections 18 Before connection to the factory default settings 22 Capturing an image 22 Switching the input signal 23 Switching the aspect ratio 23 Adjusting the waveform of the input signal........... 24 Adjusting the focus and zoom 25 Switching the picture mode 25 Adjusting the image 25 Switching off the projector automatically 25 Loading a saved setting 25 Setting your own color profile 26 4 - Connect with HDMI/PC 18 Basic Operation Switching the projector on/off 19 Power cord 19 POWER indicator...
... Lens shift and positioning 16 Connections 18 Before connection to the factory default settings 22 Capturing an image 22 Switching the input signal 23 Switching the aspect ratio 23 Adjusting the waveform of the input signal........... 24 Adjusting the focus and zoom 25 Switching the picture mode 25 Adjusting the image 25 Switching off the projector automatically 25 Loading a saved setting 25 Setting your own color profile 26 4 - Connect with HDMI/PC 18 Basic Operation Switching the projector on/off 19 Power cord 19 POWER indicator...
Hd Home Cinema Projector
Page 5
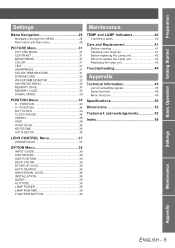
... KEYSTONE 36 AUTO SETUP 36 LENS CONTROL Menu 37 ZOOM/FOCUS 37 OPTION Menu 38 INPUT GUIDE 38 OSD DESIGN 38 OSD POSITION 38 BACK COLOR 38 STARTUP LOGO 38 AUTO SEARCH 38 HDMI SIGNAL LEVEL 38 INSTALLATION 39 SLEEP 39 ALTITUDE 39 LAMP POWER 39 LAMP RUNTIME 39 FUNCTION BUTTON 39 TEMP and LAMP Indicators 40 Controlling alerts 40 Care and Replacement 41 Before cleaning 41 Cleaning your projector 41 Before replacing the Lamp unit 42 When to replace the Lamp...
... KEYSTONE 36 AUTO SETUP 36 LENS CONTROL Menu 37 ZOOM/FOCUS 37 OPTION Menu 38 INPUT GUIDE 38 OSD DESIGN 38 OSD POSITION 38 BACK COLOR 38 STARTUP LOGO 38 AUTO SEARCH 38 HDMI SIGNAL LEVEL 38 INSTALLATION 39 SLEEP 39 ALTITUDE 39 LAMP POWER 39 LAMP RUNTIME 39 FUNCTION BUTTON 39 TEMP and LAMP Indicators 40 Controlling alerts 40 Care and Replacement 41 Before cleaning 41 Cleaning your projector 41 Before replacing the Lamp unit 42 When to replace the Lamp...

Hd Home Cinema Projector
Page 7
... not cover the air inlet port or the air outlet port. Do not set up the projector in humid or dusty places or in fire, electric shocks or plastic deterioration. If the power cord itself is emitted from the projector's lens. Always disconnect all cables before handling it . In addition, turn off the power and disconnect the power cord plug when you place directly into this light...
... not cover the air inlet port or the air outlet port. Do not set up the projector in humid or dusty places or in fire, electric shocks or plastic deterioration. If the power cord itself is emitted from the projector's lens. Always disconnect all cables before handling it . In addition, turn off the power and disconnect the power cord plug when you place directly into this light...
Hd Home Cinema Projector
Page 9
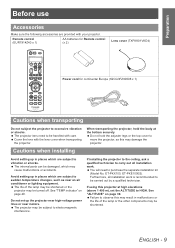
... Remote control (x 2) Lens cover (TXFKK01VKD4) Power cord for continental Europe (K2CG3FZ00008 x 1) Cautions when transporting Do not subject the projector to carry out all installation work . Do not hold the body at high elevations (above 1 400 m), set up in malfunctions or the life of the lamp may be handled with care. Avoid setting up the projector near high-voltage power lines or near an air conditioner or lighting equipment. Cover the lens...
... Remote control (x 2) Lens cover (TXFKK01VKD4) Power cord for continental Europe (K2CG3FZ00008 x 1) Cautions when transporting Do not subject the projector to carry out all installation work . Do not hold the body at high elevations (above 1 400 m), set up in malfunctions or the life of the lamp may be handled with care. Avoid setting up the projector near high-voltage power lines or near an air conditioner or lighting equipment. Cover the lens...
Hd Home Cinema Projector
Page 10
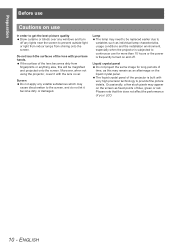
... this will be replaced earlier due to variables such as fixed points of blue, green or red. Moreover, when not using the projector, cover it become dirty or damaged. Liquid crystal panel Do not project the same image for more than 10 hours or the power is subjected to continuous use In order to the screen, and do not let it with your LCD. 10 - ENGLISH...
... this will be replaced earlier due to variables such as fixed points of blue, green or red. Moreover, when not using the projector, cover it become dirty or damaged. Liquid crystal panel Do not project the same image for more than 10 hours or the power is subjected to continuous use In order to the screen, and do not let it with your LCD. 10 - ENGLISH...
Hd Home Cinema Projector
Page 11
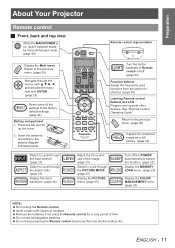
... battery life. Do not keep pressing the Remote control buttons as a still picture. (page 22) Adjust the focus and size of Remote control on , switch between standby mode and project mode. (page 20) Display the Main menu. Avoid contact with ENTER. (page 28) Reset some of the settings to cycle through the aspect ratio. (page 23) Display the input waveform. (page 24) Remote control signal emitter Turn the button backlight of the image. (page 25) Switch to the factory default settings. (page...
... battery life. Do not keep pressing the Remote control buttons as a still picture. (page 22) Adjust the focus and size of Remote control on , switch between standby mode and project mode. (page 20) Display the Main menu. Avoid contact with ENTER. (page 28) Reset some of the settings to cycle through the aspect ratio. (page 23) Display the input waveform. (page 24) Remote control signal emitter Turn the button backlight of the image. (page 25) Switch to the factory default settings. (page...

Hd Home Cinema Projector
Page 13
... open . (page 42) Air intake port AC IN Connect the Power cord to supply electronic power to the projector. (page 19) Front leg adjusters Screw up to the projector. This projector should only be used with the Kensington MicroSaver Security System. Compatible with the attached Power cord to ensure optimum performance and avoid damage to open the Top cover other than replacing the lamp unit. ENGLISH - 13 COMPONENT 2 IN Connect a YPBPR signal cable. VIDEO...
... open . (page 42) Air intake port AC IN Connect the Power cord to supply electronic power to the projector. (page 19) Front leg adjusters Screw up to the projector. This projector should only be used with the Kensington MicroSaver Security System. Compatible with the attached Power cord to ensure optimum performance and avoid damage to open the Top cover other than replacing the lamp unit. ENGLISH - 13 COMPONENT 2 IN Connect a YPBPR signal cable. VIDEO...

Hd Home Cinema Projector
Page 19
... to use . ENGLISH - 19 J Connecting Make sure to project. Connect the Power cord to the projector when not in standby. The electric consumption in . 2. J Disconnecting Make sure the MAIN POWER is provided with the projector. 1. NOTE: Do not force the connector as this may take a while. POWER indicator POWER indicator Indicator status No illumination or flashing RED Lit GREEN Flashing Lit ORANGE Lit Flashing Status The MAIN POWER is getting ready to projection mode. The POWER is switched...
... to use . ENGLISH - 19 J Connecting Make sure to project. Connect the Power cord to the projector when not in standby. The electric consumption in . 2. J Disconnecting Make sure the MAIN POWER is provided with the projector. 1. NOTE: Do not force the connector as this may take a while. POWER indicator POWER indicator Indicator status No illumination or flashing RED Lit GREEN Flashing Lit ORANGE Lit Flashing Status The MAIN POWER is getting ready to projection mode. The POWER is switched...

Hd Home Cinema Projector
Page 20
.... The power indicator lights up in ORANGE while cooling the lamp, then illuminates RED when it is displayed. Switch off the MAIN POWER on the screen. Press the POWER button. To return to the projection, press ENTER to switch off the projector Power indicator (3) (1) Basic Operation (2) 1. Press the POWER button. ENGLISH Switching the projector on/off Switching on . Switch the MAIN POWER on the projector Power indicator (1) (3) (2) 1. Remove the Lens cover from the lens. 3. NOTE: Some small rattling or tinkling sound may cause...
.... The power indicator lights up in ORANGE while cooling the lamp, then illuminates RED when it is displayed. Switch off the MAIN POWER on the screen. Press the POWER button. To return to the projection, press ENTER to switch off the projector Power indicator (3) (1) Basic Operation (2) 1. Press the POWER button. ENGLISH Switching the projector on/off Switching on . Switch the MAIN POWER on the projector Power indicator (1) (3) (2) 1. Remove the Lens cover from the lens. 3. NOTE: Some small rattling or tinkling sound may cause...

Hd Home Cinema Projector
Page 21
... the Air exhaust port as default and the signal from the connected devices is detected automatically. See "AUTO SEARCH" on page 23. 2. See "Switching the aspect ratio" on page 38. Press the LENS button to select the required aspect mode. Screw down the Front leg adjuster and adjust the angle vertically. Adjust the projected image with the Lens shift dials. Basic Operation Projecting an image Selecting the input signal 1. of the FOCUS and ZOOM buttons...
... the Air exhaust port as default and the signal from the connected devices is detected automatically. See "AUTO SEARCH" on page 23. 2. See "Switching the aspect ratio" on page 38. Press the LENS button to select the required aspect mode. Screw down the Front leg adjuster and adjust the angle vertically. Adjust the projected image with the Lens shift dials. Basic Operation Projecting an image Selecting the input signal 1. of the FOCUS and ZOOM buttons...
Hd Home Cinema Projector
Page 25
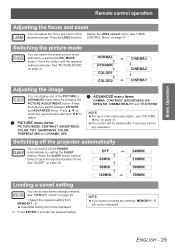
... settings, MEMORY1 - 5 will not be displayed. ENGLISH - 25 Switching off the projector automatically You can access saved settings instantly. OFF 60MIN. 90MIN. 240MIN. 210MIN. 180MIN. 120MIN. 150MIN. Press ENTER to adjust. See "SLEEP" on page 37. Press the LENS button to CONTROL Menu" on page 39. Basic Operation Remote control operation Adjusting the focus and zoom You can adjust the focus and zoom of time. See "LENS projected image. Q PICTURE menu items PICTURE MODE, CONTRAST, BRIGHTNESS, COLOR, TINT, SHARPNESS, COLOR TEMPERATURE...
... settings, MEMORY1 - 5 will not be displayed. ENGLISH - 25 Switching off the projector automatically You can access saved settings instantly. OFF 60MIN. 90MIN. 240MIN. 210MIN. 180MIN. 120MIN. 150MIN. Press ENTER to adjust. See "SLEEP" on page 37. Press the LENS button to CONTROL Menu" on page 39. Basic Operation Remote control operation Adjusting the focus and zoom You can adjust the focus and zoom of time. See "LENS projected image. Q PICTURE menu items PICTURE MODE, CONTRAST, BRIGHTNESS, COLOR, TINT, SHARPNESS, COLOR TEMPERATURE...

Hd Home Cinema Projector
Page 27
... When profiles are not adjustable. Press the COLOR MANAGEMENT button and select the PROFILE menu. White, Black and Grey are loaded under the PICTURE MODE setting, you can keep them as you can readjust the color. Select the required profile and press ENTER. Select the PROFILE SAVE menu and press ENTER The PROFILE SAVE menu is displayed. screen is displayed. Basic Operation Remote control operation Q Managing stored logs You...
... When profiles are not adjustable. Press the COLOR MANAGEMENT button and select the PROFILE menu. White, Black and Grey are loaded under the PICTURE MODE setting, you can keep them as you can readjust the color. Select the required profile and press ENTER. Select the PROFILE SAVE menu and press ENTER The PROFILE SAVE menu is displayed. screen is displayed. Basic Operation Remote control operation Q Managing stored logs You...
Hd Home Cinema Projector
Page 36
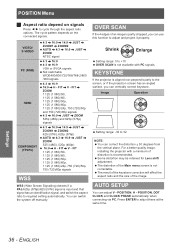
..., H - Settings 36 - POSITION Menu J Aspect ratio depend on the connected signals. Image Operation Setting range: -32 to cycle through the aspect ratio options. Some distortion may be retained for Lens shift adjustment. OVER SCAN If the 4 edges of the image. POSITION, DOT CLOCK and CLOCK PHASE automatically when connecting via PC. VIDEO/ S-VIDEO PC (RGB) HDMI COMPONENT (YPBPR) 4:3 \ 16:9 \ 14:9 \ JUST \ ZOOM1 \ ZOOM2 AUTO \ 4:3 \ 16:9 \ JUST \ ZOOM...
..., H - Settings 36 - POSITION Menu J Aspect ratio depend on the connected signals. Image Operation Setting range: -32 to cycle through the aspect ratio options. Some distortion may be retained for Lens shift adjustment. OVER SCAN If the 4 edges of the image. POSITION, DOT CLOCK and CLOCK PHASE automatically when connecting via PC. VIDEO/ S-VIDEO PC (RGB) HDMI COMPONENT (YPBPR) 4:3 \ 16:9 \ 14:9 \ JUST \ ZOOM1 \ ZOOM2 AUTO \ 4:3 \ 16:9 \ JUST \ ZOOM...
Hd Home Cinema Projector
Page 39
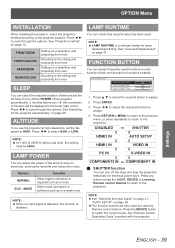
... Remote control buttons. PC IN S-VIDEO IN COMPONENT2 IN COMPONENT1 IN Q SHUTTER function You can adjust the power of time and set the fan speed to HIGH. The function buttons are also used . See "Projection method" on page 41. Press I H to select the required function to select HIGH or LOW. See "Care and Replacement" on page 15. See "Switching off the lamp and stop the projection temporary for lamp replacement timing...
... Remote control buttons. PC IN S-VIDEO IN COMPONENT2 IN COMPONENT1 IN Q SHUTTER function You can adjust the power of time and set the fan speed to HIGH. The function buttons are also used . See "Projection method" on page 41. Press I H to select the required function to select HIGH or LOW. See "Care and Replacement" on page 15. See "Switching off the lamp and stop the projection temporary for lamp replacement timing...
Hd Home Cinema Projector
Page 40
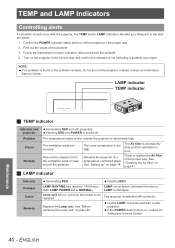
... the instructions for each indication below and solve the problem. 4. See "Cleaning the Air filter" on page 14. ENGLISH Respond to be replaced. LAMP indicator TEMP indicator Maintenance J TEMP indicator Indicator and projector Illuminating RED and still projecting Flashing RED and POWER is found or the problem remains, do not turn on the projector. See "Setting up" on page 41. Replace the Lamp unit. TEMP and LAMP Indicators Controlling alerts If a problem should occur with LAMP POWER set to NORMAL). Confirm the POWER indicator status and turn on...
... the instructions for each indication below and solve the problem. 4. See "Cleaning the Air filter" on page 14. ENGLISH Respond to be replaced. LAMP indicator TEMP indicator Maintenance J TEMP indicator Indicator and projector Illuminating RED and still projecting Flashing RED and POWER is found or the problem remains, do not turn on the projector. See "Setting up" on page 41. Replace the Lamp unit. TEMP and LAMP Indicators Controlling alerts If a problem should occur with LAMP POWER set to NORMAL). Confirm the POWER indicator status and turn on...
Hd Home Cinema Projector
Page 42
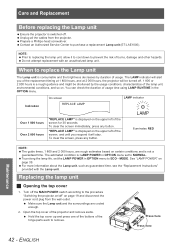
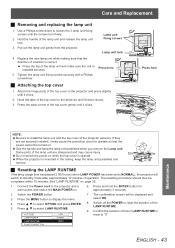
Unplug all the cables from the wall outlet. The LAMP indicator will alert you respond it to cool down to purchase a replacement Lamp unit (ET-LAE1000). You can check the duration of usage time using LAMP RUNTIME in OPTION menu set the LAMP POWER in OPTION menu to ECO - Illuminates RED NOTE: The guide times, 1 800 and 2 000 hours, are cooled enough. 2. Open the top cover of the projector and remove aside. Press...
Unplug all the cables from the wall outlet. The LAMP indicator will alert you respond it to cool down to purchase a replacement Lamp unit (ET-LAE1000). You can check the duration of usage time using LAMP RUNTIME in OPTION menu set the LAMP POWER in OPTION menu to ECO - Illuminates RED NOTE: The guide times, 1 800 and 2 000 hours, are cooled enough. 2. Open the top cover of the projector and remove aside. Press...
Hd Home Cinema Projector
Page 43
... BUTTON 7. Lamp unit fixing screws Lamp unit lock 4. Press the back corner of insertion is reset to the projector and lift down slowly. 3. Press F G to display the menu. 4. Grip the handle and keep the lamp unit paralleled and remove. Press and hold the ENTER button for approximately 3 seconds. 2. Press here J Attaching the top cover 1. Care and Replacement J Removing and replacing the lamp unit 1. Connect the Power cord to select LAMP RUNTIME. Switch off the POWER...
... BUTTON 7. Lamp unit fixing screws Lamp unit lock 4. Press the back corner of insertion is reset to the projector and lift down slowly. 3. Press F G to display the menu. 4. Grip the handle and keep the lamp unit paralleled and remove. Press and hold the ENTER button for approximately 3 seconds. 2. Press here J Attaching the top cover 1. Care and Replacement J Removing and replacing the lamp unit 1. Connect the Power cord to select LAMP RUNTIME. Switch off the POWER...
Hd Home Cinema Projector
Page 44
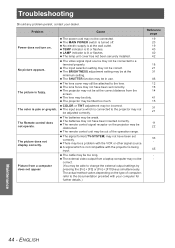
The color is lit or flashes. The power cord may not be connected. LAMP indicator is pale or greyish. The video signal input source may not be connected to the lens. The remote control signal receptor on the projector may be obstructed. There may be a problem with the VCR or other signal source. A signal which is at the minimum setting. The external video output from a laptop computer may not be correct. (You may be at...
The color is lit or flashes. The power cord may not be connected. LAMP indicator is pale or greyish. The video signal input source may not be connected to the lens. The remote control signal receptor on the projector may be obstructed. There may be a problem with the VCR or other signal source. A signal which is at the minimum setting. The external video output from a laptop computer may not be correct. (You may be at...


