
English Manual
Page 1
YourGuide toAssembly,UseandCare WalkFit 3500
YourGuide toAssembly,UseandCare WalkFit 3500

English Manual
Page 2
... fitness and tone your workouts. Getting on your fitness goals, WalkFit 3500 can exercise anywhere and at any time. - Safety WalkFit's cardiovascular workout is low-impact, which require an electrical outlet. -• WalkFit is quieter than most treadmills; You always have free access to stabilize you walk or run. Whatever your ankles, knees, hips and back. you have solid arm bars to our customer service...
... fitness and tone your workouts. Getting on your fitness goals, WalkFit 3500 can exercise anywhere and at any time. - Safety WalkFit's cardiovascular workout is low-impact, which require an electrical outlet. -• WalkFit is quieter than most treadmills; You always have free access to stabilize you walk or run. Whatever your ankles, knees, hips and back. you have solid arm bars to our customer service...
English Manual
Page 3
Contents au• P.' 4 -4 Important Safety Information 1 Parts 2 Assembly 4 Front Elevation 7 Getting Started 8 Troubleshooting 10 Care 11 Maintenance Schedule 11 Maintenance Log 11 Clean the Treadmill Belt 11 Lubricate the Treadmill Deck 12 Adjust the Treadmill Belt 14 Customer Information 15
Contents au• P.' 4 -4 Important Safety Information 1 Parts 2 Assembly 4 Front Elevation 7 Getting Started 8 Troubleshooting 10 Care 11 Maintenance Schedule 11 Maintenance Log 11 Clean the Treadmill Belt 11 Lubricate the Treadmill Deck 12 Adjust the Treadmill Belt 14 Customer Information 15

English Manual
Page 4
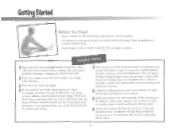
... the entire Owner's Guide and all information provided BEFORE assembling or using the exerciser. • Perform the recommended maintenance steps. can result in your chest, an irregular heartbeat, extreme shortness of breath, nausea, dizziness, lower back pain or feeling lightheadedAbu should be achieved only if the equipment is properly set up or using the fitness equipment. The following your physician before you need to...
... the entire Owner's Guide and all information provided BEFORE assembling or using the exerciser. • Perform the recommended maintenance steps. can result in your chest, an irregular heartbeat, extreme shortness of breath, nausea, dizziness, lower back pain or feeling lightheadedAbu should be achieved only if the equipment is properly set up or using the fitness equipment. The following your physician before you need to...
English Manual
Page 5
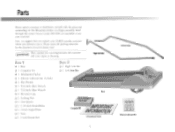
Place a protective covering between the exerciser `AIMPORTANT and your in this entire Owner's Guide BEFORE you assemble or use it. First, we suggest that you unpack your exerciser. ComputerKit wiv,97,v/w- 1164:0/17/4 7704/ Information Packet Left Arm Bar Silicone Lubricant Kit 2 Parts Please spend a moment to familiarize yourself with the parts and terminology in -home trial. 1,4 417010 ,- Right Arm Bar Dox 1 u 1 Base u 1 Computer Kit u 1 Information Packet u 1 Silicone...
Place a protective covering between the exerciser `AIMPORTANT and your in this entire Owner's Guide BEFORE you assemble or use it. First, we suggest that you unpack your exerciser. ComputerKit wiv,97,v/w- 1164:0/17/4 7704/ Information Packet Left Arm Bar Silicone Lubricant Kit 2 Parts Please spend a moment to familiarize yourself with the parts and terminology in -home trial. 1,4 417010 ,- Right Arm Bar Dox 1 u 1 Base u 1 Computer Kit u 1 Information Packet u 1 Silicone...

English Manual
Page 6
Arm Spacer (2) Nut (2) 13/4-inch 2-Inch Angled Bolt (2) Round Bolts (2) NT/ 1-Inch Round Bolt 5/32-Inch Allen Wrench 7/32-Inch Allen Wrench locking Pin (2) Flat Wrench %00 Elevation Leg (2)
Arm Spacer (2) Nut (2) 13/4-inch 2-Inch Angled Bolt (2) Round Bolts (2) NT/ 1-Inch Round Bolt 5/32-Inch Allen Wrench 7/32-Inch Allen Wrench locking Pin (2) Flat Wrench %00 Elevation Leg (2)
English Manual
Page 7
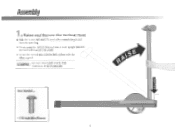
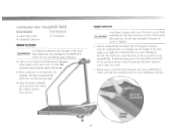
A tighten with the bolt; Assembly 1• Raise and Secure the Vertical Post • Take the I -inch bolt and 7/32-inch Allen wrench (larger one) from the parts bag. • Firmly grasp the vertical post and raise it to an upright position. 1)O NOT LET GO OF THE POST. .•--' • Secure the vertical post with the Allen wrench.
A tighten with the bolt; Assembly 1• Raise and Secure the Vertical Post • Take the I -inch bolt and 7/32-inch Allen wrench (larger one) from the parts bag. • Firmly grasp the vertical post and raise it to an upright position. 1)O NOT LET GO OF THE POST. .•--' • Secure the vertical post with the Allen wrench.

English Manual
Page 8
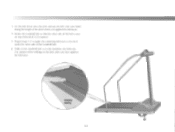
... with the left arm bar. Items Needed... • Flat Wrench • 7/32-Inch Allen Wrench 2 -a • 2 2 -b • x2 5 DO NOT TIGHTEN THE TOP BOLT UNTIL THE BOTTOM BOLT (b) HA BEEN TIGHTENED. IMPORTANT To prevent permanent damage during assembly, do not completely tighten the top bolt and nut (a) before the bottom bolt (b) is secure. 2. Attach the Arm ears ■ Remove the right arm bar from the box...
... with the left arm bar. Items Needed... • Flat Wrench • 7/32-Inch Allen Wrench 2 -a • 2 2 -b • x2 5 DO NOT TIGHTEN THE TOP BOLT UNTIL THE BOTTOM BOLT (b) HA BEEN TIGHTENED. IMPORTANT To prevent permanent damage during assembly, do not completely tighten the top bolt and nut (a) before the bottom bolt (b) is secure. 2. Attach the Arm ears ■ Remove the right arm bar from the box...

English Manual
Page 9
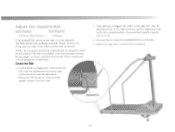
Set both locking pins are secure; Make sure both legs to the same elevation level. this will be easiest for getting started (a). Install the Exercise Computer Refer to the instructions in the elevation leg; Items Needed... 4%\ x2 • Elevation Leg x 2 0 Insert the Legs Choose the second hole in your electronics package to install and use your computer. 6 rotate the pins down to lock the legs in place (b). 4.
Set both locking pins are secure; Make sure both legs to the same elevation level. this will be easiest for getting started (a). Install the Exercise Computer Refer to the instructions in the elevation leg; Items Needed... 4%\ x2 • Elevation Leg x 2 0 Insert the Legs Choose the second hole in your electronics package to install and use your computer. 6 rotate the pins down to lock the legs in place (b). 4.
English Manual
Page 10
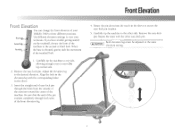
... to move the leg on the treadmill, elevate the front of the machine to three different positions. Adjust the elevation leg to the other easy-lock pin. Carefully tip the machine to the desired elevation. Use different elevation settings to vary your WalkFit 3500 to the second or third hole. When the base is elevated, gravity aids the movement of the treadmill belt. 1. If...
... to move the leg on the treadmill, elevate the front of the machine to three different positions. Adjust the elevation leg to the other easy-lock pin. Carefully tip the machine to the desired elevation. Use different elevation settings to vary your WalkFit 3500 to the second or third hole. When the base is elevated, gravity aids the movement of the treadmill belt. 1. If...
English Manual
Page 11
... by clinical stress testing. Remember, changing your physician before exercising. don't support your workouts. Don't overexert yourself. While exercising on the WalkFit`" 3500 aerobic exerciser, you haven't exercised for your weight with three to five minutes of overexertion, lightheadedness, dizziness, nausea or extreme breathlessness. Stand up and stretch your favorite television show. A true maximum heart rate can listen to warm up straight...
... by clinical stress testing. Remember, changing your physician before exercising. don't support your workouts. Don't overexert yourself. While exercising on the WalkFit`" 3500 aerobic exerciser, you haven't exercised for your weight with three to five minutes of overexertion, lightheadedness, dizziness, nausea or extreme breathlessness. Stand up and stretch your favorite television show. A true maximum heart rate can listen to warm up straight...
English Manual
Page 12
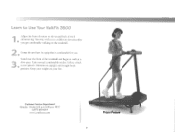
... elevation after you . Grasp the arm bars in a grip that is comfortable for you get comfortable walking on your feet. Keep your weight on the treadmill. 2. Adjust the front elevation to the second hole of the treadmill and begin to walk at a 3. You may wish to Use Your WalkFit 3500 1. slow pace. Maintain an upright and straight body position. Friday 6:00 a.m.-6:00 p.m. MST...
... elevation after you . Grasp the arm bars in a grip that is comfortable for you get comfortable walking on your feet. Keep your weight on the treadmill. 2. Adjust the front elevation to the second hole of the treadmill and begin to walk at a 3. You may wish to Use Your WalkFit 3500 1. slow pace. Maintain an upright and straight body position. Friday 6:00 a.m.-6:00 p.m. MST...
English Manual
Page 13
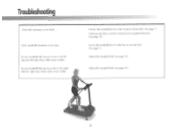
... the NordicTrack treadmill lubricant (see page 7). page 12). Adjust the treadmill belt (see page 14). If the treadmill resistance is too hard... first or second hole (See page 7). Adjust the treadmill belt (see page 14). 10 If your treadmill belt moves so far to the. Lower the treadmill deck to the right that the left that the right side of the roller is not visible... Troubleshooting If the belt resistance...
... the NordicTrack treadmill lubricant (see page 7). page 12). Adjust the treadmill belt (see page 14). If the treadmill resistance is too hard... first or second hole (See page 7). Adjust the treadmill belt (see page 14). 10 If your treadmill belt moves so far to the. Lower the treadmill deck to the right that the left that the right side of the roller is not visible... Troubleshooting If the belt resistance...

English Manual
Page 14
Perform the following maintenance to require minimal maintenance. Maintenance Log Lubricate the Treadmill Deck Date Date 11 Maintenance Schedule Clean the Treadmill Belt After Every Workout X Every 12-15 Hours of your exerciser. Care The WalkFit' 3500 aerobic exerciser is built to help ensure the safe and efficient operation of Use Imbricate the Treadmill Deck X Clean the Treadmill Belt Items Needed Time Required Clean, Dry Cloth 1-2 Minutes After each workout, wipe the treadmill belt with a clean, dry cloth.
Perform the following maintenance to require minimal maintenance. Maintenance Log Lubricate the Treadmill Deck Date Date 11 Maintenance Schedule Clean the Treadmill Belt After Every Workout X Every 12-15 Hours of your exerciser. Care The WalkFit' 3500 aerobic exerciser is built to help ensure the safe and efficient operation of Use Imbricate the Treadmill Deck X Clean the Treadmill Belt Items Needed Time Required Clean, Dry Cloth 1-2 Minutes After each workout, wipe the treadmill belt with a clean, dry cloth.
English Manual
Page 15
... the belt resistance has increased, apply lubrication. ■ Place a protective covering under the machine. Treadmill Belt Apply to get on the top surface of the treadmill belt. Lubricate the Treadmill Peck Items Needed Time Required ■ Clean, Dry Cloth ■ Treadmill Lubricant ■ 15 Minutes Before You Begin Use lubricant obtained only through NordicTrack. 'AIMPORTANT Other lubricants may damage the treadmill deck or belt. We also recommend the protective covering during...
... the belt resistance has increased, apply lubrication. ■ Place a protective covering under the machine. Treadmill Belt Apply to get on the top surface of the treadmill belt. Lubricate the Treadmill Peck Items Needed Time Required ■ Clean, Dry Cloth ■ Treadmill Lubricant ■ 15 Minutes Before You Begin Use lubricant obtained only through NordicTrack. 'AIMPORTANT Other lubricants may damage the treadmill deck or belt. We also recommend the protective covering during...
English Manual
Page 16
Rotate the treadmill belt so that the other side of the treadmill belt. 6. Protective Covering zJ O 13 Use caution ►wen walking on the treadmill belt to the deck under the other side of the belt is now an top of the deck where you have applied the lubricant. Set the belt down onto the deck and pat the hell with your hand along the length of the deck (1/2 rotation). 5. Repeat steps i-3 to apply the remaining lubricant to evenly distribute the lubricant. 3. Walk on the deck after you applied the lubricant. 4.
Rotate the treadmill belt so that the other side of the treadmill belt. 6. Protective Covering zJ O 13 Use caution ►wen walking on the treadmill belt to the deck under the other side of the belt is now an top of the deck where you have applied the lubricant. Set the belt down onto the deck and pat the hell with your hand along the length of the deck (1/2 rotation). 5. Repeat steps i-3 to apply the remaining lubricant to evenly distribute the lubricant. 3. Walk on the deck after you applied the lubricant. 4.
English Manual
Page 17
... the adjustment bolt on the left clockwise. NOTE: The two guides beneath the treadmill deck are designed to keep the belt centered. If the belt has overlapped the roller on the right side, turn at a time. 3_ Use your foot to rotate the treadmill belt six to ten times. 4. Adjust the Treadmill Belt Items Needed Time Required 5/32-Inch Allen Wrench 5 Minutes If the treadmill belt moves to...
... the adjustment bolt on the left clockwise. NOTE: The two guides beneath the treadmill deck are designed to keep the belt centered. If the belt has overlapped the roller on the right side, turn at a time. 3_ Use your foot to rotate the treadmill belt six to ten times. 4. Adjust the Treadmill Belt Items Needed Time Required 5/32-Inch Allen Wrench 5 Minutes If the treadmill belt moves to...

English Manual
Page 18
Our representatives are available: Monday - MST 1 (877) 651-6119 Visit out website at www.iconfitness.com or e-mail us at service@iconfitness.com. 1. Friday 6:00 a.m. CUSTOMER INFORMATION Please call toll free to 6:00 p.m. to our Customer Service Department with questions concerning the use or operation of your NordicTrack equipment.
Our representatives are available: Monday - MST 1 (877) 651-6119 Visit out website at www.iconfitness.com or e-mail us at service@iconfitness.com. 1. Friday 6:00 a.m. CUSTOMER INFORMATION Please call toll free to 6:00 p.m. to our Customer Service Department with questions concerning the use or operation of your NordicTrack equipment.


