L110 User's Manual
Page 3
Introduction First Steps Basic Photography and Playback: G Easy Auto Mode More on Shooting More on Playback Editing Image Movie Recording and Playback Connecting to Televisions, Computers and Printers Basic Camera Setup Notes on Camera Care and General Usage Technical Notes i
Introduction First Steps Basic Photography and Playback: G Easy Auto Mode More on Shooting More on Playback Editing Image Movie Recording and Playback Connecting to Televisions, Computers and Printers Basic Camera Setup Notes on Camera Care and General Usage Technical Notes i

L110 User's Manual
Page 4
... of flammable gas, as this could result in injury. Do not use the camera or AC adapter in the presence of flammable gas Do not use the product will read before using this Nikon product, to prevent possible injury. The consequences that should be performed only by...children Particular care should be read them. Repairs should be taken to prevent infants from the camera or AC adapter, unplug the AC adapter and remove the battery immediately, taking care to a Nikon-authorized service representative for inspection. After removing or disconnecting the power source, take the product...
... of flammable gas, as this could result in injury. Do not use the camera or AC adapter in the presence of flammable gas Do not use the product will read before using this Nikon product, to prevent possible injury. The consequences that should be performed only by...children Particular care should be read them. Repairs should be taken to prevent infants from the camera or AC adapter, unplug the AC adapter and remove the battery immediately, taking care to a Nikon-authorized service representative for inspection. After removing or disconnecting the power source, take the product...
L110 User's Manual
Page 5
...result in fire or electric shock. If you notice any change in the battery, such as necklaces or hairpins. • Do not use with Nikon digital cameras only, and are using the AC adapter, be sure to • Do not handle the plug or battery charger with a dry cloth. ...; When charging Nikon EN-MH2 rechargeable Ni-MH batteries, use in this precaution could result • Do not transport or store with DC-to-AC the product, be sure it to another or with metal in electric shock. Failure to observe this product: you are compatible with COOLPIX L110. • ...
...result in fire or electric shock. If you notice any change in the battery, such as necklaces or hairpins. • Do not use with Nikon digital cameras only, and are using the AC adapter, be sure to • Do not handle the plug or battery charger with a dry cloth. ...; When charging Nikon EN-MH2 rechargeable Ni-MH batteries, use in this precaution could result • Do not transport or store with DC-to-AC the product, be sure it to another or with metal in electric shock. Failure to observe this product: you are compatible with COOLPIX L110. • ...

L110 User's Manual
Page 6
For Your Safety Use appropriate cables When connecting cables to the input and output jacks, use only the cables provided or sold by Nikon for the purpose, to maintain compliance with liquid crystal Should the monitor break, care should be played back on an audio CD player could ... that your subject's eyes could cause temporary visual impairment. The electromagnetic waves given out by the lens cover or other moving parts with this camera may disrupt the electronic systems of the airplane or the instruments of the hospital when using inside an airplane or the hospital Turn the power...
For Your Safety Use appropriate cables When connecting cables to the input and output jacks, use only the cables provided or sold by Nikon for the purpose, to maintain compliance with liquid crystal Should the monitor break, care should be played back on an audio CD player could ... that your subject's eyes could cause temporary visual impairment. The electromagnetic waves given out by the lens cover or other moving parts with this camera may disrupt the electronic systems of the airplane or the instruments of the hospital when using inside an airplane or the hospital Turn the power...
L110 User's Manual
Page 9
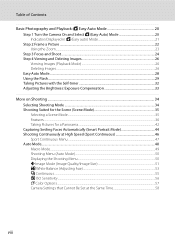
...of Contents For Your Safety...ii WARNINGS...ii Notices ...v Introduction ...1 About This Manual ...1 Information and Precautions...2 Parts of the Camera...4 The Camera Body ...4 Raising and Lowering the Built-in Flash 6 Attaching the Camera Strap and Lens Cap 7 The Monitor...8 Basic Operations...10 A (shooting mode) button ...10 c (playback) button...10 b...Shutter-release Button...13 First Steps ...14 Inserting the Batteries ...14 Applicable Batteries ...14 Turning On and Off the Camera...14 Setting Display Language, Date and Time 16 Inserting Memory Cards ...18 Removing Memory Cards...19 vii
...of Contents For Your Safety...ii WARNINGS...ii Notices ...v Introduction ...1 About This Manual ...1 Information and Precautions...2 Parts of the Camera...4 The Camera Body ...4 Raising and Lowering the Built-in Flash 6 Attaching the Camera Strap and Lens Cap 7 The Monitor...8 Basic Operations...10 A (shooting mode) button ...10 c (playback) button...10 b...Shutter-release Button...13 First Steps ...14 Inserting the Batteries ...14 Applicable Batteries ...14 Turning On and Off the Camera...14 Setting Display Language, Date and Time 16 Inserting Memory Cards ...18 Removing Memory Cards...19 vii
L110 User's Manual
Page 10
Table of Contents Basic Photography and Playback: G Easy Auto Mode 20 Step 1 Turn the Camera On and Select G (Easy Auto) Mode 20 Indicators Displayed in G (Easy auto) Mode 21 Step 2 Frame a Picture ...22 Using the Zoom...23 Step 3 Focus and ... Displaying the Shooting Menu...50 A Image Mode (Image Quality/Image Size 51 B White Balance (Adjusting hue) ...53 C Continuous ...55 E ISO Sensitivity...56 F Color Options...57 Camera Settings that Cannot Be Set at the Same Time 58 viii
Table of Contents Basic Photography and Playback: G Easy Auto Mode 20 Step 1 Turn the Camera On and Select G (Easy Auto) Mode 20 Indicators Displayed in G (Easy auto) Mode 21 Step 2 Frame a Picture ...22 Using the Zoom...23 Step 3 Focus and ... Displaying the Shooting Menu...50 A Image Mode (Image Quality/Image Size 51 B White Balance (Adjusting hue) ...53 C Continuous ...55 E ISO Sensitivity...56 F Color Options...57 Camera Settings that Cannot Be Set at the Same Time 58 viii

L110 User's Manual
Page 11
... Playback ...79 Deleting Movies...79 Connecting to Televisions, Computers and Printers 80 Connecting to a TV...80 Connecting to a Computer...82 Before Connecting the Camera...82 Transferring Pictures from a Camera to a Computer 83 Connecting to a Printer...87 Connecting the Camera and Printer...88 Printing Images One at a Time...89 Printing Multiple Images...90 ix
... Playback ...79 Deleting Movies...79 Connecting to Televisions, Computers and Printers 80 Connecting to a TV...80 Connecting to a Computer...82 Before Connecting the Camera...82 Transferring Pictures from a Camera to a Computer 83 Connecting to a Printer...87 Connecting the Camera and Printer...88 Printing Images One at a Time...89 Printing Multiple Images...90 ix
L110 User's Manual
Page 12
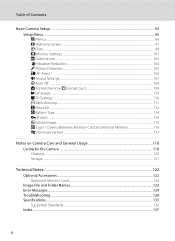
Table of Contents Basic Camera Setup ...93 Setup Menu...93 a Menus...96 c Welcome Screen...97 d Date...98 e Monitor Settings ...101 f Date Imprint...103 g Vibration Reduction...104 U Motion Detection ...105 h AF ... Type...114 d Protect ...114 f Rotate Image...115 h Copy: Copying Between Memory Card and Internal Memory 116 r Firmware Version ...117 Notes on Camera Care and General Usage 118 Caring for the Camera ...118 Cleaning ...120 Storage ...121 Technical Notes...122 Optional Accessories ...122 Approved Memory Cards ...122 Image File and Folder Names...123...
Table of Contents Basic Camera Setup ...93 Setup Menu...93 a Menus...96 c Welcome Screen...97 d Date...98 e Monitor Settings ...101 f Date Imprint...103 g Vibration Reduction...104 U Motion Detection ...105 h AF ... Type...114 d Protect ...114 f Rotate Image...115 h Copy: Copying Between Memory Card and Internal Memory 116 r Firmware Version ...117 Notes on Camera Care and General Usage 118 Caring for the Camera ...118 Cleaning ...120 Storage ...121 Technical Notes...122 Optional Accessories ...122 Approved Memory Cards ...122 Image File and Folder Names...123...

L110 User's Manual
Page 13
... samples so that more clearly shown. The memory card must be removed before the internal memory can be read before using the camera. Illustrations and Screen Display Illustrations and text displays shown in this manual, images are used to as the "default setting". •... more A information is inserted, all those who use , to prevent damage to find the information you for purchasing a Nikon COOLPIX L110 digital camera. Introduction Introduction About This Manual Thank you need, the following symbols and conventions are sometimes omitted from actual display.
... samples so that more clearly shown. The memory card must be removed before the internal memory can be read before using the camera. Illustrations and Screen Display Illustrations and text displays shown in this manual, images are used to as the "default setting". •... more A information is inserted, all those who use , to prevent damage to find the information you for purchasing a Nikon COOLPIX L110 digital camera. Introduction Introduction About This Manual Thank you need, the following symbols and conventions are sometimes omitted from actual display.
L110 User's Manual
Page 14
Additional information may be held liable for contact information: http://imaging.nikon.com/ Use Only Nikon Brand Electronic Accessories Nikon COOLPIX cameras are engineered and proven to frequently asked questions (FAQs), and general advice on a trip), take a test shot to ensure that the camera is functioning correctly. See the URL below for any damages resulting from the...
Additional information may be held liable for contact information: http://imaging.nikon.com/ Use Only Nikon Brand Electronic Accessories Nikon COOLPIX cameras are engineered and proven to frequently asked questions (FAQs), and general advice on a trip), take a test shot to ensure that the camera is functioning correctly. See the URL below for any damages resulting from the...
L110 User's Manual
Page 15
...device and then completely refill it with copyright notices The copying or reproduction of copyrighted creative works such as memory cards or builtin camera memory does not completely erase the original image data. Before discarding a data storage device or transferring ownership to another person, ...is prohibited. • Cautions on certain copies and reproductions The government has issued cautions on copies or reproductions of a scanner, digital camera or other device may be taken to avoid injury or damage to infringe copyright laws. The copying or reproduction of stamps issued by ...
...device and then completely refill it with copyright notices The copying or reproduction of copyrighted creative works such as memory cards or builtin camera memory does not completely erase the original image data. Before discarding a data storage device or transferring ownership to another person, ...is prohibited. • Cautions on certain copies and reproductions The government has issued cautions on copies or reproductions of a scanner, digital camera or other device may be taken to avoid injury or damage to infringe copyright laws. The copying or reproduction of stamps issued by ...

L110 User's Manual
Page 16
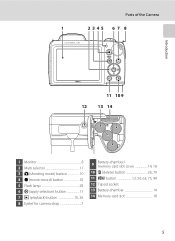
Parts of the Camera The Camera Body 1 2 34 5 6 7 8 Introduction 14 13 12 9 10 11 Zoom control 23 f : wide 23 1 g : tele 23 h : thumbnail playback 60 i : playback zoom 62 j : help 13 2 Shutter-release ... 3 Self-timer lamp 32 AF-assist illuminator 25, 106 4 Power switch/Power-on lamp 20, 108 5 Speaker 79 6 Built-in microphone (stereo 73 7 Eyelet for camera strap 7 8 Built-in flash 6, 29 9 HDMI mini connector 80 10 USB connector and audio/video output 80, 83, 88 11 Pin cover 80, 83, 88...
Parts of the Camera The Camera Body 1 2 34 5 6 7 8 Introduction 14 13 12 9 10 11 Zoom control 23 f : wide 23 1 g : tele 23 h : thumbnail playback 60 i : playback zoom 62 j : help 13 2 Shutter-release ... 3 Self-timer lamp 32 AF-assist illuminator 25, 106 4 Power switch/Power-on lamp 20, 108 5 Speaker 79 6 Built-in microphone (stereo 73 7 Eyelet for camera strap 7 8 Built-in flash 6, 29 9 HDMI mini connector 80 10 USB connector and audio/video output 80, 83, 88 11 Pin cover 80, 83, 88...
L110 User's Manual
Page 17
Parts of the Camera 1 2345 6 7 8 Introduction 11 10 9 12 13 14 1 Monitor 8 2 Multi selector 11 3 A (shooting mode) button 10 4 b (movie-record) button 10 5 Flash lamp 29 6 k (apply selection) button 11 7 c (playback) button 10, 26 8 Eyelet for camera strap 7 9 Battery-chamber/ memory card slot cover 14, 18 10 l (delete) button 26, 79 11 d button 12, 50, 63, 75, 94 12 Tripod socket 13 Battery-chamber 14 14 Memory card slot 18 5
Parts of the Camera 1 2345 6 7 8 Introduction 11 10 9 12 13 14 1 Monitor 8 2 Multi selector 11 3 A (shooting mode) button 10 4 b (movie-record) button 10 5 Flash lamp 29 6 k (apply selection) button 11 7 c (playback) button 10, 26 8 Eyelet for camera strap 7 9 Battery-chamber/ memory card slot cover 14, 18 10 l (delete) button 26, 79 11 d button 12, 50, 63, 75, 94 12 Tripod socket 13 Battery-chamber 14 14 Memory card slot 18 5

L110 User's Manual
Page 18
Push the built-in flash down gently to lower the builtin flash when not in flash See "Using the Flash" (A 29) for more information about flash settings. Introduction Parts of the Camera Raising and Lowering the Built-in Flash Raising the built-in use. 6 Lowering the Built-in Flash.
Push the built-in flash down gently to lower the builtin flash when not in flash See "Using the Flash" (A 29) for more information about flash settings. Introduction Parts of the Camera Raising and Lowering the Built-in Flash Raising the built-in use. 6 Lowering the Built-in Flash.
L110 User's Manual
Page 19
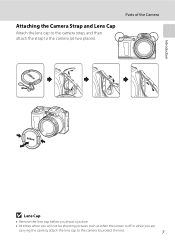
Parts of the Camera Introduction B Lens Cap • Remove the lens cap before you shoot a picture. • At times when you will not be shooting pictures such as when the power is off or while you are carrying the camera, attach the lens cap to the camera to the camera (at two places). Attaching the Camera Strap and Lens Cap Attach the lens cap to the camera strap, and then attach the strap to protect the lens. 7
Parts of the Camera Introduction B Lens Cap • Remove the lens cap before you shoot a picture. • At times when you will not be shooting pictures such as when the power is off or while you are carrying the camera, attach the lens cap to the camera to the camera (at two places). Attaching the Camera Strap and Lens Cap Attach the lens cap to the camera strap, and then attach the strap to protect the lens. 7
L110 User's Manual
Page 20
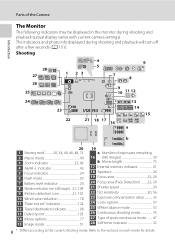
... 30, 56 23 Exposure compensation value 33 24 Color options 57 25 White balance mode 53 26 Continuous shooting mode 55 27 Type of the Camera Introduction The Monitor The following indicators may be displayed in the monitor during shooting and playback will turn off after a few seconds (A 101). Refer to...
... 30, 56 23 Exposure compensation value 33 24 Color options 57 25 White balance mode 53 26 Continuous shooting mode 55 27 Type of the Camera Introduction The Monitor The following indicators may be displayed in the monitor during shooting and playback will turn off after a few seconds (A 101). Refer to...
L110 User's Manual
Page 21
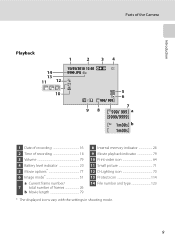
Parts of the Camera Introduction Playback 1 2 34 14 13 11 12 15/05/2010 12:00 9999.JPG 10 5 6 999/ 999 98 7 999/ 999 a 9999/9999 1m00s b 1m00s 1 Date ...
Parts of the Camera Introduction Playback 1 2 34 14 13 11 12 15/05/2010 12:00 9999.JPG 10 5 6 999/ 999 98 7 999/ 999 a 9999/9999 1m00s b 1m00s 1 Date ...
L110 User's Manual
Page 22
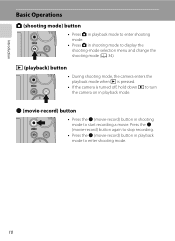
... playback mode to enter shooting mode. • Press A in shooting mode to turn the camera on in playback mode. c (playback) button • During shooting mode, the camera enters the playback mode when c is pressed. • If the camera is turned off, hold down c to display the shooting-mode selection menu and change the...
... playback mode to enter shooting mode. • Press A in shooting mode to turn the camera on in playback mode. c (playback) button • During shooting mode, the camera enters the playback mode when c is pressed. • If the camera is turned off, hold down c to display the shooting-mode selection menu and change the...
L110 User's Manual
Page 25
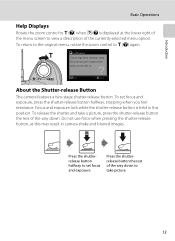
... when M/j is held in this may result in series), or multi-shot 16. Continuous Choose single frame, continuous mode, BSS (camera chooses sharpest shot in camera shake and blurred images. To release the shutter and take a picture, press the shutter-release button the rest of the menu screen ...to take picture. 13 Press the shutterrelease button halfway to g (j) again. Exit Back About the Shutter-release Button The camera features a two-stage shutter-release button. Focus and exposure lock while the shutter-release button is displayed at the lower right of the...
... when M/j is held in this may result in series), or multi-shot 16. Continuous Choose single frame, continuous mode, BSS (camera chooses sharpest shot in camera shake and blurred images. To release the shutter and take a picture, press the shutter-release button the rest of the menu screen ...to take picture. 13 Press the shutterrelease button halfway to g (j) again. Exit Back About the Shutter-release Button The camera features a two-stage shutter-release button. Focus and exposure lock while the shutter-release button is displayed at the lower right of the...
L110 User's Manual
Page 26
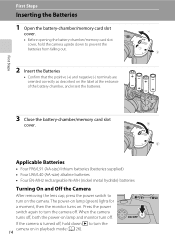
... supplied) • Four LR6/L40 (AA-size) alkaline batteries • Four EN-MH2 rechargeable Ni-MH (nickel metal hydride) batteries Turning On and Off the Camera After removing the lens cap, press the power switch to turn on in playback mode (A 26). 14 Press the power switch again to turn the... camera on the camera. When the camera turns off , hold the camera upside down c to turn off . The power-on lamp (green) lights for a moment, then the monitor turns on lamp and monitor...
... supplied) • Four LR6/L40 (AA-size) alkaline batteries • Four EN-MH2 rechargeable Ni-MH (nickel metal hydride) batteries Turning On and Off the Camera After removing the lens cap, press the power switch to turn on in playback mode (A 26). 14 Press the power switch again to turn the... camera on the camera. When the camera turns off , hold the camera upside down c to turn off . The power-on lamp (green) lights for a moment, then the monitor turns on lamp and monitor...


