
L110 User's Manual
Page 4
... are indicated by qualified technicians. Do not use the camera or AC adapter in the presence of a fall or other small parts into their entirety before using this equipment. Continued operation could result in injury. After removing or disconnecting the power source, take the... product to a Nikon-authorized service representative for inspection. For Your Safety To prevent damage to your Nikon product or injury to yourself or to others, read the following symbol: This icon marks warnings,...
... are indicated by qualified technicians. Do not use the camera or AC adapter in the presence of a fall or other small parts into their entirety before using this equipment. Continued operation could result in injury. After removing or disconnecting the power source, take the... product to a Nikon-authorized service representative for inspection. For Your Safety To prevent damage to your Nikon product or injury to yourself or to others, read the following symbol: This icon marks warnings,...
L110 User's Manual
Page 5
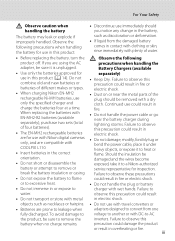
...with wet hands. Failure to flame could result • Do not transport or store with Nikon digital cameras only, and are using the AC adapter, be removed with travel converters or ...not immerse in fire. • Do not handle the power cable or go near the metal parts of water. • Before replacing the battery, turn the Observe the following precautions when handling ...heavy objects, or expose it is unplugged. Failure to observe this product: you are compatible with COOLPIX L110. • Insert batteries in the correct orientation. • Do not short or disassemble the...
...with wet hands. Failure to flame could result • Do not transport or store with Nikon digital cameras only, and are using the AC adapter, be removed with travel converters or ...not immerse in fire. • Do not handle the power cable or go near the metal parts of water. • Before replacing the battery, turn the Observe the following precautions when handling ...heavy objects, or expose it is unplugged. Failure to observe this product: you are compatible with COOLPIX L110. • Insert batteries in the correct orientation. • Do not short or disassemble the...

L110 User's Manual
Page 6
... audio CD equipment. Do not operate the flash with the flash window touching a person or object Failure to your fingers or other moving parts. CD-ROMs The CD-ROMs supplied with care Be careful that your subject's eyes could cause hearing loss or damage the equipment. Handle moving... mouth. For Your Safety Use appropriate cables When connecting cables to the input and output jacks, use only the cables provided or sold by Nikon for the purpose, to prevent liquid crystal from the subject. iv Particular care should be observed if photographing infants, when the flash should be...
... audio CD equipment. Do not operate the flash with the flash window touching a person or object Failure to your fingers or other moving parts. CD-ROMs The CD-ROMs supplied with care Be careful that your subject's eyes could cause hearing loss or damage the equipment. Handle moving... mouth. For Your Safety Use appropriate cables When connecting cables to the input and output jacks, use only the cables provided or sold by Nikon for the purpose, to prevent liquid crystal from the subject. iv Particular care should be observed if photographing infants, when the flash should be...

L110 User's Manual
Page 7
...the cord on a circuit different from that to cause birth defects or other interface cables may exceed the limits of Class B Part 15 of California to which the receiver is no guarantee that are designed to operate the equipment. Notices Notice for Customers in... a residential installation. These limits are not expressly approved by Nikon Corporation may cause harmful interference to Part 15 of the following measures: • Reorient or relocate the receiving antenna. • Increase the separation between the...
...the cord on a circuit different from that to cause birth defects or other interface cables may exceed the limits of Class B Part 15 of California to which the receiver is no guarantee that are designed to operate the equipment. Notices Notice for Customers in... a residential installation. These limits are not expressly approved by Nikon Corporation may cause harmful interference to Part 15 of the following measures: • Reorient or relocate the receiving antenna. • Increase the separation between the...
L110 User's Manual
Page 9
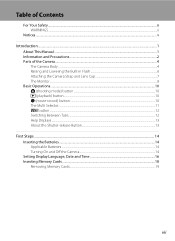
Table of Contents For Your Safety...ii WARNINGS...ii Notices ...v Introduction ...1 About This Manual ...1 Information and Precautions...2 Parts of the Camera...4 The Camera Body ...4 Raising and Lowering the Built-in Flash 6 Attaching the Camera Strap and Lens Cap 7 The Monitor...8 Basic Operations...10 A (...
Table of Contents For Your Safety...ii WARNINGS...ii Notices ...v Introduction ...1 About This Manual ...1 Information and Precautions...2 Parts of the Camera...4 The Camera Body ...4 Raising and Lowering the Built-in Flash 6 Attaching the Camera Strap and Lens Cap 7 The Monitor...8 Basic Operations...10 A (...
L110 User's Manual
Page 14
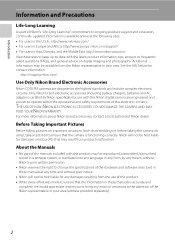
... that may be held liable for contact information: http://imaging.nikon.com/ Use Only Nikon Brand Electronic Accessories Nikon COOLPIX cameras are engineered and proven to frequently asked questions (FAQs), and general advice on digital imaging and photography. About the Manuals • No part of the manuals included with this product may be reproduced, transmitted...
... that may be held liable for contact information: http://imaging.nikon.com/ Use Only Nikon Brand Electronic Accessories Nikon COOLPIX cameras are engineered and proven to frequently asked questions (FAQs), and general advice on digital imaging and photography. About the Manuals • No part of the manuals included with this product may be reproduced, transmitted...

L110 User's Manual
Page 16
Parts of the Camera The Camera Body 1 2 34 5 6 7 8 Introduction 14 13 12 9 10 11 Zoom control 23 f : wide 23 1 g : tele 23 h : thumbnail playback 60 i : playback zoom .../video output 80, 83, 88 11 Pin cover 80, 83, 88 12 Lens 120, 133 13 DC input connector (for AC adapter available separately from Nikon) .... 15, 122 14 DC input connector cover 15 4
Parts of the Camera The Camera Body 1 2 34 5 6 7 8 Introduction 14 13 12 9 10 11 Zoom control 23 f : wide 23 1 g : tele 23 h : thumbnail playback 60 i : playback zoom .../video output 80, 83, 88 11 Pin cover 80, 83, 88 12 Lens 120, 133 13 DC input connector (for AC adapter available separately from Nikon) .... 15, 122 14 DC input connector cover 15 4
L110 User's Manual
Page 17
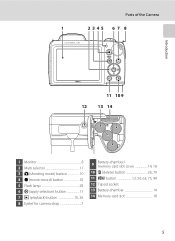
Parts of the Camera 1 2345 6 7 8 Introduction 11 10 9 12 13 14 1 Monitor 8 2 Multi selector 11 3 A (shooting mode) button 10 4 b (movie-record) button 10 5 Flash lamp 29 6 k (apply selection) button 11 7 c (playback) button 10, 26 8 Eyelet for camera strap 7 9 Battery-chamber/ memory card slot cover 14, 18 10 l (delete) button 26, 79 11 d button 12, 50, 63, 75, 94 12 Tripod socket 13 Battery-chamber 14 14 Memory card slot 18 5
Parts of the Camera 1 2345 6 7 8 Introduction 11 10 9 12 13 14 1 Monitor 8 2 Multi selector 11 3 A (shooting mode) button 10 4 b (movie-record) button 10 5 Flash lamp 29 6 k (apply selection) button 11 7 c (playback) button 10, 26 8 Eyelet for camera strap 7 9 Battery-chamber/ memory card slot cover 14, 18 10 l (delete) button 26, 79 11 d button 12, 50, 63, 75, 94 12 Tripod socket 13 Battery-chamber 14 14 Memory card slot 18 5

L110 User's Manual
Page 18
Introduction Parts of the Camera Raising and Lowering the Built-in Flash Raising the built-in Flash. Lowering the Built-in flash See "Using the Flash" (A 29) for more information about flash settings. Push the built-in flash down gently to lower the builtin flash when not in use. 6
Introduction Parts of the Camera Raising and Lowering the Built-in Flash Raising the built-in Flash. Lowering the Built-in flash See "Using the Flash" (A 29) for more information about flash settings. Push the built-in flash down gently to lower the builtin flash when not in use. 6
L110 User's Manual
Page 19
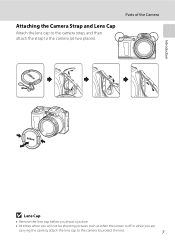
Attaching the Camera Strap and Lens Cap Attach the lens cap to the camera strap, and then attach the strap to protect the lens. 7 Parts of the Camera Introduction B Lens Cap • Remove the lens cap before you shoot a picture. • At times when you will not be shooting pictures such as when the power is off or while you are carrying the camera, attach the lens cap to the camera to the camera (at two places).
Attaching the Camera Strap and Lens Cap Attach the lens cap to the camera strap, and then attach the strap to protect the lens. 7 Parts of the Camera Introduction B Lens Cap • Remove the lens cap before you shoot a picture. • At times when you will not be shooting pictures such as when the power is off or while you are carrying the camera, attach the lens cap to the camera to the camera (at two places).
L110 User's Manual
Page 20
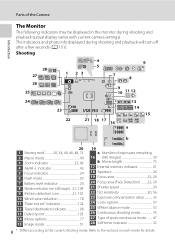
... the Camera Introduction The Monitor The following indicators may be displayed in the monitor during shooting and playback will turn off after a few seconds (A 101). Parts of sport continuous mode ....... 47 28 Self-timer indicator 32 8 * Differs according to the sections on each mode for details. The indicators and photo info...
... the Camera Introduction The Monitor The following indicators may be displayed in the monitor during shooting and playback will turn off after a few seconds (A 101). Parts of sport continuous mode ....... 47 28 Self-timer indicator 32 8 * Differs according to the sections on each mode for details. The indicators and photo info...
L110 User's Manual
Page 21
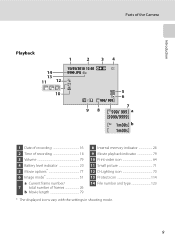
Parts of the Camera Introduction Playback 1 2 34 14 13 11 12 15/05/2010 12:00 9999.JPG 10 5 6 999/ 999 98 7 999/ 999 a 9999/9999 ...
Parts of the Camera Introduction Playback 1 2 34 14 13 11 12 15/05/2010 12:00 9999.JPG 10 5 6 999/ 999 98 7 999/ 999 a 9999/9999 ...

L110 User's Manual
Page 23
... , left, right, or by pressing k. Apply selection. Display p (macro mode) menu (A 49)/select the item below . Select the item to the left and right operating parts of the multi selector to select modes, select menu options and to the previous screen. Select the item below . Shooting menu Image mode White balance...
... , left, right, or by pressing k. Apply selection. Display p (macro mode) menu (A 49)/select the item below . Select the item to the left and right operating parts of the multi selector to select modes, select menu options and to the previous screen. Select the item below . Shooting menu Image mode White balance...
L110 User's Manual
Page 68
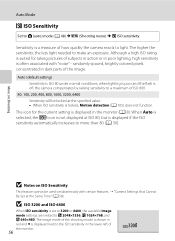
... pixels concentrated in the monitor (A 8). More on Shooting B Notes on ISO Sensitivity This feature cannot be locked at ISO 80, but is displayed in dark parts of ISO 800. 80, 100, 200, 400, 800, 1600, 3200, 6400 Sensitivity will be used simultaneously with "noise" - Although a high ISO rating is suited for...
... pixels concentrated in the monitor (A 8). More on Shooting B Notes on ISO Sensitivity This feature cannot be locked at ISO 80, but is displayed in dark parts of ISO 800. 80, 100, 200, 400, 800, 1600, 3200, 6400 Sensitivity will be used simultaneously with "noise" - Although a high ISO rating is suited for...
L110 User's Manual
Page 74
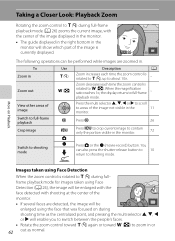
... also press the shutter-release button to 10 return to shooting mode. You can be performed while images are detected, the image will show which part of the image displayed in the monitor. • The guide displayed in the right bottom in the monitor will be × 2.0 enlarged using the face...
... also press the shutter-release button to 10 return to shooting mode. You can be performed while images are detected, the image will show which part of the image displayed in the monitor. • The guide displayed in the right bottom in the monitor will be × 2.0 enlarged using the face...
L110 User's Manual
Page 115
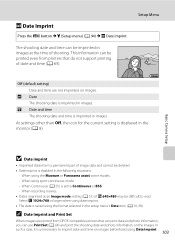
... a case, it is disabled in images. When using the Museum or Panorama assist scene modes. - Basic Camera Setup B Date imprint • Imprinted dates form a permanent part of O 640×480 may be deleted. • Date imprint is unnecessary to imprint date and time on the images. This information can use Print...
... a case, it is disabled in images. When using the Museum or Panorama assist scene modes. - Basic Camera Setup B Date imprint • Imprinted dates form a permanent part of O 640×480 may be deleted. • Date imprint is unnecessary to imprint date and time on the images. This information can use Print...
L110 User's Manual
Page 130
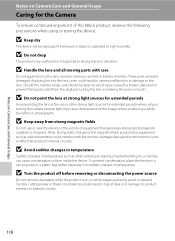
...To ensure continued enjoyment of data or in damage to the lens. B Handle the lens and all moving parts with the monitor, damage data saved on the memory card, or affect the product's internal circuitry. Should... product memory or internal circuitry. 118 Forcibly cutting power in these circumstances could result in photographs. These parts are being saved or deleted. Strong static charges or the magnetic fields produced by broken glass and to... sensor, producing a white blur effect in loss of this Nikon product, observe the following precautions when using or storing the camera.
...To ensure continued enjoyment of data or in damage to the lens. B Handle the lens and all moving parts with the monitor, damage data saved on the memory card, or affect the product's internal circuitry. Should... product memory or internal circuitry. 118 Forcibly cutting power in these circumstances could result in photographs. These parts are being saved or deleted. Strong static charges or the magnetic fields produced by broken glass and to... sensor, producing a white blur effect in loss of this Nikon product, observe the following precautions when using or storing the camera.
L110 User's Manual
Page 132
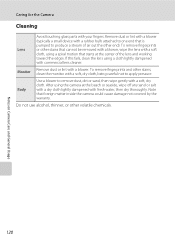
...). After using a cloth lightly dampened with your fingers. Monitor Remove dust or lint with a soft, dry cloth. Caring for the Camera Cleaning Avoid touching glass parts with commercial lens cleaner. Notes on Camera Care and General Usage 120 If this fails, clean the lens using the camera at the center of...
...). After using a cloth lightly dampened with your fingers. Monitor Remove dust or lint with a soft, dry cloth. Caring for the Camera Cleaning Avoid touching glass parts with commercial lens cleaner. Notes on Camera Care and General Usage 120 If this fails, clean the lens using the camera at the center of...
L110 User's Manual
Page 156
No reproduction in any form of this manual, in whole or in part (except for brief quotation in Japan CT0A03(11) 6MM74211-03 Printed in critical articles or reviews), may be made without written authorization from NIKON CORPORATION.
No reproduction in any form of this manual, in whole or in part (except for brief quotation in Japan CT0A03(11) 6MM74211-03 Printed in critical articles or reviews), may be made without written authorization from NIKON CORPORATION.


