
L110 User's Manual
Page 6
... hearing loss or damage the equipment. CD-ROMs The CD-ROMs supplied with product regulations. Turn the power off when using the flash Using the flash close to your fingers or other moving parts. Follow the instructions of the hospital. Playing CD-ROMs on audio CD equipment. Particular...or entering the eyes or mouth. Avoid contact with liquid crystal Should the monitor break, care should be taken to avoid injury caused by Nikon for the purpose, to maintain compliance with this precaution could result in a hospital. For Your Safety Use appropriate cables When connecting cables ...
... hearing loss or damage the equipment. CD-ROMs The CD-ROMs supplied with product regulations. Turn the power off when using the flash Using the flash close to your fingers or other moving parts. Follow the instructions of the hospital. Playing CD-ROMs on audio CD equipment. Particular...or entering the eyes or mouth. Avoid contact with liquid crystal Should the monitor break, care should be taken to avoid injury caused by Nikon for the purpose, to maintain compliance with this precaution could result in a hospital. For Your Safety Use appropriate cables When connecting cables ...
L110 User's Manual
Page 9
... Safety...ii WARNINGS...ii Notices ...v Introduction ...1 About This Manual ...1 Information and Precautions...2 Parts of the Camera...4 The Camera Body ...4 Raising and Lowering the Built-in Flash 6 Attaching the Camera Strap and Lens Cap 7 The Monitor...8 Basic Operations...10 A (shooting mode) button ...10 c (playback) button...10 b (movie-record) button ...10 The Multi...
... Safety...ii WARNINGS...ii Notices ...v Introduction ...1 About This Manual ...1 Information and Precautions...2 Parts of the Camera...4 The Camera Body ...4 Raising and Lowering the Built-in Flash 6 Attaching the Camera Strap and Lens Cap 7 The Monitor...8 Basic Operations...10 A (shooting mode) button ...10 c (playback) button...10 b (movie-record) button ...10 The Multi...
L110 User's Manual
Page 10
... Step 3 Focus and Shoot ...24 Step 4 Viewing and Deleting Images 26 Viewing Images (Playback Mode) ...26 Deleting Images ...26 Easy Auto Mode...28 Using the Flash...29 Taking Pictures with the Self-timer 32 Adjusting the Brightness: Exposure Compensation 33 More on Shooting ...34 Selecting Shooting Mode ...34 Shooting Suited for...
... Step 3 Focus and Shoot ...24 Step 4 Viewing and Deleting Images 26 Viewing Images (Playback Mode) ...26 Deleting Images ...26 Easy Auto Mode...28 Using the Flash...29 Taking Pictures with the Self-timer 32 Adjusting the Brightness: Exposure Compensation 33 More on Shooting ...34 Selecting Shooting Mode ...34 Shooting Suited for...

L110 User's Manual
Page 16
... AF-assist illuminator 25, 106 4 Power switch/Power-on lamp 20, 108 5 Speaker 79 6 Built-in microphone (stereo 73 7 Eyelet for camera strap 7 8 Built-in flash 6, 29 9 HDMI mini connector 80 10 USB connector and audio/video output 80, 83, 88 11 Pin cover 80, 83, 88 12 Lens 120, 133...
... AF-assist illuminator 25, 106 4 Power switch/Power-on lamp 20, 108 5 Speaker 79 6 Built-in microphone (stereo 73 7 Eyelet for camera strap 7 8 Built-in flash 6, 29 9 HDMI mini connector 80 10 USB connector and audio/video output 80, 83, 88 11 Pin cover 80, 83, 88 12 Lens 120, 133...
L110 User's Manual
Page 17
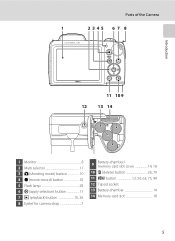
Parts of the Camera 1 2345 6 7 8 Introduction 11 10 9 12 13 14 1 Monitor 8 2 Multi selector 11 3 A (shooting mode) button 10 4 b (movie-record) button 10 5 Flash lamp 29 6 k (apply selection) button 11 7 c (playback) button 10, 26 8 Eyelet for camera strap 7 9 Battery-chamber/ memory card slot cover 14, 18 10 l (delete) button 26, 79 11 d button 12, 50, 63, 75, 94 12 Tripod socket 13 Battery-chamber 14 14 Memory card slot 18 5
Parts of the Camera 1 2345 6 7 8 Introduction 11 10 9 12 13 14 1 Monitor 8 2 Multi selector 11 3 A (shooting mode) button 10 4 b (movie-record) button 10 5 Flash lamp 29 6 k (apply selection) button 11 7 c (playback) button 10, 26 8 Eyelet for camera strap 7 9 Battery-chamber/ memory card slot cover 14, 18 10 l (delete) button 26, 79 11 d button 12, 50, 63, 75, 94 12 Tripod socket 13 Battery-chamber 14 14 Memory card slot 18 5

L110 User's Manual
Page 18
Lowering the Built-in use. 6 Push the built-in flash down gently to lower the builtin flash when not in Flash. Introduction Parts of the Camera Raising and Lowering the Built-in Flash Raising the built-in flash See "Using the Flash" (A 29) for more information about flash settings.
Lowering the Built-in use. 6 Push the built-in flash down gently to lower the builtin flash when not in Flash. Introduction Parts of the Camera Raising and Lowering the Built-in Flash Raising the built-in flash See "Using the Flash" (A 29) for more information about flash settings.
L110 User's Manual
Page 20
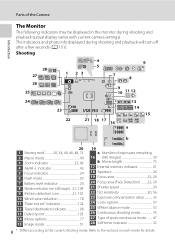
... 999 a 9999 20 1 Shooting mode 20, 34, 44, 46, 48, 73 2 Macro mode 49 3 Zoom indicator 23, 49 4 AE/AF-L indicator 43 5 Focus indicator 24 6 Flash mode 29 7 Battery level indicator 20 8 Vibration reduction icon (still images)...21, 104 9 Motion detection icon 21, 105 10 Wind noise reduction 78 11 "Date...
... 999 a 9999 20 1 Shooting mode 20, 34, 44, 46, 48, 73 2 Macro mode 49 3 Zoom indicator 23, 49 4 AE/AF-L indicator 43 5 Focus indicator 24 6 Flash mode 29 7 Battery level indicator 20 8 Vibration reduction icon (still images)...21, 104 9 Motion detection icon 21, 105 10 Wind noise reduction 78 11 "Date...

L110 User's Manual
Page 23
... of the multi selector. 11 Display n (self- Self-timer For Playback 15/05/2010 15:30 0004.JPG Display the previous image. For Shooting Display m (flash mode) menu (A 29)/select the item above . Display o (exposure compensation) menu (A 33).
... of the multi selector. 11 Display n (self- Self-timer For Playback 15/05/2010 15:30 0004.JPG Display the previous image. For Shooting Display m (flash mode) menu (A 29)/select the item above . Display o (exposure compensation) menu (A 33).

L110 User's Manual
Page 27
... is the type of battery is off and the power-on the EN-MH2 rechargeable Ni-MH batteries When using EN-MH2 batteries with the COOLPIX L110, charge the batteries four at a time using the battery. • Do not combine old and new batteries or batteries of different makes or types... read and follow the warnings for extended periods, use another make sure that the lens cap has been removed, then turn the camera on lamp flashes, and the camera enters standby mode. Choose a reliable brand. When any circumstances, use an AC Adapter EH-67 (available separately) (A 122). C Alkaline Batteries...
... is the type of battery is off and the power-on the EN-MH2 rechargeable Ni-MH batteries When using EN-MH2 batteries with the COOLPIX L110, charge the batteries four at a time using the battery. • Do not combine old and new batteries or batteries of different makes or types... read and follow the warnings for extended periods, use another make sure that the lens cap has been removed, then turn the camera on lamp flashes, and the camera enters standby mode. Choose a reliable brand. When any circumstances, use an AC Adapter EH-67 (available separately) (A 122). C Alkaline Batteries...
L110 User's Manual
Page 32
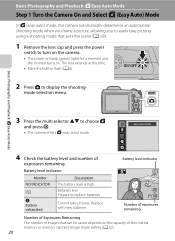
... B N Battery exhausted. Cannot take pictures using a shooting mode that can be saved depends on . The lens extends at this time. • Raise the built-in flash (A 6). 2 Press A to choose G and press k. • The camera enters G (easy auto) mode. Replace with new batteries. 14 Number of exposures remaining Number of Exposures Remaining...
... B N Battery exhausted. Cannot take pictures using a shooting mode that can be saved depends on . The lens extends at this time. • Raise the built-in flash (A 6). 2 Press A to choose G and press k. • The camera enters G (easy auto) mode. Replace with new batteries. 14 Number of exposures remaining Number of Exposures Remaining...

L110 User's Manual
Page 33
...). While the monitor is off and W is L 4000×3000. In situations where flash is needed, such as in flash is lowered, the flash setting is fixed at off during shooting and playback will turn the monitor on the Flash When the built-in dark locations or when the subject is not available. C Note... caused by pressing d. Vibration reduction icon Reduce the effects of the monitor. Step 1 Turn the Camera On and Select G (Easy Auto) Mode Indicators Displayed in flash by hand (A 6, 29).
...). While the monitor is off and W is L 4000×3000. In situations where flash is needed, such as in flash is lowered, the flash setting is fixed at off during shooting and playback will turn the monitor on the Flash When the built-in dark locations or when the subject is not available. C Note... caused by pressing d. Vibration reduction icon Reduce the effects of the monitor. Step 1 Turn the Camera On and Select G (Easy Auto) Mode Indicators Displayed in flash by hand (A 6, 29).
L110 User's Manual
Page 34
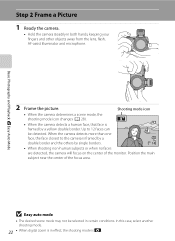
... this case, select another shooting mode. 22 • When digital zoom is in both hands, keeping your fingers and other objects away from the lens, flash, AF-assist illuminator and microphone. B Easy auto mode • The desired scene mode may not be detected. Position the main subject near the center of...
... this case, select another shooting mode. 22 • When digital zoom is in both hands, keeping your fingers and other objects away from the lens, flash, AF-assist illuminator and microphone. B Easy auto mode • The desired scene mode may not be detected. Position the main subject near the center of...
L110 User's Manual
Page 37
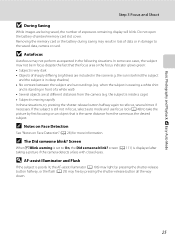
... Detection" (A 28) for more information. the sun is behind the subject and the subject is the same distance from the camera (e.g. D AF-assist Illuminator and Flash If the subject is poorly lit, the AF-assist illuminator (A 106) may light by pressing the shutter-release button halfway, or the... flash (A 29) may not be in focus despite the fact that is in the scene (e.g. C The Did someone blink? B Autofocus Autofocus may result in loss of ...
... Detection" (A 28) for more information. the sun is behind the subject and the subject is the same distance from the camera (e.g. D AF-assist Illuminator and Flash If the subject is poorly lit, the AF-assist illuminator (A 106) may light by pressing the shutter-release button halfway, or the... flash (A 29) may not be in focus despite the fact that is in the scene (e.g. C The Did someone blink? B Autofocus Autofocus may result in loss of ...
L110 User's Manual
Page 41
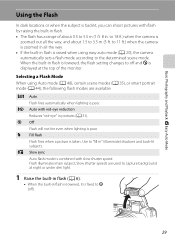
...way, and about 0.5 to 5.5 m (1 ft. 8 in. When the built-in flash is lowered, it is raised when using easy auto mode (A 20), the camera automatically sets a flash mode according to 3.5 m (5 ft. Selecting a Flash Mode When using Auto mode (A 48), certain scene modes (A 35), or smart portrait ... off ). 29 X Fill flash Flash fires when a picture is displayed at night or under dim light. 1 Raise the built-in flash (A 6). • When the built-in flash is lowered, the flash setting changes to "fill-in portraits (A 31). Flash illuminates main subject; W Off Flash will not fire even when ...
...way, and about 0.5 to 5.5 m (1 ft. 8 in. When the built-in flash is lowered, it is raised when using easy auto mode (A 20), the camera automatically sets a flash mode according to 3.5 m (5 ft. Selecting a Flash Mode When using Auto mode (A 48), certain scene modes (A 35), or smart portrait ... off ). 29 X Fill flash Flash fires when a picture is displayed at night or under dim light. 1 Raise the built-in flash (A 6). • When the built-in flash is lowered, the flash setting changes to "fill-in portraits (A 31). Flash illuminates main subject; W Off Flash will not fire even when ...
L110 User's Manual
Page 42
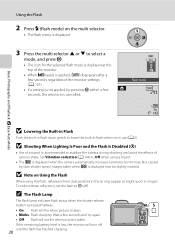
.... If the remaining battery level is low, the monitor will not fire when picture is displayed may appear as bright spots in flash down gently to stabilize the camera during shooting and avoid the effects of camera shake. Set Vibration reduction (A 104) to Off when... using the flash, reflections from dust particles in use (A 6). To reduce these reflections, set the flash to W (off until the flash has finished charging. 30 Using the Flash 2 Press m (flash mode) on Using the Flash When using a tripod. • The E is recommended to...
.... If the remaining battery level is low, the monitor will not fire when picture is displayed may appear as bright spots in flash down gently to stabilize the camera during shooting and avoid the effects of camera shake. Set Vibration reduction (A 104) to Off when... using the flash, reflections from dust particles in use (A 6). To reduce these reflections, set the flash to W (off until the flash has finished charging. 30 Using the Flash 2 Press m (flash mode) on Using the Flash When using a tripod. • The E is recommended to...

L110 User's Manual
Page 43
...be used simultaneously with an advanced red-eye reduction system. Pre-flashes are fired before it is shot. • The time required to reduce the effects of redeye. If the camera detects "red-eye" when a picture is taken, Nikon's own In-Camera Red-Eye Fix processes the image before ...the picture is taken, there is a slight lag between when the shutter-release button is pressed and when the picture is saved. Basic Photography and Playback: G Easy Auto Mode Using the Flash C The Flash Mode Setting The ...
...be used simultaneously with an advanced red-eye reduction system. Pre-flashes are fired before it is shot. • The time required to reduce the effects of redeye. If the camera detects "red-eye" when a picture is taken, Nikon's own In-Camera Red-Eye Fix processes the image before ...the picture is taken, there is a slight lag between when the shutter-release button is pressed and when the picture is saved. Basic Photography and Playback: G Easy Auto Mode Using the Flash C The Flash Mode Setting The ...
L110 User's Manual
Page 46
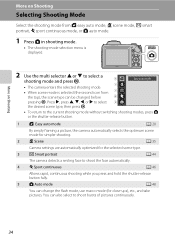
... selector H or I , J, or K to select 5 the desired scene type, then press k. • To return to shoot bursts of pictures continuously. 34 You can change the flash mode, use macro mode (for the selected scene type. 3 F Smart portrait A 44 The camera detects a smiling face to shoot the face automatically. 4 d Sport continuous A 46...
... selector H or I , J, or K to select 5 the desired scene type, then press k. • To return to shoot bursts of pictures continuously. 34 You can change the flash mode, use macro mode (for the selected scene type. 3 F Smart portrait A 44 The camera detects a smiling face to shoot the face automatically. 4 d Sport continuous A 46...
L110 User's Manual
Page 47
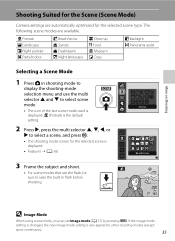
..., the new image mode setting is also applied to raise the built-in shooting mode to display the shooting-mode selection menu and use the flash, be sure to other shooting modes (except sport continuous). 35 b (Portrait) is the default setting. 2 Press K, press the multi selector H, I to ... f Party/indoor g Beach/snow h Sunset i Dusk/dawn j Night landscape k Close-up u Food l Museum n Copy o Backlight p Panorama assist Selecting a Scene Mode 1 Press A in flash before shooting. The following scene modes are automatically optimized for the selected scene is displayed.
..., the new image mode setting is also applied to raise the built-in shooting mode to display the shooting-mode selection menu and use the flash, be sure to other shooting modes (except sport continuous). 35 b (Portrait) is the default setting. 2 Press K, press the multi selector H, I to ... f Party/indoor g Beach/snow h Sunset i Dusk/dawn j Night landscape k Close-up u Food l Museum n Copy o Backlight p Panorama assist Selecting a Scene Mode 1 Press A in flash before shooting. The following scene modes are automatically optimized for the selected scene is displayed.
L110 User's Manual
Page 48
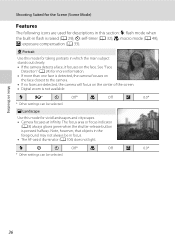
... the center of the screen. • Digital zoom is raised (A 29); o: exposure compensation (A 33). b Portrait Use this mode for descriptions in flash is not available. c Landscape Use this section: X: flash mode when the built-in this mode for more information. • If more than one face is pressed halfway. Note, however, that...
... the center of the screen. • Digital zoom is raised (A 29); o: exposure compensation (A 33). b Portrait Use this mode for descriptions in flash is not available. c Landscape Use this section: X: flash mode when the built-in this mode for more information. • If more than one face is pressed halfway. Note, however, that...
L110 User's Manual
Page 49
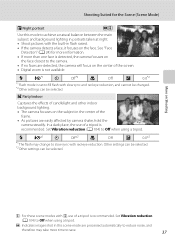
... background lighting. • The camera focuses on the center of a tripod is not available. m V*1 n Off*2 p Off o 0.0*2 *1 The flash may take more than one face is detected, the camera focuses on the face closest to the camera. • If no faces are detected, the...will focus on the subject in portraits taken at night. • Shoot pictures with red-eye reduction. m V*1 n Off*2 p Off o 0.0*2 *1 Flash mode is recommended. In a dark place, the use of the frame. • As pictures are processed automatically to reduce noise, and therefore may change ...
... background lighting. • The camera focuses on the center of a tripod is not available. m V*1 n Off*2 p Off o 0.0*2 *1 The flash may take more than one face is detected, the camera focuses on the face closest to the camera. • If no faces are detected, the...will focus on the subject in portraits taken at night. • Shoot pictures with red-eye reduction. m V*1 n Off*2 p Off o 0.0*2 *1 Flash mode is recommended. In a dark place, the use of the frame. • As pictures are processed automatically to reduce noise, and therefore may change ...


