L110 User's Manual
Page 10
... and Deleting Images 26 Viewing Images (Playback Mode) ...26 Deleting Images ...26 Easy Auto Mode...28 Using the Flash...29 Taking Pictures with the Self-timer 32 Adjusting the Brightness: Exposure Compensation 33 More on Shooting ...34 Selecting Shooting Mode ...34 Shooting Suited for... the Scene (Scene Mode 35 Selecting a Scene Mode...35 Features ...36 Taking Pictures for a Panorama ...42 Capturing Smiling Faces Automatically (Smart Portrait Mode 44 Shooting Continuously at High Speed (Sport Continuous 46 Sport Continuous ...
... and Deleting Images 26 Viewing Images (Playback Mode) ...26 Deleting Images ...26 Easy Auto Mode...28 Using the Flash...29 Taking Pictures with the Self-timer 32 Adjusting the Brightness: Exposure Compensation 33 More on Shooting ...34 Selecting Shooting Mode ...34 Shooting Suited for... the Scene (Scene Mode 35 Selecting a Scene Mode...35 Features ...36 Taking Pictures for a Panorama ...42 Capturing Smiling Faces Automatically (Smart Portrait Mode 44 Shooting Continuously at High Speed (Sport Continuous 46 Sport Continuous ...

L110 User's Manual
Page 11
... Show...66 c Delete ...67 Editing Image...69 Image Editing Function ...69 Editing Images ...70 I D-Lighting: Enhancing Brightness and Contrast 70 g Small Picture: Resizing Images...71 o Crop: Creating a Cropped Copy...72 Movie Recording and Playback...73 Recording Movies ...73 Movie Menu...75 D Movie Options...77... to Televisions, Computers and Printers 80 Connecting to a TV...80 Connecting to a Computer...82 Before Connecting the Camera...82 Transferring Pictures from a Camera to a Computer 83 Connecting to a Printer...87 Connecting the Camera and Printer...88 Printing Images One at a...
... Show...66 c Delete ...67 Editing Image...69 Image Editing Function ...69 Editing Images ...70 I D-Lighting: Enhancing Brightness and Contrast 70 g Small Picture: Resizing Images...71 o Crop: Creating a Cropped Copy...72 Movie Recording and Playback...73 Recording Movies ...73 Movie Menu...75 D Movie Options...77... to Televisions, Computers and Printers 80 Connecting to a TV...80 Connecting to a Computer...82 Before Connecting the Camera...82 Transferring Pictures from a Camera to a Computer 83 Connecting to a Printer...87 Connecting the Camera and Printer...88 Printing Images One at a...

L110 User's Manual
Page 13
...you need, the following symbols and conventions are sometimes omitted from actual display. Introduction Introduction About This Manual Thank you enjoy taking pictures with this camera can be formatted or used : This icon marks cautions, B information that should be read before the internal... operations will read it. This icon indicates that monitor indicators can be more A information is referred to help you for purchasing a Nikon COOLPIX L110 digital camera. This manual was written to as a "memory card". • The setting at the time of buttons or messages displayed...
...you need, the following symbols and conventions are sometimes omitted from actual display. Introduction Introduction About This Manual Thank you enjoy taking pictures with this camera can be formatted or used : This icon marks cautions, B information that should be read before the internal... operations will read it. This icon indicates that monitor indicators can be more A information is referred to help you for purchasing a Nikon COOLPIX L110 digital camera. This manual was written to as a "memory card". • The setting at the time of buttons or messages displayed...
L110 User's Manual
Page 14
Before Taking Important Pictures Before taking pictures on important occasions (such as at weddings or before taking the camera on digital imaging and photography. Nikon will not be held liable for damages or lost profits that the camera is functioning correctly. ...translated into any language in any form, by any means, without prior notice. • Nikon will not be held liable for contact information: http://imaging.nikon.com/ Use Only Nikon Brand Electronic Accessories Nikon COOLPIX cameras are engineered and proven to frequently asked questions (FAQs), and general advice on a ...
Before Taking Important Pictures Before taking pictures on important occasions (such as at weddings or before taking the camera on digital imaging and photography. Nikon will not be held liable for damages or lost profits that the camera is functioning correctly. ...translated into any language in any form, by any means, without prior notice. • Nikon will not be held liable for contact information: http://imaging.nikon.com/ Use Only Nikon Brand Electronic Accessories Nikon COOLPIX cameras are engineered and proven to frequently asked questions (FAQs), and general advice on a ...
L110 User's Manual
Page 15
... prohibited by national and international copyright laws. Do not use this product for the purpose of making illegal copies or to also replace any pictures selected for example, pictures of empty sky). Be sure to infringe copyright laws. The copying or reproduction of paper money, coins, or securities that deleting images or...
... prohibited by national and international copyright laws. Do not use this product for the purpose of making illegal copies or to also replace any pictures selected for example, pictures of empty sky). Be sure to infringe copyright laws. The copying or reproduction of paper money, coins, or securities that deleting images or...
L110 User's Manual
Page 19
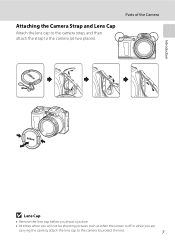
Attaching the Camera Strap and Lens Cap Attach the lens cap to the camera strap, and then attach the strap to protect the lens. 7 Parts of the Camera Introduction B Lens Cap • Remove the lens cap before you shoot a picture. • At times when you will not be shooting pictures such as when the power is off or while you are carrying the camera, attach the lens cap to the camera to the camera (at two places).
Attaching the Camera Strap and Lens Cap Attach the lens cap to the camera strap, and then attach the strap to protect the lens. 7 Parts of the Camera Introduction B Lens Cap • Remove the lens cap before you shoot a picture. • At times when you will not be shooting pictures such as when the power is off or while you are carrying the camera, attach the lens cap to the camera to the camera (at two places).
L110 User's Manual
Page 21
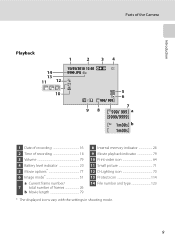
... frame number/ 7 total number of frames 26 b Movie length 79 8 Internal memory indicator 26 9 Movie playback indicator 79 10 Print-order icon 64 11 Small picture 71 12 D-Lighting icon 70 13 Protect icon 114 14 File number and type 123 * The displayed icons vary with the settings in shooting mode. 9
... frame number/ 7 total number of frames 26 b Movie length 79 8 Internal memory indicator 26 9 Movie playback indicator 79 10 Print-order icon 64 11 Small picture 71 12 D-Lighting icon 70 13 Protect icon 114 14 File number and type 123 * The displayed icons vary with the settings in shooting mode. 9
L110 User's Manual
Page 25
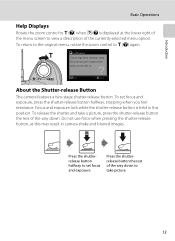
... lower right of the menu screen to view a description of the way down . To release the shutter and take a picture, press the shutter-release button the rest of the way down to take picture. 13 To set focus and exposure. Press the shutterrelease button halfway to g (j) again. To return to the original...
... lower right of the menu screen to view a description of the way down . To release the shutter and take a picture, press the shutter-release button the rest of the way down to take picture. 13 To set focus and exposure. Press the shutterrelease button halfway to g (j) again. To return to the original...
L110 User's Manual
Page 29
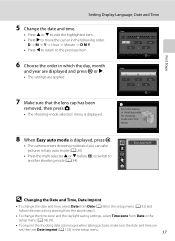
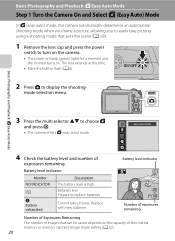
...the daylight saving settings, select Time zone from Date in the setup menu (A 98, 99). • To imprint the shooting date into images when taking pictures, make sure the date and time are applied. 7 Make sure that the lens cap has been removed, then press A. • The shooting-mode ...selection menu is displayed, press k. • The camera enters shooting mode and you can take pictures in Easy auto mode (A 20). • Press the multi selector H or I to edit the highlighted item. • Press K to another shooting mode (A ...
...the daylight saving settings, select Time zone from Date in the setup menu (A 98, 99). • To imprint the shooting date into images when taking pictures, make sure the date and time are applied. 7 Make sure that the lens cap has been removed, then press A. • The shooting-mode ...selection menu is displayed, press k. • The camera enters shooting mode and you can take pictures in Easy auto mode (A 20). • Press the multi selector H or I to edit the highlighted item. • Press K to another shooting mode (A ...
L110 User's Manual
Page 32
... mode 4 Check the battery level and number of the internal memory or memory card and image mode setting (A 52). 20 Cannot take pictures using a shooting mode that can be saved depends on . Replace with new batteries. 14 Number of exposures remaining Number of Exposures Remaining ... and Select G (Easy Auto) Mode In G (easy auto) mode, the camera automatically determines an appropriate shooting mode when you frame a picture, allowing you to easily take pictures. Basic Photography and Playback: G Easy Auto Mode 3 Press the multi selector HI to turn on the camera. • The power-on ...
... mode 4 Check the battery level and number of the internal memory or memory card and image mode setting (A 52). 20 Cannot take pictures using a shooting mode that can be saved depends on . Replace with new batteries. 14 Number of exposures remaining Number of Exposures Remaining ... and Select G (Easy Auto) Mode In G (easy auto) mode, the camera automatically determines an appropriate shooting mode when you frame a picture, allowing you to easily take pictures. Basic Photography and Playback: G Easy Auto Mode 3 Press the multi selector HI to turn on the camera. • The power-on ...
L110 User's Manual
Page 34
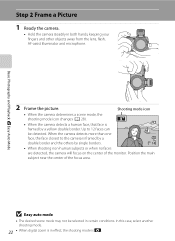
Basic Photography and Playback: G Easy Auto Mode 2 Frame the picture. In this case, select another shooting mode. 22 • When digital zoom is in both hands, keeping your fingers and other objects away from the ... camera is framed by a double border and the others by a yellow double border. Position the main subject near the center of the monitor. Step 2 Frame a Picture 1 Ready the camera. • Hold the camera steadily in effect, the shooting mode is U. When the camera detects more than one face, the face closest...
Basic Photography and Playback: G Easy Auto Mode 2 Frame the picture. In this case, select another shooting mode. 22 • When digital zoom is in both hands, keeping your fingers and other objects away from the ... camera is framed by a double border and the others by a yellow double border. Position the main subject near the center of the monitor. Step 2 Frame a Picture 1 Ready the camera. • Hold the camera steadily in effect, the shooting mode is U. When the camera detects more than one face, the face closest...
L110 User's Manual
Page 35
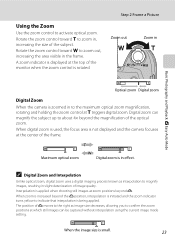
.... Maximum optical zoom Digital zoom is small. 23 When zoom is increased beyond V. When digital zoom is used, the focus area is rotated. Step 2 Frame a Picture Zoom out Zoom in to zoom out, increasing the area visible in slight deterioration of the frame. A zoom indicator is applied when shooting still images...
.... Maximum optical zoom Digital zoom is small. 23 When zoom is increased beyond V. When digital zoom is used, the focus area is rotated. Step 2 Frame a Picture Zoom out Zoom in to zoom out, increasing the area visible in slight deterioration of the frame. A zoom indicator is applied when shooting still images...
L110 User's Manual
Page 37
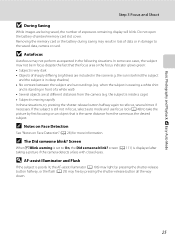
... same distance from the camera (e.g. C The Did someone blink? Screen When d Blink warning is displayed after taking a picture if the camera detects a face with closed eyes. screen (A 111) is set to take the picture by pressing the shutter-release button all the way down. 25 Removing the memory card or the battery...
... same distance from the camera (e.g. C The Did someone blink? Screen When d Blink warning is displayed after taking a picture if the camera detects a face with closed eyes. screen (A 111) is set to take the picture by pressing the shutter-release button all the way down. 25 Removing the memory card or the battery...
L110 User's Manual
Page 38
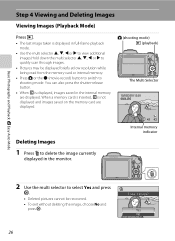
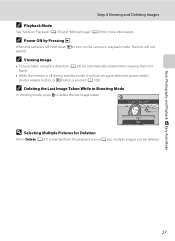
...; Use the multi selector H, I, J or K to view additional images.Hold down the multi selector H, I, J or K to quickly scan through images. • Pictures may be displayed briefly at low resolution while being read from the memory card or internal memory. • Press A or the b (movie-record) button to... switch to select Yes and press k. • Deleted pictures cannot be recovered. • To exit without deleting the image, choose No and press k. 26 Erase 1 image? When a memory card is inserted, C ...
...; Use the multi selector H, I, J or K to view additional images.Hold down the multi selector H, I, J or K to quickly scan through images. • Pictures may be displayed briefly at low resolution while being read from the memory card or internal memory. • Press A or the b (movie-record) button to... switch to select Yes and press k. • Deleted pictures cannot be recovered. • To exit without deleting the image, choose No and press k. 26 Erase 1 image? When a memory card is inserted, C ...
L110 User's Manual
Page 39
C Viewing Image • Pictures taken using face detection (A 24) are automatically rotated when viewing them fullframe. • While the monitor is off , hold down c to delete the last images ... be deleted. 27 Erase 1 image? C Power ON by Pressing c When the camera is off during standby mode, it will not extend. Yes No D Selecting Multiple Pictures for more information.
C Viewing Image • Pictures taken using face detection (A 24) are automatically rotated when viewing them fullframe. • While the monitor is off , hold down c to delete the last images ... be deleted. 27 Erase 1 image? C Power ON by Pressing c When the camera is off during standby mode, it will not extend. Yes No D Selecting Multiple Pictures for more information.
L110 User's Manual
Page 41
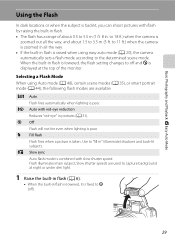
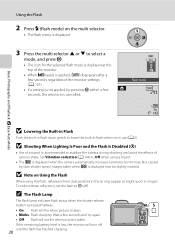
... lighting is poor. W Off Flash will not fire even when lighting is poor. Y Slow sync Auto flash mode is taken. X Fill flash Flash fires when a picture is combined with slow shutter speed. When the built-in flash is lowered, the flash setting changes to "fill-in" (illuminate) shadows and back-lit... illuminates main subject; Basic Photography and Playback: G Easy Auto Mode Using the Flash In dark locations or when the subject is backlit, you can shoot pictures with flash by raising the built-in flash. • The flash has a range of the monitor. to 18 ft.) when the camera is zoomed ...
... lighting is poor. W Off Flash will not fire even when lighting is poor. Y Slow sync Auto flash mode is taken. X Fill flash Flash fires when a picture is combined with slow shutter speed. When the built-in flash is lowered, the flash setting changes to "fill-in" (illuminate) shadows and back-lit... illuminates main subject; Basic Photography and Playback: G Easy Auto Mode Using the Flash In dark locations or when the subject is backlit, you can shoot pictures with flash by raising the built-in flash. • The flash has a range of the monitor. to 18 ft.) when the camera is zoomed ...
L110 User's Manual
Page 42
.... C The Flash Lamp The flash lamp indicates flash status when the shutter-release button is pressed halfway. • On: Flash will not fire when picture is taken. • Blinks: Flash charging. B Shooting When Lighting Is Poor and the Flash Is Disabled (W) • Use of a tripod is ...the monitor. • When U (auto) is applied, D disappears after a few seconds and try again. • Off: Flash will fire when picture is taken. Wait a few seconds regardless of camera shake. If the remaining battery level is not applied by slow shutter speed. Flash mode Basic Photography...
.... C The Flash Lamp The flash lamp indicates flash status when the shutter-release button is pressed halfway. • On: Flash will not fire when picture is taken. • Blinks: Flash charging. B Shooting When Lighting Is Poor and the Flash Is Disabled (W) • Use of a tripod is ...the monitor. • When U (auto) is applied, D disappears after a few seconds and try again. • Off: Flash will fire when picture is taken. Wait a few seconds regardless of camera shake. If the remaining battery level is not applied by slow shutter speed. Flash mode Basic Photography...

L110 User's Manual
Page 43
... shot. • The time required to reduce the effects of redeye. If the camera detects "red-eye" when a picture is taken, Nikon's own In-Camera Red-Eye Fix processes the image before the picture is taken, there is a slight lag between when the shutter-release button is pressed and when the... picture is equipped with certain features. ➝ Camera Settings that Cannot Be Set at low intensity before the main flash...
... shot. • The time required to reduce the effects of redeye. If the camera detects "red-eye" when a picture is taken, Nikon's own In-Camera Red-Eye Fix processes the image before the picture is taken, there is a slight lag between when the shutter-release button is pressed and when the... picture is equipped with certain features. ➝ Camera Settings that Cannot Be Set at low intensity before the main flash...

L110 User's Manual
Page 44
... self-timer lamp blinks. Focus and exposure are taken 10 seconds after the shutter-release button is pressed. The lamp stops blinking one second before a picture is taken, press the shutter-release button again. 1/125 F3.5 9 32 If a setting is not applied by pressing k within a few seconds, ...released, the self-timer is set . The self-timer icon (n 10) is cancelled. 3 Frame the picture and press the shutter-release button halfway. Basic Photography and Playback: G Easy Auto Mode Taking Pictures with the Self-timer When using the self-timer, use of a tripod is recommended. To stop the...
... self-timer lamp blinks. Focus and exposure are taken 10 seconds after the shutter-release button is pressed. The lamp stops blinking one second before a picture is taken, press the shutter-release button again. 1/125 F3.5 9 32 If a setting is not applied by pressing k within a few seconds, ...released, the self-timer is set . The self-timer icon (n 10) is cancelled. 3 Frame the picture and press the shutter-release button halfway. Basic Photography and Playback: G Easy Auto Mode Taking Pictures with the Self-timer When using the self-timer, use of a tripod is recommended. To stop the...
L110 User's Manual
Page 46
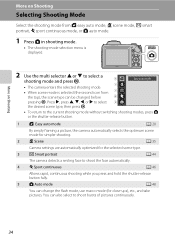
... shooting mode without switching shooting modes, press A or the shutter-release button. 1 G Easy auto mode A 20 By simply framing a picture, the camera automatically selects the optimum scene mode for simpler shooting. 2 b Scene A 35 Camera settings are automatically optimized for close-ups), etc...., and take pictures. More on Shooting More on Shooting Selecting Shooting Mode Select the shooting mode from G easy auto mode, b scene mode, F smart portrait...
... shooting mode without switching shooting modes, press A or the shutter-release button. 1 G Easy auto mode A 20 By simply framing a picture, the camera automatically selects the optimum scene mode for simpler shooting. 2 b Scene A 35 Camera settings are automatically optimized for close-ups), etc...., and take pictures. More on Shooting More on Shooting Selecting Shooting Mode Select the shooting mode from G easy auto mode, b scene mode, F smart portrait...


