
L110 User's Manual
Page 4
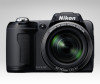
...performed only by the following safety precautions in their mouths. After removing or disconnecting the power source, take the product to a Nikon-authorized service representative for inspection. Should the camera or AC adapter break open as this could result from failure to observe the ...icon marks warnings, information that could result in explosion or fire. WARNINGS Turn off in the event of flammable gas, as the result of children Particular care should be read before using this Nikon product, to prevent possible injury. Handle the camera strap with care Never...
...performed only by the following safety precautions in their mouths. After removing or disconnecting the power source, take the product to a Nikon-authorized service representative for inspection. Should the camera or AC adapter break open as this could result from failure to observe the ...icon marks warnings, information that could result in explosion or fire. WARNINGS Turn off in the event of flammable gas, as the result of children Particular care should be read before using this Nikon product, to prevent possible injury. Handle the camera strap with care Never...
L110 User's Manual
Page 5
...8226; Before replacing the battery, turn the Observe the following precautions when handling the battery for use in the correct orientation. • Do not short or disassemble the battery or attempt to • Do not handle the plug or battery charger with COOLPIX L110. • Insert batteries in this...this precaution could result in contact with clothing or skin, rinse immediately with plenty of different makes or types. • When charging Nikon EN-MH2 rechargeable Ni-MH batteries, use with DC-to-AC the product, be sure it to water. objects such as discoloration or...
...8226; Before replacing the battery, turn the Observe the following precautions when handling the battery for use in the correct orientation. • Do not short or disassemble the battery or attempt to • Do not handle the plug or battery charger with COOLPIX L110. • Insert batteries in this...this precaution could result in contact with clothing or skin, rinse immediately with plenty of different makes or types. • When charging Nikon EN-MH2 rechargeable Ni-MH batteries, use with DC-to-AC the product, be sure it to water. objects such as discoloration or...

L110 User's Manual
Page 6
For Your Safety Use appropriate cables When connecting cables to the input and output jacks, use only the cables provided or sold by Nikon for the purpose, to maintain compliance with the flash window touching a person or object Failure to observe this precaution could result in burns or fire.... with this camera may disrupt the electronic systems of the airplane or the instruments of the hospital when using inside an airplane or the hospital Turn the power off while inside the airplane during take off when using while in .) from the monitor touching the skin or entering the eyes or...
For Your Safety Use appropriate cables When connecting cables to the input and output jacks, use only the cables provided or sold by Nikon for the purpose, to maintain compliance with the flash window touching a person or object Failure to observe this precaution could result in burns or fire.... with this camera may disrupt the electronic systems of the airplane or the instruments of the hospital when using inside an airplane or the hospital Turn the power off while inside the airplane during take off when using while in .) from the monitor touching the skin or entering the eyes or...

L110 User's Manual
Page 7
...Consult the dealer or an experienced radio/television technician for help. CAUTIONS Modifications The FCC requires the user to be determined by turning the equipment off and on, the user is no guarantee that are designed to Part 15 of California to radio communications. ... B digital device, pursuant to provide reasonable protection against harmful interference in the U.S.A. Interface Cables Use the interface cables sold or provided by Nikon Corporation may exceed the limits of Class B Part 15 of the following measures: • Reorient or relocate the receiving antenna. •...
...Consult the dealer or an experienced radio/television technician for help. CAUTIONS Modifications The FCC requires the user to be determined by turning the equipment off and on, the user is no guarantee that are designed to Part 15 of California to radio communications. ... B digital device, pursuant to provide reasonable protection against harmful interference in the U.S.A. Interface Cables Use the interface cables sold or provided by Nikon Corporation may exceed the limits of Class B Part 15 of the following measures: • Reorient or relocate the receiving antenna. •...
L110 User's Manual
Page 9
... d button ...12 Switching Between Tabs...12 Help Displays...13 About the Shutter-release Button...13 First Steps ...14 Inserting the Batteries ...14 Applicable Batteries ...14 Turning On and Off the Camera...14 Setting Display Language, Date and Time 16 Inserting Memory Cards ...18 Removing Memory Cards...19 vii
... d button ...12 Switching Between Tabs...12 Help Displays...13 About the Shutter-release Button...13 First Steps ...14 Inserting the Batteries ...14 Applicable Batteries ...14 Turning On and Off the Camera...14 Setting Display Language, Date and Time 16 Inserting Memory Cards ...18 Removing Memory Cards...19 vii
L110 User's Manual
Page 10
Table of Contents Basic Photography and Playback: G Easy Auto Mode 20 Step 1 Turn the Camera On and Select G (Easy Auto) Mode 20 Indicators Displayed in G (Easy auto) Mode 21 Step 2 Frame a Picture ...22 Using the Zoom...23 Step 3 ...
Table of Contents Basic Photography and Playback: G Easy Auto Mode 20 Step 1 Turn the Camera On and Select G (Easy Auto) Mode 20 Indicators Displayed in G (Easy auto) Mode 21 Step 2 Frame a Picture ...22 Using the Zoom...23 Step 3 ...
L110 User's Manual
Page 20
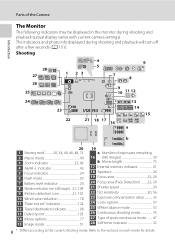
... shooting mode 55 27 Type of the Camera Introduction The Monitor The following indicators may be displayed in the monitor during shooting and playback will turn off after a few seconds (A 101). Parts of sport continuous mode ....... 47 28 Self-timer indicator 32 8 * Differs according to the sections on each mode for...
... shooting mode 55 27 Type of the Camera Introduction The Monitor The following indicators may be displayed in the monitor during shooting and playback will turn off after a few seconds (A 101). Parts of sport continuous mode ....... 47 28 Self-timer indicator 32 8 * Differs according to the sections on each mode for...
L110 User's Manual
Page 22
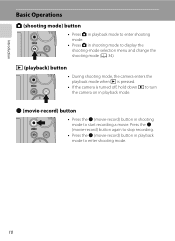
... to stop recording. • Press the b (movie-record) button in playback mode. b (movie-record) button • Press the b (movie-record) button in shooting mode to turn the camera on in playback mode to display the shooting-mode selection menu and change the shooting mode (A 34). c (playback) button • During shooting mode...
... to stop recording. • Press the b (movie-record) button in playback mode. b (movie-record) button • Press the b (movie-record) button in shooting mode to turn the camera on in playback mode to display the shooting-mode selection menu and change the shooting mode (A 34). c (playback) button • During shooting mode...
L110 User's Manual
Page 26
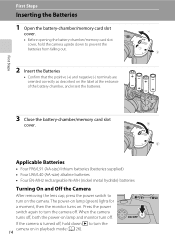
... camera on in playback mode (A 26). 14 Press the power switch again to turn on the camera. First Steps Inserting the Batteries 1 Open the battery-chamber/memory card slot cover. • Before opening the battery-chamber/memory card slot ... (batteries supplied) • Four LR6/L40 (AA-size) alkaline batteries • Four EN-MH2 rechargeable Ni-MH (nickel metal hydride) batteries Turning On and Off the Camera After removing the lens cap, press the power switch to turn the camera off. The power-on lamp (green) lights for a moment, then the monitor...
... camera on in playback mode (A 26). 14 Press the power switch again to turn on the camera. First Steps Inserting the Batteries 1 Open the battery-chamber/memory card slot cover. • Before opening the battery-chamber/memory card slot ... (batteries supplied) • Four LR6/L40 (AA-size) alkaline batteries • Four EN-MH2 rechargeable Ni-MH (nickel metal hydride) batteries Turning On and Off the Camera After removing the lens cap, press the power switch to turn the camera off. The power-on lamp (green) lights for a moment, then the monitor...

L110 User's Manual
Page 27
...Batteries Performance of batteries inserted into the camera. Inserting the Batteries B Removing the Batteries Before opening the battery-chamber/memory card slot cover, turn the camera on again. 15 The default setting is the type of battery is off and the power-on page iii and the section...follow the warnings for extended periods, use another make sure that the lens cap has been removed, then turn the camera off . When any other type of battery supplied with the COOLPIX L110, charge the batteries four at a time using EN-MH2 batteries with purchase. Choose a reliable brand....
...Batteries Performance of batteries inserted into the camera. Inserting the Batteries B Removing the Batteries Before opening the battery-chamber/memory card slot cover, turn the camera on again. 15 The default setting is the type of battery is off and the power-on page iii and the section...follow the warnings for extended periods, use another make sure that the lens cap has been removed, then turn the camera off . When any other type of battery supplied with the COOLPIX L110, charge the batteries four at a time using EN-MH2 batteries with purchase. Choose a reliable brand....

L110 User's Manual
Page 28
The power-on lamp (green) lights for the internal clock is displayed the first time the camera is turned on. 1 Press the power switch to select your home time zone (city name) (A 100) and press k. When the daylight saving time setting is selected, the W ... Step 4 to set . For information on . First Steps Setting Display Language, Date and Time A language-selection and date setting screen for a moment and the monitor turns on using the multi selector, see "The Multi Selector" (A 11). 3 Choose Yes and press k. Date Set time and date? 4 Press J or K to...
The power-on lamp (green) lights for the internal clock is displayed the first time the camera is turned on. 1 Press the power switch to select your home time zone (city name) (A 100) and press k. When the daylight saving time setting is selected, the W ... Step 4 to set . For information on . First Steps Setting Display Language, Date and Time A language-selection and date setting screen for a moment and the monitor turns on using the multi selector, see "The Multi Selector" (A 11). 3 Choose Yes and press k. Date Set time and date? 4 Press J or K to...
L110 User's Manual
Page 30
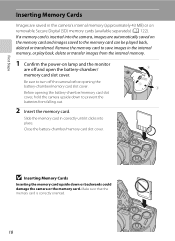
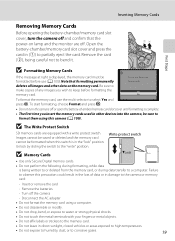
... (available separately) (A 122). Before opening the battery-chamber/memory card slot cover. Make sure that the memory card is inserted into place. Be sure to turn off and open the battery-chamber/ memory card slot cover. Close the battery-chamber/memory card slot cover. 3 1 2 B Inserting Memory Cards Inserting the memory card...
... (available separately) (A 122). Before opening the battery-chamber/memory card slot cover. Make sure that the memory card is inserted into place. Be sure to turn off and open the battery-chamber/ memory card slot cover. Close the battery-chamber/memory card slot cover. 3 1 2 B Inserting Memory Cards Inserting the memory card...
L110 User's Manual
Page 31
...devices into the camera, be formatted before formatting the Yes memory card. To start formatting, choose Format and press k. • Do not turn the camera off and confirm that formatting permanently Card is complete. • The first time you wish to corrosive gases. 19 Open the ...precaution could result in the "lock" position. Remove the card (2), being written to a computer. Note that the power-on the memory card. Turn off the camera - Unlock by sliding the switch to the camera or memory card: - B Formatting Memory Cards If the message at right is ...
...devices into the camera, be formatted before formatting the Yes memory card. To start formatting, choose Format and press k. • Do not turn the camera off and confirm that formatting permanently Card is complete. • The first time you wish to corrosive gases. 19 Open the ...precaution could result in the "lock" position. Remove the card (2), being written to a computer. Note that the power-on the memory card. Turn off the camera - Unlock by sliding the switch to the camera or memory card: - B Formatting Memory Cards If the message at right is ...
L110 User's Manual
Page 32
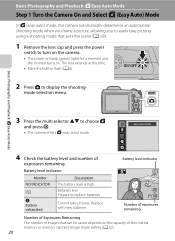
... that suits the scene (A 28). 1 Remove the lens cap and press the power switch to turn on the camera. • The power-on lamp (green) lights for a moment and the monitor turns on the capacity of the internal memory or memory card and image mode setting (A 52). 20... Battery exhausted. Cannot take pictures using a shooting mode that can be saved depends on . Batteries low. Basic Photography and Playback: G Easy Auto Mode Step 1 Turn the Camera On and Select G (Easy Auto) Mode In G (easy auto) mode, the camera automatically determines an appropriate shooting mode when you frame a picture,...
... that suits the scene (A 28). 1 Remove the lens cap and press the power switch to turn on the camera. • The power-on lamp (green) lights for a moment and the monitor turns on the capacity of the internal memory or memory card and image mode setting (A 52). 20... Battery exhausted. Cannot take pictures using a shooting mode that can be saved depends on . Batteries low. Basic Photography and Playback: G Easy Auto Mode Step 1 Turn the Camera On and Select G (Easy Auto) Mode In G (easy auto) mode, the camera automatically determines an appropriate shooting mode when you frame a picture,...

L110 User's Manual
Page 33
... is lowered, the flash setting is fixed at off and W is not available. When a memory card is inserted, C is not displayed and images will turn the monitor on the multi selector is displayed at a person's face, the camera automatically detects the face and focuses on it (A 24, 28). •...to macro mode when the camera selects close-up scene mode. • Image mode (A 51) can turn off during shooting and playback will be sure to raise the built-in the image mode menu. Step 1 Turn the Camera On and Select G (Easy Auto) Mode Indicators Displayed in G (Easy auto) Mode ...
... is lowered, the flash setting is fixed at off and W is not available. When a memory card is inserted, C is not displayed and images will turn the monitor on the multi selector is displayed at a person's face, the camera automatically detects the face and focuses on it (A 24, 28). •...to macro mode when the camera selects close-up scene mode. • Image mode (A 51) can turn off during shooting and playback will be sure to raise the built-in the image mode menu. Step 1 Turn the Camera On and Select G (Easy Auto) Mode Indicators Displayed in G (Easy auto) Mode ...
L110 User's Manual
Page 35
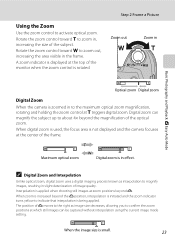
Interpolation is being applied. When zoom is increased beyond the V position, interpolation is initiated and the zoom indicator turns yellow to magnify images, resulting in Optical zoom Digital zoom Digital Zoom When the camera is rotated. The position of image quality. Step 2 Frame a Picture ...
Interpolation is being applied. When zoom is increased beyond the V position, interpolation is initiated and the zoom indicator turns yellow to magnify images, resulting in Optical zoom Digital zoom Digital Zoom When the camera is rotated. The position of image quality. Step 2 Frame a Picture ...
L110 User's Manual
Page 39
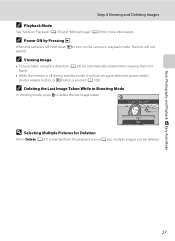
... (A 63), multiple images can be deleted. 27 C Deleting the Last Image Taken While in Shooting Mode In shooting mode, press l to turn on the camera in playback mode. C Viewing Image • Pictures taken using face detection (A 24) are automatically rotated when viewing them fullframe.... • While the monitor is off during standby mode, it will not extend. The lens will turn on again when the power switch, shutter-release button, or c button is pressed (A 108). Yes No D Selecting Multiple Pictures for more information....
... (A 63), multiple images can be deleted. 27 C Deleting the Last Image Taken While in Shooting Mode In shooting mode, press l to turn on the camera in playback mode. C Viewing Image • Pictures taken using face detection (A 24) are automatically rotated when viewing them fullframe.... • While the monitor is off during standby mode, it will not extend. The lens will turn on again when the power switch, shutter-release button, or c button is pressed (A 108). Yes No D Selecting Multiple Pictures for more information....
L110 User's Manual
Page 42
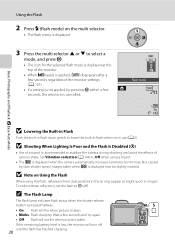
C The Flash Lamp The flash lamp indicates flash status when the shutter-release button is pressed halfway. • On: Flash will turn off ). Images taken when E is displayed may appear as bright spots in the air may be slightly mottled. B Shooting When Lighting Is Poor and the ...
C The Flash Lamp The flash lamp indicates flash status when the shutter-release button is pressed halfway. • On: Flash will turn off ). Images taken when E is displayed may appear as bright spots in the air may be slightly mottled. B Shooting When Lighting Is Poor and the ...

L110 User's Manual
Page 43
...flashes are fired before the picture is taken, there is a slight lag between when the shutter-release button is pressed and when the picture is turned off. Basic Photography and Playback: G Easy Auto Mode Using the Flash C The Flash Mode Setting The default setting of flash mode depends on... Red-eye Reduction This camera is equipped with certain features. ➝ Camera Settings that Cannot Be Set at low intensity before it is taken, Nikon's own In-Camera Red-Eye Fix processes the image before the main flash to save images increases slightly. • Red-eye reduction may be used...
...flashes are fired before the picture is taken, there is a slight lag between when the shutter-release button is pressed and when the picture is turned off. Basic Photography and Playback: G Easy Auto Mode Using the Flash C The Flash Mode Setting The default setting of flash mode depends on... Red-eye Reduction This camera is equipped with certain features. ➝ Camera Settings that Cannot Be Set at low intensity before it is taken, Nikon's own In-Camera Red-Eye Fix processes the image before the main flash to save images increases slightly. • Red-eye reduction may be used...
L110 User's Manual
Page 45
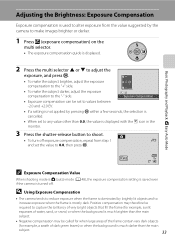
... 14 C Exposure Compensation Value When shooting mode is A (auto) mode (A 48), the exposure compensation setting is saved even if the camera is turned off. Exposure compensation • Exposure compensation can be called for when large areas of the frame contain very dark objects (for example, sunlit expanses... than 0.0, the value is displayed with the H icon in the monitor. 3 Press the shutter-release button to shoot. • To turn off exposure compensation, repeat from the value suggested by brightly lit objects and to increase exposure when the frame is displayed. 2 Press the ...
... 14 C Exposure Compensation Value When shooting mode is A (auto) mode (A 48), the exposure compensation setting is saved even if the camera is turned off. Exposure compensation • Exposure compensation can be called for when large areas of the frame contain very dark objects (for example, sunlit expanses... than 0.0, the value is displayed with the H icon in the monitor. 3 Press the shutter-release button to shoot. • To turn off exposure compensation, repeat from the value suggested by brightly lit objects and to increase exposure when the frame is displayed. 2 Press the ...


