L110 User's Manual
Page 3
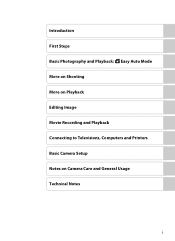
Introduction First Steps Basic Photography and Playback: G Easy Auto Mode More on Shooting More on Playback Editing Image Movie Recording and Playback Connecting to Televisions, Computers and Printers Basic Camera Setup Notes on Camera Care and General Usage Technical Notes i
Introduction First Steps Basic Photography and Playback: G Easy Auto Mode More on Shooting More on Playback Editing Image Movie Recording and Playback Connecting to Televisions, Computers and Printers Basic Camera Setup Notes on Camera Care and General Usage Technical Notes i

L110 User's Manual
Page 6
For Your Safety Use appropriate cables When connecting cables to the input and output jacks, use only the cables provided or sold by Nikon for the purpose, to observe this precaution could result in burns or fire. Turn the power off when using the flash Using the flash close ...
For Your Safety Use appropriate cables When connecting cables to the input and output jacks, use only the cables provided or sold by Nikon for the purpose, to observe this precaution could result in burns or fire. Turn the power off when using the flash Using the flash close ...

L110 User's Manual
Page 7
...following measures: • Reorient or relocate the receiving antenna. • Increase the separation between the equipment and receiver. • Connect the equipment into an outlet on this equipment does cause harmful interference to radio or television reception, which the receiver is no ...guarantee that to Part 15 of the FCC rules. Interface Cables Use the interface cables sold or provided by Nikon Corporation may void the user's authority to radio communications. Federal Communications Commission (FCC) Radio Frequency Interference Statement This equipment has...
...following measures: • Reorient or relocate the receiving antenna. • Increase the separation between the equipment and receiver. • Connect the equipment into an outlet on this equipment does cause harmful interference to radio or television reception, which the receiver is no ...guarantee that to Part 15 of the FCC rules. Interface Cables Use the interface cables sold or provided by Nikon Corporation may void the user's authority to radio communications. Federal Communications Commission (FCC) Radio Frequency Interference Statement This equipment has...

L110 User's Manual
Page 11
... Mode ...78 Y Wind Noise Reduction ...78 Movie Playback ...79 Deleting Movies...79 Connecting to Televisions, Computers and Printers 80 Connecting to a TV...80 Connecting to a Computer...82 Before Connecting the Camera...82 Transferring Pictures from a Camera to a Computer 83 Connecting to a Printer...87 Connecting the Camera and Printer...88 Printing Images One at a Time...89 Printing...
... Mode ...78 Y Wind Noise Reduction ...78 Movie Playback ...79 Deleting Movies...79 Connecting to Televisions, Computers and Printers 80 Connecting to a TV...80 Connecting to a Computer...82 Before Connecting the Camera...82 Transferring Pictures from a Camera to a Computer 83 Connecting to a Printer...87 Connecting the Camera and Printer...88 Printing Images One at a Time...89 Printing...

L110 User's Manual
Page 76
...'s memory card into the card slot of a DPOF-compatible printer (A 136) • Printing by taking the camera's memory card to a photo lab • Printing by connecting the camera (A 87) to a PictBridge-compatible printer (A 136) (by removing the memory card from the camera, you can select which no copies have been Back...
...'s memory card into the card slot of a DPOF-compatible printer (A 136) • Printing by taking the camera's memory card to a photo lab • Printing by connecting the camera (A 87) to a PictBridge-compatible printer (A 136) (by removing the memory card from the camera, you can select which no copies have been Back...
L110 User's Manual
Page 77
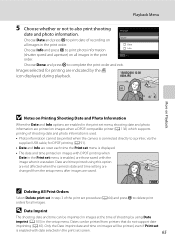
.... Playback Menu 5 Choose whether or not to complete the print order and exit. Choose Done and press k to also print shooting Print set menu is connected directly to print date of shooting by the w icon displayed during playback. 15/05/2010 12:00 0004.JPG More on Playback 44 B Notes on...
.... Playback Menu 5 Choose whether or not to complete the print order and exit. Choose Done and press k to also print shooting Print set menu is connected directly to print date of shooting by the w icon displayed during playback. 15/05/2010 12:00 0004.JPG More on Playback 44 B Notes on...
L110 User's Manual
Page 92
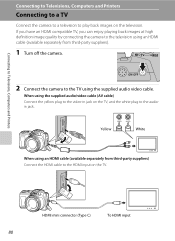
...camera to the TV using the supplied audio video cable. HDMI mini connector (Type C) To HDMI input 80 Connecting to Televisions, Computers and Printers Connecting to Televisions, Computers and Printers Connecting to a TV Connect the camera to a television to play back images on the TV, and the white plug to the audioin ...jack. When using an HDMI cable (available separately from third-party suppliers) Connect the HDMI cable to the video-in jack on the television. If you have an HDMI compatible TV, you can enjoy playing back images ...
...camera to the TV using the supplied audio video cable. HDMI mini connector (Type C) To HDMI input 80 Connecting to Televisions, Computers and Printers Connecting to Televisions, Computers and Printers Connecting to a TV Connect the camera to a television to play back images on the TV, and the white plug to the audioin ...jack. When using an HDMI cable (available separately from third-party suppliers) Connect the HDMI cable to the video-in jack on the television. If you have an HDMI compatible TV, you can enjoy playing back images ...
L110 User's Manual
Page 93
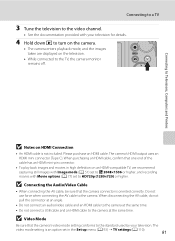
.... 4 Hold down c to turn on the camera. • The camera enters playback mode, and the images taken are displayed on the television. • While connected to the TV, the camera monitor remains off. When purchasing an HDMI cable, confirm that one end of the cable has an HDMI mini-pin... and Printers B Notes on an HDMI-compatible TV, we recommend capturing still images with Image mode (A 51) set to HD720p (1280×720) or higher. Connecting to a TV 3 Tune the television to the video channel. • See the documentation provided with Movie options (A 77) set to M 2048×1536 or ...
.... 4 Hold down c to turn on the camera. • The camera enters playback mode, and the images taken are displayed on the television. • While connected to the TV, the camera monitor remains off. When purchasing an HDMI cable, confirm that one end of the cable has an HDMI mini-pin... and Printers B Notes on an HDMI-compatible TV, we recommend capturing still images with Image mode (A 51) set to HD720p (1280×720) or higher. Connecting to a TV 3 Tune the television to the video channel. • See the documentation provided with Movie options (A 77) set to M 2048×1536 or ...

L110 User's Manual
Page 94
...ViewNX help information (System Requirements>H.264 HighDefinition (HD) movie playback) (A 86). Before Connecting the Camera Install the Software Before connecting the camera to a computer, software, including Nikon Transfer, ViewNX for displaying transferred pictures, and Panorama Maker for playing back high-definition... a computer with the supplied Nikon Transfer software. For more information on installing the software, refer to prevent the camera from an electrical outlet. If the AC Adapter EH-67 (A 122) (available separately) is used, COOLPIX L110 can be installed using the ...
...ViewNX help information (System Requirements>H.264 HighDefinition (HD) movie playback) (A 86). Before Connecting the Camera Install the Software Before connecting the camera to a computer, software, including Nikon Transfer, ViewNX for displaying transferred pictures, and Panorama Maker for playing back high-definition... a computer with the supplied Nikon Transfer software. For more information on installing the software, refer to prevent the camera from an electrical outlet. If the AC Adapter EH-67 (A 122) (available separately) is used, COOLPIX L110 can be installed using the ...

L110 User's Manual
Page 95
... Turn on lamp will remain off . 3 Connect the camera to the computer via a USB hub. 83 Do not attempt to insert connectors at an angle, and do not use force when connecting or disconnecting the USB cable. • The connection may not be recognized if the camera is ...off . The power-on the camera. The camera monitor will light. Connecting to Televisions, Computers and Printers Connecting to a Computer Transferring Pictures from a Camera to a Computer 1 Start the computer to which Nikon Transfer was installed. 2 ...
... Turn on lamp will remain off . 3 Connect the camera to the computer via a USB hub. 83 Do not attempt to insert connectors at an angle, and do not use force when connecting or disconnecting the USB cable. • The connection may not be recognized if the camera is ...off . The power-on the camera. The camera monitor will light. Connecting to Televisions, Computers and Printers Connecting to a Computer Transferring Pictures from a Camera to a Computer 1 Start the computer to which Nikon Transfer was installed. 2 ...

L110 User's Manual
Page 96
... folder on my computer, and click OK. • Mac OS X Nikon Transfer will start automatically when the camera is connected to the computer if Yes was selected in the Auto-Launch setting dialog when Nikon Transfer was first installed. • If there are transferred to a folder... and click Start Transfer. Select Copy pictures to the computer. 84 Connecting to Televisions, Computers and Printers Connecting to a Computer 5 Start Nikon Transfer installed on the computer. • Windows 7 When the Devices and Printers K L110 screen is displayed in the Change program dialog and click OK.
... folder on my computer, and click OK. • Mac OS X Nikon Transfer will start automatically when the camera is connected to the computer if Yes was selected in the Auto-Launch setting dialog when Nikon Transfer was first installed. • If there are transferred to a folder... and click Start Transfer. Select Copy pictures to the computer. 84 Connecting to Televisions, Computers and Printers Connecting to a Computer 5 Start Nikon Transfer installed on the computer. • Windows 7 When the Devices and Printers K L110 screen is displayed in the Change program dialog and click OK.

L110 User's Manual
Page 97
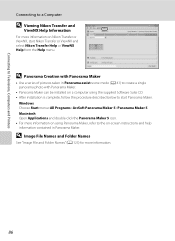
... on the desktop will also start Nikon Transfer or ViewNX. D Starting Nikon Transfer or ViewNX Manually Windows Choose Start menu>All Programs>Nikon Transfer>Nikon Transfer (or All Programs>ViewNX>ViewNX). Macintosh Open Applications and double-click Nikon Software>Nikon Transfer>Nikon Transfer (or Nikon Software>ViewNX>ViewNX). Connecting to a Computer At the Nikon Transfer default settings, ViewNX starts automatically...
... on the desktop will also start Nikon Transfer or ViewNX. D Starting Nikon Transfer or ViewNX Manually Windows Choose Start menu>All Programs>Nikon Transfer>Nikon Transfer (or All Programs>ViewNX>ViewNX). Macintosh Open Applications and double-click Nikon Software>Nikon Transfer>Nikon Transfer (or Nikon Software>ViewNX>ViewNX). Connecting to a Computer At the Nikon Transfer default settings, ViewNX starts automatically...
L110 User's Manual
Page 98
...photo with Panorama Maker. • Panorama Maker can be installed on a computer using Panorama Maker, refer to start Nikon Transfer or ViewNX and select Nikon Transfer Help or ViewNX Help from the Help menu. Macintosh Open Applications and double-click the Panorama Maker 5 icon.... • For more information on Nikon Transfer or ViewNX, start Panorama Maker. Connecting to Televisions, Computers and Printers Connecting to a Computer D Viewing Nikon Transfer and ViewNX Help Information For more information on using the supplied Software Suite CD...
...photo with Panorama Maker. • Panorama Maker can be installed on a computer using Panorama Maker, refer to start Nikon Transfer or ViewNX and select Nikon Transfer Help or ViewNX Help from the Help menu. Macintosh Open Applications and double-click the Panorama Maker 5 icon.... • For more information on Nikon Transfer or ViewNX, start Panorama Maker. Connecting to Televisions, Computers and Printers Connecting to a Computer D Viewing Nikon Transfer and ViewNX Help Information For more information on using the supplied Software Suite CD...
L110 User's Manual
Page 99
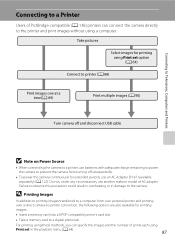
... at a time(A 89) Print multiple images (A 90) Turn camera off and disconnect USB cable B Note on Power Source • When connecting the camera to a printer, use batteries with adequate charge remaining to power the camera to prevent the camera from your personal printer and printing over... a direct camera-to-printer connection, the following options are also available for extended periods, use another make or model of prints each using a computer. Do not, ...
... at a time(A 89) Print multiple images (A 90) Turn camera off and disconnect USB cable B Note on Power Source • When connecting the camera to a printer, use batteries with adequate charge remaining to power the camera to prevent the camera from your personal printer and printing over... a direct camera-to-printer connection, the following options are also available for extended periods, use another make or model of prints each using a computer. Do not, ...

L110 User's Manual
Page 100
...not pull the connector at an 88 angle. Check printer settings. 3 Connect the camera to a Printer Connecting the Camera and Printer 1 Turn off the camera. 2 Turn on the camera. • When connected correctly, the PictBridge startup screen (1) is displayed (2). 1 2 Print selection... 15/05 2010 NO. 12 [ 12] B Connecting the USB Cable When connecting the USB cable, be sure that the connectors are oriented correctly. Connecting to Televisions, Computers and Printers ...
...not pull the connector at an 88 angle. Check printer settings. 3 Connect the camera to a Printer Connecting the Camera and Printer 1 Turn off the camera. 2 Turn on the camera. • When connected correctly, the PictBridge startup screen (1) is displayed (2). 1 2 Print selection... 15/05 2010 NO. 12 [ 12] B Connecting the USB Cable When connecting the USB cable, be sure that the connectors are oriented correctly. Connecting to Televisions, Computers and Printers ...
L110 User's Manual
Page 101
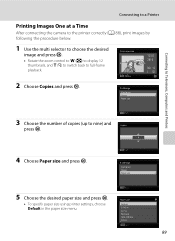
... 4×6 in . NO. 12 [ 12] 2 Choose Copies and press k. Paper size Default 3.5×5 in. 5×7 in . Exit 89 Connecting to Televisions, Computers and Printers Connecting to a Printer Printing Images One at a Time After connecting the camera to the printer correctly (A 88), print images by following the procedure below. 1 Use the multi selector to...
... 4×6 in . NO. 12 [ 12] 2 Choose Copies and press k. Paper size Default 3.5×5 in. 5×7 in . Exit 89 Connecting to Televisions, Computers and Printers Connecting to a Printer Printing Images One at a Time After connecting the camera to the printer correctly (A 88), print images by following the procedure below. 1 Use the multi selector to...

L110 User's Manual
Page 102
...displayed. 2 Use the multi selector to choose Paper size and press k. To specify paper size using printer settings, choose Default in . Connecting to Televisions, Computers and Printers 7 Printing starts. Monitor display returns to exit the print menu. 3 Choose the desired paper size and press... k. PictBridge Start print Copies Paper size Connecting to a Printer 6 Choose Start print and press k. Exit Postcard 100×150 mm 4×6 in step 1 when printing is complete....
...displayed. 2 Use the multi selector to choose Paper size and press k. To specify paper size using printer settings, choose Default in . Connecting to Televisions, Computers and Printers 7 Printing starts. Monitor display returns to exit the print menu. 3 Choose the desired paper size and press... k. PictBridge Start print Copies Paper size Connecting to a Printer 6 Choose Start print and press k. Exit Postcard 100×150 mm 4×6 in step 1 when printing is complete....

L110 User's Manual
Page 103
...select images, and press H or I to set the number of copies for each . 4 Choose Print selection, Print all images DPOF printing Paper size Exit Connecting to Televisions, Computers and Printers Print selection Choose the images (up to 99) and number of copies (up to nine) of each . • Images... selected for which no copies have been specified will not be printed. Connecting to a Printer Print menu Print selection Print all images or DPOF printing and press k. Choose Cancel and press k to return to the print menu....
...select images, and press H or I to set the number of copies for each . 4 Choose Print selection, Print all images DPOF printing Paper size Exit Connecting to Televisions, Computers and Printers Print selection Choose the images (up to 99) and number of copies (up to nine) of each . • Images... selected for which no copies have been specified will not be printed. Connecting to a Printer Print menu Print selection Print all images or DPOF printing and press k. Choose Cancel and press k to return to the print menu....
L110 User's Manual
Page 104
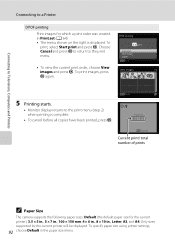
... A4. DPOF printing 010 prints Start print View images Cancel Exit • To view the current print order, choose View images and press k. Connecting to Televisions, Computers and Printers Connecting to a Printer DPOF printing Print images for the current printer), 3.5 × 5 in., 5 × 7 in., 100 × 150 mm, 4 × 6 in., 8 × 10...
... A4. DPOF printing 010 prints Start print View images Cancel Exit • To view the current print order, choose View images and press k. Connecting to Televisions, Computers and Printers Connecting to a Printer DPOF printing Print images for the current printer), 3.5 × 5 in., 5 × 7 in., 100 × 150 mm, 4 × 6 in., 8 × 10...

L110 User's Manual
Page 105
... zones. Date imprint A 103 Imprint date on . Auto off A 108 Set time before camera enters standby mode to a television. TV settings A 110 Adjust settings for connection to save power. Basic Camera Setup Setup Menu Basic Camera Setup The setup menu contains the following options. a c d e f g U h i k l/m n H d p s Menus A 96 Select how menus are displayed...
... zones. Date imprint A 103 Imprint date on . Auto off A 108 Set time before camera enters standby mode to a television. TV settings A 110 Adjust settings for connection to save power. Basic Camera Setup Setup Menu Basic Camera Setup The setup menu contains the following options. a c d e f g U h i k l/m n H d p s Menus A 96 Select how menus are displayed...


