L110 User's Manual
Page 5
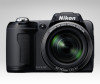
... take it to remove the inverters. Should the insulation be sure to a Nikon-authorized service representative for use with travel converters or • Batteries are using the AC adapter, be removed with COOLPIX L110. • Insert batteries in the battery, such as necklaces or hairpins. ... during lightning storms. Failure to another or with EN-MH2-B2 batteries (available separately), purchase two sets (total of different makes or types. • When charging Nikon EN-MH2 rechargeable Ni-MH batteries, use with Nikon digital cameras only, and are compatible with a dry cloth.
... take it to remove the inverters. Should the insulation be sure to a Nikon-authorized service representative for use with travel converters or • Batteries are using the AC adapter, be removed with COOLPIX L110. • Insert batteries in the battery, such as necklaces or hairpins. ... during lightning storms. Failure to another or with EN-MH2-B2 batteries (available separately), purchase two sets (total of different makes or types. • When charging Nikon EN-MH2 rechargeable Ni-MH batteries, use with Nikon digital cameras only, and are compatible with a dry cloth.
L110 User's Manual
Page 9
... Displays...13 About the Shutter-release Button...13 First Steps ...14 Inserting the Batteries ...14 Applicable Batteries ...14 Turning On and Off the Camera...14 Setting Display Language, Date and Time 16 Inserting Memory Cards ...18 Removing Memory Cards...19 vii
... Displays...13 About the Shutter-release Button...13 First Steps ...14 Inserting the Batteries ...14 Applicable Batteries ...14 Turning On and Off the Camera...14 Setting Display Language, Date and Time 16 Inserting Memory Cards ...18 Removing Memory Cards...19 vii
L110 User's Manual
Page 10
... the Shooting Menu...50 A Image Mode (Image Quality/Image Size 51 B White Balance (Adjusting hue) ...53 C Continuous ...55 E ISO Sensitivity...56 F Color Options...57 Camera Settings that Cannot Be Set at the Same Time 58 viii
... the Shooting Menu...50 A Image Mode (Image Quality/Image Size 51 B White Balance (Adjusting hue) ...53 C Continuous ...55 E ISO Sensitivity...56 F Color Options...57 Camera Settings that Cannot Be Set at the Same Time 58 viii

L110 User's Manual
Page 11
... Playback...59 Full-frame Operation ...59 Viewing Multiple Images: Thumbnail Playback 60 Calendar Display...61 Taking a Closer Look: Playback Zoom 62 Playback Menu...63 a Print Set ...64 b Slide Show...66 c Delete ...67 Editing Image...69 Image Editing Function ...69 Editing Images ...70 I D-Lighting: Enhancing Brightness and Contrast 70 g Small Picture: Resizing...
... Playback...59 Full-frame Operation ...59 Viewing Multiple Images: Thumbnail Playback 60 Calendar Display...61 Taking a Closer Look: Playback Zoom 62 Playback Menu...63 a Print Set ...64 b Slide Show...66 c Delete ...67 Editing Image...69 Image Editing Function ...69 Editing Images ...70 I D-Lighting: Enhancing Brightness and Contrast 70 g Small Picture: Resizing...
L110 User's Manual
Page 12
... ...93 Setup Menu...93 a Menus...96 c Welcome Screen...97 d Date...98 e Monitor Settings ...101 f Date Imprint...103 g Vibration Reduction...104 U Motion Detection ...105 h AF Assist ...106 i Sound Settings ...107 k Auto Off ...108 l Format Memory/m Format Card...109 n Language ...110 H TV Settings ...110 d Blink Warning...111 p Reset All ...112 s Battery Type...114 d Protect ...114...
... ...93 Setup Menu...93 a Menus...96 c Welcome Screen...97 d Date...98 e Monitor Settings ...101 f Date Imprint...103 g Vibration Reduction...104 U Motion Detection ...105 h AF Assist ...106 i Sound Settings ...107 k Auto Off ...108 l Format Memory/m Format Card...109 n Language ...110 H TV Settings ...110 d Blink Warning...111 p Reset All ...112 s Battery Type...114 d Protect ...114...

L110 User's Manual
Page 13
...before the internal memory can be read before using the camera. Read this manual, images are used to find the information you for purchasing a Nikon COOLPIX L110 digital camera. Symbols and Conventions To make it . This icon indicates that should be formatted or used : This icon marks cautions, B ... Manual Thank you need, the following symbols and conventions are sometimes omitted from actual display. This manual was written to as the "default setting". • The names of menu items displayed in the camera monitor, and the names of purchase is referred to as a "memory card"....
...before the internal memory can be read before using the camera. Read this manual, images are used to find the information you for purchasing a Nikon COOLPIX L110 digital camera. Symbols and Conventions To make it . This icon indicates that should be formatted or used : This icon marks cautions, B ... Manual Thank you need, the following symbols and conventions are sometimes omitted from actual display. This manual was written to as the "default setting". • The names of menu items displayed in the camera monitor, and the names of purchase is referred to as a "memory card"....

L110 User's Manual
Page 18
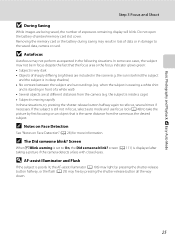
Introduction Parts of the Camera Raising and Lowering the Built-in Flash Raising the built-in Flash. Lowering the Built-in flash See "Using the Flash" (A 29) for more information about flash settings. Push the built-in flash down gently to lower the builtin flash when not in use. 6
Introduction Parts of the Camera Raising and Lowering the Built-in Flash Raising the built-in Flash. Lowering the Built-in flash See "Using the Flash" (A 29) for more information about flash settings. Push the built-in flash down gently to lower the builtin flash when not in use. 6
L110 User's Manual
Page 20
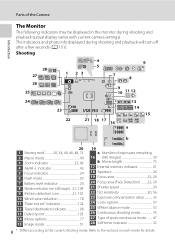
The indicators and photo info displayed during shooting and playback (actual display varies with current camera settings). Parts of sport continuous mode ....... 47 28 Self-timer indicator 32 8 * Differs according to the sections on each mode for details. Refer to the current...29 7 Battery level indicator 20 8 Vibration reduction icon (still images)...21, 104 9 Motion detection icon 21, 105 10 Wind noise reduction 78 11 "Date not set" indicator 124 12 Travel destination indicator 98 13 Date imprint 103 14 Movie options 77 15 Image mode 51 1m00s b 1m00s 19 a Number of exposures...
The indicators and photo info displayed during shooting and playback (actual display varies with current camera settings). Parts of sport continuous mode ....... 47 28 Self-timer indicator 32 8 * Differs according to the sections on each mode for details. Refer to the current...29 7 Battery level indicator 20 8 Vibration reduction icon (still images)...21, 104 9 Motion detection icon 21, 105 10 Wind noise reduction 78 11 "Date not set" indicator 124 12 Travel destination indicator 98 13 Date imprint 103 14 Movie options 77 15 Image mode 51 1m00s b 1m00s 19 a Number of exposures...
L110 User's Manual
Page 21
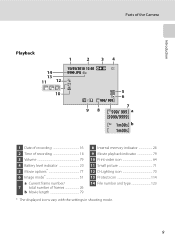
... 64 11 Small picture 71 12 D-Lighting icon 70 13 Protect icon 114 14 File number and type 123 * The displayed icons vary with the settings in shooting mode. 9
... 64 11 Small picture 71 12 D-Lighting icon 70 13 Protect icon 114 14 File number and type 123 * The displayed icons vary with the settings in shooting mode. 9
L110 User's Manual
Page 24
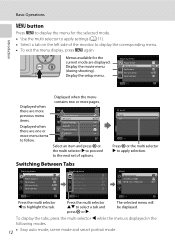
.... Movie Movie options Autofocus mode Wind noise reduction Exit Exit Exit Press the multi selector J to the next set of the monitor to select a tab and press k or K. Set up Motion detection AF assist Sound settings Auto off Format memory Language Exit Select an item and press k or the multi selector K to proceed... AF assist Auto Off Exit Press k or the multi selector K to follow. Menus available for the selected mode. • Use the multi selector to apply settings (A 11). • Select a tab on the left side of options.
.... Movie Movie options Autofocus mode Wind noise reduction Exit Exit Exit Press the multi selector J to the next set of the monitor to select a tab and press k or K. Set up Motion detection AF assist Sound settings Auto off Format memory Language Exit Select an item and press k or the multi selector K to proceed... AF assist Auto Off Exit Press k or the multi selector K to follow. Menus available for the selected mode. • Use the multi selector to apply settings (A 11). • Select a tab on the left side of options.
L110 User's Manual
Page 25
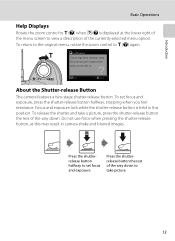
...in series), or multi-shot 16. Exit Back About the Shutter-release Button The camera features a two-stage shutter-release button. To set focus and exposure. Focus and exposure lock while the shutter-release button is displayed at the lower right of the currently selected menu option.... To release the shutter and take picture. 13 Press the shutterrelease button halfway to view a description of the menu screen to set focus and exposure, press the shutter-release button halfway, stopping when you feel resistance. To return to the original menu, rotate the zoom...
...in series), or multi-shot 16. Exit Back About the Shutter-release Button The camera features a two-stage shutter-release button. To set focus and exposure. Focus and exposure lock while the shutter-release button is displayed at the lower right of the currently selected menu option.... To release the shutter and take picture. 13 Press the shutterrelease button halfway to view a description of the menu screen to set focus and exposure, press the shutter-release button halfway, stopping when you feel resistance. To return to the original menu, rotate the zoom...

L110 User's Manual
Page 27
... mode is determined by the Auto off and the power-on lamp flashes; you can turn the camera on and change the setting. The default setting is used : First Steps Batteries with peeling Batteries with the following defects cannot be used , turn the monitor on by pressing...122). When any circumstances, use an AC Adapter EH-67 (available separately) (A 122). Failure to match the type of battery supplied with the COOLPIX L110, charge the batteries four at a time using EN-MH2 batteries with purchase. After an additional three minutes, the auto power off feature turns the ...
... mode is determined by the Auto off and the power-on lamp flashes; you can turn the camera on and change the setting. The default setting is used : First Steps Batteries with peeling Batteries with the following defects cannot be used , turn the monitor on by pressing...122). When any circumstances, use an AC Adapter EH-67 (available separately) (A 122). Failure to match the type of battery supplied with the COOLPIX L110, charge the batteries four at a time using EN-MH2 batteries with purchase. After an additional three minutes, the auto power off feature turns the ...

L110 User's Manual
Page 28
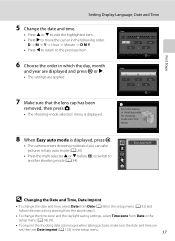
...No Cancel London Casablanca D Daylight Saving Time To use the camera in Step 4 to turn on . When the daylight saving time setting is turned on. 1 Press the power switch to set . Remove the lens cap. 2 Use the multi selector to select your home time zone (city name) (A 100) and press...clock is displayed the first time the camera is selected, the W mark appears at the top of the monitor. First Steps Setting Display Language, Date and Time A language-selection and date setting screen for a moment and the monitor turns on using the multi selector, see "The Multi Selector" (A 11). 3 ...
...No Cancel London Casablanca D Daylight Saving Time To use the camera in Step 4 to turn on . When the daylight saving time setting is turned on. 1 Press the power switch to set . Remove the lens cap. 2 Use the multi selector to select your home time zone (city name) (A 100) and press...clock is displayed the first time the camera is selected, the W mark appears at the top of the monitor. First Steps Setting Display Language, Date and Time A language-selection and date setting screen for a moment and the monitor turns on using the multi selector, see "The Multi Selector" (A 11). 3 ...
L110 User's Manual
Page 29
... in the setup menu (A 93) and follow the instructions starting from the above step 5. • To change the time zone and the daylight saving settings, select Time zone from Date in the setup menu (A 98, 99). • To imprint the shooting date into images when taking pictures, make sure... item. 6 Choose the order in which the day, month and year are displayed and press k or K. • The settings are set, then set Date imprint (A 103) in the following order. First Steps Setting Display Language, Date and Time 5 Change the date and time. • Press H or I before k, to switch to ...
... in the setup menu (A 93) and follow the instructions starting from the above step 5. • To change the time zone and the daylight saving settings, select Time zone from Date in the setup menu (A 98, 99). • To imprint the shooting date into images when taking pictures, make sure... item. 6 Choose the order in which the day, month and year are displayed and press k or K. • The settings are set, then set Date imprint (A 103) in the following order. First Steps Setting Display Language, Date and Time 5 Change the date and time. • Press H or I before k, to switch to ...
L110 User's Manual
Page 32
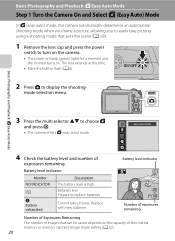
Easy auto mode 4 Check the battery level and number of the internal memory or memory card and image mode setting (A 52). 20 Basic Photography and Playback: G Easy Auto Mode 3 Press the multi selector HI to replace batteries. Batteries low. Basic Photography and Playback: G Easy Auto ...
Easy auto mode 4 Check the battery level and number of the internal memory or memory card and image mode setting (A 52). 20 Basic Photography and Playback: G Easy Auto Mode 3 Press the multi selector HI to replace batteries. Batteries low. Basic Photography and Playback: G Easy Auto ...

L110 User's Manual
Page 33
... detection icon Reduce the blurring caused by hand (A 6, 29). Image mode Display image size and quality (compression) set in the setup menu (A 93) for more information. • Set Vibration reduction to internal memory (approximately 43 MB). D Notes on the Flash When the built-in flash is lowered...or Motion detection (A 105) in the image mode menu. Internal memory indicator Images will be saved to Off when using a tripod. 21 The default setting is displayed at off after a few seconds (A 101). Changes to macro mode when the camera selects close-up scene mode. • Image mode ...
... detection icon Reduce the blurring caused by hand (A 6, 29). Image mode Display image size and quality (compression) set in the setup menu (A 93) for more information. • Set Vibration reduction to internal memory (approximately 43 MB). D Notes on the Flash When the built-in flash is lowered...or Motion detection (A 105) in the image mode menu. Internal memory indicator Images will be saved to Off when using a tripod. 21 The default setting is displayed at off after a few seconds (A 101). Changes to macro mode when the camera selects close-up scene mode. • Image mode ...
L110 User's Manual
Page 35
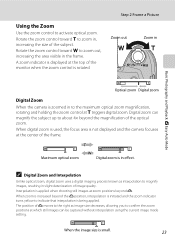
... size decreases, allowing you to zoom out, increasing the area visible in effect. Digital zoom can be captured without interpolation using the current image mode setting. When digital zoom is used, the focus area is not displayed and the camera focuses at which still images can magnify the subject up to...
... size decreases, allowing you to zoom out, increasing the area visible in effect. Digital zoom can be captured without interpolation using the current image mode setting. When digital zoom is used, the focus area is not displayed and the camera focuses at which still images can magnify the subject up to...
L110 User's Manual
Page 37
... a white wall) • Several objects are at different distances from the camera as the desired subject. D AF-assist Illuminator and Flash If the subject is set to refocus, several times if necessary. In some rare cases, the subject may result in loss of exposures remaining display will blink. If the subject...
... a white wall) • Several objects are at different distances from the camera as the desired subject. D AF-assist Illuminator and Flash If the subject is set to refocus, several times if necessary. In some rare cases, the subject may result in loss of exposures remaining display will blink. If the subject...
L110 User's Manual
Page 41
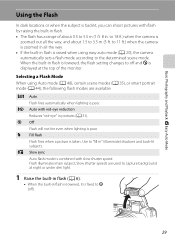
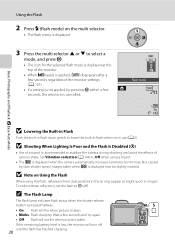
... smart portrait mode (A 44), the following flash modes are used to capture background at the top of about 1.5 to W (off and W is lowered, the flash setting changes to "fill-in portraits (A 31). Slow shutter speeds are available. to 11 ft.) when the camera is zoomed in all the way, and about... (A 6). • When the built-in flash is lowered, it is fixed to 3.5 m (5 ft. Selecting a Flash Mode When using easy auto mode (A 20), the camera automatically sets a flash mode according to 5.5 m (1 ft. 8 in. Use to off ). 29 Flash illuminates main subject;
... smart portrait mode (A 44), the following flash modes are used to capture background at the top of about 1.5 to W (off and W is lowered, the flash setting changes to "fill-in portraits (A 31). Slow shutter speeds are available. to 11 ft.) when the camera is zoomed in all the way, and about... (A 6). • When the built-in flash is lowered, it is fixed to 3.5 m (5 ft. Selecting a Flash Mode When using easy auto mode (A 20), the camera automatically sets a flash mode according to 5.5 m (1 ft. 8 in. Use to off ). 29 Flash illuminates main subject;
L110 User's Manual
Page 42
...monitor. • When U (auto) is applied, D disappears after a few seconds regardless of the monitor settings (A 101). • If a setting is low, the monitor will turn off ). To reduce these reflections, set the flash to W (off until the flash has finished charging. 30 Using the Flash 2 Press m (...Disabled (W) • Use of camera shake. Wait a few seconds and try again. • Off: Flash will fire when picture is cancelled. Set Vibration reduction (A 104) to stabilize the camera during shooting and avoid the effects of a tripod is taken. C The Flash Lamp The flash ...
...monitor. • When U (auto) is applied, D disappears after a few seconds regardless of the monitor settings (A 101). • If a setting is low, the monitor will turn off ). To reduce these reflections, set the flash to W (off until the flash has finished charging. 30 Using the Flash 2 Press m (...Disabled (W) • Use of camera shake. Wait a few seconds and try again. • Off: Flash will fire when picture is cancelled. Set Vibration reduction (A 104) to stabilize the camera during shooting and avoid the effects of a tripod is taken. C The Flash Lamp The flash ...


