

Owners Manual
Page 12
... you on the oven frame behind the storage drawer panel. For assistance or service in materials or workmanship and is reported to Maytag within 30 days from the date of purchase. 6. Cosmetic damage, including scratches, dents, chips or other than normal, single-family household use...when this major appliance is operated and maintained according to instructions attached to or furnished with the product, Maytag brand of Whirlpool Corporation or Whirlpool Canada LP (hereafter "Maytag") will pay for factory specified parts and repair labor to correct defects in accordance with electrical or ...
... you on the oven frame behind the storage drawer panel. For assistance or service in materials or workmanship and is reported to Maytag within 30 days from the date of purchase. 6. Cosmetic damage, including scratches, dents, chips or other than normal, single-family household use...when this major appliance is operated and maintained according to instructions attached to or furnished with the product, Maytag brand of Whirlpool Corporation or Whirlpool Canada LP (hereafter "Maytag") will pay for factory specified parts and repair labor to correct defects in accordance with electrical or ...

Dimension Guide
Page 1
... inlet to side wall or other combustible material. upper cabinet depth C. 30" (76.2 cm) min. clearance from the gas specified on longer runs may be made to the range. Ref. With LP gas, piping or tubing size can be used . Do not use with LP gas. Electrical: A 120 volt, 60 Hz., AC only, 15-amp fused, electrical...
... inlet to side wall or other combustible material. upper cabinet depth C. 30" (76.2 cm) min. clearance from the gas specified on longer runs may be made to the range. Ref. With LP gas, piping or tubing size can be used . Do not use with LP gas. Electrical: A 120 volt, 60 Hz., AC only, 15-amp fused, electrical...

Installation Guide
Page 3
... adults. Tools needed Check local codes and consult gas supplier. Additional Installation Requirements The installation of this range must be used will not discolor, delaminate or sustain other damage. Connect anti-tip bracket to LP gas 4.8 mm) carbide-tipped masonry drill bit (for...CFR, Part 3280 (formerly the Federal Standard for wood floors) ■ Marker or pencil ■ Noncorrosive leak-detection solution For LP/Natural Gas Conversions combination wrench ■ ½" combination wrench combination wrench ■ 7 mm nut driver ■ Quadrex®† or ...
... adults. Tools needed Check local codes and consult gas supplier. Additional Installation Requirements The installation of this range must be used will not discolor, delaminate or sustain other damage. Connect anti-tip bracket to LP gas 4.8 mm) carbide-tipped masonry drill bit (for...CFR, Part 3280 (formerly the Federal Standard for wood floors) ■ Marker or pencil ■ Noncorrosive leak-detection solution For LP/Natural Gas Conversions combination wrench ■ ½" combination wrench combination wrench ■ 7 mm nut driver ■ Quadrex®† or ...

Installation Guide
Page 5
..., with a qualified electrician if you not plug an electric spark ignition gas range or any other major appliance into a GFCI (Ground-Fault Circuit Interrupter) outlet. In the absence of the range must conform with American National Standard, National Fuel Gas Code ANSI Z223.1 - LP gas conversion: Conversion must be used , it may result in death, fire...
..., with a qualified electrician if you not plug an electric spark ignition gas range or any other major appliance into a GFCI (Ground-Fault Circuit Interrupter) outlet. In the absence of the range must conform with American National Standard, National Fuel Gas Code ANSI Z223.1 - LP gas conversion: Conversion must be used , it may result in death, fire...

Installation Guide
Page 6
...the inlet to the appliance pressure regulator. ■ Do not kink or damage the flexible metal tubing when moving the range. B Gas Supply Pressure Testing Gas supply pressure for connection to the female pipe threads of opening , such as follows for Canada). Line pressure testing at...½ psi (3.5 kPa). For elevations above sea level (not applicable for proper operation: Natural gas: Minimum pressure: 5" WCP Maximum pressure: 14" WCP LP gas: Minimum pressure: 11" WCP Maximum pressure: 14" WCP Contact local gas supplier if you are reduced at this range must be equipped with the...
...the inlet to the appliance pressure regulator. ■ Do not kink or damage the flexible metal tubing when moving the range. B Gas Supply Pressure Testing Gas supply pressure for connection to the female pipe threads of opening , such as follows for Canada). Line pressure testing at...½ psi (3.5 kPa). For elevations above sea level (not applicable for proper operation: Natural gas: Minimum pressure: 5" WCP Maximum pressure: 14" WCP LP gas: Minimum pressure: 11" WCP Maximum pressure: 14" WCP Contact local gas supplier if you are reduced at this range must be equipped with the...

Installation Guide
Page 8
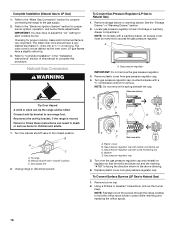
... combination of a qualified person include: licensed heating personnel, authorized gas company personnel, and authorized service personnel. Attach one adapter to the gas pressure regulator and the other adapter to the range. Open valve 3. Burner cap C. If connected to the adapters...surface burners will not light. B A C A. WARNING Make Gas Connection 3. Check that the gas pressure regulator shutoff valve is parallel to the existing gas line. E A. C. Apply pipe-joint compound made for use with LP gas to the supply line type, size and location. 1. Closed ...
... combination of a qualified person include: licensed heating personnel, authorized gas company personnel, and authorized service personnel. Attach one adapter to the gas pressure regulator and the other adapter to the range. Open valve 3. Burner cap C. If connected to the adapters...surface burners will not light. B A C A. WARNING Make Gas Connection 3. Check that the gas pressure regulator shutoff valve is parallel to the existing gas line. E A. C. Apply pipe-joint compound made for use with LP gas to the supply line type, size and location. 1. Closed ...
Installation Guide
Page 13
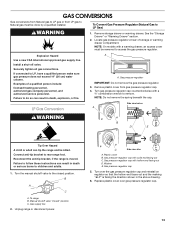
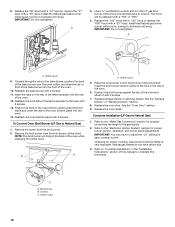
... bracket to the closed " position C. Remove plastic cover from LP gas to access the gas pressure regulator. Turn the manual shutoff valve to rear range foot. Plastic cover B. Gas pressure regulator cap 5. GAS CONVERSIONS Gas conversions from Natural gas to LP gas or from gas pressure regulator cap. 4. Install a shut-off valve. Gas pressure regulator cap with solid end facing out C. See...
... bracket to the closed " position C. Remove plastic cover from LP gas to access the gas pressure regulator. Turn the manual shutoff valve to rear range foot. Plastic cover B. Gas pressure regulator cap 5. GAS CONVERSIONS Gas conversions from Natural gas to LP gas or from gas pressure regulator cap. 4. Install a shut-off valve. Gas pressure regulator cap with solid end facing out C. See...
Installation Guide
Page 14
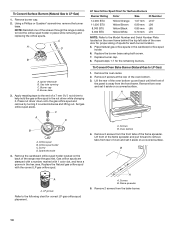
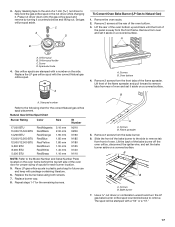
... removing and replacing the orifice spuds. LP Gas Orifice Spud Chart for each burner location. 5. Repeat steps 1-7 for correct LP gas orifice spud placement. To Convert Oven Bake Burner (Natural Gas to LP Gas) 1. Gas tube opening C. Set gas orifice spud aside. Screw D. Remove from... C. Replace the burner base using both screw. 7. Igniter electrode B. C A D B A. Remove 2 screws at the rear of the range near the gas inlet. Flame spreader 5. Burner cap D. Remove the cardboard orifice spud holder located on a covered surface. Replace burner cap. 8. Oven bottom ...
... removing and replacing the orifice spuds. LP Gas Orifice Spud Chart for each burner location. 5. Repeat steps 1-7 for correct LP gas orifice spud placement. To Convert Oven Bake Burner (Natural Gas to LP Gas) 1. Gas tube opening C. Set gas orifice spud aside. Screw D. Remove from... C. Replace the burner base using both screw. 7. Igniter electrode B. C A D B A. Remove 2 screws at the rear of the range near the gas inlet. Flame spreader 5. Burner cap D. Remove the cardboard orifice spud holder located on a covered surface. Replace burner cap. 8. Oven bottom ...
Installation Guide
Page 15
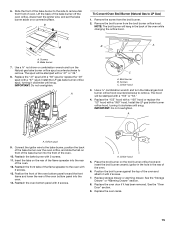
...Remove the broil burner from the broil burner. 2. Use a ³⁄₈" nut driver or combination wrench and turn the Natural gas broil burner orifice hood counterclockwise to LP Gas) 1. A C A. A x.xx A. Insert the tabs on the rear of the flame spreader into the oven. 14. Reattach ...Drawer" or "Warming Drawer" section. 8. See the "Oven Door" section. 9. B To Convert Oven Broil Burner (Natural Gas to remove. Bake burner 7. Install the LP gas bake burner orifice spud, turning it has been removed. Orifice hood 3. A. Replace the oven racks. 15 Lift the back ...
...Remove the broil burner from the broil burner. 2. Use a ³⁄₈" nut driver or combination wrench and turn the Natural gas broil burner orifice hood counterclockwise to LP Gas) 1. A C A. A x.xx A. Insert the tabs on the rear of the flame spreader into the oven. 14. Reattach ...Drawer" or "Warming Drawer" section. 8. See the "Oven Door" section. 9. B To Convert Oven Broil Burner (Natural Gas to remove. Bake burner 7. Install the LP gas bake burner orifice spud, turning it has been removed. Orifice hood 3. A. Replace the oven racks. 15 Lift the back ...
Installation Guide
Page 16
...: Do not remove the spring beneath the cap. B A C A. To range B. Remove burner cap. 2. LP 16 Natural Gas Conversion WARNING To Convert Gas Pressure Regulator (LP Gas to the gas supply. 2. Gas pressure regulator cap with solid end facing out D. Using a Phillips or Quadrex® screwdriver, remove the burner base. LP gas flames have a very distinct blue flame ¼" (0.64 cm...
...: Do not remove the spring beneath the cap. B A C A. To range B. Remove burner cap. 2. LP 16 Natural Gas Conversion WARNING To Convert Gas Pressure Regulator (LP Gas to the gas supply. 2. Gas pressure regulator cap with solid end facing out D. Using a Phillips or Quadrex® screwdriver, remove the burner base. LP gas flames have a very distinct blue flame ¼" (0.64 cm...
Installation Guide
Page 17
... sizing of oven. Flame spreader 5. Bake burner 7. C A D To Convert Oven Bake Burner (LP Gas to remove tab from the front tabs of the oven bottom. 3. A A. Oven bottom 4. Place LP gas orifice spuds in the nut driver while changing it aside on the side. Slide the front of a... Apply masking tape to the end of the bake burner to the side to Natural Gas) 1. B A A. The spud will be stamped with the correct Natural gas orifice spud. 3. Set gas orifice spud aside. Screw D. Replace the LP gas orifice spud with a "56" or a "57." 17 Remove 2 screws from front...
... sizing of oven. Flame spreader 5. Bake burner 7. C A D To Convert Oven Bake Burner (LP Gas to remove tab from the front tabs of the oven bottom. 3. A A. Oven bottom 4. Place LP gas orifice spuds in the nut driver while changing it aside on the side. Slide the front of a... Apply masking tape to the end of the bake burner to the side to Natural Gas) 1. B A A. The spud will be stamped with the correct Natural gas orifice spud. 3. Set gas orifice spud aside. Screw D. Replace the LP gas orifice spud with a "56" or a "57." 17 Remove 2 screws from front...
Installation Guide
Page 18
... against the top of the oven. 6. IMPORTANT: You may have yellow tips. 3. Natural gas flames do not have to adjust the "LO" setting for properly connecting the range to the gas supply. 2. Remove the screw from the broil burner orifice hood. NOTE: The broil burner will... to complete this procedure. Orifice hood 18 IMPORTANT: Do not overtighten. Insert the tabs on front of the oven. 10. Complete Installation (LP Gas to remove. Broil burner B. Remove the broil burner from the broil burner. 2. Screws C. IMPORTANT: Do not overtighten. Position the front ...
... against the top of the oven. 6. IMPORTANT: You may have yellow tips. 3. Natural gas flames do not have to adjust the "LO" setting for properly connecting the range to the gas supply. 2. Remove the screw from the broil burner orifice hood. NOTE: The broil burner will... to complete this procedure. Orifice hood 18 IMPORTANT: Do not overtighten. Insert the tabs on front of the oven. 10. Complete Installation (LP Gas to remove. Broil burner B. Remove the broil burner from the broil burner. 2. Screws C. IMPORTANT: Do not overtighten. Position the front ...

Warranty Information
Page 1
..., to instruct you can find your complete model number ready. Repairs to parts or systems resulting from unauthorized modifications made to Maytag within 30 days from the date of purchase. 6. Major appliances with the removal from your home of your major appliance for repairs. ... to or furnished with the product, Maytag brand of Whirlpool Corporation or Whirlpool Canada LP (hereafter "Maytag") will pay for factory specified parts and repair labor to Maytag with any questions or concerns at the number below : In the U.S.A.: Maytag Brand Home Appliances Customer eXperience Center 553...
..., to instruct you can find your complete model number ready. Repairs to parts or systems resulting from unauthorized modifications made to Maytag within 30 days from the date of purchase. 6. Major appliances with the removal from your home of your major appliance for repairs. ... to or furnished with the product, Maytag brand of Whirlpool Corporation or Whirlpool Canada LP (hereafter "Maytag") will pay for factory specified parts and repair labor to Maytag with any questions or concerns at the number below : In the U.S.A.: Maytag Brand Home Appliances Customer eXperience Center 553...


