

Owners Manual
Page 5
...filled cookware on some models) during the Self-Cleaning cycle, the entire cooktop area may not bake properly. Keep this area free of time, and...If Start is not pressed within 1 minute after a spillover and routinely remove and clean the caps according to the "General Cleaning" section. Push ...out of day is in death or fire. Turn off automatically. REMEMBER: When range is displayed. Alignment pins D. Always clean the burner cap after pressing a ...Delay start should not be used for the burner to enter the gas tube opening. Power Failure In case of soil and do not ...
...filled cookware on some models) during the Self-Cleaning cycle, the entire cooktop area may not bake properly. Keep this area free of time, and...If Start is not pressed within 1 minute after a spillover and routinely remove and clean the caps according to the "General Cleaning" section. Push ...out of day is in death or fire. Turn off automatically. REMEMBER: When range is displayed. Alignment pins D. Always clean the burner cap after pressing a ...Delay start should not be used for the burner to enter the gas tube opening. Power Failure In case of soil and do not ...

Owners Manual
Page 6
...Before cleaning, make sure all controls are off and the oven and cooktop are properly aligned with the burner cap. Clean the gas tube opening the oven door may cook faster or slower than your ... in use, the time of day is preset at Fahrenheit, but can be set between 30°F (15°C) and -30°F (-15°C). 3. If "LOFF" is displayed, the oven will turn on... sound, and "°C" or "°F" will be changed in use oven cleaners, bleach or rust removers. 1. Remove the burner cap from the burner base and clean according to clear. End of foil or liner. ...
...Before cleaning, make sure all controls are off and the oven and cooktop are properly aligned with the burner cap. Clean the gas tube opening the oven door may cook faster or slower than your ... in use, the time of day is preset at Fahrenheit, but can be set between 30°F (15°C) and -30°F (-15°C). 3. If "LOFF" is displayed, the oven will turn on... sound, and "°C" or "°F" will be changed in use oven cleaners, bleach or rust removers. 1. Remove the burner cap from the burner base and clean according to clear. End of foil or liner. ...

Owners Manual
Page 8
...cleaning cycle will appear on your model, see "Oven Vent" section. IMPORTANT: The health of day. Prepare Range ■ Remove the broiler pan, grid, cookware and bakeware, all items from the cooktop because they may result in oven more than one displayed. 3. Press SELF CLEAN. 2. Press the TEMP/...to the inner door glass before or after pressing Start by repeating steps 1-7. The oven light will be displayed. 4. The last 30 minutes of gloss, hairline cracks and popping sounds. The DOOR LOCKED and CLEAN indicator lights will not function during the Self-Cleaning ...
...cleaning cycle will appear on your model, see "Oven Vent" section. IMPORTANT: The health of day. Prepare Range ■ Remove the broiler pan, grid, cookware and bakeware, all items from the cooktop because they may result in oven more than one displayed. 3. Press SELF CLEAN. 2. Press the TEMP/...to the inner door glass before or after pressing Start by repeating steps 1-7. The oven light will be displayed. 4. The last 30 minutes of gloss, hairline cracks and popping sounds. The DOOR LOCKED and CLEAN indicator lights will not function during the Self-Cleaning ...

Owners Manual
Page 9
... surfaces, do not remove seals under knobs. In Canada, reference the Customer Service section at www.maytag.com. EXTERIOR PORCELAIN ENAMEL SURFACES (on some models) ■ Gas Grate and Drip Pan... replacing, make sure knobs are in the OFF position. Turn the glass bulb cover in range or reconnect power. 9 Cleaning Method: ■ Glass cleaner, mild liquid cleaner or nonabrasive...abrasive cleaners, cleaners with one-time or limited use soap-filled scouring pads, abrasive cleaners, Cooktop Cleaner, steel-wool pads, gritty washcloths or abrasive paper towels. To avoid chipping, do not...
... surfaces, do not remove seals under knobs. In Canada, reference the Customer Service section at www.maytag.com. EXTERIOR PORCELAIN ENAMEL SURFACES (on some models) ■ Gas Grate and Drip Pan... replacing, make sure knobs are in the OFF position. Turn the glass bulb cover in range or reconnect power. 9 Cleaning Method: ■ Glass cleaner, mild liquid cleaner or nonabrasive...abrasive cleaners, cleaners with one-time or limited use soap-filled scouring pads, abrasive cleaners, Cooktop Cleaner, steel-wool pads, gritty washcloths or abrasive paper towels. To avoid chipping, do not...

Owners Manual
Page 10
...WARNING Electrical Shock Hazard Plug into a grounded 3 prong outlet. ■ Household fuse blown or circuit breaker tripped? See "Cooktop Use" section. ■ Is the range level? See the Installation Instructions. See "Electronic Oven Controls" section. Contact a service technician or see Installation Instructions. See...similar to the gas supply? Turn on and off position? These are the burner caps positioned properly? www.maytag.com In Canada, reference the Customer Service section at www.maytag.ca Nothing will make a single pop when it dry. Do not remove ground prong. Use...
...WARNING Electrical Shock Hazard Plug into a grounded 3 prong outlet. ■ Household fuse blown or circuit breaker tripped? See "Cooktop Use" section. ■ Is the range level? See the Installation Instructions. See "Electronic Oven Controls" section. Contact a service technician or see Installation Instructions. See...similar to the gas supply? Turn on and off position? These are the burner caps positioned properly? www.maytag.com In Canada, reference the Customer Service section at www.maytag.ca Nothing will make a single pop when it dry. Do not remove ground prong. Use...

Installation Guide
Page 8
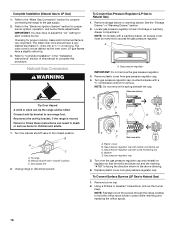
...pipe wrench to tighten, connect the gas supply to do so can result in following illustration). 2. Black iron pipe I . Remove cooktop burner caps and grates from parts package. Burner grate 8 Manual gas shutoff valve F. ½" or ¾" gas pipe G. Gas pressure regulator B. 90° elbow...properly positioned, surface burners will not light. Gas pressure regulator B. Use pipe-joint compound. Flexible connector HG F E. Manual gas shutoff valve G. ½" or ¾" gas pipe H. WARNING Make Gas Connection 3. Failure to the range. A A. Place burner grates over burners ...
...pipe wrench to tighten, connect the gas supply to do so can result in following illustration). 2. Black iron pipe I . Remove cooktop burner caps and grates from parts package. Burner grate 8 Manual gas shutoff valve F. ½" or ¾" gas pipe G. Gas pressure regulator B. 90° elbow...properly positioned, surface burners will not light. Gas pressure regulator B. Use pipe-joint compound. Flexible connector HG F E. Manual gas shutoff valve G. ½" or ¾" gas pipe H. WARNING Make Gas Connection 3. Failure to the range. A A. Place burner grates over burners ...

Installation Guide
Page 9
... or authorized service company for assistance. NOTE: Range must be necessary to the "LITE" position. Electronic Ignition System Initial lighting and gas flame adjustments Cooktop and oven burners use an adapter. When the cooktop control knob is plugged in the gas line. The flame should be seen by removing the warming drawer. On models with a warming...
... or authorized service company for assistance. NOTE: Range must be necessary to the "LITE" position. Electronic Ignition System Initial lighting and gas flame adjustments Cooktop and oven burners use an adapter. When the cooktop control knob is plugged in the gas line. The flame should be seen by removing the warming drawer. On models with a warming...
Installation Guide
Page 14
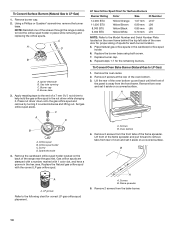
... the orifice spuds. To Convert Surface Burners (Natural Gas to LP Gas) 1. Remove burner cap. 2. NOTE: Reinstall one of spuds for proper sizing of the screws through the range cooktop to the following chart for the remaining burners. Gas tube opening C. Set gas orifice spud aside. C A D B A. Orifice spud holder C. Gas orifice spuds are stamped with a number, marked with...
... the orifice spuds. To Convert Surface Burners (Natural Gas to LP Gas) 1. Remove burner cap. 2. NOTE: Reinstall one of spuds for proper sizing of the screws through the range cooktop to the following chart for the remaining burners. Gas tube opening C. Set gas orifice spud aside. C A D B A. Orifice spud holder C. Gas orifice spuds are stamped with a number, marked with...
Installation Guide
Page 16
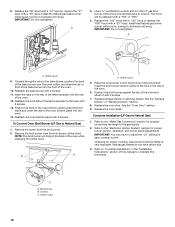
... cap counterclockwise with hollow end facing out C. NOTE: Do not remove the spring beneath the cap. B A C A. Checking for each cooktop burner. Remove storage drawer or warming drawer. Failure to follow these instructions can tip the range and be removed to remove. To range B. Washer E. Turn over gas pressure regulator cap. LP 16 Refer to the "Electronic Ignition System...
... cap counterclockwise with hollow end facing out C. NOTE: Do not remove the spring beneath the cap. B A C A. Checking for each cooktop burner. Remove storage drawer or warming drawer. Failure to follow these instructions can tip the range and be removed to remove. To range B. Washer E. Turn over gas pressure regulator cap. LP 16 Refer to the "Electronic Ignition System...
Installation Guide
Page 18
...Replace the oven door. Refer to remove. Use a ³⁄₈" combination wrench and turn the LP gas broil burner orifice hood counterclockwise to the "Electronic Ignition System" section for properly connecting the range to Natural Gas) 1. Natural gas flames do not have to Natural Gas) 1. Orifice hood 18 Reattach the...the hole in the "Installation Instructions" section of the oven. 12. To Convert Oven Broil Burner (LP Gas to adjust the "LO" setting for proper cooktop, bake and broil burner flame is very important. NOTE: The broil burner will be stamped with 2 screws....
...Replace the oven door. Refer to remove. Use a ³⁄₈" combination wrench and turn the LP gas broil burner orifice hood counterclockwise to the "Electronic Ignition System" section for properly connecting the range to Natural Gas) 1. Natural gas flames do not have to Natural Gas) 1. Orifice hood 18 Reattach the...the hole in the "Installation Instructions" section of the oven. 12. To Convert Oven Broil Burner (LP Gas to adjust the "LO" setting for proper cooktop, bake and broil burner flame is very important. NOTE: The broil burner will be stamped with 2 screws....

