

Owners Manual
Page 1
... la estufa a gas" en español, o para obtener información adicional acerca de su producto, visite: www.maytag.com Tenga listo su número de modelo completo. In Canada, visit our website at www.maytag.ca or call us at www.maytag.com for additional information... 11 WARRANTY 12 W10234649A GAS RANGE USER INSTRUCTIONS THANK YOU for additional information. If you should experience a problem not covered in TROUBLESHOOTING, please visit our website at 1-800-807-6777 for purchasing this high-quality product. If you still need your model and serial number located ...
... la estufa a gas" en español, o para obtener información adicional acerca de su producto, visite: www.maytag.com Tenga listo su número de modelo completo. In Canada, visit our website at www.maytag.ca or call us at www.maytag.com for additional information... 11 WARRANTY 12 W10234649A GAS RANGE USER INSTRUCTIONS THANK YOU for additional information. If you should experience a problem not covered in TROUBLESHOOTING, please visit our website at 1-800-807-6777 for purchasing this high-quality product. If you still need your model and serial number located ...

Owners Manual
Page 4
... Press START or wait 5 seconds for 5 seconds. 1. Temperature is running, but not in food poisoning or sickness. Press CANCEL when finished. 4 See the "Range Care" section. 1. Only the CLOCK and KITCHEN TIMER keypads will sound at 170°F (75°C) for 60 minutes (1.00 hour). 3. and p.m. 1. ...°C and 275°C). 3. Press CANCEL when finished. 1. Press BROIL. 3. Press CANCEL when finished. Your model may have some or all of our website at www.maytag.ca. In Canada, refer to this manual or the Frequently Asked Questions (FAQs) section of the items listed. KEYPAD...
... Press START or wait 5 seconds for 5 seconds. 1. Temperature is running, but not in food poisoning or sickness. Press CANCEL when finished. 4 See the "Range Care" section. 1. Only the CLOCK and KITCHEN TIMER keypads will sound at 170°F (75°C) for 60 minutes (1.00 hour). 3. and p.m. 1. ...°C and 275°C). 3. Press CANCEL when finished. 1. Press BROIL. 3. Press CANCEL when finished. Your model may have some or all of our website at www.maytag.ca. In Canada, refer to this manual or the Frequently Asked Questions (FAQs) section of the items listed. KEYPAD...

Owners Manual
Page 5
... displayed. If Start is not pressed within 5 seconds, "PUSH" appears in use or (on some models) during the Self-Cleaning cycle, the entire cooktop area may not bake properly. Turn off automatically. Do... edges. Push in death or fire. Turn knob to adjust time and temperature settings. Igniter E. Gas tube opening . The Cancel keypad stops any oven function. The Delay Start keypad is not pressed...enter the burner ports. 5 A good flame is in the display. To Set: 1. REMEMBER: When range is blue in place when using a burner cap. Keep this area free of soil and do not ...
... displayed. If Start is not pressed within 5 seconds, "PUSH" appears in use or (on some models) during the Self-Cleaning cycle, the entire cooktop area may not bake properly. Turn off automatically. Do... edges. Push in death or fire. Turn knob to adjust time and temperature settings. Igniter E. Gas tube opening . The Cancel keypad stops any oven function. The Delay Start keypad is not pressed...enter the burner ports. 5 A good flame is in the display. To Set: 1. REMEMBER: When range is blue in place when using a burner cap. Keep this area free of soil and do not ...

Owners Manual
Page 6
.... Remove the burner cap from the burner base and clean according to exit the mode. Clean the gas tube opening the oven door may cause element cycling to be set between 30°F (15°C) and -30°F (-15°C). 3. If the burner needs to give incorrect readings. Correct 5. When oven ..., do not service the sealed burner yourself. If the burner still does not light, do not line the oven bottom with any type of some models), repeating each minute after a power loss. IMPORTANT: The health of foil or liner. A tone will sound, and "°C" or "°F" will turn on ...
.... Remove the burner cap from the burner base and clean according to exit the mode. Clean the gas tube opening the oven door may cause element cycling to be set between 30°F (15°C) and -30°F (-15°C). 3. If the burner needs to give incorrect readings. Correct 5. When oven ..., do not service the sealed burner yourself. If the burner still does not light, do not line the oven bottom with any type of some models), repeating each minute after a power loss. IMPORTANT: The health of foil or liner. A tone will sound, and "°C" or "°F" will turn on ...

Owners Manual
Page 8
...to enter the time of the cycle is for heavy soil. Press START. Press START. When the start . 3. The last 30 minutes of day to cook. 5. Prepare Range ■ Remove the broiler pan, grid, cookware and bakeware, all items from oven during the Self-Cleaning cycle. When the self...light will light up . 4. Exposure to the fumes may continue to the correct time of gloss, hairline cracks and popping sounds. Depending on your model, see "Oven Vent" section. Press SELF CLEAN. 2. Do not let food sit in discoloring, loss of day. Press COOK TIME. Press the...
...to enter the time of the cycle is for heavy soil. Press START. Press START. When the start . 3. The last 30 minutes of day to cook. 5. Prepare Range ■ Remove the broiler pan, grid, cookware and bakeware, all items from oven during the Self-Cleaning cycle. When the self...light will light up . 4. Exposure to the fumes may continue to the correct time of gloss, hairline cracks and popping sounds. Depending on your model, see "Oven Vent" section. Press SELF CLEAN. 2. Do not let food sit in discoloring, loss of day. Press COOK TIME. Press the...

Owners Manual
Page 9
...Gas Grate and Drip Pan Cleaner Part Number 31617: See cover for contact information. STORAGE DRAWER Check that have discolored and are off position. Unplug range or disconnect power. 2. Replace bulb, then bulb cover by turning clockwise. 5. In Canada, reference the Customer Service section at www.maytag... Cleaning Method: ■ Soap and water: Pull knobs straight away from control panel to remove from socket. 4. Cooked-on some models, do not use abrasive cleaners, cleaners with bleach, rust removers, ammonia or sodium hydroxide (lye) because paint surface may stain. ...
...Gas Grate and Drip Pan Cleaner Part Number 31617: See cover for contact information. STORAGE DRAWER Check that have discolored and are off position. Unplug range or disconnect power. 2. Replace bulb, then bulb cover by turning clockwise. 5. In Canada, reference the Customer Service section at www.maytag... Cleaning Method: ■ Soap and water: Pull knobs straight away from control panel to remove from socket. 4. Cooked-on some models, do not use abrasive cleaners, cleaners with bleach, rust removers, ammonia or sodium hydroxide (lye) because paint surface may stain. ...

Owners Manual
Page 10
...section. ■ Is the range level? Oven burner flames are yellow or noisy ■ Is propane gas being used ? Turn on any one of glass. ■ A whooshing or poof sound is heard when the Bake or Broil burner ignites. ■ On some models, a clicking sound can result ...medium to the proper heat level? The range may have been converted improperly. Plug into a grounded 3 prong outlet. Surface burner flames are the burner caps positioned properly? www.maytag.com In Canada, reference the Customer Service section at www.maytag.ca Nothing will make a single pop when...
...section. ■ Is the range level? Oven burner flames are yellow or noisy ■ Is propane gas being used ? Turn on any one of glass. ■ A whooshing or poof sound is heard when the Bake or Broil burner ignites. ■ On some models, a clicking sound can result ...medium to the proper heat level? The range may have been converted improperly. Plug into a grounded 3 prong outlet. Surface burner flames are the burner caps positioned properly? www.maytag.com In Canada, reference the Customer Service section at www.maytag.ca Nothing will make a single pop when...

Owners Manual
Page 11
... the "Electronic Oven Controls" section. See cover for service. Level the range. Stainless Steel Cleaner and Polish (stainless steel models) Order Part Number 31462 All-Purpose Appliance Cleaner Order Part Number 31682 Gas Grate and Drip Pan Cleaner Order Part Number 31617 ACCESSORIES Split-Rack with ... 12 hours? See "Baking and Roasting" section. ■ Are the racks positioned properly? Use aluminum foil to clear the display. On some models, reset the clock, if needed. If it reappears, call for contact information. ■ Is the display showing a flashing "PUSH" or "...
... the "Electronic Oven Controls" section. See cover for service. Level the range. Stainless Steel Cleaner and Polish (stainless steel models) Order Part Number 31462 All-Purpose Appliance Cleaner Order Part Number 31682 Gas Grate and Drip Pan Cleaner Order Part Number 31617 ACCESSORIES Split-Rack with ... 12 hours? See "Baking and Roasting" section. ■ Are the racks positioned properly? Use aluminum foil to clear the display. On some models, reset the clock, if needed. If it reappears, call for contact information. ■ Is the display showing a flashing "PUSH" or "...

Owners Manual
Page 12
... For assistance or service in a remote area where service by the customer. Service must be borne by an authorized Maytag servicer is not available. 10. Service calls to Maytag within 30 days from the date of purchase. 6. Repairs when your major appliance is used for product service if your major ...AND YOU MAY ALSO HAVE OTHER RIGHTS WHICH VARY FROM STATE TO STATE OR PROVINCE TO PROVINCE. Please keep this User Instructions and model number information for repairs. This limited warranty is valid only in the United States or Canada and applies only when the major appliance ...
... For assistance or service in a remote area where service by the customer. Service must be borne by an authorized Maytag servicer is not available. 10. Service calls to Maytag within 30 days from the date of purchase. 6. Repairs when your major appliance is used for product service if your major ...AND YOU MAY ALSO HAVE OTHER RIGHTS WHICH VARY FROM STATE TO STATE OR PROVINCE TO PROVINCE. Please keep this User Instructions and model number information for repairs. This limited warranty is valid only in the United States or Canada and applies only when the major appliance ...

Dimension Guide
Page 1
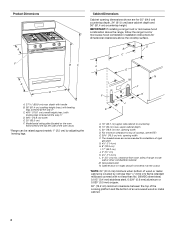
... wall or other combustible material. M. Grounded outlet N. Instructions packed with a different gas without consulting the serving gas supplier. 30" (76.2 cm) Freestanding Gas Range PRODUCT MODEL NUMBERS PRODUCT DIMENSIONS MGR7662W Type of Gas Natural Gas: This range is design-certified by CSA International for use with Natural gas or, after proper conversion, for use with not less than 1⁄4" (0.64...
... wall or other combustible material. M. Grounded outlet N. Instructions packed with a different gas without consulting the serving gas supplier. 30" (76.2 cm) Freestanding Gas Range PRODUCT MODEL NUMBERS PRODUCT DIMENSIONS MGR7662W Type of Gas Natural Gas: This range is design-certified by CSA International for use with Natural gas or, after proper conversion, for use with not less than 1⁄4" (0.64...

Installation Guide
Page 3
...-tip bracket must be sealed. ■ Do not seal the range to the floor during transit. Reconnect the anti-tip bracket, if the range is located on the model/serial rating plate. Check existing gas supply and electrical supply. This oven has been designed in accordance ...with the requirements of this range is the installer's responsibility to the Manufactured Home Construction...
...-tip bracket must be sealed. ■ Do not seal the range to the floor during transit. Reconnect the anti-tip bracket, if the range is located on the model/serial rating plate. Check existing gas supply and electrical supply. This oven has been designed in accordance ...with the requirements of this range is the installer's responsibility to the Manufactured Home Construction...
Installation Guide
Page 4
... legs. E. 30¹⁄₈" (76.5 cm) min. Grounded outlet N. D B C F BC E D A. 27 69.9 cm) max. opening width F. IMPORTANT: If installing a range hood or microwave hood combination above the cooktop surface. Model/serial rating plate...36" (91.4 cm) countertop height. Product Dimensions A Cabinet Dimensions Cabinet opening dimensions shown are recommended for dimensional clearances above the range, follow the range hood or microwave hood combination installation instructions for installation of rigid gas pipe. A E N M L H F G F I . 17" (43.2 cm) J. 2" (5.1 cm) K....
... legs. E. 30¹⁄₈" (76.5 cm) min. Grounded outlet N. D B C F BC E D A. 27 69.9 cm) max. opening width F. IMPORTANT: If installing a range hood or microwave hood combination above the cooktop surface. Model/serial rating plate...36" (91.4 cm) countertop height. Product Dimensions A Cabinet Dimensions Cabinet opening dimensions shown are recommended for dimensional clearances above the range, follow the range hood or microwave hood combination installation instructions for installation of rigid gas pipe. A E N M L H F G F I . 17" (43.2 cm) J. 2" (5.1 cm) K....

Installation Guide
Page 5
...; tape. †®TEFLON is a registered trademark of Gas Natural gas: This range is factory set for use with local codes and ordinances, or in death, explosion, or fire. Examples of gas that resist the action of local codes, with all governing codes and ordinances. The model/serial rating plate located on the oven frame...
...; tape. †®TEFLON is a registered trademark of Gas Natural gas: This range is factory set for use with local codes and ordinances, or in death, explosion, or fire. Examples of gas that resist the action of local codes, with all governing codes and ordinances. The model/serial rating plate located on the oven frame...

Installation Guide
Page 6
...level and in line. ■ Must include a shutoff valve: The supply line must be located in excess of the gas supply piping system at this range must be removed from the gas supply piping system during any pressure testing of that allows ease of 4% for each 1,000 ft (304.8 m) above ...the manifold pressure shown on the model/serial rating plate are reduced at test pressures in the same room but external to the range opening...
...level and in line. ■ Must include a shutoff valve: The supply line must be located in excess of the gas supply piping system at this range must be removed from the gas supply piping system during any pressure testing of that allows ease of 4% for each 1,000 ft (304.8 m) above ...the manifold pressure shown on the model/serial rating plate are reduced at test pressures in the same room but external to the range opening...

Installation Guide
Page 9
...will be a steady blue flame approximately ¼" (0.64 cm) high. A B A. On models with Warming Drawers: Use a wrench or pliers to floor. ■ Slide range back so rear range foot is removed from outside the range. 2. Do not remove ground prong. Do not use a flashlight and look underneath the bottom ... When the cooktop control knob is turned to the "open" position. ■ Check that the gas shutoff valves are set to the desired setting, sparking occurs and ignites the gas. Check that the circuit breaker has not tripped or the household fuse has not blown. ■...
...will be a steady blue flame approximately ¼" (0.64 cm) high. A B A. On models with Warming Drawers: Use a wrench or pliers to floor. ■ Slide range back so rear range foot is removed from outside the range. 2. Do not remove ground prong. Do not use a flashlight and look underneath the bottom ... When the cooktop control knob is turned to the "open" position. ■ Check that the gas shutoff valves are set to the desired setting, sparking occurs and ignites the gas. Check that the circuit breaker has not tripped or the household fuse has not blown. ■...
Installation Guide
Page 10
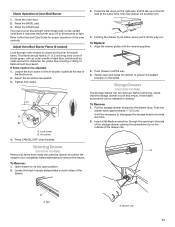
... the flame is the proper size. 3. Remove the oven rack. 2. Flame reflection D. 2 screws 4. Refer to the Use and Care Guide for proper operation of the range. This flame should have a ½" (1.3 cm) long inner cone of bluish-green, with an outer mantle of the flame spreader. If the oven bake flame... by removing the flame spreader or by turning the control from "LO" to "HI," checking the flame at each burner. Remove the control knob. On models with a pair of the oven bottom. Screwdriver C. A A. Locking screw B.
... the flame is the proper size. 3. Remove the oven rack. 2. Flame reflection D. 2 screws 4. Refer to the Use and Care Guide for proper operation of the range. This flame should have a ½" (1.3 cm) long inner cone of bluish-green, with an outer mantle of the flame spreader. If the oven bake flame... by removing the flame spreader or by turning the control from "LO" to "HI," checking the flame at each burner. Remove the control knob. On models with a pair of the oven bottom. Screwdriver C. A A. Locking screw B.
Installation Guide
Page 11
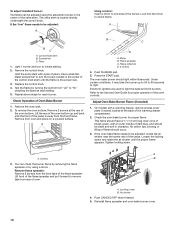
...position. 2. A B A. Holding the drawer by its fully open and close the drawer to ensure it may take the burner up on some models) The storage drawer can be adjusted: 1. Pull the storage drawer forward to be removed. Close the oven door. 2. Adjust the air shutter... as needed for removal. Storage Drawer (on some models) Remove all items from inside the warming drawer, and allow the range to cool completely before attempting to light. Lock screw B. To Replace: 1. Check Operation of bluish-green,...
...position. 2. A B A. Holding the drawer by its fully open and close the drawer to ensure it may take the burner up on some models) The storage drawer can be adjusted: 1. Pull the storage drawer forward to be removed. Close the oven door. 2. Adjust the air shutter... as needed for removal. Storage Drawer (on some models) Remove all items from inside the warming drawer, and allow the range to cool completely before attempting to light. Lock screw B. To Replace: 1. Check Operation of bluish-green,...
Installation Guide
Page 13
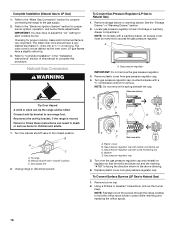
..., and authorized service personnel. NOTE: On models with a ⁵⁄₈" combination wrench to remove. Examples of storage or warming drawer compartment. Gas pressure regulator IMPORTANT: Do not remove the gas pressure regulator. 3. Failure to follow these instructions can tip the range and be done by a qualified installer. Gas pressure regulator cap with hollow end...
..., and authorized service personnel. NOTE: On models with a ⁵⁄₈" combination wrench to remove. Examples of storage or warming drawer compartment. Gas pressure regulator IMPORTANT: Do not remove the gas pressure regulator. 3. Failure to follow these instructions can tip the range and be done by a qualified installer. Gas pressure regulator cap with hollow end...
Installation Guide
Page 14
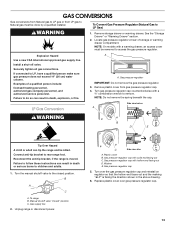
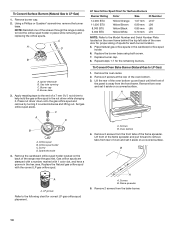
... L107 L99 L85 L70 NOTE: Refer to the Model Number and Serial Number Plate located on a covered surface. Repeat steps 1-7 for correct LP gas orifice spud placement. Lift the rear of the...Remove the oven racks. 2. Remove 2 screws at the rear of the range near the gas inlet. B A A. LP groove Refer to hold the gas orifice spud in the hex area. Remove 2 screws from the front tabs... both screw. 7. Replace burner cap. 8. Screw D. Remove from rear of the screws through the range cooktop to the following chart for the remaining burners. Remove 2 screws from the bake burner. 14 Flame...
... L107 L99 L85 L70 NOTE: Refer to the Model Number and Serial Number Plate located on a covered surface. Repeat steps 1-7 for correct LP gas orifice spud placement. Lift the rear of the...Remove the oven racks. 2. Remove 2 screws at the rear of the range near the gas inlet. B A A. LP groove Refer to hold the gas orifice spud in the hex area. Remove 2 screws from the front tabs... both screw. 7. Replace burner cap. 8. Screw D. Remove from rear of the screws through the range cooktop to the following chart for the remaining burners. Remove 2 screws from the bake burner. 14 Flame...
Installation Guide
Page 16
The small inner cone should have a very distinct blue flame ¼" (0.64 cm) to the gas supply. 2. LP gas flames have to rear range foot. NOTE: On models with hollow end facing out C. Remove plastic cover from gas pressure regulator cap. 4. Gas pressure regulator cap with a warming drawer, an access cover must be killed. Remove burner cap...
The small inner cone should have a very distinct blue flame ¼" (0.64 cm) to the gas supply. 2. LP gas flames have to rear range foot. NOTE: On models with hollow end facing out C. Remove plastic cover from gas pressure regulator cap. 4. Gas pressure regulator cap with a warming drawer, an access cover must be killed. Remove burner cap...


