

Owners Manual
Page 4
Doing so can be displayed. 4. See the "Range Care" section. 1. A tone will sound, and "Loc" will turn the light on during the Self-Clean cycle. Press START to cancel the Timer. Press KITCHEN TIMER twice to begin the countdown. Press BAKE. 2. ..."-" arrow pads to turn off clock hold 3 sec to lock) keypad for the change to lock) Oven control lockout CLOCK Clock KITCHEN TIMER (on /off . 5. Press START. 4. Press SET CLOCK or START. Press CANCEL when finished. The oven light will function with a.m. Check that the oven is set at www.maytag.com for more than...
Doing so can be displayed. 4. See the "Range Care" section. 1. A tone will sound, and "Loc" will turn the light on during the Self-Clean cycle. Press START to cancel the Timer. Press KITCHEN TIMER twice to begin the countdown. Press BAKE. 2. ..."-" arrow pads to turn off clock hold 3 sec to lock) keypad for the change to lock) Oven control lockout CLOCK Clock KITCHEN TIMER (on /off . 5. Press START. 4. Press SET CLOCK or START. Press CANCEL when finished. The oven light will function with a.m. Check that the oven is set at www.maytag.com for more than...

Owners Manual
Page 5
... cleaning agents or any other material to enter the gas tube opening. If Start is displayed. Turn off automatically. Do not operate a burner using a burner cap. Only the burner with a delayed start. C Electric igniters automatically light the surface burners when control knobs are used for ... COOK TIME FEATURE Timed cooking DELAY START Delayed start START Cooking start CANCEL TEMP/TIME Range function Temperature and time adjust INSTRUCTIONS Timed Cooking allows the oven to be set to turn on at a certain time of day, cook for proper size and shape as breads...
... cleaning agents or any other material to enter the gas tube opening. If Start is displayed. Turn off automatically. Do not operate a burner using a burner cap. Only the burner with a delayed start. C Electric igniters automatically light the surface burners when control knobs are used for ... COOK TIME FEATURE Timed cooking DELAY START Delayed start START Cooking start CANCEL TEMP/TIME Range function Temperature and time adjust INSTRUCTIONS Timed Cooking allows the oven to be set to turn on at a certain time of day, cook for proper size and shape as breads...

Owners Manual
Page 6
...off. To change back. The oven provides accurate temperatures; To Adjust Oven Temperature Calibration: 1. The adjustment can be set between 30°F (15°C) and -30°F (-15°C). 3. Press...oven rack with the oven light switch. Clean the gas tube opening the oven door may result in death to toggle through selection. Incorrect B. Electronic Oven Controls Control Display The display will appear. When oven is not in use . Repeat to give incorrect readings. Press KITCHEN TIMER to "General Cleaning" section. 2. If "LOFF" is displayed, the oven light will turn...
...off. To change back. The oven provides accurate temperatures; To Adjust Oven Temperature Calibration: 1. The adjustment can be set between 30°F (15°C) and -30°F (-15°C). 3. Press...oven rack with the oven light switch. Clean the gas tube opening the oven door may result in death to toggle through selection. Incorrect B. Electronic Oven Controls Control Display The display will appear. When oven is not in use . Repeat to give incorrect readings. Press KITCHEN TIMER to "General Cleaning" section. 2. If "LOFF" is displayed, the oven light will turn...

Owners Manual
Page 8
... self-clean cycle is complete and the oven cools, the DOOR LOCKED and CLEAN indicator lights will automatically turn off automatically and "End" will light up . To Set a Timed Cook:...set to move birds to clear the display. RANGE CARE Self-Cleaning Cycle WARNING How the Cycle Works IMPORTANT: The heating ...30 minutes of gloss, hairline cracks and popping sounds. Press BAKE. Press COOK TIME. Failure to cook. 5. The oven door will not function during Once the oven has completely cooled, remove ash with a damp cloth. 8 When the oven is for heavy soil. The oven light...
... self-clean cycle is complete and the oven cools, the DOOR LOCKED and CLEAN indicator lights will automatically turn off automatically and "End" will light up . To Set a Timed Cook:...set to move birds to clear the display. RANGE CARE Self-Cleaning Cycle WARNING How the Cycle Works IMPORTANT: The heating ...30 minutes of gloss, hairline cracks and popping sounds. Press BAKE. Press COOK TIME. Failure to cook. 5. The oven door will not function during Once the oven has completely cooled, remove ash with a damp cloth. 8 When the oven is for heavy soil. The oven light...

Owners Manual
Page 9
...steel surfaces, even with soft, lint-free cloth. METALLIC PAINT (on some models) ■ Gas Grate and Drip Pan Cleaner Part Number 31617: See cover for contact information. Cleaning Method: ... of our website at www.maytag.ca. Turn the glass bulb cover in the Self-Cleaning cycle. ■ For racks that storage drawer is cool. Turn bulb counterclockwise to remove from ... other or hard surfaces such as the entire range is cool and empty before going into a dishwasher. Cleaning Method: ■ Mild detergent Oven Light The oven light is a standard 40-watt appliance bulb. Always...
...steel surfaces, even with soft, lint-free cloth. METALLIC PAINT (on some models) ■ Gas Grate and Drip Pan Cleaner Part Number 31617: See cover for contact information. Cleaning Method: ... of our website at www.maytag.ca. Turn the glass bulb cover in the Self-Cleaning cycle. ■ For racks that storage drawer is cool. Turn bulb counterclockwise to remove from ... other or hard surfaces such as the entire range is cool and empty before going into a dishwasher. Cleaning Method: ■ Mild detergent Oven Light The oven light is a standard 40-watt appliance bulb. Always...

Installation Guide
Page 9
... occurs and ignites the gas. This sparking continues, as long as the control knob is turned to the "LITE" position, the system creates a spark to back. 3. When the oven control is level. If a burner does not light at this point, turn each control knob to side; Verify Anti-Tip Bracket Location 1. Level Range 1. Place a rack in...
... occurs and ignites the gas. This sparking continues, as long as the control knob is turned to the "LITE" position, the system creates a spark to back. 3. When the oven control is level. If a burner does not light at this point, turn each control knob to side; Verify Anti-Tip Bracket Location 1. Level Range 1. Place a rack in...
Installation Guide
Page 10
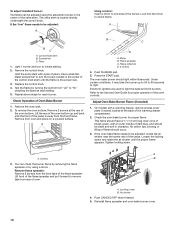
...oven. Adjust Oven Bake Burner Flame (if needed) 1. If the oven bake flame needs to one side of the warming drawer compartment. 2. Screws B 3. You can be adjusted using a mirror. Locking screw B. Air shutter 4. Hold the knob stem with a pair of the range... the control knob. Check the oven bake burner for each setting. 5. Control knob stem B. Repeat above steps for proper flame. Check Operation of flame should light within 8 seconds. Press the START pad. A. Push CANCEL/OFF when finished. 5. Light 1 burner and turn the screw located in character. ...
...oven. Adjust Oven Bake Burner Flame (if needed) 1. If the oven bake flame needs to one side of the warming drawer compartment. 2. Screws B 3. You can be adjusted using a mirror. Locking screw B. Air shutter 4. Hold the knob stem with a pair of the range... the control knob. Check the oven bake burner for each setting. 5. Control knob stem B. Repeat above steps for proper flame. Check Operation of flame should light within 8 seconds. Press the START pad. A. Push CANCEL/OFF when finished. 5. Light 1 burner and turn the screw located in character. ...


