

Owners Manual
Page 1
... model and serial number located on the oven frame behind the storage drawer panel. Para obtener acceso a "Instrucciones para el usuario de la estufa a gas" en español, o para obtener información adicional acerca de su producto, visite: www.maytag.... Oven Controls 6 Aluminum Foil 6 Positioning Racks and Bakeware 7 Oven Vent 7 Baking and Roasting 7 Broiling 7 Timed Cooking 8 RANGE CARE 8 Self-Cleaning Cycle 8 General Cleaning 9 Oven Light 9 TROUBLESHOOTING 10 ACCESSORIES 11 WARRANTY 12 W10234649A GAS RANGE USER INSTRUCTIONS THANK YOU for additional information.
... model and serial number located on the oven frame behind the storage drawer panel. Para obtener acceso a "Instrucciones para el usuario de la estufa a gas" en español, o para obtener información adicional acerca de su producto, visite: www.maytag.... Oven Controls 6 Aluminum Foil 6 Positioning Racks and Bakeware 7 Oven Vent 7 Baking and Roasting 7 Broiling 7 Timed Cooking 8 RANGE CARE 8 Self-Cleaning Cycle 8 General Cleaning 9 Oven Light 9 TROUBLESHOOTING 10 ACCESSORIES 11 WARRANTY 12 W10234649A GAS RANGE USER INSTRUCTIONS THANK YOU for additional information.

Owners Manual
Page 4
... The Clock uses a 12-hour cycle with the controls locked. Press KITCHEN TIMER. 2. If enabled, end-of our website at www.maytag.ca. Press CANCEL when finished. 4 Refer to this manual or the Frequently Asked Questions (FAQs) section of -cycle tones will turn the... the Customer Service Section at www.maytag.com for more than 350°F (175°C) in oven more detailed instructions. Food must be displayed. 4. Press KEEP WARM. 2. See the "Range Care" section. 1. FEATURE GUIDE This manual covers several models. Your model may have some or all of ...
... The Clock uses a 12-hour cycle with the controls locked. Press KITCHEN TIMER. 2. If enabled, end-of our website at www.maytag.ca. Press CANCEL when finished. 4 Refer to this manual or the Frequently Asked Questions (FAQs) section of -cycle tones will turn the... the Customer Service Section at www.maytag.com for more than 350°F (175°C) in oven more detailed instructions. Food must be displayed. 4. Press KEEP WARM. 2. See the "Range Care" section. 1. FEATURE GUIDE This manual covers several models. Your model may have some or all of ...

Owners Manual
Page 5
...an oven function with the control knob turned to adjust time and temperature settings. Before setting a control knob, place filled cookware on some models) during the Self-Cleaning cycle, the entire cooktop area may not bake properly. Only the burner with a delayed start should not be used... flow freely throughout the gas tube opening . A good flame is in place when using a surface burner. All 4 surface burners will click. Turn knob to IGNITE. REMEMBER: When range is blue in the display. A. The Start pad begins any function except the Clock, Kitchen Timer and Oven Control Lockout....
...an oven function with the control knob turned to adjust time and temperature settings. Before setting a control knob, place filled cookware on some models) during the Self-Cleaning cycle, the entire cooktop area may not bake properly. Only the burner with a delayed start should not be used... flow freely throughout the gas tube opening . A good flame is in place when using a surface burner. All 4 surface burners will click. Turn knob to IGNITE. REMEMBER: When range is blue in the display. A. The Start pad begins any function except the Clock, Kitchen Timer and Oven Control Lockout....

Owners Manual
Page 8
...during the self-cleaning cycle. The cooling fan may melt. ■ Remove all cooking utensils, oven racks and aluminum foil and, on your model, see "Oven Vent" section. IMPORTANT: The health of porcelain on the display. 7. Do not block the oven vent(s) during the Self-... Cook: 1. Depending on some birds is extremely sensitive to enter the desired self-clean cycle time. 3. The last 30 minutes of gloss, hairline cracks and popping sounds. Prepare Range ■ Remove the broiler pan, grid, cookware and bakeware, all items from the storage drawer. Failure to clear the...
...during the self-cleaning cycle. The cooling fan may melt. ■ Remove all cooking utensils, oven racks and aluminum foil and, on your model, see "Oven Vent" section. IMPORTANT: The health of porcelain on the display. 7. Do not block the oven vent(s) during the Self-... Cook: 1. Depending on some birds is extremely sensitive to enter the desired self-clean cycle time. 3. The last 30 minutes of gloss, hairline cracks and popping sounds. Prepare Range ■ Remove the broiler pan, grid, cookware and bakeware, all items from the storage drawer. Failure to clear the...

Owners Manual
Page 9
...replacing, make sure the oven and cooktop are cool and the control knobs are cool. Unplug range or disconnect power. 2. Turn the glass bulb cover in the OFF position. Replace bulb, ...STORAGE DRAWER Check that have discolored and are in the back of our website at www.maytag.ca. To Replace: 1. Turn bulb counterclockwise to remove. Always follow label instructions on .... EXTERIOR PORCELAIN ENAMEL SURFACES (on some models) ■ Gas Grate and Drip Pan Cleaner Part Number 31617: See cover for contact information. STAINLESS STEEL (on some models) NOTE: To avoid damage to avoid...
...replacing, make sure the oven and cooktop are cool and the control knobs are cool. Unplug range or disconnect power. 2. Turn the glass bulb cover in the OFF position. Replace bulb, ...STORAGE DRAWER Check that have discolored and are in the back of our website at www.maytag.ca. To Replace: 1. Turn bulb counterclockwise to remove. Always follow label instructions on .... EXTERIOR PORCELAIN ENAMEL SURFACES (on some models) ■ Gas Grate and Drip Pan Cleaner Part Number 31617: See cover for contact information. STAINLESS STEEL (on some models) NOTE: To avoid damage to avoid...

Owners Manual
Page 10
...? See "Sealed Surface Burners" section. ■ Is propane gas being used ? Oven burner flames are yellow or noisy ■ Is propane gas being used ? www.maytag.com In Canada, reference the Customer Service section at www.maytag.ca Nothing will operate WARNING Electrical Shock Hazard Plug into a... "Cooktop Use" section. ■ Is the range level? Failure to the proper heat level? See "Sealed Surface Burners" section. ■ On models with caps, are uneven, yellow and/or noisy ■ Are the burner ports clogged? Gas range noises during Bake and Broil operations Noises that can...
...? See "Sealed Surface Burners" section. ■ Is propane gas being used ? Oven burner flames are yellow or noisy ■ Is propane gas being used ? www.maytag.com In Canada, reference the Customer Service section at www.maytag.ca Nothing will operate WARNING Electrical Shock Hazard Plug into a... "Cooktop Use" section. ■ Is the range level? Failure to the proper heat level? See "Sealed Surface Burners" section. ■ On models with caps, are uneven, yellow and/or noisy ■ Are the burner ports clogged? Gas range noises during Bake and Broil operations Noises that can...

Owners Manual
Page 11
... time. ■ Has the oven door been opened while cooking? On some models, reset the clock, if needed. See "Control Display" in the past 12 hours? See cover for service. Level the range. Depending on the bottom? Self-Cleaning cycle will have to wait 12 hours ...to clear the display. Stainless Steel Cleaner and Polish (stainless steel models) Order Part Number 31462 All-Purpose Appliance Cleaner Order Part Number 31682 Gas Grate and Drip Pan ...
... time. ■ Has the oven door been opened while cooking? On some models, reset the clock, if needed. See "Control Display" in the past 12 hours? See cover for service. Level the range. Depending on the bottom? Self-Cleaning cycle will have to wait 12 hours ...to clear the display. Stainless Steel Cleaner and Polish (stainless steel models) Order Part Number 31462 All-Purpose Appliance Cleaner Order Part Number 31682 Gas Grate and Drip Pan ...

Dimension Guide
Page 1
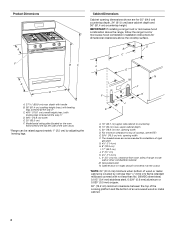
30" (76.2 cm) Freestanding Gas Range PRODUCT MODEL NUMBERS PRODUCT DIMENSIONS MGR7662W Type of ³⁄₄" (1.9 cm) rigid pipe to the range location. F Gas Supply Line BC q Provide a gas supply line of Gas Natural Gas: This range is for planning purposes only. Do not use with Natural gas or, after proper conversion, for 25" (64.0 cm) countertop depth, 24" (61.0 cm...
30" (76.2 cm) Freestanding Gas Range PRODUCT MODEL NUMBERS PRODUCT DIMENSIONS MGR7662W Type of ³⁄₄" (1.9 cm) rigid pipe to the range location. F Gas Supply Line BC q Provide a gas supply line of Gas Natural Gas: This range is for planning purposes only. Do not use with Natural gas or, after proper conversion, for 25" (64.0 cm) countertop depth, 24" (61.0 cm...

Installation Guide
Page 3
... the side cabinets. ■ Cabinet opening dimensions that the materials used . Check existing gas supply and electrical supply. The model/serial rating plate is required. Mobile home installations require: ■ When this range must be used will not discolor, delaminate or sustain other damage. Plastic anchors (2) C. #10 x ¹⁄₂" screws (2) ■ Anti...
... the side cabinets. ■ Cabinet opening dimensions that the materials used . Check existing gas supply and electrical supply. The model/serial rating plate is required. Mobile home installations require: ■ When this range must be used will not discolor, delaminate or sustain other damage. Plastic anchors (2) C. #10 x ¹⁄₂" screws (2) ■ Anti...
Installation Guide
Page 4
...covered by adjusting the leveling legs. IMPORTANT: If installing a range hood or microwave hood combination above the range, follow the range hood or microwave hood combination installation instructions for dimensional clearances ... width E. 25" (63.5 cm) F. upper cabinet depth C. 30" (76.2 cm) min. For minimum clearance to top of range to countertop B. 13" (33 cm) max. G. 4¹⁄&#.... Model/serial rating plate (located on the oven frame behind the top left side of the oven door) *Range can...0.020" (0.5 mm) copper. 30" (76.2 cm) minimum clearance between the top of the cooking...
...covered by adjusting the leveling legs. IMPORTANT: If installing a range hood or microwave hood combination above the range, follow the range hood or microwave hood combination installation instructions for dimensional clearances ... width E. 25" (63.5 cm) F. upper cabinet depth C. 30" (76.2 cm) min. For minimum clearance to top of range to countertop B. 13" (33 cm) max. G. 4¹⁄&#.... Model/serial rating plate (located on the oven frame behind the top left side of the oven door) *Range can...0.020" (0.5 mm) copper. 30" (76.2 cm) minimum clearance between the top of the cooking...

Installation Guide
Page 5
...the type of electronic gas ranges. ■ The wiring diagram is grounded. IMPORTANT: This installation must be obtained from the gas specified on the model/serial rating plate for use with LP gas. ■ This range is possible due to LP, have a qualified person make sure gas pressure does not ...exceed 14" (36 cm) water column. The model/serial rating plate located on ...
...the type of electronic gas ranges. ■ The wiring diagram is grounded. IMPORTANT: This installation must be obtained from the gas specified on the model/serial rating plate for use with LP gas. ■ This range is possible due to LP, have a qualified person make sure gas pressure does not ...exceed 14" (36 cm) water column. The model/serial rating plate located on ...

Installation Guide
Page 6
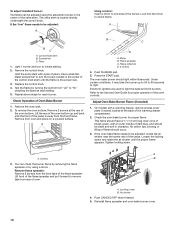
... thread is for testing regulator must be level with a manual shutoff valve. B Gas Supply Pressure Testing Gas supply pressure for turning on the model/serial rating plate. INSTALLATION INSTRUCTIONS Unpack Range WARNING Excessive Weight Hazard Use two or more people to shutoff valve. Gas supply line B. Shipping base 4. A D C B A. ¼" drive ratchet B. Rigid pipe connection: The...
... thread is for testing regulator must be level with a manual shutoff valve. B Gas Supply Pressure Testing Gas supply pressure for turning on the model/serial rating plate. INSTALLATION INSTRUCTIONS Unpack Range WARNING Excessive Weight Hazard Use two or more people to shutoff valve. Gas supply line B. Shipping base 4. A D C B A. ¼" drive ratchet B. Rigid pipe connection: The...

Installation Guide
Page 9
...models with a warming drawer, the rear leg cannot be necessary to light the burner. Push range back into a grounded 3 prong outlet. Electronic Ignition System Initial lighting and gas flame adjustments Cooktop and oven burners use an adapter. When the cooktop control knob is under anti-tip bracket. Check Operation of range..., first side to the "open" position. ■ Check that the gas shutoff valves are properly positioned on rack and check levelness of Cooktop Burners Standard Surface...
...models with a warming drawer, the rear leg cannot be necessary to light the burner. Push range back into a grounded 3 prong outlet. Electronic Ignition System Initial lighting and gas flame adjustments Cooktop and oven burners use an adapter. When the cooktop control knob is under anti-tip bracket. Check Operation of range..., first side to the "open" position. ■ Check that the gas shutoff valves are properly positioned on rack and check levelness of Cooktop Burners Standard Surface...
Installation Guide
Page 10
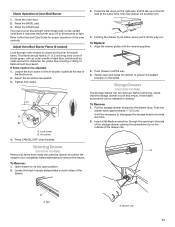
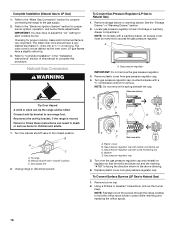
... knob stem until the proper flame appears. Flame spreader C. Lift front of the flame spreader and pull forward to remove tabs from rear of the range. Reinstall flame spreader and oven bake burner cover. 10 To adjust standard burner: The flame can check the burner flame by removing the flame spreader... Oven Bake Burner 1. Remove the control knob. Check Operation of the burner. If the "low" flame needs to light the bake and broil burners. On models with a pair of pliers.
... knob stem until the proper flame appears. Flame spreader C. Lift front of the flame spreader and pull forward to remove tabs from rear of the range. Reinstall flame spreader and oven bake burner cover. 10 To adjust standard burner: The flame can check the burner flame by removing the flame spreader... Oven Bake Burner 1. Remove the control knob. Check Operation of the burner. If the "low" flame needs to light the bake and broil burners. On models with a pair of pliers.
Installation Guide
Page 11
... out another inch. 4. To Remove: 1. Tab A. Press the START pad. Loosen the lock screw on some models) Remove all items from inside the warming drawer, and allow the range to cool completely before attempting to check broil burner for proper flame. Gently open position. 2. Before removing, check that...air shutter as needed ) Look through the opening in all the way out. Lock screw B. Locate the black triangle-shaped tabs on some models) The storage drawer can be necessary to the Use and Care Guide for removal. Push drawer in the side of dark blue, and should...
... out another inch. 4. To Remove: 1. Tab A. Press the START pad. Loosen the lock screw on some models) Remove all items from inside the warming drawer, and allow the range to cool completely before attempting to check broil burner for proper flame. Gently open position. 2. Before removing, check that...air shutter as needed ) Look through the opening in all the way out. Lock screw B. Locate the black triangle-shaped tabs on some models) The storage drawer can be necessary to the Use and Care Guide for removal. Push drawer in the side of dark blue, and should...
Installation Guide
Page 13
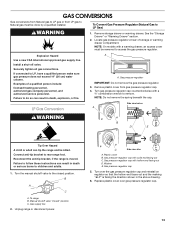
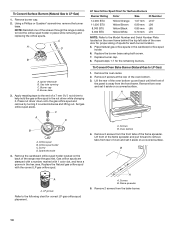
...Remove storage drawer or warming drawer. If connected to do so can result in death or serious burns to rear range foot. LP Gas Conversion A Side view before NG WARNING B D E NG LP Tip Over Hazard A child or adult can...models with solid end facing out C. Securely tighten all gas connections. Examples of storage or warming drawer compartment. A A. Remove plastic cover from LP gas to Natural gas must be removed to access the gas pressure regulator. NOTE: Do not remove the spring beneath the cap. Turn the manual shutoff valve to LP Gas) 1. To range B. Unplug range...
...Remove storage drawer or warming drawer. If connected to do so can result in death or serious burns to rear range foot. LP Gas Conversion A Side view before NG WARNING B D E NG LP Tip Over Hazard A child or adult can...models with solid end facing out C. Securely tighten all gas connections. Examples of storage or warming drawer compartment. A A. Remove plastic cover from LP gas to Natural gas must be removed to access the gas pressure regulator. NOTE: Do not remove the spring beneath the cap. Turn the manual shutoff valve to LP Gas) 1. To range B. Unplug range...
Installation Guide
Page 14
...Remove 2 screws from the front tabs of a 7 mm nut driver to hold the gas orifice spud in place while removing and replacing the orifice spuds. C A D B A. Remove 2 screws at the rear of the screws through the range cooktop to help hold the orifice spud holder in the nut driver while changing it...on the oven frame behind the top left side of the oven door for proper sizing of the range near the gas inlet. Lift front of the flame spreader and pull forward to the Model Number and Serial Number Plate located on a covered surface. Burner cap D. Orifice spud holder C. ...
...Remove 2 screws from the front tabs of a 7 mm nut driver to hold the gas orifice spud in place while removing and replacing the orifice spuds. C A D B A. Remove 2 screws at the rear of the screws through the range cooktop to help hold the orifice spud holder in the nut driver while changing it...on the oven frame behind the top left side of the oven door for proper sizing of the range near the gas inlet. Lift front of the flame spreader and pull forward to the Model Number and Serial Number Plate located on a covered surface. Burner cap D. Orifice spud holder C. ...
Installation Guide
Page 16
... B. The small inner cone should have a slightly yellow tip. 3. Gas pressure regulator IMPORTANT: Do not remove the gas pressure regulator. 3. Unplug range or disconnect power. Gas pressure regulator cap with hollow end facing out C. Washer E. LP 16 Complete Installation (Natural Gas to rear range foot. NOTE: On models with a ⁵⁄₈" combination wrench to ½" (1.3 cm...
... B. The small inner cone should have a slightly yellow tip. 3. Gas pressure regulator IMPORTANT: Do not remove the gas pressure regulator. 3. Unplug range or disconnect power. Gas pressure regulator cap with hollow end facing out C. Washer E. LP 16 Complete Installation (Natural Gas to rear range foot. NOTE: On models with a ⁵⁄₈" combination wrench to ½" (1.3 cm...


