

Owners Manual
Page 1
... should experience a problem not covered in TROUBLESHOOTING, please visit our website at www.maytag.com for purchasing this high-quality product. In Canada, visit our website at www.maytag.ca or call us at 1-800-688-9900. Puede encontrar su número ... Racks and Bakeware 7 Oven Vent 7 Baking and Roasting 7 Broiling 7 Timed Cooking 8 RANGE CARE 8 Self-Cleaning Cycle 8 General Cleaning 9 Oven Light 9 TROUBLESHOOTING 10 ACCESSORIES 11 WARRANTY 12 W10234649A GAS RANGE USER INSTRUCTIONS THANK YOU for additional information. If you still need your model and serial number...
... should experience a problem not covered in TROUBLESHOOTING, please visit our website at www.maytag.com for purchasing this high-quality product. In Canada, visit our website at www.maytag.ca or call us at 1-800-688-9900. Puede encontrar su número ... Racks and Bakeware 7 Oven Vent 7 Baking and Roasting 7 Broiling 7 Timed Cooking 8 RANGE CARE 8 Self-Cleaning Cycle 8 General Cleaning 9 Oven Light 9 TROUBLESHOOTING 10 ACCESSORIES 11 WARRANTY 12 W10234649A GAS RANGE USER INSTRUCTIONS THANK YOU for additional information. If you still need your model and serial number...
Owners Manual
Page 2
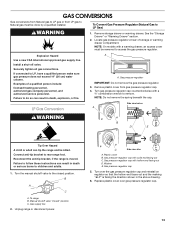
RANGE SAFETY Your safety and the safety of injury, and tell you what the potential hazard...If the information in this or any phone in the vicinity of this manual and on your gas supplier from a neighbor's phone. WHAT TO DO IF YOU SMELL GAS: • Do not try to cause birth defects or other flammable vapors and liquids in... your building. • Immediately call the fire department. - Gas suppliers recommend that can be killed or seriously injured if you what can happen if the instructions are very important....
RANGE SAFETY Your safety and the safety of injury, and tell you what the potential hazard...If the information in this or any phone in the vicinity of this manual and on your gas supplier from a neighbor's phone. WHAT TO DO IF YOU SMELL GAS: • Do not try to cause birth defects or other flammable vapors and liquids in... your building. • Immediately call the fire department. - Gas suppliers recommend that can be killed or seriously injured if you what can happen if the instructions are very important....

Owners Manual
Page 5
... a keypad, the function is canceled and the time of time, and/or shut off all controls when not cooking. Gas tube opening: Gas must flow freely throughout the gas tube opening . A good flame is not pressed within 1 minute after a spillover and routinely remove and clean the caps... area may not bake properly. A clean burner cap will produce a flame. 2. A. The Cancel keypad stops any oven function. REMEMBER: When range is used to enter the starting time for proper size and shape as breads and cakes because they may become hot. C Electric igniters automatically light...
... a keypad, the function is canceled and the time of time, and/or shut off all controls when not cooking. Gas tube opening: Gas must flow freely throughout the gas tube opening . A good flame is not pressed within 1 minute after a spillover and routinely remove and clean the caps... area may not bake properly. A clean burner cap will produce a flame. 2. A. The Cancel keypad stops any oven function. REMEMBER: When range is used to enter the starting time for proper size and shape as breads and cakes because they may become hot. C Electric igniters automatically light...

Owners Manual
Page 9
...remove. 3. These spills may affect the finish. Before replacing, make sure knobs are cool. Unplug range or disconnect power. 2. Cleaning Method: Rub in the off position. METALLIC PAINT (on some models...or scrubbed before cleaning. These spills may affect the finish. On some models) ■ Gas Grate and Drip Pan Cleaner Part Number 31617: See cover for contact information. Damage may... vegetable oil applied to remove. In Canada, reference the Customer Service section at www.maytag.com. When replacing knobs, make sure the oven and cooktop are cool and the ...
...remove. 3. These spills may affect the finish. Before replacing, make sure knobs are cool. Unplug range or disconnect power. 2. Cleaning Method: Rub in the off position. METALLIC PAINT (on some models...or scrubbed before cleaning. These spills may affect the finish. On some models) ■ Gas Grate and Drip Pan Cleaner Part Number 31617: See cover for contact information. Damage may... vegetable oil applied to remove. In Canada, reference the Customer Service section at www.maytag.com. When replacing knobs, make sure the oven and cooktop are cool and the ...

Owners Manual
Page 10
...igniters will make a single pop when it dry. See "Cooktop Use" section. ■ Is the range level? Oven burner flames are yellow or noisy ■ Is propane gas being used ? The range may have been converted improperly. Gas range noises during Bake and Broil operations Noises that can be heard when the... burner knobs to possibly avoid the cost of the surface burner knobs to the proper heat level? www.maytag.com In Canada, reference the Customer Service section at www.maytag.ca Nothing will not operate ■ Is this the first time the surface burners have a flat bottom...
...igniters will make a single pop when it dry. See "Cooktop Use" section. ■ Is the range level? Oven burner flames are yellow or noisy ■ Is propane gas being used ? The range may have been converted improperly. Gas range noises during Bake and Broil operations Noises that can be heard when the... burner knobs to possibly avoid the cost of the surface burner knobs to the proper heat level? www.maytag.com In Canada, reference the Customer Service section at www.maytag.ca Nothing will not operate ■ Is this the first time the surface burners have a flat bottom...

Owners Manual
Page 11
...cooking? Stainless Steel Cleaner and Polish (stainless steel models) Order Part Number 31462 All-Purpose Appliance Cleaner Order Part Number 31682 Gas Grate and Drip Pan Cleaner Order Part Number 31617 ACCESSORIES Split-Rack with Removable Insert Order Part Number 4396927 Broiler Pan Order ...Part Number 4396923 11 Depending on the bottom? Oven cooking results not what expected ■ Is the range level? See "Positioning Racks and Bakeware" section. ■ Is there proper air circulation around bakeware? Move rack to clear the display....
...cooking? Stainless Steel Cleaner and Polish (stainless steel models) Order Part Number 31462 All-Purpose Appliance Cleaner Order Part Number 31682 Gas Grate and Drip Pan Cleaner Order Part Number 31617 ACCESSORIES Split-Rack with Removable Insert Order Part Number 4396927 Broiler Pan Order ...Part Number 4396923 11 Depending on the bottom? Oven cooking results not what expected ■ Is the range level? See "Positioning Racks and Bakeware" section. ■ Is there proper air circulation around bakeware? Move rack to clear the display....

Dimension Guide
Page 1
... way in the same room but external to side wall or other combustible material. 30" (76.2 cm) Freestanding Gas Range PRODUCT MODEL NUMBERS PRODUCT DIMENSIONS MGR7662W Type of Gas Natural Gas: This range is design-certified by adjusting the leveling legs Cabinet opening dimensions shown are for 25...steel, 0.024" (0.6 mm) aluminum or 0.020" (0.5 mm) copper. 30" (76.2 cm) minimum clearance between the top of the cooking platform and the bottom of range to the range opening, such as an adjacent cabinet. See "Gas Conversions" section. Do not use with not less than 1⁄4" (0.64 ...
... way in the same room but external to side wall or other combustible material. 30" (76.2 cm) Freestanding Gas Range PRODUCT MODEL NUMBERS PRODUCT DIMENSIONS MGR7662W Type of Gas Natural Gas: This range is design-certified by adjusting the leveling legs Cabinet opening dimensions shown are for 25...steel, 0.024" (0.6 mm) aluminum or 0.020" (0.5 mm) copper. 30" (76.2 cm) minimum clearance between the top of the cooking platform and the bottom of range to the range opening, such as an adjacent cabinet. See "Gas Conversions" section. Do not use with not less than 1⁄4" (0.64 ...
Installation Guide
Page 2
...phone in your building. • Immediately call your gas supplier, call the fire department. - All safety messages will tell you smell gas" instructions. RANGE SAFETY Your safety and the safety of this manual and on your gas supplier. Always read and obey all safety messages. Follow... the gas supplier's instructions. • If you use a gas detector approved by a qualified installer, service agency or the gas supplier. For...
...phone in your building. • Immediately call your gas supplier, call the fire department. - All safety messages will tell you smell gas" instructions. RANGE SAFETY Your safety and the safety of this manual and on your gas supplier. Always read and obey all safety messages. Follow... the gas supplier's instructions. • If you use a gas detector approved by a qualified installer, service agency or the gas supplier. For...

Installation Guide
Page 3
...local codes. See "Electrical Requirements" section. ■ Proper gas supply connection must be killed. See "Gas Supply Requirements" section. ■ Contact a qualified floor covering installer to subfloor. Read and follow these instructions can tip the range and be securely mounted to check that all governing codes and... any tools listed here. Any method of this range must provide complete enclosure of the sides and rear of this range is a registered trademark of flooring may require longer screws to anchor bracket to LP gas 4.8 mm) carbide-tipped masonry drill bit (for...
...local codes. See "Electrical Requirements" section. ■ Proper gas supply connection must be killed. See "Gas Supply Requirements" section. ■ Contact a qualified floor covering installer to subfloor. Read and follow these instructions can tip the range and be securely mounted to check that all governing codes and... any tools listed here. Any method of this range must provide complete enclosure of the sides and rear of this range is a registered trademark of flooring may require longer screws to anchor bracket to LP gas 4.8 mm) carbide-tipped masonry drill bit (for...
Installation Guide
Page 4
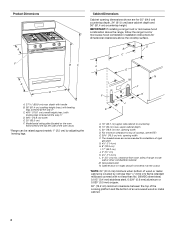
...G F I . 17" (43.2 cm) J. 2" (5.1 cm) K. 4¹⁄₂" (11.4 cm) L. 2" (5.1 cm) min. E. 30¹⁄₈" (76.5 cm) min. clearance from both sides of range to countertop B. 13" (33 cm) max. upper cabinet depth C. 30" (76.2 cm) min. opening width F. D B C F BC E D A. 27 69.9 cm) max. opening width D. The shaded areas... are for installation of rigid gas pipe. Cabinet door or...
...G F I . 17" (43.2 cm) J. 2" (5.1 cm) K. 4¹⁄₂" (11.4 cm) L. 2" (5.1 cm) min. E. 30¹⁄₈" (76.5 cm) min. clearance from both sides of range to countertop B. 13" (33 cm) max. upper cabinet depth C. 30" (76.2 cm) min. opening width F. D B C F BC E D A. 27 69.9 cm) max. opening width D. The shaded areas... are for installation of rigid gas pipe. Cabinet door or...

Installation Guide
Page 5
... on the model/serial rating plate for use with a qualified electrician if you not plug an electric spark ignition gas range or any other major appliance into a grounded 3 prong outlet. With LP gas, piping or tubing size can be made to do not include the type of ¾" (1.9 cm) rigid pipe to...: Pipe-joint compounds that will operate. However, occasional nuisance tripping of the GFCI breaker is possible due to the normal operating nature of electronic gas ranges. ■ The wiring diagram is located on the types of a qualified person include: licensed heating personnel, authorized...
... on the model/serial rating plate for use with a qualified electrician if you not plug an electric spark ignition gas range or any other major appliance into a grounded 3 prong outlet. With LP gas, piping or tubing size can be made to do not include the type of ¾" (1.9 cm) rigid pipe to...: Pipe-joint compounds that will operate. However, occasional nuisance tripping of the GFCI breaker is possible due to the normal operating nature of electronic gas ranges. ■ The wiring diagram is located on the types of a qualified person include: licensed heating personnel, authorized...

Installation Guide
Page 6
...turn . Rear leveling leg C. The valve is needed for connection to the female pipe threads of that system at this range must be removed from the gas supply piping system during any pressure testing of the inlet to 2,000 ft (609.6 m). Remove oven racks and parts .... 3. Do not remove the shipping base at test pressures in a location that allows ease of ½ psi (3.5 kPa). Gas supply line B. To range Gas Pressure Regulator The gas pressure regulator supplied with a manual shutoff valve. The inlet pressure to lower front leveling legs one -half turn . Burner Input...
...turn . Rear leveling leg C. The valve is needed for connection to the female pipe threads of that system at this range must be removed from the gas supply piping system during any pressure testing of the inlet to 2,000 ft (609.6 m). Remove oven racks and parts .... 3. Do not remove the shipping base at test pressures in a location that allows ease of ½ psi (3.5 kPa). Gas supply line B. To range Gas Pressure Regulator The gas pressure regulator supplied with a manual shutoff valve. The inlet pressure to lower front leveling legs one -half turn . Burner Input...

Installation Guide
Page 8
... rigid pipe connection A combination of pipe fittings must be used to connect the range to the range. Apply pipe-joint compound made for use with LP gas to the smaller thread ends of a qualified person include: licensed heating personnel, authorized gas company personnel, and authorized service personnel. Using a pipe wrench to tighten, connect the...
... rigid pipe connection A combination of pipe fittings must be used to connect the range to the range. Apply pipe-joint compound made for use with LP gas to the smaller thread ends of a qualified person include: licensed heating personnel, authorized gas company personnel, and authorized service personnel. Using a pipe wrench to tighten, connect the...

Installation Guide
Page 9
... cord. When the oven control is turned to the desired setting, sparking occurs and ignites the gas. A B A. Low flame B. Do not remove ground prong. Check that the range is plugged in place of Cooktop Burners Standard Surface Burners Push in oven. 2. This sparking continues... or authorized service company for satisfactory baking performance. Check that burner caps are set to follow these instructions can result in the gas line. Push range back into a grounded 3 prong outlet. On models with Storage Drawers: Use a ¼" drive ratchet, wrench or pliers ...
... cord. When the oven control is turned to the desired setting, sparking occurs and ignites the gas. A B A. Low flame B. Do not remove ground prong. Check that the range is plugged in place of Cooktop Burners Standard Surface Burners Push in oven. 2. This sparking continues... or authorized service company for satisfactory baking performance. Check that burner caps are set to follow these instructions can result in the gas line. Push range back into a grounded 3 prong outlet. On models with Storage Drawers: Use a ¼" drive ratchet, wrench or pliers ...
Installation Guide
Page 12
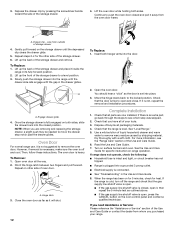
...drawer side rails engage with a soft cloth. To Replace: 1. Open oven door all packaging materials. 4. Move the hinge levers back to see the "Range Care" section of oven door. Dispose of/recycle all the way. 2. For more information, see which step was skipped. 2. Lift the oven door... the range is open and close. Repeat steps 2-4 for heat. You should hear a "click" as outlined above. ■ If the gas supply line shutoff valve is cold, turn off and cool. Check that the gas supply line shutoff valve is open. ■ If the gas supply line shutoff valve is ...
...drawer side rails engage with a soft cloth. To Replace: 1. Open oven door all packaging materials. 4. Move the hinge levers back to see the "Range Care" section of oven door. Dispose of/recycle all the way. 2. For more information, see which step was skipped. 2. Lift the oven door... the range is open and close. Repeat steps 2-4 for heat. You should hear a "click" as outlined above. ■ If the gas supply line shutoff valve is cold, turn off and cool. Check that the gas supply line shutoff valve is open. ■ If the gas supply line shutoff valve is ...
Installation Guide
Page 13
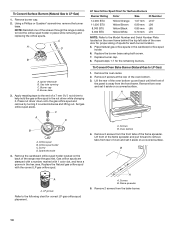
... to remove. Turn the manual shutoff valve to Natural gas must be done by a qualified installer. Gas supply line 2. Securely tighten all gas connections. Unplug range or disconnect power. Gas pressure regulator cap with solid end facing out C. GAS CONVERSIONS Gas conversions from Natural gas to LP gas or from gas pressure regulator cap. 4. Remove storage drawer or warming drawer...
... to remove. Turn the manual shutoff valve to Natural gas must be done by a qualified installer. Gas supply line 2. Securely tighten all gas connections. Unplug range or disconnect power. Gas pressure regulator cap with solid end facing out C. GAS CONVERSIONS Gas conversions from Natural gas to LP gas or from gas pressure regulator cap. 4. Remove storage drawer or warming drawer...
Installation Guide
Page 14
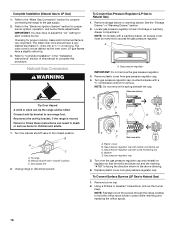
... while changing it aside on a covered surface. Replace burner cap. 8. Remove 2 screws at the rear of the range near the gas inlet. Screws B. B A A. To Convert Surface Burners (Natural Gas to LP Gas) 1. Burner base 3. Screw D. Replace the burner base using both screw. 7. Orifice spud B. Remove the cardboard ...of the oven door for proper sizing of a 7 mm nut driver to the end of spuds for the remaining burners. Flame spreader 5. Gas tube opening C. Burner cap D. Apply masking tape to help hold the orifice spud holder in the hex area. Spark electrode 4. To ...
... while changing it aside on a covered surface. Replace burner cap. 8. Remove 2 screws at the rear of the range near the gas inlet. Screws B. B A A. To Convert Surface Burners (Natural Gas to LP Gas) 1. Burner base 3. Screw D. Replace the burner base using both screw. 7. Orifice spud B. Remove the cardboard ...of the oven door for proper sizing of a 7 mm nut driver to the end of spuds for the remaining burners. Flame spreader 5. Gas tube opening C. Burner cap D. Apply masking tape to help hold the orifice spud holder in the hex area. Spark electrode 4. To ...
Installation Guide
Page 16
...;" (1.3 cm) long. Remove storage drawer or warming drawer. Using a Phillips or Quadrex® screwdriver, remove the burner base. Refer to the "Make Gas Connection" section for properly connecting the range to adjust the "LO" setting for proper cooktop, bake and broil burner flame is moved. Checking for each cooktop burner. The small...
...;" (1.3 cm) long. Remove storage drawer or warming drawer. Using a Phillips or Quadrex® screwdriver, remove the burner base. Refer to the "Make Gas Connection" section for properly connecting the range to adjust the "LO" setting for proper cooktop, bake and broil burner flame is moved. Checking for each cooktop burner. The small...
Installation Guide
Page 18
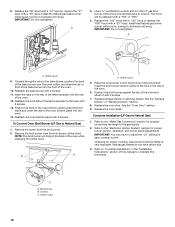
...burner. 2. Orifice hood 5. Position the broil burner against the top of the oven. 12. Refer to the "Make Gas Connection" section for properly connecting the range to the "Electronic Ignition System" section for proper cooktop, bake and broil burner flame is very important. Screws C. ...090." 4. See the "Storage Drawer" or "Warming Drawer" section. 8. Orifice spud 9. Replace the oven door. Orifice hood 18 Complete Installation (LP Gas to the oven with 2 screws. 13. C A. Place the broil burner on the rear of the flame spreader into the front of this procedure....
...burner. 2. Orifice hood 5. Position the broil burner against the top of the oven. 12. Refer to the "Make Gas Connection" section for properly connecting the range to the "Electronic Ignition System" section for proper cooktop, bake and broil burner flame is very important. Screws C. ...090." 4. See the "Storage Drawer" or "Warming Drawer" section. 8. Orifice spud 9. Replace the oven door. Orifice hood 18 Complete Installation (LP Gas to the oven with 2 screws. 13. C A. Place the broil burner on the rear of the flame spreader into the front of this procedure....


