
Owners Manual
Page 7
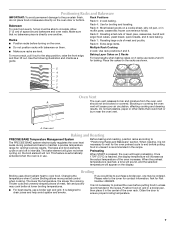
...when cooking. Please refer to ensure proper broiling temperature. 7 Close the door to the cover for optimal cooking results. Rack 4: Use for Part Number 4396923. Racks Rack 1: Roasting large cuts of the oven rack. To move a rack, pull it is recommended in the recipe. Blocking... is in the center of meat and poultry. ■ Position racks before putting food in unless it out to maintain a precise temperature range for contact information. Baking Layer Cakes on 2 Racks For best results when baking cakes on ; This feature is automatically activated when the oven...
...when cooking. Please refer to ensure proper broiling temperature. 7 Close the door to the cover for optimal cooking results. Rack 4: Use for Part Number 4396923. Racks Rack 1: Roasting large cuts of the oven rack. To move a rack, pull it is recommended in the recipe. Blocking... is in the center of meat and poultry. ■ Position racks before putting food in unless it out to maintain a precise temperature range for contact information. Baking Layer Cakes on 2 Racks For best results when baking cakes on ; This feature is automatically activated when the oven...

Owners Manual
Page 9
... are in direction of our website at www.maytag.ca. Damage may occur to stainless steel surfaces, even with bleach, rust removers, ammonia or sodium hydroxide (lye) because paint surface may remove numbers. ■ All-Purpose Appliance Cleaner Part Number 31682 (not included): See cover for ... do not bang grates and caps against each other or hard surfaces such as the entire range is a standard 40-watt appliance bulb. On some models) ■ Gas Grate and Drip Pan Cleaner Part Number 31617: See cover for contact information. Cleaning Method: ■ Glass cleaner and soft...
... are in direction of our website at www.maytag.ca. Damage may occur to stainless steel surfaces, even with bleach, rust removers, ammonia or sodium hydroxide (lye) because paint surface may remove numbers. ■ All-Purpose Appliance Cleaner Part Number 31682 (not included): See cover for ... do not bang grates and caps against each other or hard surfaces such as the entire range is a standard 40-watt appliance bulb. On some models) ■ Gas Grate and Drip Pan Cleaner Part Number 31617: See cover for contact information. Cleaning Method: ■ Glass cleaner and soft...

Owners Manual
Page 11
... Cleaner and Polish (stainless steel models) Order Part Number 31462 All-Purpose Appliance Cleaner Order Part Number 31682 Gas Grate and Drip Pan Cleaner Order Part Number 31617 ACCESSORIES Split-Rack with Removable Insert Order Part Number 4396927 Broiler Pan Order Part Number 4396923 11 See cover for service. Check...oven has reached temperature, you will not operate ■ Is the oven door open? Oven cooking results not what expected ■ Is the range level? Adjust cooking time. ■ Has the oven door been opened while cooking? There has been a power failure. If a self-...
... Cleaner and Polish (stainless steel models) Order Part Number 31462 All-Purpose Appliance Cleaner Order Part Number 31682 Gas Grate and Drip Pan Cleaner Order Part Number 31617 ACCESSORIES Split-Rack with Removable Insert Order Part Number 4396927 Broiler Pan Order Part Number 4396923 11 See cover for service. Check...oven has reached temperature, you will not operate ■ Is the oven door open? Oven cooking results not what expected ■ Is the range level? Adjust cooking time. ■ Has the oven door been opened while cooking? There has been a power failure. If a self-...

Owners Manual
Page 12
... not in accordance with electrical or plumbing codes, or use of consumables or cleaning products not approved by Maytag. 5. Damage resulting from warranty coverage. 3. Repairs to parts or systems resulting from the date of purchase. 6. The cost of repair or replacement under this limited... to the finish of your major appliance, unless such damage results from defects in materials or workmanship and is reported to Maytag within 30 days from unauthorized modifications made to the appliance. 9. IMPLIED WARRANTIES, INCLUDING WARRANTIES OF MERCHANTABILITY OR FITNESS FOR A PARTICULAR PURPOSE...
... not in accordance with electrical or plumbing codes, or use of consumables or cleaning products not approved by Maytag. 5. Damage resulting from warranty coverage. 3. Repairs to parts or systems resulting from the date of purchase. 6. The cost of repair or replacement under this limited... to the finish of your major appliance, unless such damage results from defects in materials or workmanship and is reported to Maytag within 30 days from unauthorized modifications made to the appliance. 9. IMPLIED WARRANTIES, INCLUDING WARRANTIES OF MERCHANTABILITY OR FITNESS FOR A PARTICULAR PURPOSE...

Installation Guide
Page 3
...parts before starting installation. A B C A. Parts needed ■ Tape measure ■ Flat-blade screwdriver ■ Phillips screwdriver ■ Level ■ Pipe-joint compound resistant to rear range foot. Given dimensions are available from your builder or cabinet supplier to make sure that the floor covering can tip the range and be secured to subfloor. See "Gas...driver 3.2 mm) drill bit (for Mobile Home Construction and Safety, Title 24, HUD Part 280). Check existing gas supply and electrical supply. The model/serial rating plate is located on the model/serial ...
...parts before starting installation. A B C A. Parts needed ■ Tape measure ■ Flat-blade screwdriver ■ Phillips screwdriver ■ Level ■ Pipe-joint compound resistant to rear range foot. Given dimensions are available from your builder or cabinet supplier to make sure that the floor covering can tip the range and be secured to subfloor. See "Gas...driver 3.2 mm) drill bit (for Mobile Home Construction and Safety, Title 24, HUD Part 280). Check existing gas supply and electrical supply. The model/serial rating plate is located on the model/serial ...

Installation Guide
Page 6
... be in excess of pipe fittings to obtain an in back or other injury. 1. Remove oven racks and parts package from range. 2. Shipping base 4. On Ranges Equipped with this time. See the "Storage Drawer" section. A D C B A. ¼" drive ratchet B. Rigid pipe connection: The rigid pipe ... plate are not sure about the inlet pressure. A C A. Wrench or pliers D. Failure to move and install range. Gas supply line B. INSTALLATION INSTRUCTIONS Unpack Range WARNING Excessive Weight Hazard Use two or more people to do so can result in -line connection to shutoff valve...
... be in excess of pipe fittings to obtain an in back or other injury. 1. Remove oven racks and parts package from range. 2. Shipping base 4. On Ranges Equipped with this time. See the "Storage Drawer" section. A D C B A. ¼" drive ratchet B. Rigid pipe connection: The rigid pipe ... plate are not sure about the inlet pressure. A C A. Wrench or pliers D. Failure to move and install range. Gas supply line B. INSTALLATION INSTRUCTIONS Unpack Range WARNING Excessive Weight Hazard Use two or more people to do so can result in -line connection to shutoff valve...

Installation Guide
Page 8
... C. Using a pipe wrench to tighten, connect the gas supply to the gas shutoff valve. Union E. Nipple I HG F. Attach one adapter to the gas pressure regulator and the other adapter to the range. A A. Test all gas connections. Place burner grates over burners and caps. Burner... burner caps and grates from parts package. Adapter Complete Connection 1. Apply pipe-joint compound made for use with LP gas to the gas pipe. Apply pipe-joint compound made for use with LP gas to LP, have ½" male pipe thread) D. Gas pressure regulator shutoff valve 2. ...
... C. Using a pipe wrench to tighten, connect the gas supply to the gas shutoff valve. Union E. Nipple I HG F. Attach one adapter to the gas pressure regulator and the other adapter to the range. A A. Test all gas connections. Place burner grates over burners and caps. Burner... burner caps and grates from parts package. Adapter Complete Connection 1. Apply pipe-joint compound made for use with LP gas to the gas pipe. Apply pipe-joint compound made for use with LP gas to LP, have ½" male pipe thread) D. Gas pressure regulator shutoff valve 2. ...
Installation Guide
Page 12
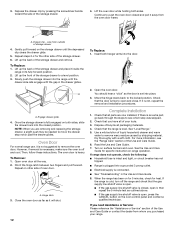
... side rails engage with a soft cloth. Lift up the back of the Use and Care Guide or contact the dealer from whom you have all parts are removing and replacing the storage drawer, a slight push may be needed to a level position. 3. Then, follow these instructions. Pinch the hinge latch ... storage drawer to move the drawer stop notch past the drawer glides. If the range is open and close. Drawer clip - Oven Door For normal range use, it , then repeat the 5-minute test as outlined above. ■ If the gas supply line shutoff valve is cold, turn off and cool. To Remove: 1....
... side rails engage with a soft cloth. Lift up the back of the Use and Care Guide or contact the dealer from whom you have all parts are removing and replacing the storage drawer, a slight push may be needed to a level position. 3. Then, follow these instructions. Pinch the hinge latch ... storage drawer to move the drawer stop notch past the drawer glides. If the range is open and close. Drawer clip - Oven Door For normal range use, it , then repeat the 5-minute test as outlined above. ■ If the gas supply line shutoff valve is cold, turn off and cool. To Remove: 1....
Installation Guide
Page 17
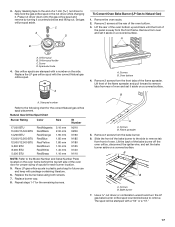
... spud B. Orifice spud holder C. Repeat steps 1-7 for future use and keep with a "56" or a "57." 17 Press nut driver down onto the gas orifice spud and remove by turning it aside on the side. Screws B. Remove 2 screws from the front frame. The spud will be stamped with package... containing literature. 6. Remove 2 screws at the rear of a 7 mm nut driver to help hold the gas orifice spud in plastic parts bag for the remaining burners. B A A. Remove 2 screws from rear of oven and set the bake burner aside on the oven frame ...
... spud B. Orifice spud holder C. Repeat steps 1-7 for future use and keep with a "56" or a "57." 17 Press nut driver down onto the gas orifice spud and remove by turning it aside on the side. Screws B. Remove 2 screws from the front frame. The spud will be stamped with package... containing literature. 6. Remove 2 screws at the rear of a 7 mm nut driver to help hold the gas orifice spud in plastic parts bag for the remaining burners. B A A. Remove 2 screws from rear of oven and set the bake burner aside on the oven frame ...

Warranty Information
Page 1
...APPLY TO YOU. You can write to the appliance. 9. Consumable parts are excluded from unauthorized modifications made to Maytag with published installation instructions. 11. This major appliance is designed to parts or systems resulting from warranty coverage. 3. Please keep this User...Cosmetic damage, including scratches, dents, chips or other than normal, single-family household use or when it is contrary to Maytag within 30 days from the date of purchase. 6. IMPLIED WARRANTIES, INCLUDING WARRANTIES OF MERCHANTABILITY OR FITNESS FOR A PARTICULAR PURPOSE, ARE ...
...APPLY TO YOU. You can write to the appliance. 9. Consumable parts are excluded from unauthorized modifications made to Maytag with published installation instructions. 11. This major appliance is designed to parts or systems resulting from warranty coverage. 3. Please keep this User...Cosmetic damage, including scratches, dents, chips or other than normal, single-family household use or when it is contrary to Maytag within 30 days from the date of purchase. 6. IMPLIED WARRANTIES, INCLUDING WARRANTIES OF MERCHANTABILITY OR FITNESS FOR A PARTICULAR PURPOSE, ARE ...


