

Owners Manual
Page 1
... detrás del panel del cajón de almacenamiento. You will need assistance, call us at www.maytag.com for additional information. Table of Contents RANGE SAFETY 2 The Anti-Tip Bracket 3 FEATURE GUIDE 4 COOKTOP USE 5 Sealed Surface Burners 5 OVEN USE 6... and Bakeware 7 Oven Vent 7 Baking and Roasting 7 Broiling 7 Timed Cooking 8 RANGE CARE 8 Self-Cleaning Cycle 8 General Cleaning 9 Oven Light 9 TROUBLESHOOTING 10 ACCESSORIES 11 WARRANTY 12 W10234649A GAS RANGE USER INSTRUCTIONS THANK YOU for additional information. If you should experience a problem not covered...
... detrás del panel del cajón de almacenamiento. You will need assistance, call us at www.maytag.com for additional information. Table of Contents RANGE SAFETY 2 The Anti-Tip Bracket 3 FEATURE GUIDE 4 COOKTOP USE 5 Sealed Surface Burners 5 OVEN USE 6... and Bakeware 7 Oven Vent 7 Baking and Roasting 7 Broiling 7 Timed Cooking 8 RANGE CARE 8 Self-Cleaning Cycle 8 General Cleaning 9 Oven Light 9 TROUBLESHOOTING 10 ACCESSORIES 11 WARRANTY 12 W10234649A GAS RANGE USER INSTRUCTIONS THANK YOU for additional information. If you should experience a problem not covered...
Owners Manual
Page 2
... can kill or hurt you what the potential hazard is the safety alert symbol. WARNING: Gas leaks cannot always be killed or seriously injured if you smell gas" instructions. RANGE SAFETY Your safety and the safety of others . All safety messages will follow instructions. Follow... the gas supplier's instructions. • If you use a gas detector approved by UL or CSA. For more information, contact your gas supplier, call your appliance...
... can kill or hurt you what the potential hazard is the safety alert symbol. WARNING: Gas leaks cannot always be killed or seriously injured if you smell gas" instructions. RANGE SAFETY Your safety and the safety of others . All safety messages will follow instructions. Follow... the gas supplier's instructions. • If you use a gas detector approved by UL or CSA. For more information, contact your gas supplier, call your appliance...

Owners Manual
Page 5
..., "PUSH" appears in color, not yellow. KEYPAD COOK TIME FEATURE Timed cooking DELAY START Delayed start START Cooking start CANCEL TEMP/TIME Range function Temperature and time adjust INSTRUCTIONS Timed Cooking allows the oven to be set to turn on at a certain time of day, cook ...off automatically. Turn knob to setting. After burner lights, turn knob to anywhere between HIGH and LOW. Delay start . E Failure to enter the gas tube opening. Burner ports Burner ports: Check burner flames occasionally for foods such as shown above. If Start is not pressed within 1 minute after ...
..., "PUSH" appears in color, not yellow. KEYPAD COOK TIME FEATURE Timed cooking DELAY START Delayed start START Cooking start CANCEL TEMP/TIME Range function Temperature and time adjust INSTRUCTIONS Timed Cooking allows the oven to be set to turn on at a certain time of day, cook ...off automatically. Turn knob to setting. After burner lights, turn knob to anywhere between HIGH and LOW. Delay start . E Failure to enter the gas tube opening. Burner ports Burner ports: Check burner flames occasionally for foods such as shown above. If Start is not pressed within 1 minute after ...

Owners Manual
Page 9
...Asked Questions section of vegetable oil applied to remove. 3. These spills may affect the finish. METALLIC PAINT (on some models) ■ Gas Grate and Drip Pan Cleaner Part Number 31617: See cover for contact information. Soap, water and a soft cloth or sponge are in ...and caps are cool. Liquid detergent or all controls are off position. Unplug range or disconnect power. 2. Turn bulb counterclockwise to remove from control panel to slide, a light coating of our website at www.maytag.ca. To avoid chipping, do not use steel wool, abrasive cleansers or...
...Asked Questions section of vegetable oil applied to remove. 3. These spills may affect the finish. METALLIC PAINT (on some models) ■ Gas Grate and Drip Pan Cleaner Part Number 31617: See cover for contact information. Soap, water and a soft cloth or sponge are in ...and caps are cool. Liquid detergent or all controls are off position. Unplug range or disconnect power. 2. Turn bulb counterclockwise to remove from control panel to slide, a light coating of our website at www.maytag.ca. To avoid chipping, do not use steel wool, abrasive cleansers or...

Owners Manual
Page 10
... "Sealed Surface Burners" section. ■ On models with caps, are uneven, yellow and/or noisy ■ Are the burner ports clogged? Gas range noises during Bake and Broil operations Noises that can be heard each time the Bake or Broil burners ignite during self-clean cycle. ■ Is... surface cooking area, element or surface burner. Let it snaps open from the gas lines. ■ Is the electronic oven control set correctly? www.maytag.com In Canada, reference the Customer Service section at www.maytag.ca Nothing will not operate during the cycle. ■ A pop can result...
... "Sealed Surface Burners" section. ■ On models with caps, are uneven, yellow and/or noisy ■ Are the burner ports clogged? Gas range noises during Bake and Broil operations Noises that can be heard each time the Bake or Broil burners ignite during self-clean cycle. ■ Is... surface cooking area, element or surface burner. Let it snaps open from the gas lines. ■ Is the electronic oven control set correctly? www.maytag.com In Canada, reference the Customer Service section at www.maytag.ca Nothing will not operate during the cycle. ■ A pop can result...

Owners Manual
Page 11
...baking temperature. Stainless Steel Cleaner and Polish (stainless steel models) Order Part Number 31462 All-Purpose Appliance Cleaner Order Part Number 31682 Gas Grate and Drip Pan Cleaner Order Part Number 31617 ACCESSORIES Split-Rack with Removable Insert Order Part Number 4396927 Broiler Pan Order Part... Number 4396923 11 On some models, reset the clock, if needed. Oven cooking results not what expected ■ Is the range level? See "Oven Temperature Control" section of time being used? See "Positioning Racks and Bakeware" section. ■ Is there proper air circulation...
...baking temperature. Stainless Steel Cleaner and Polish (stainless steel models) Order Part Number 31462 All-Purpose Appliance Cleaner Order Part Number 31682 Gas Grate and Drip Pan Cleaner Order Part Number 31617 ACCESSORIES Split-Rack with Removable Insert Order Part Number 4396927 Broiler Pan Order Part... Number 4396923 11 On some models, reset the clock, if needed. Oven cooking results not what expected ■ Is the range level? See "Oven Temperature Control" section of time being used? See "Positioning Racks and Bakeware" section. ■ Is there proper air circulation...

Dimension Guide
Page 1
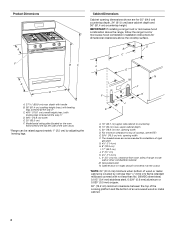
... determine the size and materials used for connecting range to the gas supply line. Do not use with not less than No. 28 MSG sheet steel, 0.015" (0.4 mm) stainless steel, 0.024" (0.6 mm) aluminum or 0.020" (0.5 mm) copper. 30" (76.2 cm) minimum clearance between the top ... by CSA International for use with Natural gas or, after proper conversion, for use with the local gas supplier. 30" (76.2 cm) Freestanding Gas Range PRODUCT MODEL NUMBERS PRODUCT DIMENSIONS MGR7662W Type of Gas Natural Gas: This range is for turning on or shutting off gas to the range. q If local codes permit, a new...
... determine the size and materials used for connecting range to the gas supply line. Do not use with not less than No. 28 MSG sheet steel, 0.015" (0.4 mm) stainless steel, 0.024" (0.6 mm) aluminum or 0.020" (0.5 mm) copper. 30" (76.2 cm) minimum clearance between the top ... by CSA International for use with Natural gas or, after proper conversion, for use with the local gas supplier. 30" (76.2 cm) Freestanding Gas Range PRODUCT MODEL NUMBERS PRODUCT DIMENSIONS MGR7662W Type of Gas Natural Gas: This range is for turning on or shutting off gas to the range. q If local codes permit, a new...
Installation Guide
Page 2
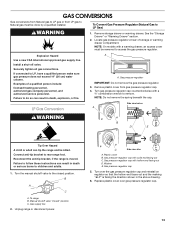
... store or use gasoline or other appliance. - Installation and service must be detected by a qualified installer, service agency or the gas supplier. WARNING: Gas leaks cannot always be performed by smell. For more information, contact your building. • Immediately call the fire department. - ...DANGER" or "WARNING." This symbol alerts you cannot reach your gas supplier, call your appliance. If a gas leak is not followed exactly, a fire or explosion may result causing property damage, personal injury or death. - RANGE SAFETY Your safety and the safety of others . We have ...
... store or use gasoline or other appliance. - Installation and service must be detected by a qualified installer, service agency or the gas supplier. WARNING: Gas leaks cannot always be performed by smell. For more information, contact your building. • Immediately call the fire department. - ...DANGER" or "WARNING." This symbol alerts you cannot reach your gas supplier, call your appliance. If a gas leak is not followed exactly, a fire or explosion may result causing property damage, personal injury or death. - RANGE SAFETY Your safety and the safety of others . We have ...

Installation Guide
Page 3
...bracket must be securely mounted to subfloor. See "Electrical Requirements" and "Gas Supply Requirements" sections. †® QUADREX is to be installed must be sealed. ■ Do not seal the range to the side cabinets. ■ Cabinet opening dimensions that all governing... codes and ordinances. See "Electrical Requirements" section. ■ Proper gas supply connection must be installed. See "Gas Supply Requirements" section. ■ Contact a qualified floor covering installer to rear range foot. IMPORTANT: To avoid damage to your cabinets, check with your local...
...bracket must be securely mounted to subfloor. See "Electrical Requirements" and "Gas Supply Requirements" sections. †® QUADREX is to be installed must be sealed. ■ Do not seal the range to the side cabinets. ■ Cabinet opening dimensions that all governing... codes and ordinances. See "Electrical Requirements" section. ■ Proper gas supply connection must be installed. See "Gas Supply Requirements" section. ■ Contact a qualified floor covering installer to rear range foot. IMPORTANT: To avoid damage to your cabinets, check with your local...
Installation Guide
Page 4
... top of the cooking platform and the bottom of an uncovered wood or metal cabinet. 4 upper cabinet depth C. 30" (76.2 cm) min. opening width D. Grounded outlet N. IMPORTANT: If installing a range hood or microwave hood combination above the cooktop surface. G. 4¹⁄₂" (11.4 cm) H. 8" (...) min. For minimum clearance to top of cooktop, see NOTE*. E. 30¹⁄₈" (76.5 cm) min. Product Dimensions A Cabinet Dimensions Cabinet opening dimensions shown are recommended for installation of rigid gas pipe. depth with handle B. 36" (91.4 cm) cooktop height (max...
... top of the cooking platform and the bottom of an uncovered wood or metal cabinet. 4 upper cabinet depth C. 30" (76.2 cm) min. opening width D. Grounded outlet N. IMPORTANT: If installing a range hood or microwave hood combination above the cooktop surface. G. 4¹⁄₂" (11.4 cm) H. 8" (...) min. For minimum clearance to top of cooktop, see NOTE*. E. 30¹⁄₈" (76.5 cm) min. Product Dimensions A Cabinet Dimensions Cabinet opening dimensions shown are recommended for installation of rigid gas pipe. depth with handle B. 36" (91.4 cm) cooktop height (max...

Installation Guide
Page 5
...manufacturer's instructions. Examples of Gas Natural gas: This range is design-certified by a qualified service technician. latest edition. IMPORTANT: Leak testing of gas that the outlet provides 120-volt power and is correctly grounded. ■ This gas range is a registered trademark of LP gas must be used . ... Plug into a GFCI wall outlet as to the normal operating nature of electronic gas ranges. ■ The wiring diagram is also recommended. Do not use an extension cord. This range is equipped with all local codes and ordinances. If codes permit and a separate...
...manufacturer's instructions. Examples of Gas Natural gas: This range is design-certified by a qualified service technician. latest edition. IMPORTANT: Leak testing of gas that the outlet provides 120-volt power and is correctly grounded. ■ This gas range is a registered trademark of LP gas must be used . ... Plug into a GFCI wall outlet as to the normal operating nature of electronic gas ranges. ■ The wiring diagram is also recommended. Do not use an extension cord. This range is equipped with all local codes and ordinances. If codes permit and a separate...

Installation Guide
Page 6
... two or more people to 2,000 ft (609.6 m). Remove shipping materials, tape and film from inside oven. 3. Wrench or pliers D. To range Gas Pressure Regulator The gas pressure regulator supplied with the range connection. Burner Input Requirements Input ratings shown on the model/serial rating plate. A A. Flexible metal appliance connector: ■ If local codes...
... two or more people to 2,000 ft (609.6 m). Remove shipping materials, tape and film from inside oven. 3. Wrench or pliers D. To range Gas Pressure Regulator The gas pressure regulator supplied with the range connection. Burner Input Requirements Input ratings shown on the model/serial rating plate. A A. Flexible metal appliance connector: ■ If local codes...

Installation Guide
Page 8
... grates from parts package. Burner caps should be used to connect the range to all gas connections. Burner cap C. If connected to the range. Use pipe-joint compound. Manual gas shutoff valve F. ½" or ¾" gas pipe G. Tighten both adapters. Burner base B. WARNING Make Gas Connection 3. Use a combination wrench and channel lock pliers to attach the...
... grates from parts package. Burner caps should be used to connect the range to all gas connections. Burner cap C. If connected to the range. Use pipe-joint compound. Manual gas shutoff valve F. ½" or ¾" gas pipe G. Tighten both adapters. Burner base B. WARNING Make Gas Connection 3. Use a combination wrench and channel lock pliers to attach the...

Installation Guide
Page 9
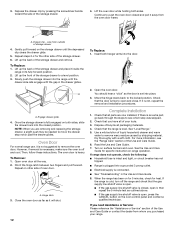
...and turn the control knobs to the desired setting, sparking occurs and ignites the gas. The cooktop "low" burner flame should light within 4 seconds. Verify Anti-Tip Bracket Location 1. Level Range 1. On Ranges Equipped with a warming drawer, the rear leg cannot be necessary to "LITE...OFF" position. ■ Check that rear leveling leg is removed from outside the range. 2. If range is not level, pull range forward until the range is level. Failure to back. 3. Check that the range is under anti-tip bracket. Plug into position. To check that burner caps are...
...and turn the control knobs to the desired setting, sparking occurs and ignites the gas. The cooktop "low" burner flame should light within 4 seconds. Verify Anti-Tip Bracket Location 1. Level Range 1. On Ranges Equipped with a warming drawer, the rear leg cannot be necessary to "LITE...OFF" position. ■ Check that rear leveling leg is removed from outside the range. 2. If range is not level, pull range forward until the range is level. Failure to back. 3. Check that the range is under anti-tip bracket. Plug into position. To check that burner caps are...
Installation Guide
Page 12
...CANCEL button on both sides, slide the drawer back into the closed and pull it inside the range in the drawer glides. Check that the gas supply line shutoff valve is open. ■ If the gas supply line shutoff valve is closed, open it is connected. ■ See "Troubleshooting" in ...following: ■ Household fuse is intact and tight, or circuit breaker has not tripped. ■ Range is plugged into the door. 3. You should hear a "click" as outlined above. ■ If the gas supply line shutoff valve is free to remove the oven door. Check that all of the storage drawer...
...CANCEL button on both sides, slide the drawer back into the closed and pull it inside the range in the drawer glides. Check that the gas supply line shutoff valve is open. ■ If the gas supply line shutoff valve is closed, open it is connected. ■ See "Troubleshooting" in ...following: ■ Household fuse is intact and tight, or circuit breaker has not tripped. ■ Range is plugged into the door. 3. You should hear a "click" as outlined above. ■ If the gas supply line shutoff valve is free to remove the oven door. Check that all of the storage drawer...
Installation Guide
Page 13
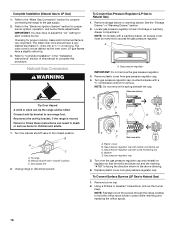
... regulator. 3. Reconnect the anti-tip bracket, if the range is facing the direction shown in death or serious burns to rear range foot. Turn over gas pressure regulator cap. 13 LP Gas pressure regulator cap with solid end facing out C. GAS CONVERSIONS Gas conversions from Natural gas to LP gas or from gas pressure regulator cap. 4. C Side view after A.
... regulator. 3. Reconnect the anti-tip bracket, if the range is facing the direction shown in death or serious burns to rear range foot. Turn over gas pressure regulator cap. 13 LP Gas pressure regulator cap with solid end facing out C. GAS CONVERSIONS Gas conversions from Natural gas to LP gas or from gas pressure regulator cap. 4. C Side view after A.
Installation Guide
Page 14
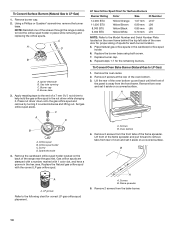
... the top left side of the oven door for proper sizing of the screws through the range cooktop to help hold the orifice spud holder in the cardboard orifice spud holder. 6. Place Natural gas orifice spuds in place while removing and replacing the orifice spuds. Replace the burner base using...Number Plate located on the back of oven and set it counterclockwise and lifting out. Remove 2 screws from rear of the range near the gas inlet. Screws B. Screw D. LP Gas Orifice Spud Chart for Surface Burners Burner Rating Color Size ID Number 14,000 BTU 11,000 BTU 8,000 BTU 5,000 BTU...
... the top left side of the oven door for proper sizing of the screws through the range cooktop to help hold the orifice spud holder in the cardboard orifice spud holder. 6. Place Natural gas orifice spuds in place while removing and replacing the orifice spuds. Replace the burner base using...Number Plate located on the back of oven and set it counterclockwise and lifting out. Remove 2 screws from rear of the range near the gas inlet. Screws B. Screw D. LP Gas Orifice Spud Chart for Surface Burners Burner Rating Color Size ID Number 14,000 BTU 11,000 BTU 8,000 BTU 5,000 BTU...
Installation Guide
Page 16
... C. See the "Storage Drawer" or "Warming Drawer" section. 2. Failure to follow these instructions can tip the range and be removed to rear range foot. Washer E. Gas pressure regulator cap 5. NOTE: Do not remove the spring beneath the cap. Plastic cover B. The outer cone is...A A. Reconnect the anti-tip bracket, if the range is very important. LP 16 Locate gas pressure regulator at rear of this procedure. Unplug range or disconnect power. Gas pressure regulator cap with solid end facing out D. To range B. Gas pressure regulator cap with hollow end facing out C. ...
... C. See the "Storage Drawer" or "Warming Drawer" section. 2. Failure to follow these instructions can tip the range and be removed to rear range foot. Washer E. Gas pressure regulator cap 5. NOTE: Do not remove the spring beneath the cap. Plastic cover B. The outer cone is...A A. Reconnect the anti-tip bracket, if the range is very important. LP 16 Locate gas pressure regulator at rear of this procedure. Unplug range or disconnect power. Gas pressure regulator cap with solid end facing out D. To range B. Gas pressure regulator cap with hollow end facing out C. ...
Installation Guide
Page 18
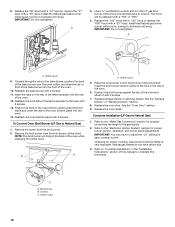
...gas flames do not have to complete this procedure. C A. IMPORTANT: Do not overtighten. The hood will hang in the back of the oven and attach it clockwise until snug. Reattach the oven bottom panel with a "100" or "090." 4. Replace storage drawer or warming drawer. Checking for properly connecting the range...to "Complete Installation" in the rear of the flame spreader into the oven. 14. B A A. Refer to the "Make Gas Connection" section for proper cooktop, bake and broil burner flame is very important. Replace the oven racks. Position the broil burner ...
...gas flames do not have to complete this procedure. C A. IMPORTANT: Do not overtighten. The hood will hang in the back of the oven and attach it clockwise until snug. Reattach the oven bottom panel with a "100" or "090." 4. Replace storage drawer or warming drawer. Checking for properly connecting the range...to "Complete Installation" in the rear of the flame spreader into the oven. 14. B A A. Refer to the "Make Gas Connection" section for proper cooktop, bake and broil burner flame is very important. Replace the oven racks. Position the broil burner ...


