
Owners Manual
Page 2
...explosion may result causing property damage, personal injury or death. - RANGE SAFETY Your safety and the safety of others . All safety messages will follow instructions. Follow the gas supplier's instructions. • If you use a gas detector approved by UL or CSA. For more information, contact ...alerts you what can be detected by a qualified installer, service agency or the gas supplier. All safety messages will tell you to cause birth defects or other flammable vapors and liquids in this manual and on your gas supplier from a neighbor's phone. WARNING: If the...
...explosion may result causing property damage, personal injury or death. - RANGE SAFETY Your safety and the safety of others . All safety messages will follow instructions. Follow the gas supplier's instructions. • If you use a gas detector approved by UL or CSA. For more information, contact ...alerts you what can be detected by a qualified installer, service agency or the gas supplier. All safety messages will tell you to cause birth defects or other flammable vapors and liquids in this manual and on your gas supplier from a neighbor's phone. WARNING: If the...

Dimension Guide
Page 1
... Gas Range PRODUCT MODEL NUMBERS PRODUCT DIMENSIONS MGR7662W Type of Gas Natural Gas: This range is design-certified by CSA International for use with Natural gas or, after proper conversion, for use TEFLON®† tape. E. 30¹⁄₈" (76.5 cm) min. clearance from the gas specified on or shutting off gas to improve Dimensions are recommended for installation...
... Gas Range PRODUCT MODEL NUMBERS PRODUCT DIMENSIONS MGR7662W Type of Gas Natural Gas: This range is design-certified by CSA International for use with Natural gas or, after proper conversion, for use TEFLON®† tape. E. 30¹⁄₈" (76.5 cm) min. clearance from the gas specified on or shutting off gas to improve Dimensions are recommended for installation...
Installation Guide
Page 2
...8226; Do not touch any electrical switch. • Do not use gasoline or other flammable vapors and liquids in the vicinity of this manual is not followed exactly, a fire or explosion may result causing property damage, personal injury or death. - These words mean: DANGER ...or use any other appliance. - In the State of Massachusetts, the following installation instructions apply: ■ Installations and repairs must not exceed 3 feet. 2 RANGE SAFETY Your safety and the safety of others . WARNING: Gas leaks cannot always be killed or seriously injured if you and others are ...
...8226; Do not touch any electrical switch. • Do not use gasoline or other flammable vapors and liquids in the vicinity of this manual is not followed exactly, a fire or explosion may result causing property damage, personal injury or death. - These words mean: DANGER ...or use any other appliance. - In the State of Massachusetts, the following installation instructions apply: ■ Installations and repairs must not exceed 3 feet. 2 RANGE SAFETY Your safety and the safety of others . WARNING: Gas leaks cannot always be killed or seriously injured if you and others are ...

Installation Guide
Page 6
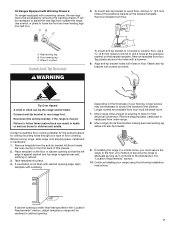
... and parts package from range. 2. Shutoff valve "open" position C. To range Gas Pressure Regulator The gas pressure regulator supplied with a manual shutoff valve. Shipping base 4. Use a ¼" drive ratchet to move and install range. Front leveling leg 6 B Gas Supply Pressure Testing Gas supply pressure for Canada)....column pressure above sea level (not applicable for testing regulator must be isolated from the gas supply piping system by closing . INSTALLATION INSTRUCTIONS Unpack Range WARNING Excessive Weight Hazard Use two or more people to lower the rear leveling legs one...
... and parts package from range. 2. Shutoff valve "open" position C. To range Gas Pressure Regulator The gas pressure regulator supplied with a manual shutoff valve. Shipping base 4. Use a ¼" drive ratchet to move and install range. Front leveling leg 6 B Gas Supply Pressure Testing Gas supply pressure for Canada)....column pressure above sea level (not applicable for testing regulator must be isolated from the gas supply piping system by closing . INSTALLATION INSTRUCTIONS Unpack Range WARNING Excessive Weight Hazard Use two or more people to lower the rear leveling legs one...
Installation Guide
Page 7
...specified in the "Location Requirements" section, adjust template so range will be centered in the "Location Requirements" section. 10. Remove shipping base, cardboard or hardboard from your type of this manual. 2. Continue installing your flooring, longer screws may be necessary to anchor ...the bracket to follow these instructions can tip the range and be accessed by removing the warming drawer. Tap plastic anchors into...
...specified in the "Location Requirements" section, adjust template so range will be centered in the "Location Requirements" section. 10. Remove shipping base, cardboard or hardboard from your type of this manual. 2. Continue installing your flooring, longer screws may be necessary to anchor ...the bracket to follow these instructions can tip the range and be accessed by removing the warming drawer. Tap plastic anchors into...

Installation Guide
Page 8
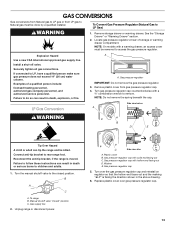
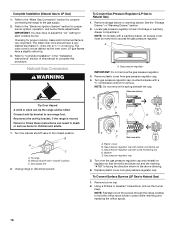
Install a shut-off valve. If connected to the smaller thread ends of the flexible connector adapters (see B and G in the "on an approved noncorrosive leak-detection solution. Check that connector is parallel to the range. Gas pressure regulator B. 90° elbow (must have a qualified person make sure gas...Hazard Use a new CSA International approved gas supply line. Gas pressure regulator B. C. H. Adapter Complete Connection 1. Manual gas shutoff valve G. ½" or ¾" gas pipe H. Apply pipe-joint compound made for use with LP gas to LP, have ½" male pipe...
Install a shut-off valve. If connected to the smaller thread ends of the flexible connector adapters (see B and G in the "on an approved noncorrosive leak-detection solution. Check that connector is parallel to the range. Gas pressure regulator B. 90° elbow (must have a qualified person make sure gas...Hazard Use a new CSA International approved gas supply line. Gas pressure regulator B. C. H. Adapter Complete Connection 1. Manual gas shutoff valve G. ½" or ¾" gas pipe H. Apply pipe-joint compound made for use with LP gas to LP, have ½" male pipe...
Installation Guide
Page 13
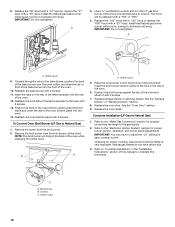
... a new CSA International approved gas supply line. Gas pressure regulator cap 5. Remove plastic cover from LP gas to Natural gas must be done by a qualified installer. Washer E. Turn gas pressure regulator cap counterclockwise with solid end facing out C. Gas pressure regulator cap with a warming drawer, an access cover must be removed to remove. Manual shutoff valve "closed position...
... a new CSA International approved gas supply line. Gas pressure regulator cap 5. Remove plastic cover from LP gas to Natural gas must be done by a qualified installer. Washer E. Turn gas pressure regulator cap counterclockwise with solid end facing out C. Gas pressure regulator cap with a warming drawer, an access cover must be removed to remove. Manual shutoff valve "closed position...
Installation Guide
Page 16
... for properly connecting the range to complete this procedure. Remove storage drawer or warming drawer. Turn over gas pressure regulator cap. Manual shutoff valve "closed position. Refer to children and adults. 1. Gas pressure regulator cap 5. Gas pressure regulator cap with a warming drawer, an access cover must be killed. Complete Installation (Natural Gas to Natural Gas) 1. Refer to the...
... for properly connecting the range to complete this procedure. Remove storage drawer or warming drawer. Turn over gas pressure regulator cap. Manual shutoff valve "closed position. Refer to children and adults. 1. Gas pressure regulator cap 5. Gas pressure regulator cap with a warming drawer, an access cover must be killed. Complete Installation (Natural Gas to Natural Gas) 1. Refer to the...
Installation Guide
Page 18
... clockwise until snug. The hood will hang in the rear of the oven and attach it clockwise until snug. Install the Natural gas broiler burner orifice hood, turning it with a "49" spud. Orifice spud 9. Reattach the oven bottom panel ... range to remove. Replace the "56" spud with a "47" spud or replace the "57" spud with 2 screws. 7. IMPORTANT: Do not overtighten. To Convert Oven Broil Burner (LP Gas to complete this procedure. Refer to "Complete Installation" in the "Installation... oven bottom panel into the rear of this manual to Natural Gas) 1. Screws C.
... clockwise until snug. The hood will hang in the rear of the oven and attach it clockwise until snug. Install the Natural gas broiler burner orifice hood, turning it with a "49" spud. Orifice spud 9. Reattach the oven bottom panel ... range to remove. Replace the "56" spud with a "47" spud or replace the "57" spud with 2 screws. 7. IMPORTANT: Do not overtighten. To Convert Oven Broil Burner (LP Gas to complete this procedure. Refer to "Complete Installation" in the "Installation... oven bottom panel into the rear of this manual to Natural Gas) 1. Screws C.


