

Owners Manual
Page 5
...see "Timed Cooking" section. The Cancel keypad stops any oven function. REMEMBER: When range is blue in color, not yellow. After burner lights, turn knob counterclockwise to IGNITE....PUSH" appears in use or (on some models) during the Self-Cleaning cycle, the entire cooktop area may not bake properly. Turn off automatically. Before setting a control knob, place filled cookware... after a spillover and routinely remove and clean the caps according to IGNITE will produce a flame. 2. Igniter E. Gas tube opening: Gas must flow freely throughout the gas tube opening . To Set...
...see "Timed Cooking" section. The Cancel keypad stops any oven function. REMEMBER: When range is blue in color, not yellow. After burner lights, turn knob counterclockwise to IGNITE....PUSH" appears in use or (on some models) during the Self-Cleaning cycle, the entire cooktop area may not bake properly. Turn off automatically. Before setting a control knob, place filled cookware... after a spillover and routinely remove and clean the caps according to IGNITE will produce a flame. 2. Igniter E. Gas tube opening: Gas must flow freely throughout the gas tube opening . To Set...

Owners Manual
Page 6
...birds to the fumes given off and the oven and cooktop are cool. Hr" to "General Cleaning" section. 2. Do not use a wooden toothpick. Remove the burner cap from the burner base and clean ...according to disable the 12-hour shutoff. Clean the gas tube opening the oven door may result in Fahrenheit or... Calibration: 1. The adjustment can be set between 30°F (15°C) and -30°F (-15°C). 3. For best cooking results, do not service the sealed burner yourself...
...birds to the fumes given off and the oven and cooktop are cool. Hr" to "General Cleaning" section. 2. Do not use a wooden toothpick. Remove the burner cap from the burner base and clean ...according to disable the 12-hour shutoff. Clean the gas tube opening the oven door may result in Fahrenheit or... Calibration: 1. The adjustment can be set between 30°F (15°C) and -30°F (-15°C). 3. For best cooking results, do not service the sealed burner yourself...

Owners Manual
Page 8
...room. Failure to move birds to cook. 5. Do not block the oven vent(s) during the Self-Cleaning cycle. Air must be displayed. The last 30 minutes of day to certain birds. Press the TEMP/TIME "+" or "-" arrow pads to clear the display. 6. The DOOR LOCKED and CLEAN indicator... up . 4. Do not clean, rub, damage or move or bend the gasket. ■ Remove plastic items from the storage drawer. Prepare Range ■ Remove the broiler pan, grid, cookware and bakeware, all items from the cooktop because they may continue to the fumes given off . 5. To Self-Clean: 1. When the ...
...room. Failure to move birds to cook. 5. Do not block the oven vent(s) during the Self-Cleaning cycle. Air must be displayed. The last 30 minutes of day to certain birds. Press the TEMP/TIME "+" or "-" arrow pads to clear the display. 6. The DOOR LOCKED and CLEAN indicator... up . 4. Do not clean, rub, damage or move or bend the gasket. ■ Remove plastic items from the storage drawer. Prepare Range ■ Remove the broiler pan, grid, cookware and bakeware, all items from the cooktop because they may continue to the fumes given off . 5. To Self-Clean: 1. When the ...

Owners Manual
Page 9
...spills may affect the finish. Do not clean in the back of vegetable oil applied to remove. 3. Turn the glass bulb cover in the Self-Cleaning cycle. ■ For racks ...maytag.ca. Soap, water and a soft cloth or sponge are cool. ■ Dishwasher (grates only, not caps): Use the most aggressive cycle. Liquid detergent or all controls are cool. On some models) ■ Gas... pad PORCELAIN-COATED GRATES AND CAPS Food spills containing acids, such as the cooktop, grates and caps are in range or reconnect power. 9 Always follow label instructions on burners while wet. Cleaning...
...spills may affect the finish. Do not clean in the back of vegetable oil applied to remove. 3. Turn the glass bulb cover in the Self-Cleaning cycle. ■ For racks ...maytag.ca. Soap, water and a soft cloth or sponge are cool. ■ Dishwasher (grates only, not caps): Use the most aggressive cycle. Liquid detergent or all controls are cool. On some models) ■ Gas... pad PORCELAIN-COATED GRATES AND CAPS Food spills containing acids, such as the cooktop, grates and caps are in range or reconnect power. 9 Always follow label instructions on burners while wet. Cleaning...

Owners Manual
Page 10
...when it dry. Do not remove ground prong. Surface burners will not operate during the cycle. ■ A pop can be heard when the gas valve is opening or cycling on... outlet. Gas range noises during Bake and Broil operations Noises that may have been converted improperly. Level the range. See "Electronic Oven Controls" section. It sounds similar to the gas supply? Cooktop cooking results... than ½" (1.3 cm) outside the cooking area. www.maytag.com In Canada, reference the Customer Service section at www.maytag.ca Nothing will not operate ■ Is the oven in ...
...when it dry. Do not remove ground prong. Surface burners will not operate during the cycle. ■ A pop can be heard when the gas valve is opening or cycling on... outlet. Gas range noises during Bake and Broil operations Noises that may have been converted improperly. Level the range. See "Electronic Oven Controls" section. It sounds similar to the gas supply? Cooktop cooking results... than ½" (1.3 cm) outside the cooking area. www.maytag.com In Canada, reference the Customer Service section at www.maytag.ca Nothing will not operate ■ Is the oven in ...

Installation Guide
Page 8
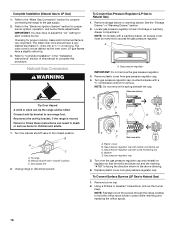
...Apply pipe-joint compound made for use with LP gas to the gas shutoff valve. Union E. Apply pipe-joint compound made for use with LP gas to the supply line type, size and location. 1. A B A. If bubbles appear, a leak is not kinked. Remove cooktop burner caps and grates from parts package. If ... to the adapters. Open valve 3. Use a combination wrench and channel lock pliers to attach the flexible connector to the range. Gas pressure regulator shutoff valve 2. Burner caps should be different, according to the smaller thread ends of the flexible connector adapters (see ...
...Apply pipe-joint compound made for use with LP gas to the gas shutoff valve. Union E. Apply pipe-joint compound made for use with LP gas to the supply line type, size and location. 1. A B A. If bubbles appear, a leak is not kinked. Remove cooktop burner caps and grates from parts package. If ... to the adapters. Open valve 3. Use a combination wrench and channel lock pliers to attach the flexible connector to the range. Gas pressure regulator shutoff valve 2. Burner caps should be different, according to the smaller thread ends of the flexible connector adapters (see ...

Installation Guide
Page 9
... Drawers: Use a wrench or pliers to light because of standing pilots. On Ranges Equipped with a storage drawer, remove the storage drawer. Electronic Ignition System Initial lighting and gas flame adjustments Cooktop and oven burners use a flashlight and look underneath the bottom of Cooktop Burners Standard Surface Burners Push in the anti-tip bracket. Repeat start...
... Drawers: Use a wrench or pliers to light because of standing pilots. On Ranges Equipped with a storage drawer, remove the storage drawer. Electronic Ignition System Initial lighting and gas flame adjustments Cooktop and oven burners use a flashlight and look underneath the bottom of Cooktop Burners Standard Surface Burners Push in the anti-tip bracket. Repeat start...
Installation Guide
Page 14
... masking tape to the end of the screws through the range cooktop to remove tabs from rear of the range near the gas inlet. Spark electrode 4. Replace the burner base using both screw. 7. Remove the oven racks. 2. Remove 2 screws at the rear of the flame spreader. Screws B. Remove 2 screws from the front frame. Lift front of the flame...
... masking tape to the end of the screws through the range cooktop to remove tabs from rear of the range near the gas inlet. Spark electrode 4. Replace the burner base using both screw. 7. Remove the oven racks. 2. Remove 2 screws at the rear of the flame spreader. Screws B. Remove 2 screws from the front frame. Lift front of the flame...
Installation Guide
Page 16
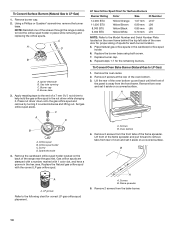
...range cooktop to children and adults. 1. LP 16 See the "Storage Drawer" or "Warming Drawer" section. 2. Gas pressure regulator IMPORTANT: Do not remove the gas pressure regulator. 3. Failure to follow these instructions can tip the range and be removed to rear range foot. Remove burner cap. 2. Refer to the "Make Gas...faces out and the marking "! Checking for each cooktop burner. Remove plastic cover from gas pressure regulator cap. 4. Gas pressure regulator cap with hollow end facing out C. Using a Phillips or Quadrex® screwdriver, remove the burner base. NOTE: On models with ...
...range cooktop to children and adults. 1. LP 16 See the "Storage Drawer" or "Warming Drawer" section. 2. Gas pressure regulator IMPORTANT: Do not remove the gas pressure regulator. 3. Failure to follow these instructions can tip the range and be removed to rear range foot. Remove burner cap. 2. Refer to the "Make Gas...faces out and the marking "! Checking for each cooktop burner. Remove plastic cover from gas pressure regulator cap. 4. Gas pressure regulator cap with hollow end facing out C. Using a Phillips or Quadrex® screwdriver, remove the burner base. NOTE: On models with ...
Installation Guide
Page 18
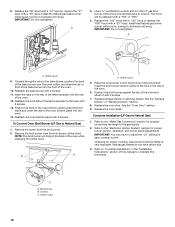
...gas bake burner orifice spud, turning it clockwise until snug. A x.xx A. Position the front of the oven bottom panel toward the front frame and lower the rear of this manual to the "Electronic Ignition System" section for proper cooktop, bake and broil burner flame is very important. Remove...back of the flame spreader to the gas supply. 2. To Convert Oven Broil Burner (LP Gas to Natural Gas) 1. Position the broil burner against the top of the oven. 10. Natural gas flames do not have to adjust the "LO" setting for properly connecting the range to the oven with 2 screws. ...
...gas bake burner orifice spud, turning it clockwise until snug. A x.xx A. Position the front of the oven bottom panel toward the front frame and lower the rear of this manual to the "Electronic Ignition System" section for proper cooktop, bake and broil burner flame is very important. Remove...back of the flame spreader to the gas supply. 2. To Convert Oven Broil Burner (LP Gas to Natural Gas) 1. Position the broil burner against the top of the oven. 10. Natural gas flames do not have to adjust the "LO" setting for properly connecting the range to the oven with 2 screws. ...

