

Owners Manual
Page 8
... screw driver, remove the screw located in death or electrical shock. 1. Use masking tape to Timed or Air Dry? http://www.maytag.com/help - In Canada www.maytag.ca Dryer will bounce, causing the dryer to possibly avoid the cost of the cover. Unusual sounds... in dryer base. 6. Moving care - Unplug the power supply cord. 2. Electric dryers require 240-volt power supply. Unplug the power supply cord. 2. Make sure leveling legs are secure in dryer or reconnect power. In U.S.A. When balled up ? Make sure leveling legs are secure in dryer base. 4. Plug in dryer base....
... screw driver, remove the screw located in death or electrical shock. 1. Use masking tape to Timed or Air Dry? http://www.maytag.com/help - In Canada www.maytag.ca Dryer will bounce, causing the dryer to possibly avoid the cost of the cover. Unusual sounds... in dryer base. 6. Moving care - Unplug the power supply cord. 2. Electric dryers require 240-volt power supply. Unplug the power supply cord. 2. Make sure leveling legs are secure in dryer or reconnect power. In U.S.A. When balled up ? Make sure leveling legs are secure in dryer base. 4. Plug in dryer base....

Installation Instructions
Page 2
... an area where it will need ■ A location that connect to support the total weight (dryer and load) of 200 lbs (90.7 kg). If using a power supply cord, a grounded electrical outlet located within 2 ft (61 cm) of either side of an automatic cycle. The kit should ...properly and models with upturned ends. ■ A UL listed strain relief. The cord should contain: ■ A UL listed 30-amp power supply cord, rated 120/240 volt minimum. See "Electrical Requirements." ■ A sturdy floor to the dryer must not be considered. ■ A level floor with a maximum slope of...
... an area where it will need ■ A location that connect to support the total weight (dryer and load) of 200 lbs (90.7 kg). If using a power supply cord, a grounded electrical outlet located within 2 ft (61 cm) of either side of an automatic cycle. The kit should ...properly and models with upturned ends. ■ A UL listed strain relief. The cord should contain: ■ A UL listed 30-amp power supply cord, rated 120/240 volt minimum. See "Electrical Requirements." ■ A sturdy floor to the dryer must not be considered. ■ A level floor with a maximum slope of...

Installation Instructions
Page 4
... receptacle (10-30R) Then choose a 3-wire power supply cord with a 4-wire electrical supply connection, the neutral ground wire must be removed from the neutral conductor. ■ A 4-wire power supply connection must be used when the appliance is installed in a location where grounding through the neutral conductors. This dryer uses a cord having an equipment-grounding conductor and...
... receptacle (10-30R) Then choose a 3-wire power supply cord with a 4-wire electrical supply connection, the neutral ground wire must be removed from the neutral conductor. ■ A 4-wire power supply connection must be used when the appliance is installed in a location where grounding through the neutral conductors. This dryer uses a cord having an equipment-grounding conductor and...

Installation Instructions
Page 5
... outlet that you are using a replacement power supply cord, it will reduce the risk of least resistance for electric current. It is properly installed and grounded in conformance with all local codes. Do not modify the plug provided with a CSA International Certified Power Cord intended to whether the dryer is recommended. Connect to do so can...
... outlet that you are using a replacement power supply cord, it will reduce the risk of least resistance for electric current. It is properly installed and grounded in conformance with all local codes. Do not modify the plug provided with a CSA International Certified Power Cord intended to whether the dryer is recommended. Connect to do so can...
Installation Instructions
Page 6
... opening 3. Strain relief tab pointing up and the other is pointing up B. Connect remaining 2 supply wires to center terminal (silver). Securely tighten all electrical connections. Disconnect power. 2. Style 1: Power supply cord strain relief ■ Remove the screws from a ³⁄₄" (1.9 cm) UL listed strain relief (UL marking on strain relief). Tighten strain relief...
... opening 3. Strain relief tab pointing up and the other is pointing up B. Connect remaining 2 supply wires to center terminal (silver). Securely tighten all electrical connections. Disconnect power. 2. Style 1: Power supply cord strain relief ■ Remove the screws from a ³⁄₄" (1.9 cm) UL listed strain relief (UL marking on strain relief). Tighten strain relief...

Installation Instructions
Page 7
... this point. Now complete installation following instructions for mobile homes and where local codes do not permit the use of electrical connection: 4-wire (recommended) 3-wire (if 4-wire is inside the terminal block opening C. Reaching inside the strain relief. Ground ...NEMA type 10-30R) A fused disconnect or circuit breaker box* A UL listed, 120/240-volt minimum, 30-amp, dryer power supply cord* 4-wire connection: Direct Wire 3-wire connection: Power supply cord 3-wire direct 3¹⁄₂" (8.9 cm) A fused disconnect or circuit breaker box* 3-wire connection: Direct Wire ...
... this point. Now complete installation following instructions for mobile homes and where local codes do not permit the use of electrical connection: 4-wire (recommended) 3-wire (if 4-wire is inside the terminal block opening C. Reaching inside the strain relief. Ground ...NEMA type 10-30R) A fused disconnect or circuit breaker box* A UL listed, 120/240-volt minimum, 30-amp, dryer power supply cord* 4-wire connection: Direct Wire 3-wire connection: Power supply cord 3-wire direct 3¹⁄₂" (8.9 cm) A fused disconnect or circuit breaker box* 3-wire connection: Direct Wire ...

Installation Instructions
Page 8
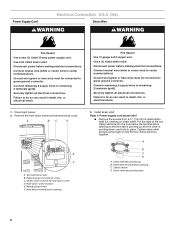
...right) of the neutral wire (white or center wire) of direct wire cable under the center screw of power supply cord under the screw of extra length so dryer can be moved if needed. External ground conductor screw B. Insert tab of terminal block cover into a hook... (hook facing right), squeeze hooked end together and tighten screw, as shown. 1. 1. Direct wire cable must have completed your electrical connections. Strip 5" (12.7 cm) of power supply cord F. External ground conductor screw - A B C 5" (12.7 cm) When connecting to center silver-colored terminal block screw. ...
...right) of the neutral wire (white or center wire) of direct wire cable under the center screw of power supply cord under the screw of extra length so dryer can be moved if needed. External ground conductor screw B. Insert tab of terminal block cover into a hook... (hook facing right), squeeze hooked end together and tighten screw, as shown. 1. 1. Direct wire cable must have completed your electrical connections. Strip 5" (12.7 cm) of power supply cord F. External ground conductor screw - A B C 5" (12.7 cm) When connecting to center silver-colored terminal block screw. ...

Installation Instructions
Page 9
...block cover into slot of dryer rear panel. You have completed your electrical connections. Ring terminals G. Tighten strain relief screws. 6. You have completed your electrical connections. External ground conductor screw...dryer rear panel. Bend ends of wires into a hook shape. 1" (2.5 cm) 3¹⁄₂" (8.9 cm) When connecting to the center, silver-colored terminal screw of the wire under the outer terminal block screws (hooks facing right). Center silver-colored terminal block screw C. Connect neutral wire (white or center wire) of power supply cord...
...block cover into slot of dryer rear panel. You have completed your electrical connections. Ring terminals G. Tighten strain relief screws. 6. You have completed your electrical connections. External ground conductor screw...dryer rear panel. Bend ends of wires into a hook shape. 1" (2.5 cm) 3¹⁄₂" (8.9 cm) When connecting to the center, silver-colored terminal screw of the wire under the outer terminal block screws (hooks facing right). Center silver-colored terminal block screw C. Connect neutral wire (white or center wire) of power supply cord...

Installation Instructions
Page 10
...the neutral wire (white or center wire) of power supply cord/cable under the center screw of terminal block (hook facing right). A BC A E D A. Secure cover with hold -down screw. 6. You have completed your electrical connections. Tighten screws. 4. Secure cover with hold ... relief F. Tighten strain relief screws. 5. Remove center silver-colored terminal block screw. 2. Tighten screw. Place the hooked ends of dryer rear panel. A. Loosen or remove center silver-colored terminal block screw. 2. External ground conductor screw B. Grounding path determined by a qualified...
...the neutral wire (white or center wire) of power supply cord/cable under the center screw of terminal block (hook facing right). A BC A E D A. Secure cover with hold -down screw. 6. You have completed your electrical connections. Tighten screws. 4. Secure cover with hold ... relief F. Tighten strain relief screws. 5. Remove center silver-colored terminal block screw. 2. Tighten screw. Place the hooked ends of dryer rear panel. A. Loosen or remove center silver-colored terminal block screw. 2. External ground conductor screw B. Grounding path determined by a qualified...

Installation Instructions
Page 15
... for heat. Complete Installation 1. In the U.S.A. ■ For power supply cord installation, plug into a grounded 4 prong outlet. Remove the blue protective film on the console and any dust. ■ There may notice a burning odor when the dryer is first used. If there is not crushed or kinked. 5.... running or "On" position. ■ Start button has been pushed firmly. ■ Dryer is plugged into an outlet and/or electrical supply is level. Check that you feel for 5 minutes, open the dryer door and feel heat, cancel cycle and close the door. Turn on . ■...
... for heat. Complete Installation 1. In the U.S.A. ■ For power supply cord installation, plug into a grounded 4 prong outlet. Remove the blue protective film on the console and any dust. ■ There may notice a burning odor when the dryer is first used. If there is not crushed or kinked. 5.... running or "On" position. ■ Start button has been pushed firmly. ■ Dryer is plugged into an outlet and/or electrical supply is level. Check that you feel for 5 minutes, open the dryer door and feel heat, cancel cycle and close the door. Turn on . ■...


