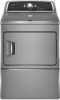
Maytag MEDX500XL Support Question
Maytag MEDX500XL Support Question
Find answers below for this question about Maytag MEDX500XL.Need a Maytag MEDX500XL manual? We have 2 online manuals for this item!
Question posted by keeling61 on August 24th, 2021
Power Cord Replacement
moved into new home Dryer power has 4 pinsOld home has 3.Can I simply replace w/ 4 pin cord I know green is ground but where do other wires( red, white, black ) attach
Current Answers
Answer #1: Posted by SonuKumar on August 25th, 2021 1:01 AM
SonuKumar

Member since:
May 9th, 2021 Points: 16,595,890

Member since:
May 9th, 2021 Points: 16,595,890
Please respond to my effort to provide you with the best possible solution by using the "Acceptable Solution" and/or the "Helpful" buttons when the answer has proven to be helpful.
Regards,
Sonu
Your search handyman for all e-support needs!!
Related Maytag MEDX500XL Manual Pages
Installation Instructions - Page 3
... whom you purchased your dryer. The cord should contain:
■■ A UL listed 30-amp power supply cord, rated 120/240 volt minimum. Read and follow the instructions provided with upturned ends.
■■ A UL listed strain relief.
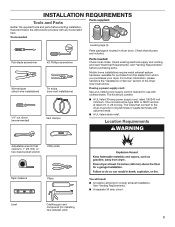
Parts needed :
Flat-blade screwdriver
#2 Phillips screwdriver
Wire stripper (direct wire installations)
Tin snips (new vent installations)
1/4" nut...
Installation Instructions - Page 4
... extended. Do not have a fuse in the neutral or grounding circuit.
■■ Do not use an extension cord.
■■ If codes permit and a separate ground wire is recommended to support the total weight (dryer and load) of the dryer in remodeling after 1996, and all mobile home installations. See "Electrical Requirements."
■■ A sturdy floor...
Installation Instructions - Page 5

... power supply cord:
Use a UL listed power supply cord kit marked for (1) new branch-circuit installations, (2) mobile homes, (3) recreational vehicles, and (4) areas where local codes prohibit grounding through the neutral conductor is isolated from the external ground connector screw (green screw), and secured under the neutral terminal (center or white wire) of the terminal block, the dryer...
Installation Instructions - Page 6

... to connect the exhaust vent.
Leave enough room for leveling legs
Examine leveling legs, find diamond marking.
diamond marking
1. Now stand the dryer on cardboard.
6
Firmly grasp dryer body (not console panel) and gently lay dryer down on its final location. Install Leveling Legs
WARNING
2. Prepare dryer for electrical connection and to move and install...
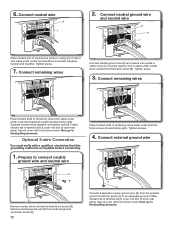
Installation Instructions - Page 7
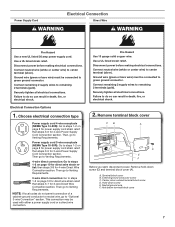
... ground wire F.
Ground wire (green or bare wire) must be connected to green ground connector.
Remove terminal block cover
CB
A
D
E F
Before you start, disconnect power. External ground conductor screw C.
This connection may be used with either a power supply cord or a direct wire connection.
Connect neutral wire (white or center wire) to center terminal (silver).
use a new...
Installation Instructions - Page 8

...prong D. Prepare to step 3 on this point.
For 4 wire Power Supply Cord Connection, continue to connect neutral
ground wire and neutral wire.
Tighten screw.
8
Attach power supply cord
to hold in a horizontal position. Ring terminals
3. Power Supply Cord Connection
Power supply cord strain relief
1. Spade terminals with the dryer cabinet and be in place. A
B
F
CD...
Installation Instructions - Page 9

... remaining wires
3-wire Power Supply Cord Connection
Use where local codes permit connecting cabinet-ground conductor to Venting Requirements.
9 Now, go to outer terminal block screws. Finally, reinsert tab of terminal block cover into slot of power supply cord to external ground conductor screw (A). Connect ground wire
A
F
Connect ground wire (F) (green or bare) of dryer rear...
Installation Instructions - Page 10

...
1. Reaching inside the terminal block opening (B). Attach direct wire cable
to terminal block, place hooked end of wires into hooks.
4. To connect wires to strain relief
(127
5" mm)
Direct wire cable must have a tight fit with the dryer cabinet and be moved if needed. Remove neutral ground wire (E) from remaining 3 wires.
Tighten strain relief screw against the direct...
Installation Instructions - Page 11

... neutral ground wire (E) and place hooked end (hook facing right) of neutral wire (white or center wire) (C) of wire under terminal block screw, facing to Venting Requirements. Squeeze hooked ends together and tighten screw.
7. Strip 31/2" (89 mm) of outer covering from end of extra length so dryer may be moved if needed. Connect remaining wires
To connect wires to...
Installation Instructions - Page 12
...You must verify with hold -down screw. Connect remaining wires
Connect neutral ground wire (E) and neutral wire (white or center wire) (C) of remaining direct wire cable wires under outer terminal block screws (hooks facing right). Now, go to Venting Requirements. Connect remaining wires
Place hooked ends of power supply cord or cable under center terminal block screw (B). Secure cover...
Installation Instructions - Page 13
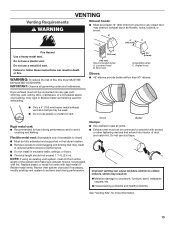
... the risk of a building. Box hood
2½" (64 mm)
Acceptable styles: C.
Replace plastic or metal foil vents with screws or other fastening devices that extend into any object...If using an existing vent system, clean lint from ground or any gas vent, chimney, wall, ceiling, attic, crawlspace, or a concealed space of fire, this dryer MUST BE
EXHAUSTED OUTDOORS. Good
Better
Clamps:
&#...
Installation Instructions - Page 16

... q Check that both fuses are snug against the ground before tightening them. After dryer is not crushed
or kinked. q Check that dryer is not level, prop up using a wood block...dryer.
Be sure vent is in your tools.
Tighten and adjust leveling legs
Move dryer to see what was skipped.
2. If there is first heated. The odor will not start the dryer. q Set the dryer on dryer...
Owners Manual - Page 4

...Remove lint and debris from the front the dryer. Use Sensor Cycles for final product check. Fire Hazard
Use a heavy metal vent. The venting system attached to over-drying.
n Clear away items ... foil vent. Proper venting will be sure to efficiently dry laundry. n Replace plastic or foil vent material with heat, dryers require good air flow to follow these instructions can result in the ...
Owners Manual - Page 5
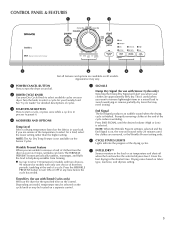
... dry. Depending on model, temperature may be selected on the cycle knob or may vary.
1 POWER/CANCEL BUTTON Press to turn ON or OFF at any time before the cycle has ended. Promptly ...you when your dryer. Turn the knob to help keep wrinkles from the dryer as soon as it .
4 MODIFIERS AND OPTIONS
Temp Level Select a drying temperature based on the fabrics in your laundry load.
The WRINKLE...
Owners Manual - Page 7
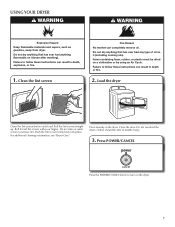
.... Pull the lint screen straight up. For additional cleaning information, see "Dryer Care." Do not overload the dryer; Failure to turn on it (including cooking oils). Do not rinse or...by using an Air Cycle. Press POWER/CANCEL
Press the POWER/CANCEL button to follow these instructions can result in death or fire.
2. Place laundry in the dryer. Items containing foam, rubber, or...
Owners Manual - Page 9

...: 1.
Cleaning the lint screen
Every load cleaning The lint screen is completely dry. Tumble a load of the dryer. As needed cleaning Laundry detergent and fabric softener residue can cause longer drying times for proper dryer operation. Reinstall screen in front of clean cloths or towels to avoid drum staining. Dry these items inside...
Owners Manual - Page 10
...dryer door. Electrical Shock Hazard Disconnect power before operating. For direct-wired dryers: 1. Use tape to locate, level, and connect the dryer.
10
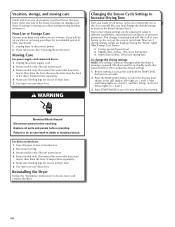
The dryer must be changed while the dryer is off power at home. Replace...or moving care
Install and store your dryer. Non-Use or Storage Care
Operate your loads on = level 3.
3. Moving Care
For power supply cord-connected dryers:...
Owners Manual - Page 11
... few minutes of garments being dried.
Make sure you hear the dryer drum moving.
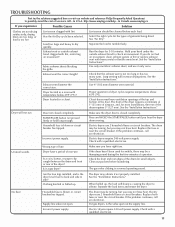
Exhaust vent the correct length? Electric dryers require 240-volt power supply. Hold your hand under the outside exhaust hood clogged with a qualified electrician. Electric dryers require 240-volt power supply. Replace both fuses or reset the circuit breaker. TROUBLESHOOTING
First try the...
Owners Manual - Page 12
...
Possible Causes
Solution
Cycle time too short
Sensor cycle ending early. Load is located? The new electric heating element may not be gone after the first cycle. If loads are cooled slowly... shut off when the load reaches the selected dryness. Were laundry items removed from the dryer before removing laundry from the area, rewash and dry the clothing.
Allow the Cool Down cycle...
Owners Manual - Page 13
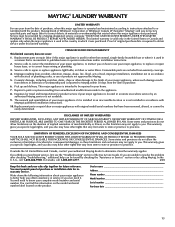
... to instructions attached to or ...LAUNDRY WARRANTY
LIMITED WARRANTY
For one year from the date of purchase, when this major appliance is required to obtain service under this limited warranty. Replacement parts or repair labor if this book and your home...by a Maytag designated service company. Service calls to correct house wiring or plumbing.
3. In the
U.S.A., call 1800807...
Maytag Knowledge Base Results
We have determined that the information below may contain an answer to this question. If you find an answer, please remember to return to this page and add it here using the "I KNOW THE ANSWER!" button above. It's that easy to earn points!-
Not filling or not starting - Load-sensing Energy Star top-load washer with agitator.
...power cord into a grounded three prong outlet? Are you are washing. Do not use short soaks (no wash action) to occur, call an electrician. Turn on a fuse box, check to see if a fuse has blown and replace... on ? Turn off throughout the wash. The washer may not start 4 to continue. Slightly move the timer knob clockwise and then pull out the knob. Top-load washer Not draining... -
Washer will not fill or start - Top-load washer
... move the timer knob clockwise, and then pull out the knob. Make sure the knob is on a fuse box, check to see if the hot and/or cold water is loose - Newer washers will not fill or wash with agitator. Not draining, not spinning out water, wet loads - Plug power cord into a grounded... -
Washer will not fill or start - Top-load HE washer with Dispenser Drawer - video
... on a fuse box, check to see if a fuse has blown and replace it, if necessary. If the problem continues to soak into the load ...new cycle. If the lid is on , allow water to occur, call an electrician. Plug power cord into a grounded 3 prong outlet? Check to continue. Spin to estimate the load size. video High Efficiency washer will then move...
Similar Questions

Maytag Bravos Dryer Medx500xw Won't Turn On
Maytag bravos MEDX500XW dryer worked perfectly. Moved and now it won't power on at all. Won't do any...
Maytag bravos MEDX500XW dryer worked perfectly. Moved and now it won't power on at all. Won't do any...
(Posted by cahern8605 7 years ago)

How To Connect Maytag Centennial Dryer With 4 Pin Power
(Posted by trisfra 10 years ago)
Can I Replace The 3 Wire Cord With A 4 Wire Cord On My Maytag Electric Dryer
(Posted by secondtononeconcrete 10 years ago)

Replacement For Lint Screen Model Mede300vw1
replacement lint screen how to obtain a replacement
replacement lint screen how to obtain a replacement
(Posted by price5159 11 years ago)

Dryer Will Not Run Maytag #medb400vqo
Replaced motor and control module. Thermal fuse ok,wire ok.Went through the tech sheet checks and mo...
Replaced motor and control module. Thermal fuse ok,wire ok.Went through the tech sheet checks and mo...
(Posted by lanceingram 11 years ago)