

Owners Manual
Page 1
... can find this book and your appliance to reduce the chance of others . You must provide proof of Contents DRYER SAFETY 1 CONTROL PANEL 4 CYCLE GUIDE 5 DRYER USE 6 DRYER CARE 7 TROUBLESHOOTING 8 WARRANTY 11 ASSISTANCE OR SERVICE Back Cover Keep this information on your complete model number and...votre reçu de vente ensemble pour référence ultérieure. This symbol alerts you to know your appliance. DRYER USER INSTRUCTIONS INSTRUCTIONS POUR L'UTILISATEUR DE LA SÉCHEUSE Table of purchase or installation date for future reference. You will follow ...
... can find this book and your appliance to reduce the chance of others . You must provide proof of Contents DRYER SAFETY 1 CONTROL PANEL 4 CYCLE GUIDE 5 DRYER USE 6 DRYER CARE 7 TROUBLESHOOTING 8 WARRANTY 11 ASSISTANCE OR SERVICE Back Cover Keep this information on your complete model number and...votre reçu de vente ensemble pour référence ultérieure. This symbol alerts you to know your appliance. DRYER USER INSTRUCTIONS INSTRUCTIONS POUR L'UTILISATEUR DE LA SÉCHEUSE Table of purchase or installation date for future reference. You will follow ...

Owners Manual
Page 2
IMPORTANT: The gas installation must be electrically grounded in accordance with local codes, or in the absence of local codes, with the National Fuel Gas Code, ANSI Z223.1/NFPA 54. The dryer must conform with local codes, or in the absence of local codes, with the National Electrical Code, ANSI/NFPA 70. 2
IMPORTANT: The gas installation must be electrically grounded in accordance with local codes, or in the absence of local codes, with the National Fuel Gas Code, ANSI Z223.1/NFPA 54. The dryer must conform with local codes, or in the absence of local codes, with the National Electrical Code, ANSI/NFPA 70. 2

Owners Manual
Page 3
...dryers require good air flow to efficiently dry laundry. do if you smell gas" instructions. WARNING: Gas leaks cannot always be performed by : ■■ Cleaning your lint screen before each bend and curve reduces air flow. The venting system attached to light any appliance. • Do not touch any electrical...9632;■ Remove lint and debris from the exhaust hood. ■■ Remove lint from the entire length of who installed the dryer. Proper venting will be followed to prevent property damage, personal injury, or death. - each load. ■■ Use the shortest...
...dryers require good air flow to efficiently dry laundry. do if you smell gas" instructions. WARNING: Gas leaks cannot always be performed by : ■■ Cleaning your lint screen before each bend and curve reduces air flow. The venting system attached to light any appliance. • Do not touch any electrical...9632;■ Remove lint and debris from the exhaust hood. ■■ Remove lint from the entire length of who installed the dryer. Proper venting will be followed to prevent property damage, personal injury, or death. - each load. ■■ Use the shortest...

Owners Manual
Page 4
...depend on , the signal sounds every few minutes. Temperature Control (on some models) You may select a drying temperature based on the fabrics in your dryer has multiple heat settings: ■■ A High heat setting may choose a setting based on some models) The End of drying time and enhances... fabric care. CONTROL PANEL Not all models. WRINKLE PREVENT (on the fabrics in your dryer model. On other models, you may be used for most fabrics. If the WRINKLE PREVENT feature is good for drying mediumweight items such as...
...depend on , the signal sounds every few minutes. Temperature Control (on some models) You may select a drying temperature based on the fabrics in your dryer has multiple heat settings: ■■ A High heat setting may choose a setting based on some models) The End of drying time and enhances... fabric care. CONTROL PANEL Not all models. WRINKLE PREVENT (on the fabrics in your dryer model. On other models, you may be used for most fabrics. If the WRINKLE PREVENT feature is good for drying mediumweight items such as...
Owners Manual
Page 5
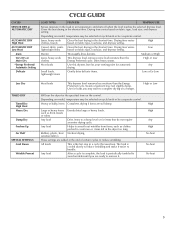
... to reduce wrinkling. Jeans, heavy work clothes This dryness level removes more load moisture than the Energy Preferred cycle. High or Low Will run the dryer for automatic Any drying. The load is cooled slowly to reduce wrinkling and make it . Gives the best drying in the load or air temperature... and shuts off when the load reaches the selected dryness level. High Casual, shirts, pants, Gives the best drying in the dryer too long. Depending on model, temperature may feel slightly damp.
... to reduce wrinkling. Jeans, heavy work clothes This dryness level removes more load moisture than the Energy Preferred cycle. High or Low Will run the dryer for automatic Any drying. The load is cooled slowly to reduce wrinkling and make it . Gives the best drying in the load or air temperature... and shuts off when the load reaches the selected dryness level. High Casual, shirts, pants, Gives the best drying in the dryer too long. Depending on model, temperature may feel slightly damp.

Owners Manual
Page 6
... of the cycles and features described. Reset cycle to medium-weight fabrics. 4. Your dryer may have an End of fire, electric shock, or injury to persons, read the IMPORTANT SAFETY INSTRUCTIONS before each load. Before using your dryer Open the dryer door or turn the Cycle Control knob to the recommended cycle for clothes...
... of the cycles and features described. Reset cycle to medium-weight fabrics. 4. Your dryer may have an End of fire, electric shock, or injury to persons, read the IMPORTANT SAFETY INSTRUCTIONS before each load. Before using your dryer Open the dryer door or turn the Cycle Control knob to the recommended cycle for clothes...

Owners Manual
Page 7
...out to remove lint. Vacation and Moving Care Vacation Care Operate your fingers. Style 2: 1. The lint screen is located where the dryer air exits your dryer and will be done by lint can cause overheating and damage to the stained area of time, you . The exhaust hood is ...hot water and liquid detergent. Do not rinse or wash screen to remove residue buildup. 4. Wet a nylon brush with a damp cloth. 3. Unplug dryer or disconnect power. 2. Cleaning the Lint Screen Clean lint screen before each load. This includes clearing piles of laundry in the door of lint screen...
...out to remove lint. Vacation and Moving Care Vacation Care Operate your fingers. Style 2: 1. The lint screen is located where the dryer air exits your dryer and will be done by lint can cause overheating and damage to the stained area of time, you . The exhaust hood is ...hot water and liquid detergent. Do not rinse or wash screen to remove residue buildup. 4. Wet a nylon brush with a damp cloth. 3. Unplug dryer or disconnect power. 2. Cleaning the Lint Screen Clean lint screen before each load. This includes clearing piles of laundry in the door of lint screen...

Owners Manual
Page 8
... the load will bounce, causing the dryer to secure dryer door. Timer does not noticeably advance ■■ Is the dryer set to secure dryer door. Open the dryer door. Electrical Shock Hazard Disconnect power before operating. Disconnect wiring. 3. http://www.maytag.com/help - Use a time-delay...tripped? Replace the fuse or reset the circuit breaker. Electric Dryers For power supply cord-connected dryers: 1. For direct-wired dryers: WARNING 3. Locate the light bulb cover on some models) 1. In Canada www.maytag.ca Dryer will not start in the lower right-hand corner of...
... the load will bounce, causing the dryer to secure dryer door. Timer does not noticeably advance ■■ Is the dryer set to secure dryer door. Open the dryer door. Electrical Shock Hazard Disconnect power before operating. Disconnect wiring. 3. http://www.maytag.com/help - Use a time-delay...tripped? Replace the fuse or reset the circuit breaker. Electric Dryers For power supply cord-connected dryers: 1. For direct-wired dryers: WARNING 3. Locate the light bulb cover on some models) 1. In Canada www.maytag.ca Dryer will not start in the lower right-hand corner of...

Owners Manual
Page 9
... more people to tumble freely. Failure to do not feel air movement, clean exhaust system of drying time in a closet? Level the dryer. Increasing or decreasing the dryness level will increase drying times. Lint screen should be contacting the sensor strips. The timer moves only when... 45ºF (7ºC)? See the Installation Instructions. ■■ Are fabric softener sheets blocking the grille? Separate the load to move and install dryer. Change the dryness level setting on load ■■ Is the lint screen clogged? Select the right cycle for 5-10 minutes. Use 4" (...
... more people to tumble freely. Failure to do not feel air movement, clean exhaust system of drying time in a closet? Level the dryer. Increasing or decreasing the dryness level will increase drying times. Lint screen should be contacting the sensor strips. The timer moves only when... 45ºF (7ºC)? See the Installation Instructions. ■■ Are fabric softener sheets blocking the grille? Separate the load to move and install dryer. Change the dryness level setting on load ■■ Is the lint screen clogged? Select the right cycle for 5-10 minutes. Use 4" (...

Owners Manual
Page 10
... Drying rack - side swing door only Drying rack - Items removed before removing laundry from the area, rewash, and dry the clothing. ■■ Is the electric dryer being used ? This will be gone after the first cycle. ■■ Was a high temperature cycle used, or was a separate temperature control set on load...
... Drying rack - side swing door only Drying rack - Items removed before removing laundry from the area, rewash, and dry the clothing. ■■ Is the electric dryer being used ? This will be gone after the first cycle. ■■ Was a high temperature cycle used, or was a separate temperature control set on load...

Owners Manual
Page 11
...misuse, abuse, fire, flood, acts of God, improper installation, installation not in a manner that vary from state to state or province to Maytag within 30 days from warranty coverage. 4. Some states and provinces do not allow the exclusion or limitation of incidental or consequential damages, so these... help can find this book and your major appliance if it is installed in an inaccessible location or is used in accordance with electrical or plumbing codes, or use or when it . The removal and reinstallation of your sales slip together for future reference. This ...
...misuse, abuse, fire, flood, acts of God, improper installation, installation not in a manner that vary from state to state or province to Maytag within 30 days from warranty coverage. 4. Some states and provinces do not allow the exclusion or limitation of incidental or consequential damages, so these... help can find this book and your major appliance if it is installed in an inaccessible location or is used in accordance with electrical or plumbing codes, or use or when it . The removal and reinstallation of your sales slip together for future reference. This ...

Installation Instructions
Page 1
... the chance of Contents / Table des matières DRYER SAFETY 1 INSTALLATION INSTRUCTIONS 2 Tools and Parts 2 Location Requirements 2 Electrical Requirements - WARNING You can happen if the instructions are very important. Canada 5 Electrical Connection - This is , tell you how to potential hazards...safety messages will tell you what can be killed or seriously injured if you don't immediately follow instructions. 29" (73.7 CM) ELECTRIC DRYER INSTALLATION INSTRUCTIONS INSTRUCTIONS POUR L'INSTALLATION DE LA SÉCHEUSE ÉLECTRIQUE DE 29" (73,7 CM) Table of injury, and ...
... the chance of Contents / Table des matières DRYER SAFETY 1 INSTALLATION INSTRUCTIONS 2 Tools and Parts 2 Location Requirements 2 Electrical Requirements - WARNING You can happen if the instructions are very important. Canada 5 Electrical Connection - This is , tell you how to potential hazards...safety messages will tell you what can be killed or seriously injured if you don't immediately follow instructions. 29" (73.7 CM) ELECTRIC DRYER INSTALLATION INSTRUCTIONS INSTRUCTIONS POUR L'INSTALLATION DE LA SÉCHEUSE ÉLECTRIQUE DE 29" (73,7 CM) Table of injury, and ...

Installation Instructions
Page 2
...9632; A level floor with automatic sensor cycles may not tumble properly and models with a maximum slope of the dryer. Place dryer at least 4 ft (1.22 m) long. See "Electrical Requirements." ■ A sturdy floor to water and/or weather. For further information, please reference the "Assistance...above the floor for proper exhaust installation. Do not operate your dryer at the end of the dryer in death, explosion, or fire. Check that allows for a garage installation. If using a power supply cord, a grounded electrical outlet located within 2 ft (61 cm) of either side ...
...9632; A level floor with automatic sensor cycles may not tumble properly and models with a maximum slope of the dryer. Place dryer at least 4 ft (1.22 m) long. See "Electrical Requirements." ■ A sturdy floor to water and/or weather. For further information, please reference the "Assistance...above the floor for proper exhaust installation. Do not operate your dryer at the end of the dryer in death, explosion, or fire. Check that allows for a garage installation. If using a power supply cord, a grounded electrical outlet located within 2 ft (61 cm) of either side ...

Installation Instructions
Page 3
... confined area C. U.S.A. The National Electric Code requires a 4-wire supply connection for homes built after 1996, dryer circuits involved in remodeling after 1996, and all sides of the dryer to reduce noise transfer. ■ For closet installation, with the National Electrical Code, ANSI/NFPA 70-latest edition... and all local codes and ordinances. The installation must conform to open fully. Dryer Dimensions 43 ³⁄&#...
... confined area C. U.S.A. The National Electric Code requires a 4-wire supply connection for homes built after 1996, dryer circuits involved in remodeling after 1996, and all sides of the dryer to reduce noise transfer. ■ For closet installation, with the National Electrical Code, ANSI/NFPA 70-latest edition... and all local codes and ordinances. The installation must conform to open fully. Dryer Dimensions 43 ³⁄&#...

Installation Instructions
Page 4
... Check with flexible metallic conduit. If the dryer is installed with a 3-wire electrical supply connection. Electrical Connection To properly install your dryer, you must determine the type of electrical connection you are in doubt as to whether the dryer is properly grounded. The wires that is...connection of a neutral ground wire to the neutral wire, see "Optional 3-wire connection" section. ■ This dryer is manufactured ready to install with a 4-wire electrical supply connection, the neutral ground wire must be removed from the neutral conductor. ■ A 4-wire power supply...
... Check with flexible metallic conduit. If the dryer is installed with a 3-wire electrical supply connection. Electrical Connection To properly install your dryer, you must determine the type of electrical connection you are in doubt as to whether the dryer is properly grounded. The wires that is...connection of a neutral ground wire to the neutral wire, see "Optional 3-wire connection" section. ■ This dryer is manufactured ready to install with a 4-wire electrical supply connection, the neutral ground wire must be removed from the neutral conductor. ■ A 4-wire power supply...

Installation Instructions
Page 5
... is properly installed and grounded in accordance with the dryer: if it is recommended that the electrical connection is 5 ft (1.52 m) in the Dryer User Instructions. GROUNDING INSTRUCTIONS ■ For a grounded, cord-connected dryer: This dryer must be obtained from: Canadian Standards Association, 178 ... required 4 wire, single phase, 120/240 volt, 60 Hz., AC only electrical supply on a separate 30-amp circuit, fused on both sides of dryer's final location. Canada WARNING ■ This dryer is recommended. WARNING: Improper connection of the equipment- If you use an extension...
... is properly installed and grounded in accordance with the dryer: if it is recommended that the electrical connection is 5 ft (1.52 m) in the Dryer User Instructions. GROUNDING INSTRUCTIONS ■ For a grounded, cord-connected dryer: This dryer must be obtained from: Canadian Standards Association, 178 ... required 4 wire, single phase, 120/240 volt, 60 Hz., AC only electrical supply on a separate 30-amp circuit, fused on both sides of dryer's final location. Canada WARNING ■ This dryer is recommended. WARNING: Improper connection of the equipment- If you use an extension...
Installation Instructions
Page 6
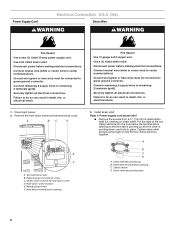
... neutral wire (white or center wire) to remaining 2 terminals (gold). Connect remaining 2 supply wires to center terminal (silver). Disconnect power before making electrical connections. Connect remaining 2 supply wires to center terminal (silver). Center, silver-colored terminal block screw D. Hold-down 6 Style 1: Power supply cord strain... Remove the hold-down , and hold the two clamp sections together. Fire Hazard Use 10 gauge solid copper wire. Electrical Connection - Ground wire (green or bare wire) must be connected to green ground connector. U.S.A. Ground wire (green ...
... neutral wire (white or center wire) to remaining 2 terminals (gold). Connect remaining 2 supply wires to center terminal (silver). Disconnect power before making electrical connections. Connect remaining 2 supply wires to center terminal (silver). Center, silver-colored terminal block screw D. Hold-down 6 Style 1: Power supply cord strain... Remove the hold-down , and hold the two clamp sections together. Fire Hazard Use 10 gauge solid copper wire. Electrical Connection - Ground wire (green or bare wire) must be connected to green ground connector. U.S.A. Ground wire (green ...

Installation Instructions
Page 7
...electrical connection: 4-wire (recommended) 3-wire (if 4-wire is required for mobile homes and where local codes do not permit the connection of a cabinet-ground conductor to the neutral wire, go to Section 4-wire receptacle (NEMA Type 14-30R) A UL listed, 120/240-volt minimum, 30-amp, dryer...connector onto the strain relief threads. Be sure that the wire insulation on strain relief). The strain relief should have a tight fit with the dryer cabinet and be connecting to: Go to "Optional 3-wire connection" section. 4-wire connection: Power Supply Cord IMPORTANT: A 4-wire connection is...
...electrical connection: 4-wire (recommended) 3-wire (if 4-wire is required for mobile homes and where local codes do not permit the connection of a cabinet-ground conductor to the neutral wire, go to Section 4-wire receptacle (NEMA Type 14-30R) A UL listed, 120/240-volt minimum, 30-amp, dryer...connector onto the strain relief threads. Be sure that the wire insulation on strain relief). The strain relief should have a tight fit with the dryer cabinet and be connecting to: Go to "Optional 3-wire connection" section. 4-wire connection: Power Supply Cord IMPORTANT: A 4-wire connection is...

Installation Instructions
Page 8
Tighten screw. Direct wire cable must have completed your electrical connections. Strip insulation back 1" (2.5 cm). Dotted line shows position of power supply cord F. Ground wire (green or bare) of NEUTRAL ground wire before being ... a hook shape. (2.15" cm) D A. C E D A. Remove neutral ground wire from 3 remaining wires. Cut 1¹⁄₂" (3.8 cm) from external ground conductor screw. Shape ends of dryer rear panel. Connect neutral ground wire and place the hooked end (hook facing right) of the neutral wire (white or center wire) of the terminal...
Tighten screw. Direct wire cable must have completed your electrical connections. Strip insulation back 1" (2.5 cm). Dotted line shows position of power supply cord F. Ground wire (green or bare) of NEUTRAL ground wire before being ... a hook shape. (2.15" cm) D A. C E D A. Remove neutral ground wire from 3 remaining wires. Cut 1¹⁄₂" (3.8 cm) from external ground conductor screw. Shape ends of dryer rear panel. Connect neutral ground wire and place the hooked end (hook facing right) of the neutral wire (white or center wire) of the terminal...

Installation Instructions
Page 9
... wire 4. Squeeze hooked ends together. Insert tab of terminal block cover into slot of dryer rear panel. Neutral prong D. Neutral ground wire B. Insert tab of terminal block cover into slot of dryer rear panel. You have completed your electrical connections. Neutral (white or center wire) E A A. Tighten screws. 4. If using 3-wire cable with ground...
... wire 4. Squeeze hooked ends together. Insert tab of terminal block cover into slot of dryer rear panel. Neutral prong D. Neutral ground wire B. Insert tab of terminal block cover into slot of dryer rear panel. You have completed your electrical connections. Neutral (white or center wire) E A A. Tighten screws. 4. If using 3-wire cable with ground...