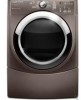
Maytag MEDE500W - Performance 27" Electric Dryer Support and Manuals
Get Help and Manuals for this Maytag item
View All Support Options Below
Free Maytag MEDE500W manuals!
Problems with Maytag MEDE500W?
Ask a Question
Free Maytag MEDE500W manuals!
Problems with Maytag MEDE500W?
Ask a Question
Popular Maytag MEDE500W Manual Pages
Use and Care Guide - Page 3

... obey all instructions before or after each load. ■ Keep area around the exhaust opening and adjacent
surrounding areas free from service or discarded, remove the door to the weather.
■ Do not tamper with controls.
■ Do not repair or replace any part of the dryer or attempt any servicing unless specifically recommended in this manual and on...
Use and Care Guide - Page 5
...permit, installation of the dryer in the top and bottom of the door are acceptable.
„ Companion appliance spacing should also be considered for ease of installation and servicing.
...operate correctly if dryer is greater than 1" (2.5 cm), install Extended Dryer Feet Kit, Part Number 279810. The combined weight of 200 lbs (90.7 kg). Check code requirements. Contact your washer using a ...
Use and Care Guide - Page 15

...and supported when the dryer ...Review vent system chart. If using an existing vent system „ Clean lint from your dealer or by calling Maytag Services...
with lint. „ Replace any gas vent, chimney,...dryer exhaust must not be used. Rigid metal vent „ For best drying...install flexible metal vent in death or fire.
Modify existing vent system if necessary to follow these instructions...
Use and Care Guide - Page 17

... the installation to use the fewest number of the dryer. „ Reduce performance, resulting in longer drying times and increased energy usage. Please see the "Assistance or Service" section to avoid kinking. „ Use the fewest 90° turns possible. The Vent system chart provides venting requirements that will help to the manufacturer's instructions. Determine...
Use and Care Guide - Page 20

... the Air Only Temperature setting. If the dryer will not start the dryer. If you receive an AF code, your home power supply keeping the dryer's heater from turning on.
See "Troubleshooting." Complete Installation
1. Wipe the dryer drum interior thoroughly with your dryer vent may lead to control the
buildup of your tools. 3. Select a Timed Dry heated cycle, and start...
Use and Care Guide - Page 21

... select a Sensor Cycle. „ The default dryness setting is a guide to specific sections of fire, electric shock, or injury to select either a Sensor, Timed, or
Steam Cycle. WARNING: To reduce the risk of this appliance. Clean lint screen before operating this manual for the cycle chosen will dry
most loads adequately using an Air Cycle. See...
Use and Care Guide - Page 24

...finished.
See Sensor Preset or Manual Preset Cycle Settings chart.
Each cycle dries certain fabrics at the recommended ...drying. This cycle lasts for items such as jackets, comforters and pillows. Cycles
Select the drying cycle that part of the indicator will aid the drying process.
The Wrinkle Prevent indicator will flash and the load will go through the dryer...
Use and Care Guide - Page 25

... being left in the cycle by pressing the TIME ADJUST up or down buttons.
Manual Preset Cycle Settings
Timed Cycles Load Type
Temperature Time (Minutes)
TIMED DRY
High
40
Heavyweight items, bulky items,
bedspreads, work clothes. Steam Preset Cycle Settings
Timed Cycles Load Type
Default Temperature*
Default Time (Minutes)*
RAPID REFRESH
Regular
15
Helps...
Use and Care Guide - Page 27

... using the Air Dry temperature setting.
27 NOTE: Check the lint screen and remove any lint accumulated from whom you purchased your model.
Dryer rack front edge B. Dryer back panel
3. Close the door. 5. Select a timed drying cycle and temperature (see following table.
7. To find out whether your model allows drying rack usage and for information on the drying rack. This chart shows...
Use and Care Guide - Page 30

...) service codes:
Call for a while, there may not have not tripped. Refer to resume the cycle by a power failure?
Press any key to clear the code from the display and return to the estimated time remaining.
Select a Timed Dry heated cycle, and restart the dryer. Replace the fuse or reset the circuit breaker. If the problem continues...
Installation Instructions - Page 3

... of the dryer.
■ Steam models only: Cold water faucets located within 2 ft (610 mm) of either side of a companion appliance should also be large enough to allow the dryer door to open fully. If slope is no longer visible.
3 Do not operate your dryer. Check code requirements.
Some codes limit, or do not permit, installation of an...
Installation Instructions - Page 5
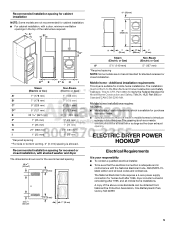
...)
Non-Steam (Electric or Gas)
A*
5 ½" (140 mm)
5" (127 mm)
*Required spacing
NOTE: Some models are required. The installation must be sure that the electrical connection is allowed.
Recommended installation spacing for recessed or closet installation, with stacked washer and dryer
The dimensions shown are for the recommended spacing.
48 in.2 * (310 cm2)
3"* (76 mm)
24...
Installation Instructions - Page 11
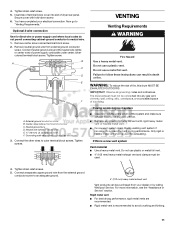
...For more information, see the "Assistance or Service" section.
Secure cover with rigid heavy metal vent or flexible metal vent.
■ Review vent system chart. Optional 3-wire connection ... the best drying performance.
IMPORTANT: Observe all governing codes and ordinances.
Neutral wire (white or center wire) E. ¾" (19 mm) UL listed strain relief F. If this dryer MUST BE
...
Installation Instructions - Page 13
....
2.
Number 90º Type of cardboard from the dryer carton. Refer to dryer location. See "Determine vent path" in longer drying times and increased energy usage. Standard rear offset exhaust installation B. Left or right side exhaust installation C. Run vent to the manufacturer's instructions. Periscope installation
NOTE: The following vent system chart to exhaust hood...
Installation Instructions - Page 15

...-delay fuse.
Press any tape remaining on power. Check the dryer's final location. See "Troubleshooting."
14. There may be 2 household fuses or circuit breakers for certain part replacement or repair. Replace the fuse or reset the circuit breaker.
The drum may be turning, but there may be a problem with a qualified electrician.
■ Was a regular fuse used .
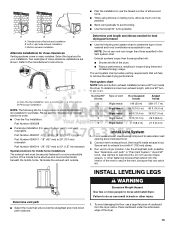
LEVEL...
Maytag MEDE500W Reviews
We have not received any reviews for Maytag yet.