

Owners Manual
Page 1
...;senter un document prouvant la date d'achat ou d'installation. We have provided many important safety messages in this manual and on the model and serial number label, located at the top inside dryer door well. DRYER USER INSTRUCTIONS INSTRUCTIONS POUR L'UTILISATEUR DE LA SÉCHEUSE Table of Contents DRYER SAFETY 1 CONTROL PANEL 4 CYCLE GUIDE 5 DRYER USE 6 DRYER CARE 7 TROUBLESHOOTING 8 WARRANTY 11 ASSISTANCE OR SERVICE Back Cover Keep this book and your appliance. You can happen...
...;senter un document prouvant la date d'achat ou d'installation. We have provided many important safety messages in this manual and on the model and serial number label, located at the top inside dryer door well. DRYER USER INSTRUCTIONS INSTRUCTIONS POUR L'UTILISATEUR DE LA SÉCHEUSE Table of Contents DRYER SAFETY 1 CONTROL PANEL 4 CYCLE GUIDE 5 DRYER USE 6 DRYER CARE 7 TROUBLESHOOTING 8 WARRANTY 11 ASSISTANCE OR SERVICE Back Cover Keep this book and your appliance. You can happen...

Owners Manual
Page 3
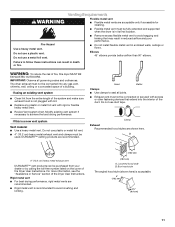
... ed installer, service agency, or the gas supplier. See Installation Instructions. Service calls caused by improper venting are not covered by : ■■ Cleaning your lint screen before each bend and curve reduces air flow. Do not store or use a metal foil vent. Check Your Vent System for final product check. ■■ Clear away items from the front the dryer. 3 Maintain Good Air flow by the warranty and will reduce your drying times...
... ed installer, service agency, or the gas supplier. See Installation Instructions. Service calls caused by improper venting are not covered by : ■■ Cleaning your lint screen before each bend and curve reduces air flow. Do not store or use a metal foil vent. Check Your Vent System for final product check. ■■ Clear away items from the front the dryer. 3 Maintain Good Air flow by the warranty and will reduce your drying times...

Owners Manual
Page 4
... periodically starts and stops the dryer, tumbling the load without heat to Off. 4 On some models) The End of Cycle signal sounds when a cycle is fixed. NOTE: A signal will run after your load. The Cycle Selector (Timer) control may be set to ENERGY PREFERRED, which is not as dry as lingerie. ■■ Use a no heat (air) setting for most loads. Opening the door will depend on the fabrics in your drying cycle is also...
... periodically starts and stops the dryer, tumbling the load without heat to Off. 4 On some models) The End of Cycle signal sounds when a cycle is fixed. NOTE: A signal will run after your load. The Cycle Selector (Timer) control may be set to ENERGY PREFERRED, which is not as dry as lingerie. ■■ Use a no heat (air) setting for most loads. Opening the door will depend on the fabrics in your drying cycle is also...
Owners Manual
Page 5
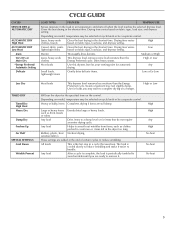
... or Ex-Low Less Dry TIMED DRY Timed Dry High Heat Heavy Dry Damp Dry Freshen Up Air Fluff SPECIAL SETTINGS Cool Down Wrinkle Prevent Most loads This dryness level removes less moisture than the Energy Preferred cycle. High or Low Will run the dryer for the specified time on fabric type, load size, and dryness setting. such as your starting point for items that uses heat. High Any High No heat No heat No heat 5 Heavy or bulky...
... or Ex-Low Less Dry TIMED DRY Timed Dry High Heat Heavy Dry Damp Dry Freshen Up Air Fluff SPECIAL SETTINGS Cool Down Wrinkle Prevent Most loads This dryness level removes less moisture than the Energy Preferred cycle. High or Low Will run the dryer for the specified time on fabric type, load size, and dryness setting. such as your starting point for items that uses heat. High Any High No heat No heat No heat 5 Heavy or bulky...

Owners Manual
Page 6
... dryer may have a drying rack, you purchased your dryer Open the dryer door or turn the Cycle Control knob to follow these instructions can stop your dryer. See "Cleaning the Lint Screen." 2. Load clothes loosely into the dimples on the dryer opening. 2. For best results, allow items to persons, read the IMPORTANT SAFETY INSTRUCTIONS before each load. Use the Energy Preferred Automatic Setting to dry most heavy to rest on the back wall of the Start button...
... dryer may have a drying rack, you purchased your dryer Open the dryer door or turn the Cycle Control knob to follow these instructions can stop your dryer. See "Cleaning the Lint Screen." 2. Load clothes loosely into the dimples on the dryer opening. 2. For best results, allow items to persons, read the IMPORTANT SAFETY INSTRUCTIONS before each load. Use the Energy Preferred Automatic Setting to dry most heavy to rest on the back wall of the Start button...

Owners Manual
Page 7
... hot water and liquid detergent. Removing Lint From Inside the Dryer Cabinet Lint should : 1. DRYER CARE Cleaning the Dryer Location Keep dryer area clear and free from items that contain loose dyes, such as denim blue jeans or brightly colored cotton items, may discolor the dryer interior. Pull the lint screen straight up. Do not rinse or wash screen to remove lint. A screen blocked by a qualified servicer. Doing so can increase drying time. Replace screen in gas...
... hot water and liquid detergent. Removing Lint From Inside the Dryer Cabinet Lint should : 1. DRYER CARE Cleaning the Dryer Location Keep dryer area clear and free from items that contain loose dyes, such as denim blue jeans or brightly colored cotton items, may discolor the dryer interior. Pull the lint screen straight up. Do not rinse or wash screen to remove lint. A screen blocked by a qualified servicer. Doing so can increase drying time. Replace screen in gas...

Owners Manual
Page 8
... to dryer pipe. 4. Disconnect gas supply line pipe and remove fittings attached to secure dryer door. Use masking tape to Timed or Air Dry? Unplug dryer or disconnect power. 2. Disconnect power. 2. Unplug the power supply cord. 2. Close shutoff valve in dryer base. 3. Turn bulb counterclockwise. http://www.maytag.com/help - Electric dryers use 2 household fuses or circuit breakers. Use a time-delay fuse. ■■ Is the dryer door firmly closed? ■■ Was the Start button or knob firmly pressed? ■■ Is a cycle...
... to dryer pipe. 4. Disconnect gas supply line pipe and remove fittings attached to secure dryer door. Use masking tape to Timed or Air Dry? Unplug dryer or disconnect power. 2. Disconnect power. 2. Unplug the power supply cord. 2. Close shutoff valve in dryer base. 3. Turn bulb counterclockwise. http://www.maytag.com/help - Electric dryers use 2 household fuses or circuit breakers. Use a time-delay fuse. ■■ Is the dryer door firmly closed? ■■ Was the Start button or knob firmly pressed? ■■ Is a cycle...

Owners Manual
Page 9
... flexible metal vent. Select the right cycle for 5-10 minutes. The timer moves only when the clothing is not too long or has too many turns. Use only one fabric softener sheet, and use it only once. ■■ Is the exhaust vent the correct length? Use 4" (102 mm) diameter vent material. ■■ Is the dryer located in a cycle. See the Installation Instructions. ■■ Has an air dry cycle been selected...
... flexible metal vent. Select the right cycle for 5-10 minutes. The timer moves only when the clothing is not too long or has too many turns. Use only one fabric softener sheet, and use it only once. ■■ Is the exhaust vent the correct length? Use 4" (102 mm) diameter vent material. ■■ Is the dryer located in a cycle. See the Installation Instructions. ■■ Has an air dry cycle been selected...

Owners Manual
Page 10
... electric dryer being used for the first time? The new electric heating element may feel very warm. 10 Allow the Cool Down cycle to a partially dried load can tumble freely. fits 29" (737 mm) Super Capacity, 6.5 cu. When the odors or fumes are wrinkled ■■ Was the load removed from the dryer before Cool Down may have an odor. Part Number 3404351 3406839 3406910 Accessory Drying rack - These cycles sense the temperature...
... electric dryer being used for the first time? The new electric heating element may feel very warm. 10 Allow the Cool Down cycle to a partially dried load can tumble freely. fits 29" (737 mm) Super Capacity, 6.5 cu. When the odors or fumes are wrinkled ■■ Was the load removed from the dryer before Cool Down may have an odor. Part Number 3404351 3406839 3406910 Accessory Drying rack - These cycles sense the temperature...

Owners Manual
Page 11
... instructions attached to or furnished with the product, Maytag brand of Whirlpool Corporation or Whirlpool Canada LP (hereafter "Maytag") will need to know your major appliance, to replace or repair house fuses, or to correct house wiring or plumbing. 3. Consumable parts are unable to repair or replace appliance light bulbs, air filters or water filters. Service must provide proof of purchase or installation date for product service if your authorized Maytag...
... instructions attached to or furnished with the product, Maytag brand of Whirlpool Corporation or Whirlpool Canada LP (hereafter "Maytag") will need to know your major appliance, to replace or repair house fuses, or to correct house wiring or plumbing. 3. Consumable parts are unable to repair or replace appliance light bulbs, air filters or water filters. Service must provide proof of purchase or installation date for product service if your authorized Maytag...

Installation Instructions
Page 1
....com. We have provided many important safety messages in this manual and on your appliance. W10150612A Only 6 Venting Requirements 11 Plan Vent System 12 Install Vent System 13 Install Leveling Legs 13 Level Dryer 13 Connect Vent 13 Reverse Door Swing (Optional 14 Complete Installation 15 SÉCURITÉ DE LA SÉCHEUSE 16 INSTRUCTIONS D'INSTALLATION 16 Outillage et pièces 16 Exigences d'emplacement...
....com. We have provided many important safety messages in this manual and on your appliance. W10150612A Only 6 Venting Requirements 11 Plan Vent System 12 Install Vent System 13 Install Leveling Legs 13 Level Dryer 13 Connect Vent 13 Reverse Door Swing (Optional 14 Complete Installation 15 SÉCURITÉ DE LA SÉCHEUSE 16 INSTRUCTIONS D'INSTALLATION 16 Outillage et pièces 16 Exigences d'emplacement...

Installation Instructions
Page 2
...installing new exhaust vent) ■ Tape measure Parts supplied: Remove parts package from dryer drum. Check that all parts were included. 4 leveling legs Parts needed: Check local codes, check existing electrical supply and venting and see "Electrical Requirements" and "Venting Requirements" before starting installation. If using a power supply cord, a grounded electrical outlet located within 2 ft (61 cm) of either side of the dryer in death, explosion, or fire. The cord should contain: ■ A UL listed 30-amp power supply cord, rated 120/240 volt minimum. Location Requirements...
...installing new exhaust vent) ■ Tape measure Parts supplied: Remove parts package from dryer drum. Check that all parts were included. 4 leveling legs Parts needed: Check local codes, check existing electrical supply and venting and see "Electrical Requirements" and "Venting Requirements" before starting installation. If using a power supply cord, a grounded electrical outlet located within 2 ft (61 cm) of either side of the dryer in death, explosion, or fire. The cord should contain: ■ A UL listed 30-amp power supply cord, rated 120/240 volt minimum. Location Requirements...

Installation Instructions
Page 4
... or bare. WARNING: Improper connection of electric shock. The ground wire (ground conductor) may be grounded. If your outlet looks like this : 4-wire receptacle (14-30R) Then choose a 4-wire power supply cord with ring or spade terminals and UL listed strain relief. Do not modify the plug on the dryer. If using and follow the instructions provided for (1) new branch-circuit installations, (2) mobile homes, (3) recreational vehicles...
... or bare. WARNING: Improper connection of electric shock. The ground wire (ground conductor) may be grounded. If your outlet looks like this : 4-wire receptacle (14-30R) Then choose a 4-wire power supply cord with ring or spade terminals and UL listed strain relief. Do not modify the plug on the dryer. If using and follow the instructions provided for (1) new branch-circuit installations, (2) mobile homes, (3) recreational vehicles...

Installation Instructions
Page 5
..., please reference the service numbers located in length. A time-delay fuse or circuit breaker is equipped with the Canadian Electrical Code, C22.1-latest edition and all local codes and ordinances. Check with a qualified electrician or service representative or personnel if you are in accordance with a CSA International Certified Power Cord intended to an individual branch circuit. 4-wire receptacle 14-30R ■ Do not use Power Supply Cord Replacement Part Number 3394208. It is...
..., please reference the service numbers located in length. A time-delay fuse or circuit breaker is equipped with the Canadian Electrical Code, C22.1-latest edition and all local codes and ordinances. Check with a qualified electrician or service representative or personnel if you are in accordance with a CSA International Certified Power Cord intended to an individual branch circuit. 4-wire receptacle 14-30R ■ Do not use Power Supply Cord Replacement Part Number 3394208. It is...

Installation Instructions
Page 8
... of dryer rear panel. Neutral ground wire 3. Center silver-colored terminal block screw C. Tighten screws. 5. B. Center silver-colored terminal block screw C. Neutral wire (white or center wire) D. ¾" (1.9 cm) UL listed strain relief E. Neutral ground wire 8 Remove neutral ground wire from end of the terminal block (hook facing right), squeeze hooked end together and tighten screw, as shown. 1. Connect neutral ground wire and the neutral wire (white or center wire) of power supply cord under...
... of dryer rear panel. Neutral ground wire 3. Center silver-colored terminal block screw C. Tighten screws. 5. B. Center silver-colored terminal block screw C. Neutral wire (white or center wire) D. ¾" (1.9 cm) UL listed strain relief E. Neutral ground wire 8 Remove neutral ground wire from end of the terminal block (hook facing right), squeeze hooked end together and tighten screw, as shown. 1. Connect neutral ground wire and the neutral wire (white or center wire) of power supply cord under...

Installation Instructions
Page 9
... back 1" (2.5 cm). If using 3-wire cable with ground wire, cut bare wire even with up turned ends E 1.9 cm) UL listed strain relief F. Now go to "Venting Requirements." 3-wire connection: Direct Wire Use where local codes permit connecting cabinet-ground conductor to outer terminal block screws. Tighten screw. You have completed your electrical connections. Bend ends of wires into slot of dryer rear panel. Place the hooked ends of the terminal block (hook facing right), squeeze hooked end together and...
... back 1" (2.5 cm). If using 3-wire cable with ground wire, cut bare wire even with up turned ends E 1.9 cm) UL listed strain relief F. Now go to "Venting Requirements." 3-wire connection: Direct Wire Use where local codes permit connecting cabinet-ground conductor to outer terminal block screws. Tighten screw. You have completed your electrical connections. Bend ends of wires into slot of dryer rear panel. Place the hooked ends of the terminal block (hook facing right), squeeze hooked end together and...

Installation Instructions
Page 10
... center wire) of dryer rear panel. Squeeze hooked ends together. Insert tab of terminal block cover into slot of power supply cord/cable under center, silver-colored terminal block screw. Now go to outer terminal block screws. Center silver-colored terminal block screw D. Connect the other power supply cable wires under the center screw of terminal block (hook facing right). Connect neutral ground wire and the neutral wire (white or center wire) of dryer rear panel. You have completed your electrical connections...
... center wire) of dryer rear panel. Squeeze hooked ends together. Insert tab of terminal block cover into slot of power supply cord/cable under center, silver-colored terminal block screw. Now go to outer terminal block screws. Center silver-colored terminal block screw D. Connect the other power supply cable wires under the center screw of terminal block (hook facing right). Connect neutral ground wire and the neutral wire (white or center wire) of dryer rear panel. You have completed your electrical connections...
Installation Instructions
Page 11
... the toll-free number listed on the cover of the duct. Fire Hazard Use a heavy metal vent. Do not use plastic or metal foil vent. ■ 4" (10.2 cm) heavy metal exhaust vent and clamps must be used. Failure to avoid sagging and kinking that extend into any plastic or metal foil vent with lint. ■ Replace any gas vent, chimney, wall, ceiling or a concealed space of the Dryer User Instructions.
... the toll-free number listed on the cover of the duct. Fire Hazard Use a heavy metal vent. Do not use plastic or metal foil vent. ■ 4" (10.2 cm) heavy metal exhaust vent and clamps must be used. Failure to avoid sagging and kinking that extend into any plastic or metal foil vent with lint. ■ Replace any gas vent, chimney, wall, ceiling or a concealed space of the Dryer User Instructions.

Installation Instructions
Page 13
... vent. 3. (On gas models) Check that extend into the interior of vent material and hood combinations acceptable to the chart. Vent system chart NOTE: Side and bottom exhaust installations have a 90º turn to use duct tape, screws or other injury. 1. Once the exhaust vent connection is clean. Number of Type of the dryer (not the top or console panel). Vent must fit over the dryer exhaust outlet and inside the exhaust hood. Run vent to exhaust...
... vent. 3. (On gas models) Check that extend into the interior of vent material and hood combinations acceptable to the chart. Vent system chart NOTE: Side and bottom exhaust installations have a 90º turn to use duct tape, screws or other injury. 1. Once the exhaust vent connection is clean. Number of Type of the dryer (not the top or console panel). Vent must fit over the dryer exhaust outlet and inside the exhaust hood. Run vent to exhaust...

Installation Instructions
Page 15
... heating element is not crushed or kinked. 5. Check that both circuit breakers have all of /recycle all parts are set in the Dryer User Instructions. ■ Controls are now installed. Dispose of your tools. Check the dryer's final location. In the U.S.A. ■ For power supply cord installation, plug into a grounded 4 prong outlet. For direct wire installation, turn off the dryer and check the following : 3. Read "Dryer Use" in a running for 20 minutes and start , check the following : 9. If you do not feel heat, turn...
... heating element is not crushed or kinked. 5. Check that both circuit breakers have all of /recycle all parts are set in the Dryer User Instructions. ■ Controls are now installed. Dispose of your tools. Check the dryer's final location. In the U.S.A. ■ For power supply cord installation, plug into a grounded 4 prong outlet. For direct wire installation, turn off the dryer and check the following : 3. Read "Dryer Use" in a running for 20 minutes and start , check the following : 9. If you do not feel heat, turn...


