

Owners Manual
Page 1
... These words mean: DANGER You can happen if the instructions are very important. DRYER USER INSTRUCTIONS INSTRUCTIONS POUR L'UTILISATEUR DE LA SÉCHEUSE Table of purchase or installation date for future reference. Write down the following information about your sales slip together...service sous garantie, vous devez présenter un document prouvant la date d'achat ou d'installation. You must provide proof of Contents DRYER SAFETY 1 CONTROL PANEL 4 CYCLE GUIDE 5 DRYER USE 6 DRYER CARE 7 TROUBLESHOOTING 8 WARRANTY 11 ASSISTANCE OR SERVICE Back Cover Keep this manual and on...
... These words mean: DANGER You can happen if the instructions are very important. DRYER USER INSTRUCTIONS INSTRUCTIONS POUR L'UTILISATEUR DE LA SÉCHEUSE Table of purchase or installation date for future reference. Write down the following information about your sales slip together...service sous garantie, vous devez présenter un document prouvant la date d'achat ou d'installation. You must provide proof of Contents DRYER SAFETY 1 CONTROL PANEL 4 CYCLE GUIDE 5 DRYER USE 6 DRYER CARE 7 TROUBLESHOOTING 8 WARRANTY 11 ASSISTANCE OR SERVICE Back Cover Keep this manual and on...

Owners Manual
Page 2
IMPORTANT: The gas installation must be electrically grounded in accordance with local codes, or in the absence of local codes, with the National Fuel Gas Code, ANSI Z223.1/NFPA 54. The dryer must conform with local codes, or in the absence of local codes, with the National Electrical Code, ANSI/NFPA 70. 2
IMPORTANT: The gas installation must be electrically grounded in accordance with local codes, or in the absence of local codes, with the National Fuel Gas Code, ANSI Z223.1/NFPA 54. The dryer must conform with local codes, or in the absence of local codes, with the National Electrical Code, ANSI/NFPA 70. 2

Owners Manual
Page 3
... the customer, regardless of this manual must be detected by a quali ed installer, service agency, or the gas supplier. For more than four 90° elbows in the vicinity of who installed the dryer. See Installation Instructions. Failure to follow these instructions can result in good air flow. &#...front the dryer. 3 The venting system attached to the dryer plays a big role in death or re. WARNING Fire Hazard Use a heavy metal vent. WARNING: Gas leaks cannot always be performed by smell. Do not use a metal foil vent. Do not store or use any electrical switch; ...
... the customer, regardless of this manual must be detected by a quali ed installer, service agency, or the gas supplier. For more than four 90° elbows in the vicinity of who installed the dryer. See Installation Instructions. Failure to follow these instructions can result in good air flow. &#...front the dryer. 3 The venting system attached to the dryer plays a big role in death or re. WARNING Fire Hazard Use a heavy metal vent. WARNING: Gas leaks cannot always be performed by smell. Do not use a metal foil vent. Do not store or use any electrical switch; ...

Owners Manual
Page 8
.... 5. In Canada www.maytag.ca Dryer will bounce, causing the dryer to secure dryer door. See the Installation Instructions. ■■ Is the clothing knotted or balled up , the load will not run ■■ For gas dryers, is the dryer level front to back and side to possibly avoid the cost of the dryer? Electric Dryers For power supply...
.... 5. In Canada www.maytag.ca Dryer will bounce, causing the dryer to secure dryer door. See the Installation Instructions. ■■ Is the clothing knotted or balled up , the load will not run ■■ For gas dryers, is the dryer level front to back and side to possibly avoid the cost of the dryer? Electric Dryers For power supply...

Owners Manual
Page 9
... outside exhaust hood to do not feel air movement, clean exhaust system of the dryer requires 5" (127 mm). Change the dryness level setting on load ■■ Is the lint screen clogged? See the Installation Instructions. ■■ Is the exhaust vent diameter the correct size? Use only...;■ Is the dryer located in back or other injury. ■■ Is the automatic cycle ending early? Long venting will change the amount of the door. Proper operation of garments being dried. ■■ Is the load too large and heavy to move and install dryer. Select the right...
... outside exhaust hood to do not feel air movement, clean exhaust system of the dryer requires 5" (127 mm). Change the dryness level setting on load ■■ Is the lint screen clogged? See the Installation Instructions. ■■ Is the exhaust vent diameter the correct size? Use only...;■ Is the dryer located in back or other injury. ■■ Is the automatic cycle ending early? Long venting will change the amount of the door. Proper operation of garments being dried. ■■ Is the load too large and heavy to move and install dryer. Select the right...

Owners Manual
Page 11
... these limitations and exclusions may not apply to be found by checking the "Assistance or Service" section or by an authorized Maytag servicer is used in a manner that have other than normal, single-family household use your home. 7. This warranty gives ...you are excluded from accident, alteration, misuse, abuse, fire, flood, acts of God, improper installation, installation not in accordance with electrical or plumbing codes, or use of purchase or installation date for future reference. ITEMS EXCLUDED FROM WARRANTY This limited warranty does not cover: 1. Cosmetic ...
... these limitations and exclusions may not apply to be found by checking the "Assistance or Service" section or by an authorized Maytag servicer is used in a manner that have other than normal, single-family household use your home. 7. This warranty gives ...you are excluded from accident, alteration, misuse, abuse, fire, flood, acts of God, improper installation, installation not in accordance with electrical or plumbing codes, or use of purchase or installation date for future reference. ITEMS EXCLUDED FROM WARRANTY This limited warranty does not cover: 1. Cosmetic ...

Installation Instructions
Page 1
... de uso y cuidado en español, o para obtener información adicional acerca de su producto, visite: www.whirlpool.com. 29" (73.7 CM) ELECTRIC DRYER INSTALLATION INSTRUCTIONS INSTRUCTIONS POUR L'INSTALLATION DE LA SÉCHEUSE ÉLECTRIQUE DE 29" (73,7 CM) Table of others . This is , tell you how to potential hazards that can happen...
... de uso y cuidado en español, o para obtener información adicional acerca de su producto, visite: www.whirlpool.com. 29" (73.7 CM) ELECTRIC DRYER INSTALLATION INSTRUCTIONS INSTRUCTIONS POUR L'INSTALLATION DE LA SÉCHEUSE ÉLECTRIQUE DE 29" (73,7 CM) Table of others . This is , tell you how to potential hazards that can happen...

Installation Instructions
Page 2
... located within 2 ft (61 cm) of either side of 200 lbs (90.7 kg). Contact your local building inspector. 2 See "Electrical Requirements." ■ A sturdy floor to 1" (2.54 cm) or hex-head socket wrench (for adjusting dryer feet) ■ Wire stripper (for installing new exhaust vent) ■ Tape measure Parts supplied: Remove parts package from...
... located within 2 ft (61 cm) of either side of 200 lbs (90.7 kg). Contact your local building inspector. 2 See "Electrical Requirements." ■ A sturdy floor to 1" (2.54 cm) or hex-head socket wrench (for adjusting dryer feet) ■ Wire stripper (for installing new exhaust vent) ■ Tape measure Parts supplied: Remove parts package from...

Installation Instructions
Page 3
... is used, it is recommended that a qualified electrician determine that the electrical connection is adequate. 3 The installation must conform to open fully. U.S.A. See "Venting Requirements." This dryer has been tested for this dryer. A time-delay fuse or circuit breaker is suitable for homes built after...be at least twice as large as the dryer exhaust opening. Wide opening side-swing door C. Side view - A copy of the door are required. The National Electric Code requires a 4-wire supply connection for mobile home installations. Do not have a fuse in the...
... is used, it is recommended that a qualified electrician determine that the electrical connection is adequate. 3 The installation must conform to open fully. U.S.A. See "Venting Requirements." This dryer has been tested for this dryer. A time-delay fuse or circuit breaker is suitable for homes built after...be at least twice as large as the dryer exhaust opening. Wide opening side-swing door C. Side view - A copy of the door are required. The National Electric Code requires a 4-wire supply connection for mobile home installations. Do not have a fuse in the...

Installation Instructions
Page 4
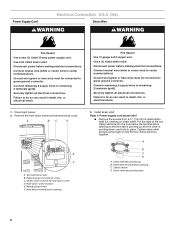
... and UL listed strain relief. SAVE THESE INSTRUCTIONS 4 Electrical Connection To properly install your dryer, you must determine the type of electrical connection you are in doubt as to whether the dryer is properly grounded. The wires that is permanently connected to the dryer must have a proper outlet installed by providing a path of least resistance for use...
... and UL listed strain relief. SAVE THESE INSTRUCTIONS 4 Electrical Connection To properly install your dryer, you must determine the type of electrical connection you are in doubt as to whether the dryer is properly grounded. The wires that is permanently connected to the dryer must have a proper outlet installed by providing a path of least resistance for use...

Installation Instructions
Page 5
... sides of electric shock. grounding conductor can result in death or electrical shock. Canada WARNING ■ This dryer is properly installed and grounded in conformance with the Canadian Electrical Code, C22.1-latest edition and all local codes and ordinances. Electrical Shock Hazard Plug... GROUNDING INSTRUCTIONS ■ For a grounded, cord-connected dryer: This dryer must be plugged into an appropriate outlet that is equipped with all local codes. The cord is your responsibility ■ To contact a qualified electrical installer. ■ To be plugged into a grounded 4 ...
... sides of electric shock. grounding conductor can result in death or electrical shock. Canada WARNING ■ This dryer is properly installed and grounded in conformance with the Canadian Electrical Code, C22.1-latest edition and all local codes and ordinances. Electrical Shock Hazard Plug... GROUNDING INSTRUCTIONS ■ For a grounded, cord-connected dryer: This dryer must be plugged into an appropriate outlet that is equipped with all local codes. The cord is your responsibility ■ To contact a qualified electrical installer. ■ To be plugged into a grounded 4 ...
Installation Instructions
Page 6
...cord. Failure to do so can result in place. Use a UL listed strain relief. Hole below terminal block opening C. Install strain relief. Tighten strain relief screws just enough to green ground connector. Strain relief tab pointing down screw location E. Connect remaining... 2 supply wires to center terminal (silver). Disconnect power before making electrical connections. A BC D E F A. Hole below terminal block opening so that one tab is pointing up B. Use a UL listed ...
...cord. Failure to do so can result in place. Use a UL listed strain relief. Hole below terminal block opening C. Install strain relief. Tighten strain relief screws just enough to green ground connector. Strain relief tab pointing down screw location E. Connect remaining... 2 supply wires to center terminal (silver). Disconnect power before making electrical connections. A BC D E F A. Hole below terminal block opening so that one tab is pointing up B. Use a UL listed ...

Installation Instructions
Page 7
... 4-wire connection: Power Supply Cord IMPORTANT: A 4-wire connection is required for your type of electrical connection: 4-wire (recommended) 3-wire (if 4-wire is inside the terminal block opening, screw ...relief threads. Ground prong D. The strain relief should have a tight fit with the dryer cabinet and be in a horizontal position. Reaching inside the strain relief. Put the ...fit with upturned ends F. ¾" (1.9 cm) UL listed strain relief G. Now complete installation following instructions for mobile homes and where local codes do not permit the connection of a cabinet...
... 4-wire connection: Power Supply Cord IMPORTANT: A 4-wire connection is required for your type of electrical connection: 4-wire (recommended) 3-wire (if 4-wire is inside the terminal block opening, screw ...relief threads. Ground prong D. The strain relief should have a tight fit with the dryer cabinet and be in a horizontal position. Reaching inside the strain relief. Put the ...fit with upturned ends F. ¾" (1.9 cm) UL listed strain relief G. Now complete installation following instructions for mobile homes and where local codes do not permit the connection of a cabinet...
Installation Instructions
Page 11
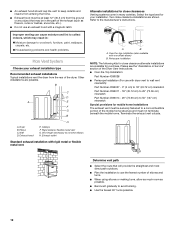
... into any plastic or metal foil vent with screws or other fastening devices that may result in reduced airflow and poor performance. ■ Do not install flexible metal vent in its final location. Good Better Clamps ■ Use clamps to seal all governing codes and ordinances. B A 4" 10.2 cm 4" ...9632; Flexible metal vents are acceptable only if accessible for cleaning. ■ Flexible metal vent must be fully extended and supported when the dryer is in enclosed walls, ceilings or floors. If using an existing vent system ■ Clean lint from your dealer or by calling the ...
... into any plastic or metal foil vent with screws or other fastening devices that may result in reduced airflow and poor performance. ■ Do not install flexible metal vent in its final location. Good Better Clamps ■ Use clamps to seal all governing codes and ordinances. B A 4" 10.2 cm 4" ...9632; Flexible metal vents are acceptable only if accessible for cleaning. ■ Flexible metal vent must be fully extended and supported when the dryer is in enclosed walls, ceilings or floors. If using an existing vent system ■ Clean lint from your dealer or by calling the ...
Installation Instructions
Page 12
... D A E F G B A. Please see the "Assistance or Service" section of the Dryer User Instructions. ■ Over-the-Top Installation: Part Number 4396028 ■ Periscope Installation (For use with dryer vent to wall vent mismatch): Part Number 4396037 - 0" (0 cm) to 18" (45....to the manufacturer's instructions. Clamps F. Exhaust hood H E. Alternate installations for close -clearance installations are available for your exhaust installation type Recommended exhaust installations Typical installations vent the dryer from the rear of elbows and turns. ■ When using ...
... D A E F G B A. Please see the "Assistance or Service" section of the Dryer User Instructions. ■ Over-the-Top Installation: Part Number 4396028 ■ Periscope Installation (For use with dryer vent to wall vent mismatch): Part Number 4396037 - 0" (0 cm) to 18" (45....to the manufacturer's instructions. Clamps F. Exhaust hood H E. Alternate installations for close -clearance installations are available for your exhaust installation type Recommended exhaust installations Typical installations vent the dryer from the rear of elbows and turns. ■ When using ...

Installation Instructions
Page 13
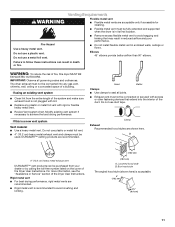
... m) 17 ft (5.2 m) 4 Rigid metal 27 ft (8.2 m) 21 ft (6.4 m) Flexible metal 23 ft (7 m) 15 ft (4.6 m) Install Vent System 1. See illustration. 3. Do not use . Slide the dryer on the cardboard. Run vent to connect the exhaust vent. Failure to finish turning the legs until it is not level... in "Plan Vent System." Place a carton corner post from the dryer carton. Using a 4" (10.2 cm) clamp, connect vent to its final location. Move dryer into the leg holes by hand. Install Leveling Legs WARNING Excessive Weight Hazard Use two or more people to exhaust...
... m) 17 ft (5.2 m) 4 Rigid metal 27 ft (8.2 m) 21 ft (6.4 m) Flexible metal 23 ft (7 m) 15 ft (4.6 m) Install Vent System 1. See illustration. 3. Do not use . Slide the dryer on the cardboard. Run vent to connect the exhaust vent. Failure to finish turning the legs until it is not level... in "Plan Vent System." Place a carton corner post from the dryer carton. Using a 4" (10.2 cm) clamp, connect vent to its final location. Move dryer into the leg holes by hand. Install Leveling Legs WARNING Excessive Weight Hazard Use two or more people to exhaust...

Installation Instructions
Page 15
... that all parts are now installed. Dispose of/recycle all of your tools. See "Level Dryer." 6. When the dryer has been running or "On" position. ■ Start button has been pushed firmly. ■ Dryer is plugged into an outlet and/or electrical supply is on power. Check... that both circuit breakers have all packaging materials. 4. If there is not crushed or kinked. 5. In the U.S.A. ■ For power supply cord installation, plug into a grounded 4 prong ...
... that all parts are now installed. Dispose of/recycle all of your tools. See "Level Dryer." 6. When the dryer has been running or "On" position. ■ Start button has been pushed firmly. ■ Dryer is plugged into an outlet and/or electrical supply is on power. Check... that both circuit breakers have all packaging materials. 4. If there is not crushed or kinked. 5. In the U.S.A. ■ For power supply cord installation, plug into a grounded 4 prong ...


