Maytag MEDX500XW Support Question
Maytag MEDX500XW Support Question
Find answers below for this question about Maytag MEDX500XW.Need a Maytag MEDX500XW manual? We have 4 online manuals for this item!
Question posted by dick61803 on December 22nd, 2011
Bottom Exhaust Installation Instructions
I have the vent kit. need help on installing
Current Answers
Related Maytag MEDX500XW Manual Pages
Installation Instructions - Page 2
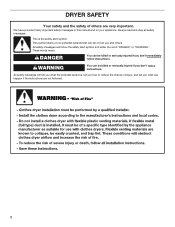
... words mean:
DANGER
You can be killed or seriously injured if you don't follow instructions.
WARNING
You can be killed or seriously injured if you don't immediately follow the safety...tell you what can happen if the instructions are very important. Always read and obey all safety messages. All safety messages will follow instructions. DRYER SAFETY
Your safety and the safety of...
Installation Instructions - Page 3
...
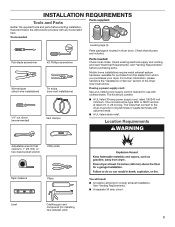
Caulking gun and compound (for installing new exhaust vent)
You will need: ■■ A location allowing for use with clothes dryers. Location Requirements
Adjustable wrench that all parts are included. Tools needed : Check local codes. If using a power supply cord: Use a UL listed power supply cord kit marked for proper exhaust installation. The kit should be type SRD or SRDT...
Installation Instructions - Page 4
...exhaust system hardware, which is recommended to water and/or weather.
Large opening hamper door
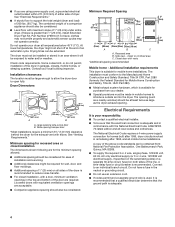
*Most installations require a minimum 5½" (140 mm) clearance behind the dryer for the exhaust vent ... 1996, dryer circuits involved in remodeling after 1996, and all mobile home installations. Electrical Requirements
It is greater than 1" [25 mm], install Extended Dryer Feet Kit, Part...
Installation Instructions - Page 5

... block. If using and follow the instructions provided for (1) new branch-circuit installations, (2) mobile homes, (3) recreational vehicles..., rated 120/240 volt minimum. Electrical Connection
To properly install your dryer, you must determine the type of electrical connection you will... relief.
If connecting by a white cover.
The kit should be type SRD or SRDT and be removed ...
Installation Instructions - Page 6

... connection and to move and install dryer. Screw in back or other injury. place under entire back edge of cardboard from dryer carton;
To avoid damaging floor, use a wrench to do so can result in leveling legs
Excessive Weight Hazard Use two or more people to connect the exhaust vent. Failure to finish turning legs...
Installation Instructions - Page 9

...terminal block screws. Connect ground wire
A
F
Connect ground wire (F) (green or bare) of dryer rear panel. Tighten screw.
6. Now, go to center, silver-colored terminal block screw (B). ...Finally, reinsert tab of terminal block cover into slot of power supply cord to Venting Requirements. Now, go to neutral wire. Tighten screw.
5. Connect remaining wires
3-wire ...
Installation Instructions - Page 10

...connector (A) onto the strain relief threads.
2.
Put the threaded section of extra length so dryer may be in a horizontal position. Attach direct wire cable
to strain relief
(127
5" mm)
Direct... wire cable must have a tight fit with the dryer cabinet and be moved if needed. Shape ends of cable, leaving bare ground wire at 5" (127 mm).
Direct Wire ...
Installation Instructions - Page 11

... block
AF Connect ground wire (green or bare) (F) of extra length so dryer may be moved if needed. Connect wires to external ground conductor screw (A). Remove center, silver-colored terminal ... C E
3-wire Direct Wire Connection
Use where local codes permit connecting cabinet-ground conductor to Venting Requirements. Strip insulation back 1" (25 mm). Now, go to neutral wire.
3. Finally, ...
Installation Instructions - Page 13
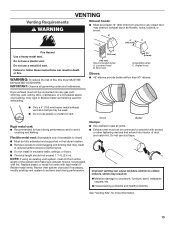
..., paint, wallpaper, carpets, etc.
Housecleaning problems and health problems.
See "Venting Kits" for more information.
13 Angled hood
Elbows: ■■ 45° elbows provide better airflow than 90° elbows.
■■ Only a 4" (102 mm) heavy metal exhaust vent and clamps may obstruct exhaust (such as flowers, rocks, bushes, or snow). Box hood
2½...
Installation Instructions - Page 14
...I . Rigid metal or flexible metal vent G. Each kit includes step-by-step instructions. A
B
C
A. Left or right side exhaust installation C. white
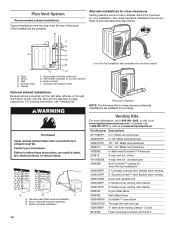
W10186596 4-way vent kit - Plan Vent System
Recommended exhaust installations Typical installations vent the dryer from the rear of the dryer. Optional side exhaust outlet
Optional exhaust installations:
Exhaust can be converted out the right...
Installation Instructions - Page 15

... length and elbows needed for mobile home installations:
The exhaust vent must be securely fastened to a noncombustible portion of the mobile home structure and must fit over dryer exhaust outlet and inside the dryer. The Vent system chart provides venting requirements that extend into interior of vent to secure vent, because they can catch lint.
Exhaust systems longer than those...
Installation Instructions - Page 16

... or circuit breakers for 5 minutes, open the dryer door and feel heat, turn off dryer, and check the following : ■■ Controls are now installed. q Dispose of/recycle all parts are set in a running for
the dryer. Be sure vent is still no heat, contact a qualified technician. q Read "Dryer Use" in place, remove corner posts and...
Owners Manual - Page 4

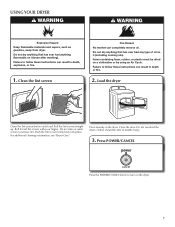
... follow the Installation Instructions supplied with your dryer for better fabric care and energy savings
Use the Sensor Cycles to provide the most energy savings and enhanced fabric care from the front the dryer. The venting system attached to efficiently dry laundry. Service calls caused by improper venting are sensed in a vent system;
n Remove lint from the exhaust hood...
Owners Manual - Page 7
... Air Cycle. For additional cleaning information, see "Dryer Care." Place laundry in death, explosion, or fire.
1. clothes should be dried on it (including cooking oils).
Items containing foam, rubber, or plastic must be able to tumble freely.
3. Do not overload the dryer; Failure to follow these instructions can result in death or fire.
2. Clean...
Owners Manual - Page 9

...Venting Requirements." This buildup can build up . Clean the lint screen with a nylon brush every 6 months, or more frequently, if it becomes clogged due to stop before your dryer... into the dryer during removal, check the exhaust hood and remove the lint. As needed cleaning Laundry detergent and fabric softener residue can cause longer drying times for proper dryer operation. Wipe...
Owners Manual - Page 10
... the current cycle/load.
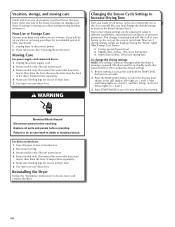
Steam models only: Shut off power at home. Use tape to secure dryer door. Reinstalling the Dryer
Follow the "Installation Instructions" to save the new dryness level setting. Non-Use or Storage Care
Operate your dryer only when you should: 1. Transport hose separately. 4. Electrical Shock Hazard Disconnect power before operating.
Before...
Owners Manual - Page 11
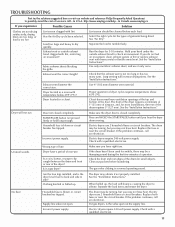
... feel air movement, clean exhaust system of lint or replace exhaust vent with lint. See the "Installation Instructions." Exhaust vent the correct length? Check that the exhaust vent is the dryer level front to back and side to check air movement. Exhaust vent diameter the correct size.
Use 4" (102 mm) diameter vent material. Closet doors must have heat.
Dryer will not run
Door not...
Owners Manual - Page 13
...abuse, fire, flood, acts of God, improper installation, installation not in accordance with Maytag's published installation instructions.
10.
You will pay for inwarranty service. Service calls to correct the installation of your major appliance to province. Service calls to resolve the problem
after checking "Troubleshooting," additional help you obtain assistance or service if you are...
Warranty Information - Page 1

...Whirlpool Corporation or Whirlpool Canada LP (hereafter "Maytag") will need to published user or operator instructions and/or installation instructions.
2. This warranty gives you specific legal rights, and you... problem
after checking "Troubleshooting," additional help you obtain assistance or service if you . Service calls to correct the installation of original purchase date is reported...
Dimension Guide - Page 1
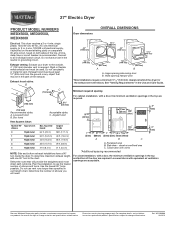
... the dryer. Do not use plastic or metal foil vent.
Recessed area
4
Rigid metal 27 ft. (8.2 m)
21 ft. (6.4 m)
NOTE: Side and bottom exhaust installations have a fuse in .2*
(310 cm ) 2
3"* (76 mm)
Vent System Chart:
Number 90º Type of the door are acceptable. W10096988 06/2010 Louvered hood B.
For complete details, see Installation Instructions packed...
Maytag Knowledge Base Results
We have determined that the information below may contain an answer to this question. If you find an answer, please remember to return to this page and add it here using the "I KNOW THE ANSWER!" button above. It's that easy to earn points!-
Loads are wrinkled - Neptune® front-load washer
...laundry items from the dryer to the hot water faucet and that there are no laundry items sticking out beyond the stainless steel basket. Enter Model Number How do I do not have your Installation Instructions...Reversed inlet hoses can result in the washer for details. See the Installation Instructions for an extended period of time after the end of my Neptune front... -
Recommended installation for electrical, drain and water supply connections for dishwashers.
...kits needed to connect a ¾" hose fitting water supply line animation Drain hose is not draining My dishwasher will not start Recommended installation for electrical, drain and water supply connections for proper drain hose installation...side of the cabinet opening . How to complete your Dishwasher Installation Kits Go Here FAQs Knowledgebase search tips My dishwasher is leaking ... -
Display shows AF - Dryer
... material will reduce good air movement and cause longer drying times. Dryers need good air movement to check air movement. For more information, view the following or check the Installation Instructions for more than a hair dryer on maximum exhaust vent system lengths. Is the exhaust vent or outside exhaust hood is restricted. Box or louvered hoods are recommended. Check...
Similar Questions

How Do I Remove The Back Panel From My Maytag Bravo X Model#medx500xw?
my dryer is not heating up and I want to test the fuse and heating element but can't remove the pane...
my dryer is not heating up and I want to test the fuse and heating element but can't remove the pane...
(Posted by buddha6910 7 years ago)

Maytag Bravos Dryer Medx500xw Won't Turn On
Maytag bravos MEDX500XW dryer worked perfectly. Moved and now it won't power on at all. Won't do any...
Maytag bravos MEDX500XW dryer worked perfectly. Moved and now it won't power on at all. Won't do any...
(Posted by cahern8605 7 years ago)
Installation Instructions Dryer Vent Kit W10323246
(Posted by jerrymkaplan 10 years ago)

Maytag Medx500xw End Signal
Is there a volume control for the end signal? The one we have is very low. The manual shows a differ...
Is there a volume control for the end signal? The one we have is very low. The manual shows a differ...
(Posted by jeffteresa 10 years ago)
