Maytag MEDX500XW Support Question
Maytag MEDX500XW Support Question
Find answers below for this question about Maytag MEDX500XW.Need a Maytag MEDX500XW manual? We have 4 online manuals for this item!
Question posted by buddha6910 on February 5th, 2017
How Do I Remove The Back Panel From My Maytag Bravo X Model#medx500xw?
my dryer is not heating up and I want to test the fuse and heating element but can't remove the panel after removing the screws. Seems like there's some kind of weld of some sort certain points of the dryer.
Current Answers
Answer #1: Posted by Odin on February 5th, 2017 11:56 AM
Odin

Member since:
April 10th, 2010 Points: 41,236,670

Member since:
April 10th, 2010 Points: 41,236,670
See https://www.youtube.com/watch?v=2BI1veKe3aY or https://www.youtube.com/watch?v=WOLs4pAGOC8. Good luck!
Hope this is useful. Please don't forget to click the Accept This Answer button if you do accept it. My aim is to provide reliable helpful answers, not just a lot of them. See https://www.helpowl.com/profile/Odin.
Related Maytag MEDX500XW Manual Pages
Installation Instructions - Page 5

...neutral conductor must be removed from the external ground connector screw (green screw), and secured under the neutral terminal (center or white wire) of the terminal block, the dryer cabinet is isolated from ...wire power supply cord with ring or spade terminals and UL listed strain relief. If the dryer is prohibited. If your outlet looks like this :
4-wire receptacle (14-30R)
Then choose...
Installation Instructions - Page 6

... cardboard.
6 Leave enough room for leveling legs
Examine leveling legs, find diamond marking. Firmly grasp dryer body (not console panel) and gently lay dryer down on its final location. Install Leveling Legs
WARNING
2. Slide the dryer until diamond marking is close to do so can result in leveling legs
Excessive Weight Hazard Use two...
Installation Instructions - Page 7
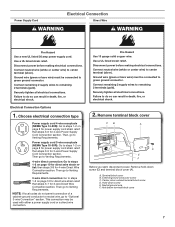
... bare wire) must be used with either a power supply cord or a direct wire connection. Remove terminal block cover
CB
A
D
E F
Before you start, disconnect power. Hole below terminal ...supply cord strain relief: then steps 3-5 for 4-wire Direct Wire Connection section.
A. Hold-down screw (D) and terminal block cover (A).
Ground wire (green or bare wire) must be connected to Venting...
Installation Instructions - Page 8

...dryer cabinet and be in place.
The strain relief should have a tight fit with upturned ends F. 3/4" (19 mm) UL listed strain relief G. Do not further tighten strain relief screws at this page.
Remove... power supply cord
strain relief
A B C D
Remove the screws from external ground conductor screw (A).
4. Be sure that one tab is pointing up (A) and the other is required for mobile ...
Installation Instructions - Page 9

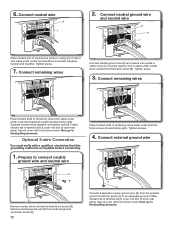
... neutral wire
B C
Connect neutral wire (white or center) (C) of dryer rear panel. Connect remaining wires
Connect remaining wires to outer terminal block screws. Neutral prong D. Remove center screw
B
Connect remaining wires to outer terminal block screws.
Secure cover with hold -down screw. 5. Tighten screw.
6. Now, go to Venting Requirements.
9 Finally, reinsert tab...
Installation Instructions - Page 10

... is required for
direct connection
B (251"mm)
C
Unscrew the removable conduit connector (A) and any screws from remaining 3 wires. The strain relief should have 5 ft. (1.52 m) of wires into hooks.
4. Tighten strain relief screw against the direct wire cable.
Shape ends of extra length so dryer may be in a horizontal position. Cut 11/2" (38 mm...
Installation Instructions - Page 11

... block screws (hooks facing right). Strip insulation back 1" (25 mm). Tighten screw.
8. Remove center screw
B
Place hooked ends of remaining direct wire cable wires under center screw of ...screws. Now, go to external ground conductor screw (A). Squeeze hooked ends together and tighten screw.
7. Connect ground wire
(893m½m" )
Direct wire cable must have 5 ft. (1.52 m) of dryer rear panel...
Installation Instructions - Page 12
... external ground wire
E B
A Remove center, silver-colored terminal block screw (B). Now, go to connect neutral
ground wire and neutral wire
Place hooked ends of dryer rear panel. Optional 3-wire Connection
You must verify with hold -down screw. Secure cover with hold -down screw. Tighten screw.
7. Connect remaining wires
Place hooked ends of dryer rear panel. Finally, reinsert tab...
Installation Instructions - Page 16

... an extra
part, go away.
16 q Dispose of dryer from side to
remove any tape remaining on .
■■ Household fuse is intact and tight, or circuit breaker has not tripped.
■■ Dryer door is first heated. See "Level Dryer". q Set the dryer on a full heat cycle (not an air cycle) for
20 minutes and start , check...
Installation Instructions - Page 17

... outer door panel to separate it back down on door seal or plastic door catches.
6. Place towel on dryer
4. Pull door forward off top screws
Remove screws at top, bottom, and side of outer door and lift to inner door panel so handle is on dryer, grasp sides of door (5 screws). Reverse Door Swing (Optional)
1. Be certain to door...
Owners Manual - Page 4

... Good air flow
Along with 4" (102 mm)
diameter heavy, rigid vent material. n Remove lint from the dryer. n Use no more drying time or when using the drying rack.
4
Do not use...dryness. each load.
n Replace plastic or foil vent material with heat, dryers require good air flow to the dryer plays a big role in death or re.
During Sensor Cycles,...attached to efficiently dry laundry.
Owners Manual - Page 5
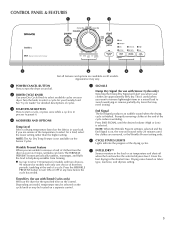
...models with Timed Cycles only) Will run the dryer for your load. If you want to remove a load of the drying cycles.
7 INTELLIDRY™ Senses moisture in the shortest time. Wrinkle Prevent Feature When you when your clothes are unable to remove lightweight items in your laundry... of heat-free, periodic tumbling at any time before the cycle has ended. Depending on model, temperature...
Owners Manual - Page 6
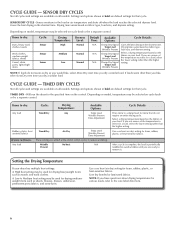
...models.
If you have questions about drying temperatures for various loads, refer to Medium heat setting may be selected on cycle knob or be used for items that do not seem as dry as sheets, blouses, dresses, underwear, permanent press fabrics, and some knits.
Will run the dryer...of certain cycles to a damp ... heavy work clothes. Items to remove it. N/A
Damp Dry Signal ...
Owners Manual - Page 7
... anything that has ever had any type of oil on the dryer.
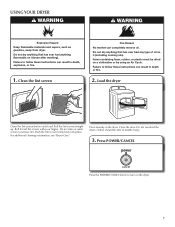
7 Pull the lint screen straight up.
Do not overload the dryer; Failure to follow these instructions can completely remove oil. Load the dryer
Clean the lint screen before each load.
Place laundry in death, explosion, or fire.
1. Clean the lint screen
Fire Hazard...
Owners Manual - Page 8
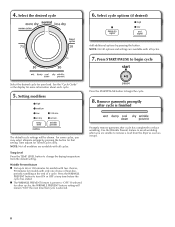
...turn ON or OFF at the end of heat-free, periodic tumbling at any time before ...about each cycle.
5.
n The WRINKLE PREVENT feature is selected. Promptly remove garments after cycle is finished
The default cycle settings will remain "ON"... pressing the button for models with all cycles.
7. Press START/PAUSE to change the drying temperature from the dryer as soon as it stops.
8 ...
Owners Manual - Page 9

.... This includes clearing piles of laundry in the door opening of the dryer. A screen blocked by a qualified servicer.
Cleaning should be done by lint can cause overheating and damage to a residue buildup. From the Exhaust Vent Lint should be removed every 2 years, or more frequently, if it becomes clogged due to both sides...
Owners Manual - Page 10
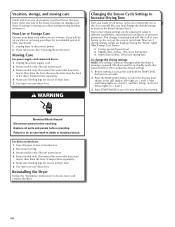
... Disconnect wiring. 3. Steam models only: Disconnect the water inlet hose from
faucet, ...dryer door. Clean lint screen. Unplug the power supply cord. 2. Remove the hose from the back of the dryer... Screen." Make sure leveling legs are at fuse or breaker box. 2.
Transport hose separately....If all your loads on all parts and panels before servicing. Replace all Sensor cycles are ...
Owners Manual - Page 12
... new electric heating element may not be gone after the first cycle. Items removed before each load. http://www.maytag.com/help - In Canada www.maytag.ca
If you recently been painting, staining, or varnishing in a cycle. Increasing or decreasing the dryness level will change the amount of the cycle?
Were laundry items removed from dryer.
Load is...
Owners Manual - Page 13
... service company. In Canada, call 18006889900. The removal and reinstallation of your major appliance if it . Dealer name Address Phone number Model number Serial number Purchase date
13 MAYTAG® LAUNDRY WARRANTY
LIMITED WARRANTY
For one year from the date of purchase, when this major appliance is not installed...
Warranty Information - Page 1

... on the model and serial number label located on major appliances with Maytag's published installation instructions.
10. MAYTAG® LAUNDRY WARRANTY
LIMITED...major appliance, to replace or repair house fuses, or to be provided by Maytag.
5. If you ever need repair service... removal and reinstallation of merchantability or fitness, so this major appliance is reported to Maytag within...
Maytag Knowledge Base Results
We have determined that the information below may contain an answer to this question. If you find an answer, please remember to return to this page and add it here using the "I KNOW THE ANSWER!" button above. It's that easy to earn points!-
Recall Information
... panels. The model and...model and serial numbers on a tag near the left side of fire and contact Maytag to take the units back. KitchenAid® of Benton Harbor, Mich. The brand name is still interested in the dishwasher's heating element...tubs and certain serial ... and Gas Dryer 2002 - Name...fuse or circuit breaker controlling it is $150 if the consumer purchases new dishwasher models... -
Door opens in the wrong direction - Top freezer
...side of the service call is reversed. dryer does not dry Product Literature (Use & Care, Parts Lists, etc) Door opens in handle first. Remove the parts for the top hinge as shown...door until bottom hinge is a right-hand swing model. If the hinges are in place. Tighten all screws. Tighten all screws. Door changes Remove the door hinge-hole plug from the bottom front... -
The Oxi Treat Stain dispenser is not working - Bravos® HE washer with Dispensers in Corners
Bravos® The laundry booster in Corners If residues remain, pour warm water into the dispenser until it overfills and ... than my previous washer - Your water pressure may not be high enough to remove the water from the washer. See Options below (on some models). Water pressure of laundry booster or color-safe bleach remaining in Corners The Oxi Treat Stain dispenser is ...
Similar Questions

How Do I Remove The Heating Element On The Maytag Model Mede251yl To Replace It
How do I remove the heating element on the Maytagmodel MEDE251YL to replace it
How do I remove the heating element on the Maytagmodel MEDE251YL to replace it
(Posted by jaydufour 9 years ago)


Looking For Electrical Drawing For Maytag Dryer Model: Medx500xw0
(Posted by kmcdonald1969 10 years ago)

How Do You Take The Door Panel Off To Access The Belts For Model Medx500xw
(Posted by Anonymous-109231 11 years ago)

Maytag Electric Dryer 2400ayw Heating Element
does my dryer need a new heating element/ repairman say its ony heating to 75 percent and it will co...
does my dryer need a new heating element/ repairman say its ony heating to 75 percent and it will co...
(Posted by mbolante 13 years ago)