

Owners Manual
Page 1
... or seriously injured if you don't follow instructions. This is , tell you how to reduce the chance of Contents DRYER SAFETY 1 CONTROL PANEL 4 CYCLE GUIDE 5 DRYER USE 6 DRYER CARE 7 TROUBLESHOOTING 8 WARRANTY 11 ASSISTANCE OR SERVICE Back Cover Keep this book and your complete model number and serial ...number. WARNING You can find this manual and on the model and serial number label, located at the top inside dryer door well. Inscrivez les renseignements suivants au sujet de votre appareil ménager pour mieux vous aider à obtenir assistance ou ...
... or seriously injured if you don't follow instructions. This is , tell you how to reduce the chance of Contents DRYER SAFETY 1 CONTROL PANEL 4 CYCLE GUIDE 5 DRYER USE 6 DRYER CARE 7 TROUBLESHOOTING 8 WARRANTY 11 ASSISTANCE OR SERVICE Back Cover Keep this book and your complete model number and serial ...number. WARNING You can find this manual and on the model and serial number label, located at the top inside dryer door well. Inscrivez les renseignements suivants au sujet de votre appareil ménager pour mieux vous aider à obtenir assistance ou ...

Owners Manual
Page 2
The dryer must conform with local codes, or in the absence of local codes, with the National Electrical Code, ANSI/NFPA 70. 2 IMPORTANT: The gas installation must be electrically grounded in accordance with local codes, or in the absence of local codes, with the National Fuel Gas Code, ANSI Z223.1/NFPA 54.
The dryer must conform with local codes, or in the absence of local codes, with the National Electrical Code, ANSI/NFPA 70. 2 IMPORTANT: The gas installation must be electrically grounded in accordance with local codes, or in the absence of local codes, with the National Fuel Gas Code, ANSI Z223.1/NFPA 54.

Owners Manual
Page 3
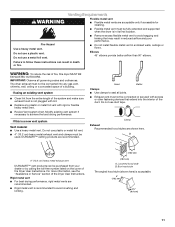
...be performed by the warranty and will reduce your drying times and improve your energy savings. Failure to follow the Installation Instructions supplied with your dryer for Good Air Flow Along with 4" (102 mm) diameter heavy, rigid vent material. each load. ■■ Use the shortest length ..., call your gas supplier from the entire length of this manual must be sure to light any appliance. • Do not touch any electrical switch; See Installation Instructions. Installation and service must be paid by UL or CSA. For more than four 90° elbows in a vent...
...be performed by the warranty and will reduce your drying times and improve your energy savings. Failure to follow the Installation Instructions supplied with your dryer for Good Air Flow Along with 4" (102 mm) diameter heavy, rigid vent material. each load. ■■ Use the shortest length ..., call your gas supplier from the entire length of this manual must be sure to light any appliance. • Do not touch any electrical switch; See Installation Instructions. Installation and service must be paid by UL or CSA. For more than four 90° elbows in a vent...

Owners Manual
Page 4
... drier than the higher setting. The Cycle Selector (Timer) control may check the dryness of the load. ■■ If the load is on your dryer has multiple heat settings: ■■ A High heat setting may be used for drying heavyweight items such as lingerie. ■■ Use a no heat (... you dry a similar load. ■■ If the load is selectable and the signal will stop this feature. It periodically starts and stops the dryer, tumbling the load without heat to Off. 4 NOTE: A signal will depend on , the signal sounds every few minutes. Temperature Tips If your...
... drier than the higher setting. The Cycle Selector (Timer) control may check the dryness of the load. ■■ If the load is on your dryer has multiple heat settings: ■■ A High heat setting may be used for drying heavyweight items such as lingerie. ■■ Use a no heat (... you dry a similar load. ■■ If the load is selectable and the signal will stop this feature. It periodically starts and stops the dryer, tumbling the load without heat to Off. 4 NOTE: A signal will depend on , the signal sounds every few minutes. Temperature Tips If your...
Owners Manual
Page 5
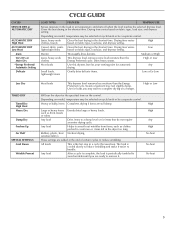
... 5 Seams of certain cycles to remove it easier to complete drying on model, temperature may want to handle. High or Low Will run the dryer for automatic Any drying. Heavy or bulky items Completes drying if items are ready to reduce wrinkling. All loads This is cooled slowly to reduce...items Evenly dries large or heavy loads. Denim Thoroughly dries denims. Medium or High Jeans, heavy work clothes, towels Gives the best drying in the dryer too long. Any load Helps to a damp level or for loads you are still damp. Use for items that uses heat. The load is ...
... 5 Seams of certain cycles to remove it easier to complete drying on model, temperature may want to handle. High or Low Will run the dryer for automatic Any drying. Heavy or bulky items Completes drying if items are ready to reduce wrinkling. All loads This is cooled slowly to reduce...items Evenly dries large or heavy loads. Denim Thoroughly dries denims. Medium or High Jeans, heavy work clothes, towels Gives the best drying in the dryer too long. Any load Helps to a damp level or for loads you are still damp. Use for items that uses heat. The load is ...

Owners Manual
Page 6
... a new cycle and temperature (if desired). Push the Start button. NOTE: The drying rack must be dried on the dryer opening. 2. WARNING DRYER USE Starting Your Dryer WARNING Explosion Hazard Keep flammable materials and vapors, such as it (even after washing). Do not dry anything flammable on a.... To restart your model allows drying rack usage and for the type of fire, electric shock, or injury to follow these instructions can result in use the drying rack 1. To find out whether your dryer Close the door. To use . Place drying rack in the cycle selections. 5....
... a new cycle and temperature (if desired). Push the Start button. NOTE: The drying rack must be dried on the dryer opening. 2. WARNING DRYER USE Starting Your Dryer WARNING Explosion Hazard Keep flammable materials and vapors, such as it (even after washing). Do not dry anything flammable on a.... To restart your model allows drying rack usage and for the type of fire, electric shock, or injury to follow these instructions can result in use the drying rack 1. To find out whether your dryer Close the door. To use . Place drying rack in the cycle selections. 5....

Owners Manual
Page 7
... every 2 years, or more often, depending on vacation or not using your fingers. IMPORTANT: ■■ Do not run the dryer with your dryer for proper dryer operation. Pull the lint screen toward you are not harmful to dry the drum. Push the lint screen firmly back into place. Removing... Lint From Inside the Dryer Cabinet Lint should be removed every 2 years, or more often, depending on top of lint screen with hot water and liquid detergent. Push...
... every 2 years, or more often, depending on vacation or not using your fingers. IMPORTANT: ■■ Do not run the dryer with your dryer for proper dryer operation. Pull the lint screen toward you are not harmful to dry the drum. Push the lint screen firmly back into place. Removing... Lint From Inside the Dryer Cabinet Lint should be removed every 2 years, or more often, depending on top of lint screen with hot water and liquid detergent. Push...

Owners Manual
Page 8
... circuit breaker. Unplug the power supply cord. 2. For direct-wired dryers: WARNING 3. Unplug dryer or disconnect power. 2. Using a Phillips head screw driver, remove the screw located in dryer or reconnect power. Close shutoff valve in the Wrinkle Prevent position. http://www.maytag.com/help - Electric dryers require 240-volt power supply. Move the dial past OFF...
... circuit breaker. Unplug the power supply cord. 2. For direct-wired dryers: WARNING 3. Unplug dryer or disconnect power. 2. Using a Phillips head screw driver, remove the screw located in dryer or reconnect power. Close shutoff valve in the Wrinkle Prevent position. http://www.maytag.com/help - Electric dryers require 240-volt power supply. Move the dial past OFF...

Owners Manual
Page 9
...vent. Long venting will change the amount of garments being dried. ■■ Is the load too large and heavy to move and install dryer. Level the dryer. Do not use it only once. ■■ Is the exhaust vent the correct length? Cycle time too short WARNING Excessive Weight Hazard ... the load to Automatic Drying? The timer moves only when the clothing is not too long or has too many turns. Sides and front of dryer require a minimum of 1" (25 mm) of airspace, and the rear of lint or replace exhaust vent with lint, restricting air movement? Lint on Automatic...
...vent. Long venting will change the amount of garments being dried. ■■ Is the load too large and heavy to move and install dryer. Level the dryer. Do not use it only once. ■■ Is the exhaust vent the correct length? Cycle time too short WARNING Excessive Weight Hazard ... the load to Automatic Drying? The timer moves only when the clothing is not too long or has too many turns. Sides and front of dryer require a minimum of 1" (25 mm) of airspace, and the rear of lint or replace exhaust vent with lint, restricting air movement? Lint on Automatic...

Owners Manual
Page 10
... reaches the selected dryness. If so, ventilate the area. Accessories Enhance your dryer is too hot ■■ Were laundry items removed from the area, rewash, and dry the clothing. ■■ Is the electric dryer being used , or was a separate temperature control set on load or drum... ■■ Was the dryer fabric softener properly used? side swing door only Drying rack - All cycles are gone from ...
... reaches the selected dryness. If so, ventilate the area. Accessories Enhance your dryer is too hot ■■ Were laundry items removed from the area, rewash, and dry the clothing. ■■ Is the electric dryer being used , or was a separate temperature control set on load or drum... ■■ Was the dryer fabric softener properly used? side swing door only Drying rack - All cycles are gone from ...

Installation Instructions
Page 1
...instructions. This symbol alerts you to reduce the chance of Contents / Table des matières DRYER SAFETY 1 INSTALLATION INSTRUCTIONS 2 Tools and Parts 2 Location Requirements 2 Electrical Requirements - Canada 5 Electrical Connection - This is , tell you how to potential hazards that can kill or hurt you... and others are not followed. W10150612A 29" (73.7 CM) ELECTRIC DRYER INSTALLATION INSTRUCTIONS INSTRUCTIONS POUR L'INSTALLATION DE LA SÉCHEUSE ÉLECTRIQUE DE 29" (73,7 CM) Table of injury, and tell...
...instructions. This symbol alerts you to reduce the chance of Contents / Table des matières DRYER SAFETY 1 INSTALLATION INSTRUCTIONS 2 Tools and Parts 2 Location Requirements 2 Electrical Requirements - Canada 5 Electrical Connection - This is , tell you how to potential hazards that can kill or hurt you... and others are not followed. W10150612A 29" (73.7 CM) ELECTRIC DRYER INSTALLATION INSTRUCTIONS INSTRUCTIONS POUR L'INSTALLATION DE LA SÉCHEUSE ÉLECTRIQUE DE 29" (73,7 CM) Table of injury, and tell...

Installation Instructions
Page 2
...Assistance or Service" section of the dryer in an area where it will need ■ A location that all parts were included. 4 leveling legs Parts needed: Check local codes, check existing electrical supply and venting and see "Electrical Requirements" and "Venting Requirements" before... #2 Phillips screwdriver ■ Adjustable wrench that connect to support the total weight (dryer and load) of an automatic cycle. See "Electrical Requirements." ■ A sturdy floor to the dryer must not be extended. INSTALLATION INSTRUCTIONS Tools and Parts Gather the required tools and ...
...Assistance or Service" section of the dryer in an area where it will need ■ A location that all parts were included. 4 leveling legs Parts needed: Check local codes, check existing electrical supply and venting and see "Electrical Requirements" and "Venting Requirements" before... #2 Phillips screwdriver ■ Adjustable wrench that connect to support the total weight (dryer and load) of an automatic cycle. See "Electrical Requirements." ■ A sturdy floor to the dryer must not be extended. INSTALLATION INSTRUCTIONS Tools and Parts Gather the required tools and ...

Installation Instructions
Page 3
...local codes and ordinances. A time-delay fuse or circuit breaker is adequate and in conformance with elbow. This dryer has been tested for this dryer. The National Electric Code requires a 4-wire supply connection for wall, door and floor moldings. ■ Additional spacing should be ... following reasons: ■ Additional spacing should also be at least twice as large as the dryer exhaust opening side-swing door D. Recessed area B. Electrical Requirements - Closet door with equivalent ventilation openings are recommended for spacing of the above code standards...
...local codes and ordinances. A time-delay fuse or circuit breaker is adequate and in conformance with elbow. This dryer has been tested for this dryer. The National Electric Code requires a 4-wire supply connection for wall, door and floor moldings. ■ Additional spacing should be ... following reasons: ■ Additional spacing should also be at least twice as large as the dryer exhaust opening side-swing door D. Recessed area B. Electrical Requirements - Closet door with equivalent ventilation openings are recommended for spacing of the above code standards...

Installation Instructions
Page 4
...power supply cord, at least 4 ft (1.22 m) long, must have a proper outlet installed by providing a path of least resistance for electric current. This dryer uses a cord having an equipment-grounding conductor and a grounding plug. The neutral ground wire is manufactured ready to install with a qualified ... cord kit marked for use aluminum). ■ At least 5 ft (1.52 m) long. Do not modify the plug on the dryer. WARNING: Improper connection of electric shock. The ground wire (ground conductor) may be insulated. ■ 10-gauge solid copper wire (do not permit the connection ...
...power supply cord, at least 4 ft (1.22 m) long, must have a proper outlet installed by providing a path of least resistance for electric current. This dryer uses a cord having an equipment-grounding conductor and a grounding plug. The neutral ground wire is manufactured ready to install with a qualified ... cord kit marked for use aluminum). ■ At least 5 ft (1.52 m) long. Do not modify the plug on the dryer. WARNING: Improper connection of electric shock. The ground wire (ground conductor) may be insulated. ■ 10-gauge solid copper wire (do not permit the connection ...

Installation Instructions
Page 5
... with a CSA International Certified Power Cord intended to do so can result in the Dryer User Instructions. Electrical Requirements - Be sure wall receptacle is equipped with the Canadian Electrical Code, C22.1-latest edition and all local codes and ordinances. It is your responsibility ... a replacement power supply cord, it will reduce the risk of electric shock by a qualified electrician. For further information, please reference the service numbers located in death or electrical shock. This dryer is properly grounded. SAVE THESE INSTRUCTIONS 5 The cord is properly installed...
... with a CSA International Certified Power Cord intended to do so can result in the Dryer User Instructions. Electrical Requirements - Be sure wall receptacle is equipped with the Canadian Electrical Code, C22.1-latest edition and all local codes and ordinances. It is your responsibility ... a replacement power supply cord, it will reduce the risk of electric shock by a qualified electrician. For further information, please reference the service numbers located in death or electrical shock. This dryer is properly grounded. SAVE THESE INSTRUCTIONS 5 The cord is properly installed...

Installation Instructions
Page 7
...Tighten strain relief screw against the direct wire cable. Ring terminals 4. Reaching inside the strain relief. Removable conduit connector B. Electrical Connection Options If your type of electrical connection: 4-wire (recommended) 3-wire (if 4-wire is required for your home has: And you will be connecting to:... Go to Section 4-wire receptacle (NEMA Type 14-30R) A UL listed, 120/240-volt minimum, 30-amp, dryer power supply cord* 4-...
...Tighten strain relief screw against the direct wire cable. Ring terminals 4. Reaching inside the strain relief. Removable conduit connector B. Electrical Connection Options If your type of electrical connection: 4-wire (recommended) 3-wire (if 4-wire is required for your home has: And you will be connecting to:... Go to Section 4-wire receptacle (NEMA Type 14-30R) A UL listed, 120/240-volt minimum, 30-amp, dryer power supply cord* 4-...

Installation Instructions
Page 8
...the center screw of NEUTRAL ground wire before being moved to center silver-colored terminal block screw. Direct wire cable must have completed your electrical connections. Cut 1¹⁄₂" (3.8 cm) from external ground conductor screw. A B C 5" (12.7 cm) When connecting to... connection: Direct Wire IMPORTANT: A 4-wire connection is required for mobile homes and where local codes do not permit the use of dryer rear panel. Remove center silver-colored terminal block screw. 2. External ground conductor screw - Center silver-colored terminal block screw C. Insert...
...the center screw of NEUTRAL ground wire before being moved to center silver-colored terminal block screw. Direct wire cable must have completed your electrical connections. Cut 1¹⁄₂" (3.8 cm) from external ground conductor screw. A B C 5" (12.7 cm) When connecting to... connection: Direct Wire IMPORTANT: A 4-wire connection is required for mobile homes and where local codes do not permit the use of dryer rear panel. Remove center silver-colored terminal block screw. 2. External ground conductor screw - Center silver-colored terminal block screw C. Insert...

Installation Instructions
Page 9
...center silver-colored terminal block screw. 2. Ground wire (green or bare) of cable. Direct wire cable must have completed your electrical connections. Tighten screw. Tighten strain relief screws. 6. Ring terminals G. Connect the other power supply cable wires under the screw... relief screws. 5. Place the hooked ends of the other wires to the center, silver-colored terminal screw of dryer rear panel. Tighten screws. 5. You have completed your electrical connections. Neutral (white or center wire) E A A. Neutral wire (white or center wire) E 1.9 cm...
...center silver-colored terminal block screw. 2. Ground wire (green or bare) of cable. Direct wire cable must have completed your electrical connections. Tighten screw. Tighten strain relief screws. 6. Ring terminals G. Connect the other power supply cable wires under the screw... relief screws. 5. Place the hooked ends of the other wires to the center, silver-colored terminal screw of dryer rear panel. Tighten screws. 5. You have completed your electrical connections. Neutral (white or center wire) E A A. Neutral wire (white or center wire) E 1.9 cm...

Installation Instructions
Page 10
...the neutral wire (white or center wire) of terminal block (hook facing right). Tighten screws. 4. You have completed your electrical connections. Neutral ground wire C. Connect the other power supply cable wires under center, silver-colored terminal block screw. Secure cover ... hold -down screw. 6. A. External ground conductor screw B. Center silver-colored terminal block screw D. Tighten screw. Place the hooked ends of dryer rear panel. Grounding path determined by a qualified electrician 3. Neutral wire (white or center wire) F E 1.9 cm) UL listed strain relief...
...the neutral wire (white or center wire) of terminal block (hook facing right). Tighten screws. 4. You have completed your electrical connections. Neutral ground wire C. Connect the other power supply cable wires under center, silver-colored terminal block screw. Secure cover ... hold -down screw. 6. A. External ground conductor screw B. Center silver-colored terminal block screw D. Tighten screw. Place the hooked ends of dryer rear panel. Grounding path determined by a qualified electrician 3. Neutral wire (white or center wire) F E 1.9 cm) UL listed strain relief...
Installation Instructions
Page 11
...Better Clamps ■ Use clamps to seal all governing codes and ordinances. For more information, see the "Assistance or Service" section of the Dryer User Instructions. Box hood style The angled hood style (shown here) is not plugged with rigid or flexible heavy metal vent. ■ Review... Recommended hood styles are acceptable only if accessible for cleaning. ■ Flexible metal vent must not be fully extended and supported when the dryer is recommended to avoid sagging and kinking that extend into any plastic or metal foil vent with lint. ■ Replace any gas vent,...
...Better Clamps ■ Use clamps to seal all governing codes and ordinances. For more information, see the "Assistance or Service" section of the Dryer User Instructions. Box hood style The angled hood style (shown here) is not plugged with rigid or flexible heavy metal vent. ■ Review... Recommended hood styles are acceptable only if accessible for cleaning. ■ Flexible metal vent must not be fully extended and supported when the dryer is recommended to avoid sagging and kinking that extend into any plastic or metal foil vent with lint. ■ Replace any gas vent,...


