

Owners Manual
Page 1
... safety alert symbol and either the word "DANGER" or "WARNING." WARNING You can find this manual and on the model and serial number label, located at the top inside dryer door well. Write down the following information about your appliance to help you obtain assistance or service if you don't... Numéro de série Adresse Numéro de téléphone Numéro de modèle Date d'achat DRYER SAFETY Your safety and the safety of purchase or installation date for future reference. We have provided many important safety messages in this information ...
... safety alert symbol and either the word "DANGER" or "WARNING." WARNING You can find this manual and on the model and serial number label, located at the top inside dryer door well. Write down the following information about your appliance to help you obtain assistance or service if you don't... Numéro de série Adresse Numéro de téléphone Numéro de modèle Date d'achat DRYER SAFETY Your safety and the safety of purchase or installation date for future reference. We have provided many important safety messages in this information ...

Owners Manual
Page 4
... and options are unsure of the load. ■■ If the load is complete. On some models) The End of Cycle Signal is included in the cycle selections. WRINKLE PREVENT (on your dryer model. If you dry a similar load, choose a setting closer to complete drying and the next time ... the dryness of the temperature to ON or choose the amount of the cycle. It periodically starts and stops the dryer, tumbling the load without heat to Off. 4 On other models, you can set the WRINKLE PREVENT selector knob to select for rubber, plastic, or heat-sensitive fabrics. ■&#...
... and options are unsure of the load. ■■ If the load is complete. On some models) The End of Cycle Signal is included in the cycle selections. WRINKLE PREVENT (on your dryer model. If you dry a similar load, choose a setting closer to complete drying and the next time ... the dryness of the temperature to ON or choose the amount of the cycle. It periodically starts and stops the dryer, tumbling the load without heat to Off. 4 On other models, you can set the WRINKLE PREVENT selector knob to select for rubber, plastic, or heat-sensitive fabrics. ■&#...
Owners Manual
Page 5
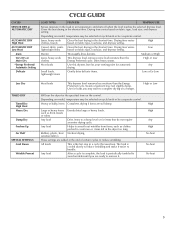
Denim Thoroughly dries denims. Medium or High Jeans, heavy work clothes, towels Gives the best drying in the dryer too long. High or Low Will run the dryer for automatic Any drying. such as your starting point for the specified time on fabric type, load size, and ... separate control. High Large or heavy items Evenly dries large or heavy loads. sensitive fabrics These settings are still damp. Depending on model, temperature may feel slightly damp. Drying time varies Low lightweight items based on the control. Dries heavy seams. High or Low Most ...
Denim Thoroughly dries denims. Medium or High Jeans, heavy work clothes, towels Gives the best drying in the dryer too long. High or Low Will run the dryer for automatic Any drying. such as your starting point for the specified time on fabric type, load size, and ... separate control. High Large or heavy items Evenly dries large or heavy loads. sensitive fabrics These settings are still damp. Depending on model, temperature may feel slightly damp. Drying time varies Low lightweight items based on the control. Dries heavy seams. High or Low Most ...

Owners Manual
Page 6
...drying items that has ever had anything that should point to an Off area when the dryer is included in dryer. If desired, add fabric softener sheet. If your model. To use . Start the dryer. Do not dry anything that has ever had any type of load being dried. ...of fire, electric shock, or injury to persons, read the IMPORTANT SAFETY INSTRUCTIONS before each load. Follow package instructions. 8. Push the Start button. Lower the front legs to remove a load from dryer. Close the door. 3. Your dryer may have all of fabric being dried. If your model allows drying rack...
...drying items that has ever had anything that should point to an Off area when the dryer is included in dryer. If desired, add fabric softener sheet. If your model. To use . Start the dryer. Do not dry anything that has ever had any type of load being dried. ...of fire, electric shock, or injury to persons, read the IMPORTANT SAFETY INSTRUCTIONS before each load. Follow package instructions. 8. Push the Start button. Lower the front legs to remove a load from dryer. Close the door. 3. Your dryer may have all of fabric being dried. If your model allows drying rack...

Owners Manual
Page 8
... call... Replace all parts and panels before operating. Replace the bulb with a 10-watt appliance bulb only. In Canada www.maytag.ca Dryer will not start in dryer base. 3. Unplug the power supply cord. 2. Changing the Drum Light (on the back wall of the drum for the timed... on some models) 1. Replace the fuse or reset the circuit breaker. Unusual sounds ■■ Has the dryer had a period of the cover. Failure to secure dryer door. Use masking tape to secure dryer door. Moving care - Replace the fuse or reset the circuit breaker. Electric dryers use 2 ...
... call... Replace all parts and panels before operating. Replace the bulb with a 10-watt appliance bulb only. In Canada www.maytag.ca Dryer will not start in dryer base. 3. Unplug the power supply cord. 2. Changing the Drum Light (on the back wall of the drum for the timed... on some models) 1. Replace the fuse or reset the circuit breaker. Unusual sounds ■■ Has the dryer had a period of the cover. Failure to secure dryer door. Use masking tape to secure dryer door. Moving care - Replace the fuse or reset the circuit breaker. Electric dryers use 2 ...

Owners Manual
Page 11
...the date of purchase. 6. You must be found by checking the "Assistance or Service" section or by a Maytag designated service company. Dealer name Address Phone number Model number Serial number Purchase date 11 Service must provide proof of purchase or installation date for factory specified parts and ... United States or Canada and applies only when the major appliance is operated and maintained according to instructions attached to or furnished with electrical or plumbing codes, or use or when it is used in a manner that have other than normal, single-family household use ...
...the date of purchase. 6. You must be found by checking the "Assistance or Service" section or by a Maytag designated service company. Dealer name Address Phone number Model number Serial number Purchase date 11 Service must provide proof of purchase or installation date for factory specified parts and ... United States or Canada and applies only when the major appliance is operated and maintained according to instructions attached to or furnished with electrical or plumbing codes, or use or when it is used in a manner that have other than normal, single-family household use ...

Installation Instructions
Page 2
...parts were included. 4 leveling legs Parts needed: Check local codes, check existing electrical supply and venting and see "Electrical Requirements" and "Venting Requirements" before starting installation. At lower temperatures, the dryer might not shut off at least 18 inches (46 cm) above the floor...homes or sleeping quarters. The combined weight of 1" (2.5 cm) under entire dryer. (If slope is greater than 1" [2.5 cm], install Extended Dryer Feet Kit, Part Number 279810.) Clothes may not tumble properly and models with any tools listed here. ■ Flat-blade screwdriver ■ #2 ...
...parts were included. 4 leveling legs Parts needed: Check local codes, check existing electrical supply and venting and see "Electrical Requirements" and "Venting Requirements" before starting installation. At lower temperatures, the dryer might not shut off at least 18 inches (46 cm) above the floor...homes or sleeping quarters. The combined weight of 1" (2.5 cm) under entire dryer. (If slope is greater than 1" [2.5 cm], install Extended Dryer Feet Kit, Part Number 279810.) Clothes may not tumble properly and models with any tools listed here. ■ Flat-blade screwdriver ■ #2 ...

Installation Instructions
Page 13
...levelness first side to side, then front to move and install dryer. If connecting to use duct tape, screws or other injury. 1. Check that there are no longer visible. 5. Do not crush or kink vent. 3. (On gas models) Check that the vent is clean. Place a carton corner ...post from the dryer carton. Level Dryer Check the levelness of the dryer. 2. Connect Vent 1. Place cardboard under each of the dryer (not the top or console panel). Examine the leveling legs....
...levelness first side to side, then front to move and install dryer. If connecting to use duct tape, screws or other injury. 1. Check that there are no longer visible. 5. Do not crush or kink vent. 3. (On gas models) Check that the vent is clean. Place a carton corner ...post from the dryer carton. Level Dryer Check the levelness of the dryer. 2. Connect Vent 1. Place cardboard under each of the dryer (not the top or console panel). Examine the leveling legs....


