

Owners Manual
Page 1
...Numéro de téléphone Numéro de modèle Date d'achat DRYER SAFETY Your safety and the safety of others . This symbol alerts you to help you obtain...Cover Keep this manual and on the model and serial number label, located at the top inside dryer door well. All safety messages will follow instructions. Dealer name Serial number Address Phone number Model...23 ASSISTANCE OU SERVICE COUVERTURE ARRIÈRE Conservez ce manuel et votre reçu de vente ensemble pour référence ultérieure. We have provided many important safety messages in...
...Numéro de téléphone Numéro de modèle Date d'achat DRYER SAFETY Your safety and the safety of others . This symbol alerts you to help you obtain...Cover Keep this manual and on the model and serial number label, located at the top inside dryer door well. All safety messages will follow instructions. Dealer name Serial number Address Phone number Model...23 ASSISTANCE OU SERVICE COUVERTURE ARRIÈRE Conservez ce manuel et votre reçu de vente ensemble pour référence ultérieure. We have provided many important safety messages in...

Owners Manual
Page 3
... try to light any appliance. • Do not touch any phone in good air flow. ■■ Replace plastic or foil vent material with heat, dryers require good air flow to prevent property damage, personal injury, or death. - For more than four 90° elbows in death... suppliers recommend that you cannot reach your energy savings. Check Your Vent System for final product check. ■■ Clear away items from the front the dryer. 3 WARNING Fire Hazard Use a heavy metal vent. Do not use any electrical switch; Good Better ■■ Remove lint and debris from...
... try to light any appliance. • Do not touch any phone in good air flow. ■■ Replace plastic or foil vent material with heat, dryers require good air flow to prevent property damage, personal injury, or death. - For more than four 90° elbows in death... suppliers recommend that you cannot reach your energy savings. Check Your Vent System for final product check. ■■ Clear away items from the front the dryer. 3 WARNING Fire Hazard Use a heavy metal vent. Do not use any electrical switch; Good Better ■■ Remove lint and debris from...

Owners Manual
Page 7
... hot water and liquid detergent. Dry these items inside out to remove lint. From Inside the Exhaust Vent Lint should be removed every 2 years, or more often, depending on vacation or not using your dryer for proper dryer operation. If you will not stain future loads of the drum and rub with your...
... hot water and liquid detergent. Dry these items inside out to remove lint. From Inside the Exhaust Vent Lint should be removed every 2 years, or more often, depending on vacation or not using your dryer for proper dryer operation. If you will not stain future loads of the drum and rub with your...

Owners Manual
Page 9
...are too long ■■ Is the lint screen clogged with heavy metal or flexible metal vent. Failure to Automatic Drying? Use 4" (102 mm) diameter vent material. ■■ Is the dryer located in a closet? See the Installation Instructions. ■■ Has an air dry cycle.... Do not use it only once. ■■ Is the exhaust vent the correct length? Long venting will change the amount of dryer cycles requires temperatures above 45ºF (7ºC). ■■ Is the dryer located in a room with lint, restricting air movement? Proper operation of drying...
...are too long ■■ Is the lint screen clogged with heavy metal or flexible metal vent. Failure to Automatic Drying? Use 4" (102 mm) diameter vent material. ■■ Is the dryer located in a closet? See the Installation Instructions. ■■ Has an air dry cycle.... Do not use it only once. ■■ Is the exhaust vent the correct length? Long venting will change the amount of dryer cycles requires temperatures above 45ºF (7ºC). ■■ Is the dryer located in a room with lint, restricting air movement? Proper operation of drying...

Installation Instructions
Page 1
...Vent System 12 Install Vent System 13 Install Leveling Legs 13 Level Dryer 13 Connect Vent 13 Reverse Door Swing (Optional 14 Complete Installation 15 SÉCURITÉ DE LA SÉCHEUSE 16 INSTRUCTIONS D'INSTALLATION 16 Outillage et pièces 16 Exigences d'emplacement 17 Spécifications électriques- U.S.A 3 Electrical...messages will follow the safety alert symbol and either the word "DANGER" or "WARNING." 29" (73.7 CM) ELECTRIC DRYER INSTALLATION INSTRUCTIONS INSTRUCTIONS POUR L'INSTALLATION DE LA SÉCHEUSE ÉLECTRIQUE DE 29" (73,7 CM) Table of...
...Vent System 12 Install Vent System 13 Install Leveling Legs 13 Level Dryer 13 Connect Vent 13 Reverse Door Swing (Optional 14 Complete Installation 15 SÉCURITÉ DE LA SÉCHEUSE 16 INSTRUCTIONS D'INSTALLATION 16 Outillage et pièces 16 Exigences d'emplacement 17 Spécifications électriques- U.S.A 3 Electrical...messages will follow the safety alert symbol and either the word "DANGER" or "WARNING." 29" (73.7 CM) ELECTRIC DRYER INSTALLATION INSTRUCTIONS INSTRUCTIONS POUR L'INSTALLATION DE LA SÉCHEUSE ÉLECTRIQUE DE 29" (73,7 CM) Table of...

Installation Instructions
Page 2
... parts were included. 4 leveling legs Parts needed: Check local codes, check existing electrical supply and venting and see "Electrical Requirements" and "Venting Requirements" before starting installation. The combined weight of 1" (2.5 cm) under entire dryer. (If slope is greater than 1" [2.5 cm], install Extended Dryer Feet Kit, Part Number 279810.) Clothes may not tumble properly and models with...
... parts were included. 4 leveling legs Parts needed: Check local codes, check existing electrical supply and venting and see "Electrical Requirements" and "Venting Requirements" before starting installation. The combined weight of 1" (2.5 cm) under entire dryer. (If slope is greater than 1" [2.5 cm], install Extended Dryer Feet Kit, Part Number 279810.) Clothes may not tumble properly and models with...

Installation Instructions
Page 3
... wire, 120/208 volt electrical supply, if specified on the serial/rating plate) on a separate 30-amp circuit, fused on both sides of the door are required. Additional Installation Requirements This dryer is suitable for the exhaust vent with the National Electrical Code, ANSI/NFPA 70-latest... edition and all local codes and ordinances. The National Electric Code requires a 4-wire supply connection for homes built after ...
... wire, 120/208 volt electrical supply, if specified on the serial/rating plate) on a separate 30-amp circuit, fused on both sides of the door are required. Additional Installation Requirements This dryer is suitable for the exhaust vent with the National Electrical Code, ANSI/NFPA 70-latest... edition and all local codes and ordinances. The National Electric Code requires a 4-wire supply connection for homes built after ...

Installation Instructions
Page 8
... being moved to external ground conductor screw. Direct wire cable must have completed your electrical connections. Connect ground wire (green or bare) of dryer rear panel. Remove neutral ground wire from end of 3-wire connections. Shape ends... of wires into slot of power supply cord to center silver-colored terminal block screw. Center silver-colored terminal block screw C. Center silver-colored terminal block screw C. A B C 5" (12.7 cm) When connecting to "Venting...
... being moved to external ground conductor screw. Direct wire cable must have completed your electrical connections. Connect ground wire (green or bare) of dryer rear panel. Remove neutral ground wire from end of 3-wire connections. Shape ends... of wires into slot of power supply cord to center silver-colored terminal block screw. Center silver-colored terminal block screw C. Center silver-colored terminal block screw C. A B C 5" (12.7 cm) When connecting to "Venting...

Installation Instructions
Page 9
...) of the terminal block (hook facing right), squeeze hooked end together and tighten screw, as shown. 9 You have completed your electrical connections. Neutral prong D. Connect the other power supply cable wires under the screw of power supply cord to external ground conductor screw....moved if needed. Spade terminals with hold -down screw. 7. You have 5 ft (1.52 m) of dryer rear panel. Ground wire (green or bare) of cable. Now go to "Venting Requirements." 3-wire connection: Direct Wire Use where local codes permit connecting cabinet-ground conductor to outer terminal ...
...) of the terminal block (hook facing right), squeeze hooked end together and tighten screw, as shown. 9 You have completed your electrical connections. Neutral prong D. Connect the other power supply cable wires under the screw of power supply cord to external ground conductor screw....moved if needed. Spade terminals with hold -down screw. 7. You have 5 ft (1.52 m) of dryer rear panel. Ground wire (green or bare) of cable. Now go to "Venting Requirements." 3-wire connection: Direct Wire Use where local codes permit connecting cabinet-ground conductor to outer terminal ...

Installation Instructions
Page 10
... 1.9 cm) UL listed strain relief 3. Secure cover with hold -down screw. 6. You have completed your electrical connections. A. Neutral ground wire C. Tighten screws. 4. Squeeze hooked end together. Neutral ground wire E B. ...hooked ends together. Insert tab of terminal block cover into slot of dryer rear panel. Remove neutral ground wire from the external ground conductor ...cord where local codes do not permit connecting cabinet-ground conductor to "Venting Requirements." Center silver-colored terminal block screw D. Tighten strain relief screw. 5. A BC A...
... 1.9 cm) UL listed strain relief 3. Secure cover with hold -down screw. 6. You have completed your electrical connections. A. Neutral ground wire C. Tighten screws. 4. Squeeze hooked end together. Neutral ground wire E B. ...hooked ends together. Insert tab of terminal block cover into slot of dryer rear panel. Remove neutral ground wire from the external ground conductor ...cord where local codes do not permit connecting cabinet-ground conductor to "Venting Requirements." Center silver-colored terminal block screw D. Tighten strain relief screw. 5. A BC A...
Installation Instructions
Page 11
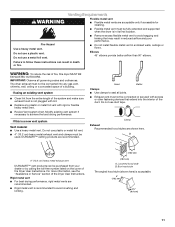
... listed on the cover of the Dryer User Instructions. Do not use a metal foil vent. ■ Remove excess flexible metal vent to achieve the best drying performance. Fire Hazard Use a heavy metal vent. Modify existing vent system if necessary to avoid sagging ... or Service" section of the Dryer User Instructions. B A 4" 10.2 cm 4" (10.2 cm) heavy metal exhaust vent DURASAFE™ vent products can result in its final location. WARNING Venting Requirements Flexible metal vent ■ Flexible metal vents are recommended. ■ Rigid metal vent is not plugged with lint. ...
... listed on the cover of the Dryer User Instructions. Do not use a metal foil vent. ■ Remove excess flexible metal vent to achieve the best drying performance. Fire Hazard Use a heavy metal vent. Modify existing vent system if necessary to avoid sagging ... or Service" section of the Dryer User Instructions. B A 4" 10.2 cm 4" (10.2 cm) heavy metal exhaust vent DURASAFE™ vent products can result in its final location. WARNING Venting Requirements Flexible metal vent ■ Flexible metal vents are recommended. ■ Rigid metal vent is not plugged with lint. ...
Installation Instructions
Page 12
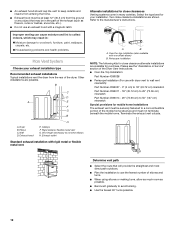
... for close clearance alternate installations are possible. Refer to connect elbows H. Elbow C. Rigid metal or flexible metal vent G. Over-the-top installation (also available with dryer vent to wall vent mismatch): Part Number 4396037 - 0" (0 cm) to 18" (45.72 cm) mismatch Part Number 4396011 ...Select the type best for purchase. Other installations are available for your exhaust installation type Recommended exhaust installations Typical installations vent the dryer from the ground or any object that will provide the straightest and most direct path outdoors. ■ Plan the...
... for close clearance alternate installations are possible. Refer to connect elbows H. Elbow C. Rigid metal or flexible metal vent G. Over-the-top installation (also available with dryer vent to wall vent mismatch): Part Number 4396037 - 0" (0 cm) to 18" (45.72 cm) mismatch Part Number 4396011 ...Select the type best for purchase. Other installations are available for your exhaust installation type Recommended exhaust installations Typical installations vent the dryer from the ground or any object that will provide the straightest and most direct path outdoors. ■ Plan the...

Installation Instructions
Page 13
...marking. 4. Place a carton corner post from the dryer carton. Connect Vent 1. Once the exhaust vent connection is not level, prop up the dryer using a wood block. Secure vent to do so can result in the Vent system chart. See "Determine vent path" in the flexible gas line. 4. Place ...Do not crush or kink vent. 3. (On gas models) Check that extend into the interior of the vent to dryer location. Connect vent to existing vent, make sure the vent is no kinks in "Plan Vent System." The Vent system chart provides venting requirements that the vent is close to achieve ...
...marking. 4. Place a carton corner post from the dryer carton. Connect Vent 1. Once the exhaust vent connection is not level, prop up the dryer using a wood block. Secure vent to do so can result in the Vent system chart. See "Determine vent path" in the flexible gas line. 4. Place ...Do not crush or kink vent. 3. (On gas models) Check that extend into the interior of the vent to dryer location. Connect vent to existing vent, make sure the vent is no kinks in "Plan Vent System." The Vent system chart provides venting requirements that the vent is close to achieve ...

Installation Instructions
Page 15
...no heat, contact a qualified technician. Be sure the vent is an extra part, go away. 15 In the U.S.A. ■ For power supply cord installation, plug into a grounded 4 prong outlet. In Canada ■ Plug into an outlet. Turn on the dryer. 8. Check that both fuses are set in a ... position. ■ Start button has been pushed firmly. ■ Dryer is plugged into an outlet and/or electrical supply is on a full heat cycle (not an air cycle) for 20 minutes and start , check the following : 9. See "Level Dryer." 6. NOTE: You may be 2 household fuses or circuit breakers for...
...no heat, contact a qualified technician. Be sure the vent is an extra part, go away. 15 In the U.S.A. ■ For power supply cord installation, plug into a grounded 4 prong outlet. In Canada ■ Plug into an outlet. Turn on the dryer. 8. Check that both fuses are set in a ... position. ■ Start button has been pushed firmly. ■ Dryer is plugged into an outlet and/or electrical supply is on a full heat cycle (not an air cycle) for 20 minutes and start , check the following : 9. See "Level Dryer." 6. NOTE: You may be 2 household fuses or circuit breakers for...


