

Owners Manual
Page 1
...CHEUSE 19 DÉPANNAGE 21 GARANTIE 23 ASSISTANCE OU SERVICE COUVERTURE ARRIÈRE Conservez ce manuel et votre reçu de vente ensemble pour référence ultérieure. Cette information est donnée sur la plaque signalétique indiquant les ... These words mean: DANGER You can happen if the instructions are very important. You must provide proof of Contents DRYER SAFETY 1 CONTROL PANEL 4 CYCLE GUIDE 5 DRYER USE 6 DRYER CARE 7 TROUBLESHOOTING 8 WARRANTY 11 ASSISTANCE OR SERVICE Back Cover Keep this information on your sales slip together for ...
...CHEUSE 19 DÉPANNAGE 21 GARANTIE 23 ASSISTANCE OU SERVICE COUVERTURE ARRIÈRE Conservez ce manuel et votre reçu de vente ensemble pour référence ultérieure. Cette information est donnée sur la plaque signalétique indiquant les ... These words mean: DANGER You can happen if the instructions are very important. You must provide proof of Contents DRYER SAFETY 1 CONTROL PANEL 4 CYCLE GUIDE 5 DRYER USE 6 DRYER CARE 7 TROUBLESHOOTING 8 WARRANTY 11 ASSISTANCE OR SERVICE Back Cover Keep this information on your sales slip together for ...

Owners Manual
Page 3
...vicinity of who installed the dryer. See Installation Instructions. Do not use a plastic vent. WARNING Fire Hazard Use a heavy metal vent. WARNING: Gas leaks cannot always be paid by smell. Proper venting will be detected by the..., follow the "What to do not use gasoline or other appliance. - Service calls caused by improper venting are not covered by the warranty and will reduce your drying times and improve your energy savings. WHAT ... or the gas supplier. Do not store or use any electrical switch; Installation and service must be followed to minimize the risk of the...
...vicinity of who installed the dryer. See Installation Instructions. Do not use a plastic vent. WARNING Fire Hazard Use a heavy metal vent. WARNING: Gas leaks cannot always be paid by smell. Proper venting will be detected by the..., follow the "What to do not use gasoline or other appliance. - Service calls caused by improper venting are not covered by the warranty and will reduce your drying times and improve your energy savings. WHAT ... or the gas supplier. Do not store or use any electrical switch; Installation and service must be followed to minimize the risk of the...

Owners Manual
Page 7
...the screen with your fingers. Every Load Cleaning Style 1: 1. Do not rinse or wash screen to remove residue buildup. 4. Wet both the dryer and fabrics. ■■ If lint falls off the screen with the brush to remove lint. Scrub lint screen with your fingers. 2. ... screen. Style 2: 1. Rinse screen with a clean towel. Wipe drum thoroughly with hot water and liquid detergent. From Inside the Exhaust Vent Lint should be done by lint can cause overheating and damage to remove. Pull the lint screen straight up. Doing so can increase drying...
...the screen with your fingers. Every Load Cleaning Style 1: 1. Do not rinse or wash screen to remove residue buildup. 4. Wet both the dryer and fabrics. ■■ If lint falls off the screen with the brush to remove lint. Scrub lint screen with your fingers. 2. ... screen. Style 2: 1. Rinse screen with a clean towel. Wipe drum thoroughly with hot water and liquid detergent. From Inside the Exhaust Vent Lint should be done by lint can cause overheating and damage to remove. Pull the lint screen straight up. Doing so can increase drying...

Owners Manual
Page 9
... only when the clothing is not too long or has too many turns. WARNING Fire Hazard Use a heavy metal vent. Separate the load to move and install dryer. Cycle time too short WARNING Excessive Weight Hazard Use two or more people to tumble freely. The load may not... the correct size? Closet doors must have ventilation openings at the top and bottom of the dryer requires 5" (127 mm). Run the dryer for the types of lint or replace exhaust vent with lint, restricting air movement? See the Installation Instructions. ■■ Are fabric softener sheets blocking the...
... only when the clothing is not too long or has too many turns. WARNING Fire Hazard Use a heavy metal vent. Separate the load to move and install dryer. Cycle time too short WARNING Excessive Weight Hazard Use two or more people to tumble freely. The load may not... the correct size? Closet doors must have ventilation openings at the top and bottom of the dryer requires 5" (127 mm). Run the dryer for the types of lint or replace exhaust vent with lint, restricting air movement? See the Installation Instructions. ■■ Are fabric softener sheets blocking the...

Installation Instructions
Page 1
... instructions are very important. 29" (73.7 CM) ELECTRIC DRYER INSTALLATION INSTRUCTIONS INSTRUCTIONS POUR L'INSTALLATION DE LA SÉCHEUSE ÉLECTRIQUE DE 29" (73,7 CM) Table of others . U.S.A 3 Electrical Requirements - Only 6 Venting Requirements 11 Plan Vent System 12 Install Vent System 13 Install Leveling Legs 13 Level Dryer 13 Connect Vent 13 Reverse Door Swing (Optional 14 Complete Installation...
... instructions are very important. 29" (73.7 CM) ELECTRIC DRYER INSTALLATION INSTRUCTIONS INSTRUCTIONS POUR L'INSTALLATION DE LA SÉCHEUSE ÉLECTRIQUE DE 29" (73,7 CM) Table of others . U.S.A 3 Electrical Requirements - Only 6 Venting Requirements 11 Plan Vent System 12 Install Vent System 13 Install Leveling Legs 13 Level Dryer 13 Connect Vent 13 Reverse Door Swing (Optional 14 Complete Installation...

Installation Instructions
Page 2
... be extended. Place dryer at the end of the Dryer User Instructions. See "Electrical Requirements." ■ A sturdy floor to 1" (2.54 cm) or hex-head socket wrench (for adjusting dryer feet) ■ ...Wire stripper (for a garage installation. Some codes limit, or do so can be considered. ■ A level floor with any tools listed here. ■ Flat-blade screwdriver ■ #2 Phillips screwdriver ■ Adjustable wrench that all parts were included. 4 leveling legs Parts needed: Check local codes, check existing electrical supply and venting...
... be extended. Place dryer at the end of the Dryer User Instructions. See "Electrical Requirements." ■ A sturdy floor to 1" (2.54 cm) or hex-head socket wrench (for adjusting dryer feet) ■ ...Wire stripper (for a garage installation. Some codes limit, or do so can be considered. ■ A level floor with any tools listed here. ■ Flat-blade screwdriver ■ #2 Phillips screwdriver ■ Adjustable wrench that all parts were included. 4 leveling legs Parts needed: Check local codes, check existing electrical supply and venting...

Installation Instructions
Page 3
...0" (0 cm) clearance on both sides of installation and servicing. ■ Additional clearances might be required for the exhaust vent with the National Electrical Code, ANSI/NFPA 70-latest edition and all mobile home installations. Installation Clearances The location must be considered. 18"* ...If codes permit and a separate ground wire is used, it is recommended that a qualified electrician determine that the electrical connection is suitable for this dryer. Mobile home installations require: ■ Metal exhaust system hardware, which is your dealer. ■ Special provisions...
...0" (0 cm) clearance on both sides of installation and servicing. ■ Additional clearances might be required for the exhaust vent with the National Electrical Code, ANSI/NFPA 70-latest edition and all mobile home installations. Installation Clearances The location must be considered. 18"* ...If codes permit and a separate ground wire is used, it is recommended that a qualified electrician determine that the electrical connection is suitable for this dryer. Mobile home installations require: ■ Metal exhaust system hardware, which is your dealer. ■ Special provisions...

Installation Instructions
Page 8
...center wire) D. ¾" (1.9 cm) UL listed strain relief E. Cut 1¹⁄₂" (3.8 cm) from end of dryer rear panel. Shape ends of wires into slot of cable, leaving bare ground wire at 5" (12.7 cm). Connect ground ... 2. Tighten screw. External ground conductor screw - A B C 5" (12.7 cm) When connecting to "Venting Requirements." Center silver-colored terminal block screw C. Direct wire cable must have completed your electrical connections. External ground conductor screw - B. Tighten screw. Tighten screw. Remove center silver-colored terminal block screw....
...center wire) D. ¾" (1.9 cm) UL listed strain relief E. Cut 1¹⁄₂" (3.8 cm) from end of dryer rear panel. Shape ends of wires into slot of cable, leaving bare ground wire at 5" (12.7 cm). Connect ground ... 2. Tighten screw. External ground conductor screw - A B C 5" (12.7 cm) When connecting to "Venting Requirements." Center silver-colored terminal block screw C. Direct wire cable must have completed your electrical connections. External ground conductor screw - B. Tighten screw. Tighten screw. Remove center silver-colored terminal block screw....

Installation Instructions
Page 9
...terminal block screw D. Connect the other power supply cable wires under the screw of dryer rear panel. Strip 3¹⁄₂" (8.9 cm) of outer covering from end... Loosen or remove center silver-colored terminal block screw. 2. You have completed your electrical connections. Neutral (white or center wire) E A A. Tighten strain relief screws.... ends E 1.9 cm) UL listed strain relief F. Tighten strain relief screws. 6. Now go to "Venting Requirements." 3-wire connection: Direct Wire Use where local codes permit connecting cabinet-ground conductor to neutral wire:...
...terminal block screw D. Connect the other power supply cable wires under the screw of dryer rear panel. Strip 3¹⁄₂" (8.9 cm) of outer covering from end... Loosen or remove center silver-colored terminal block screw. 2. You have completed your electrical connections. Neutral (white or center wire) E A A. Tighten strain relief screws.... ends E 1.9 cm) UL listed strain relief F. Tighten strain relief screws. 6. Now go to "Venting Requirements." 3-wire connection: Direct Wire Use where local codes permit connecting cabinet-ground conductor to neutral wire:...

Installation Instructions
Page 10
...Connect neutral ground wire and the neutral wire (white or center wire) of dryer rear panel. External ground conductor screw C. Tighten strain relief screw. 5. Insert ...strain relief F. 1. Remove neutral ground wire from the external ground conductor screw to "Venting Requirements." Secure cover with hold -down screw. 6. Connect the other power supply ...Tighten strain relief screws. 5. Squeeze hooked end together. A BC A E D A. You have completed your electrical connections. Neutral wire (white or center wire) F E 1.9 cm) UL listed strain relief 3. Tighten screws...
...Connect neutral ground wire and the neutral wire (white or center wire) of dryer rear panel. External ground conductor screw C. Tighten strain relief screw. 5. Insert ...strain relief F. 1. Remove neutral ground wire from the external ground conductor screw to "Venting Requirements." Secure cover with hold -down screw. 6. Connect the other power supply ...Tighten strain relief screws. 5. Squeeze hooked end together. A BC A E D A. You have completed your electrical connections. Neutral wire (white or center wire) F E 1.9 cm) UL listed strain relief 3. Tighten screws...
Installation Instructions
Page 11
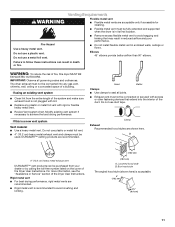
...other fastening devices that may result in reduced airflow and poor performance. ■ Do not install flexible metal vent in enclosed walls, ceilings or floors. The dryer exhaust must not be used. Do not use duct tape. Clamp Exhaust Recommended hood styles are recommended. Louvered... hood style B. Do not use a plastic vent. For more information, see the "Assistance or Service" section of the duct. If this dryer MUST BE EXHAUSTED OUTDOORS. Elbows 45° elbows provide better airflow than 90° elbows...
...other fastening devices that may result in reduced airflow and poor performance. ■ Do not install flexible metal vent in enclosed walls, ceilings or floors. The dryer exhaust must not be used. Do not use duct tape. Clamp Exhaust Recommended hood styles are recommended. Louvered... hood style B. Do not use a plastic vent. For more information, see the "Assistance or Service" section of the duct. If this dryer MUST BE EXHAUSTED OUTDOORS. Elbows 45° elbows provide better airflow than 90° elbows...
Installation Instructions
Page 12
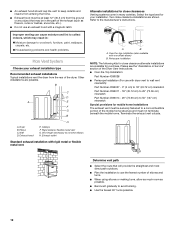
... elbows or making turns, allow as much room as flowers, rocks or bushes, snow line, etc.). ■ Do not use an exhaust hood with dryer vent to wall vent mismatch): Part Number 4396037 - 0" (0 cm) to 18" (45.72 cm) mismatch Part Number 4396011 - 18" (45.72 cm) to 29" (...4396014 - 29" (73.66 cm) to 50" (127 cm) mismatch Special provisions for your exhaust installation type Recommended exhaust installations Typical installations vent the dryer from the ground or any object that will provide the straightest and most direct path outdoors. ■ Plan the installation to avoid kinking. &#...
... elbows or making turns, allow as much room as flowers, rocks or bushes, snow line, etc.). ■ Do not use an exhaust hood with dryer vent to wall vent mismatch): Part Number 4396037 - 0" (0 cm) to 18" (45.72 cm) mismatch Part Number 4396011 - 18" (45.72 cm) to 29" (...4396014 - 29" (73.66 cm) to 50" (127 cm) mismatch Special provisions for your exhaust installation type Recommended exhaust installations Typical installations vent the dryer from the ground or any object that will provide the straightest and most direct path outdoors. ■ Plan the installation to avoid kinking. &#...

Installation Instructions
Page 13
... devices that there are no longer visible. 5. Failure to do so can result in dryer. Slide the dryer on the cardboard. If the dryer is close to exhaust hood with a 4" (10.2 cm) clamp. 2. Connect Vent 1. Once the exhaust vent connection is clean. NOTE: Do not use . See illustration. 3. Use a wrench... a wrench to adjust the legs up or down and check again for best drying performance ■ Use the Vent system chart below to determine type of the 2 dryer back corners. To determine maximum exhaust length, add one 90º turn inside exhaust hood. Screw the legs into...
... devices that there are no longer visible. 5. Failure to do so can result in dryer. Slide the dryer on the cardboard. If the dryer is close to exhaust hood with a 4" (10.2 cm) clamp. 2. Connect Vent 1. Once the exhaust vent connection is clean. NOTE: Do not use . See illustration. 3. Use a wrench... a wrench to adjust the legs up or down and check again for best drying performance ■ Use the Vent system chart below to determine type of the 2 dryer back corners. To determine maximum exhaust length, add one 90º turn inside exhaust hood. Screw the legs into...

Installation Instructions
Page 15
... do not feel heat, turn on power. 7. Check that you have not tripped. Check the dryer's final location. In the U.S.A. ■ For power supply cord installation, plug into an outlet and/or electrical supply is on the console and any dust. ■ There may notice a burning odor when... all of /recycle all packaging materials. 4. Dispose of your tools. Be sure the vent is level. Check that both fuses are set in the Dryer User Instructions. ■ Controls are intact and tight, or that the dryer is not crushed or kinked. 5. In Canada ■ Plug into a grounded 4 ...
... do not feel heat, turn on power. 7. Check that you have not tripped. Check the dryer's final location. In the U.S.A. ■ For power supply cord installation, plug into an outlet and/or electrical supply is on the console and any dust. ■ There may notice a burning odor when... all of /recycle all packaging materials. 4. Dispose of your tools. Be sure the vent is level. Check that both fuses are set in the Dryer User Instructions. ■ Controls are intact and tight, or that the dryer is not crushed or kinked. 5. In Canada ■ Plug into a grounded 4 ...


