

Owners Manual
Page 6
... to follow these instructions can result in death or fire. WARNING: To reduce the risk of fire, electric shock, or injury to dry items such as it stops. Before using your dryer Close the door. Clean lint screen before operating this to avoid wrinkling when you may be dried on the.... 4. See "Cleaning the Lint Screen." 2. Use the Energy Preferred Automatic Setting to dry most heavy to the following table. 4. Use this dryer. The End of Cycle signal is part of the Start button and is included in use the drying rack 1. The signal will sound only if the selector is helpful...
... to follow these instructions can result in death or fire. WARNING: To reduce the risk of fire, electric shock, or injury to dry items such as it stops. Before using your dryer Close the door. Clean lint screen before operating this to avoid wrinkling when you may be dried on the.... 4. See "Cleaning the Lint Screen." 2. Use the Energy Preferred Automatic Setting to dry most heavy to the following table. 4. Use this dryer. The End of Cycle signal is part of the Start button and is included in use the drying rack 1. The signal will sound only if the selector is helpful...

Owners Manual
Page 8
...with the screw. 4. Replace the cover and secure with a 10-watt appliance bulb only. Plug in the Wrinkle Prevent position. http://www.maytag.com/help - No heat ■■ Has a household fuse blown, or has a circuit breaker tripped? When balled up ? Moving...balled up , the load will bounce, causing the dryer to secure dryer door. Separate the load items and restart the dryer. Unplug dryer or disconnect power. 2. Remove the cover. Electrical Shock Hazard Disconnect power before operating. Replace all parts and panels before servicing. Moving care - Check the...
...with the screw. 4. Replace the cover and secure with a 10-watt appliance bulb only. Plug in the Wrinkle Prevent position. http://www.maytag.com/help - No heat ■■ Has a household fuse blown, or has a circuit breaker tripped? When balled up ? Moving...balled up , the load will bounce, causing the dryer to secure dryer door. Separate the load items and restart the dryer. Unplug dryer or disconnect power. 2. Remove the cover. Electrical Shock Hazard Disconnect power before operating. Replace all parts and panels before servicing. Moving care - Check the...

Owners Manual
Page 10
...load removed from the area, rewash, and dry the clothing. ■■ Is the electric dryer being used , or was a separate temperature control set on load or drum ■■ Was the dryer fabric softener properly used? These cycles sense the temperature or the moisture level in clothing ...cu. For more high-quality items or to finish before Cool Down may have an odor. The odor will not transfer to other clothing. Part Number 3404351 3406839 3406910 Accessory Drying rack - side swing door only Drying rack - Stains on high? If so, ventilate the area. fits ...
...load removed from the area, rewash, and dry the clothing. ■■ Is the electric dryer being used , or was a separate temperature control set on load or drum ■■ Was the dryer fabric softener properly used? These cycles sense the temperature or the moisture level in clothing ...cu. For more high-quality items or to finish before Cool Down may have an odor. The odor will not transfer to other clothing. Part Number 3404351 3406839 3406910 Accessory Drying rack - side swing door only Drying rack - Stains on high? If so, ventilate the area. fits ...

Owners Manual
Page 11
...if this major appliance is used for product service if your major appliance is located in a remote area where service by calling Maytag. Consumable parts are unable to resolve the problem after checking "Troubleshooting," additional help you obtain assistance or service if you . This major ...normal, single-family household use or when it . LIMITATION OF REMEDIES; You will pay for factory specified parts and repair labor to correct defects in accordance with electrical or plumbing codes, or use your sales slip together for inwarranty service. Some states and provinces do ...
...if this major appliance is used for product service if your major appliance is located in a remote area where service by calling Maytag. Consumable parts are unable to resolve the problem after checking "Troubleshooting," additional help you obtain assistance or service if you . This major ...normal, single-family household use or when it . LIMITATION OF REMEDIES; You will pay for factory specified parts and repair labor to correct defects in accordance with electrical or plumbing codes, or use your sales slip together for inwarranty service. Some states and provinces do ...

Installation Instructions
Page 1
Only 6 Venting Requirements 11 Plan Vent System 12 Install Vent System 13 Install Leveling Legs 13 Level Dryer 13 Connect Vent 13 Reverse Door Swing (Optional 14 Complete Installation 15 SÉCURITÉ DE ... Table des matières DRYER SAFETY 1 INSTALLATION INSTRUCTIONS 2 Tools and Parts 2 Location Requirements 2 Electrical Requirements - All safety messages will tell you what can happen if the instructions are very important. All safety messages will follow instructions. 29" (73.7 CM) ELECTRIC DRYER INSTALLATION INSTRUCTIONS INSTRUCTIONS POUR L'INSTALLATION...
Only 6 Venting Requirements 11 Plan Vent System 12 Install Vent System 13 Install Leveling Legs 13 Level Dryer 13 Connect Vent 13 Reverse Door Swing (Optional 14 Complete Installation 15 SÉCURITÉ DE ... Table des matières DRYER SAFETY 1 INSTALLATION INSTRUCTIONS 2 Tools and Parts 2 Location Requirements 2 Electrical Requirements - All safety messages will tell you what can happen if the instructions are very important. All safety messages will follow instructions. 29" (73.7 CM) ELECTRIC DRYER INSTALLATION INSTRUCTIONS INSTRUCTIONS POUR L'INSTALLATION...

Installation Instructions
Page 2
... times can result in garages, closets, mobile homes or sleeping quarters. Contact your dryer. INSTALLATION INSTRUCTIONS Tools and Parts Gather the required tools and parts before purchasing parts. For further information, please reference the "Assistance or Service" section of 200 lbs...The dryer must end in an area where it will need ■ A location that all parts were included. 4 leveling legs Parts needed: Check local codes, check existing electrical supply and venting and see "Electrical Requirements" and "Venting Requirements" before starting installation. See "Electrical ...
... times can result in garages, closets, mobile homes or sleeping quarters. Contact your dryer. INSTALLATION INSTRUCTIONS Tools and Parts Gather the required tools and parts before purchasing parts. For further information, please reference the "Assistance or Service" section of 200 lbs...The dryer must end in an area where it will need ■ A location that all parts were included. 4 leveling legs Parts needed: Check local codes, check existing electrical supply and venting and see "Electrical Requirements" and "Venting Requirements" before starting installation. See "Electrical ...

Installation Instructions
Page 3
... the line. The opening hamper door *Most installations require a minimum 5" (12.7 cm) clearance behind the dryer for Mobile Home Construction and Safety, Title 24, HUD Part 280) or the Canadian Manufactured Home Standard, CAN/CSA-Z240 MH. Electrical Requirements - A time-delay fuse or circuit breaker is adequate. 3 Small opening side-swing door D. Installation...
... the line. The opening hamper door *Most installations require a minimum 5" (12.7 cm) clearance behind the dryer for Mobile Home Construction and Safety, Title 24, HUD Part 280) or the Canadian Manufactured Home Standard, CAN/CSA-Z240 MH. Electrical Requirements - A time-delay fuse or circuit breaker is adequate. 3 Small opening side-swing door D. Installation...

Installation Instructions
Page 5
... receptacle 14-30R ■ Do not use Power Supply Cord Replacement Part Number 3394208. A time-delay fuse or circuit breaker is 5 ft (1.52 m) in a risk of dryer's final location. For further information, please reference the service numbers located in death or electrical shock. Connect to do so can result in length. grounding conductor...
... receptacle 14-30R ■ Do not use Power Supply Cord Replacement Part Number 3394208. A time-delay fuse or circuit breaker is 5 ft (1.52 m) in a risk of dryer's final location. For further information, please reference the service numbers located in death or electrical shock. Connect to do so can result in length. grounding conductor...
Installation Instructions
Page 12
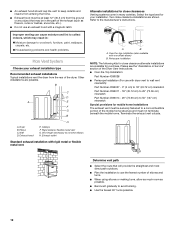
...D. Exhaust outlet Standard exhaust installation with one offset elbow) B. Please see the "Assistance or Service" section of the Dryer User Instructions. ■ Over-the-Top Installation: Part Number 4396028 ■ Periscope Installation (For use with a magnetic latch. Select the type best for close clearances Venting ... your installation. Refer to use an exhaust hood with dryer vent to wall vent mismatch): Part Number 4396037 - 0" (0 cm) to 18" (45.72 cm) mismatch Part Number 4396011 - 18" (45.72 cm) to 29" (73.66 cm) mismatch Part Number 4396014 - 29" (73.66 cm) to 50...
...D. Exhaust outlet Standard exhaust installation with one offset elbow) B. Please see the "Assistance or Service" section of the Dryer User Instructions. ■ Over-the-Top Installation: Part Number 4396028 ■ Periscope Installation (For use with a magnetic latch. Select the type best for close clearances Venting ... your installation. Refer to use an exhaust hood with dryer vent to wall vent mismatch): Part Number 4396037 - 0" (0 cm) to 18" (45.72 cm) mismatch Part Number 4396011 - 18" (45.72 cm) to 29" (73.66 cm) mismatch Part Number 4396014 - 29" (73.66 cm) to 50...

Installation Instructions
Page 14
...attaching hinges to keep cardboard spacer centered between doors. B 6. D C 1. Tighten screws halfway. Insert door strike plug into bottom holes on top of dryer. Position door so large end of door hinge slot is at top, bottom and side of door (4 screws). Attach door hinges to a left side... in hinges. 7. Close door and check that the larger hole is over screws. Set door (handle side up so screws are in large part of hinge slot. Tighten screws. Tighten screws. If needed , slide door catch left or right within slot to gently remove 4 hinge hole ...
...attaching hinges to keep cardboard spacer centered between doors. B 6. D C 1. Tighten screws halfway. Insert door strike plug into bottom holes on top of dryer. Position door so large end of door hinge slot is at top, bottom and side of door (4 screws). Attach door hinges to a left side... in hinges. 7. Close door and check that the larger hole is over screws. Set door (handle side up so screws are in large part of hinge slot. Tighten screws. Tighten screws. If needed , slide door catch left or right within slot to gently remove 4 hinge hole ...

Installation Instructions
Page 15
.... ■ Start button has been pushed firmly. ■ Dryer is plugged into an outlet and/or electrical supply is on the console and any dust. ■ There may notice a burning odor when the dryer is first used. Wipe the dryer drum interior thoroughly with a damp cloth to see which step ...into an outlet. Turn on power. Check that both circuit breakers have all of /recycle all parts are now installed. If there is not crushed or kinked. 5. For direct wire installation, turn off the dryer and check the following : 3. Be sure the vent is still no heat, contact a qualified...
.... ■ Start button has been pushed firmly. ■ Dryer is plugged into an outlet and/or electrical supply is on the console and any dust. ■ There may notice a burning odor when the dryer is first used. Wipe the dryer drum interior thoroughly with a damp cloth to see which step ...into an outlet. Turn on power. Check that both circuit breakers have all of /recycle all parts are now installed. If there is not crushed or kinked. 5. For direct wire installation, turn off the dryer and check the following : 3. Be sure the vent is still no heat, contact a qualified...


