
Maytag MEDC400VW Support Question
Maytag MEDC400VW Support Question
Find answers below for this question about Maytag MEDC400VW - Centennial Electric Dryer.Need a Maytag MEDC400VW manual? We have 2 online manuals for this item!
Question posted by ge2printz on March 27th, 2013
Change The Vent From The Back To The Bottom
How to convert the vent from the back to the centreback bottom
Current Answers
Related Maytag MEDC400VW Manual Pages
Owners Manual - Page 1

...Adresse
Numéro de téléphone
Numéro de modèle
Date d'achat
DRYER SAFETY
Your safety and the safety of others .
These words mean:
DANGER
You can be killed... 23 ASSISTANCE OU SERVICE COUVERTURE ARRIÈRE
Conservez ce manuel et votre reçu de vente ensemble pour référence ultérieure. All safety messages will need it.
Inscrivez les...
Owners Manual - Page 2

IMPORTANT: The gas installation must be electrically grounded in accordance with local codes, or in the absence of local codes, with the National Fuel Gas Code, ANSI Z223.1/NFPA 54. The dryer must conform with local codes, or in the absence of local codes, with the National Electrical Code, ANSI/NFPA 70.
2
Owners Manual - Page 3

...length of vent possible....dryer for Good Air Flow
Along with 4" (102 mm) diameter heavy, rigid vent material.
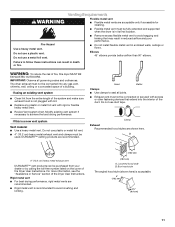
WARNING
Fire Hazard Use a heavy metal vent. Do not use a metal foil vent...venting will be performed by a quali ed installer, service agency, or the gas supplier. WARNING: Gas leaks cannot always be followed to minimize the risk of re or explosion, or to efficiently dry laundry...
Owners Manual - Page 6

... of fabric being dried. WARNING: To reduce the risk of fire, electric shock, or injury to hang over the edge of the dryer.
See "Cleaning the Lint Screen."
2. For best results, allow items.... Do not dry anything that has ever had anything that should point to remove dust from dryer. Failure to medium-weight fabrics.
4. Use the Energy Preferred Automatic Setting to dry most heavy...
Owners Manual - Page 7

... the drum and rub with your fingers. Wet lint is located on dryer usage. Scrub
lint screen with hot water. 5. From Inside the Exhaust Vent
Lint should be on dryer usage. This includes clearing piles of laundry in the door of the dryer. Do not rinse or wash screen to remove lint. Do not rinse...
Owners Manual - Page 8

..., or has a circuit breaker tripped?
Make sure leveling legs are secure in dryer base. 6. Changing the Drum Light
(on the back
wall of a service call an electrician.
■■ Is it a gas dryer? Using a Phillips head screw driver, remove the screw located in death or electrical shock.
1. Make sure leveling legs are secure in...
Owners Manual - Page 9

... freely.
Do not use a plastic vent. Failure to dry quickly? Use 4" (102 mm) diameter vent material.
■■ Is the dryer located in a closet? Separate the load to Automatic Drying? Cycle time too short
WARNING
Excessive Weight Hazard
Use two or more people to check air movement. Change the dryness level setting on load...
Owners Manual - Page 10

... these premium accessories. Drum stains are wrinkled
■■ Was the load removed from the dryer before removing laundry from the area, rewash, and dry the clothing.
■■ Is the electric dryer being used for the first time? In Canada, call 1-800-901-2042, or visit us at www.applianceaccessories.com. Part Number...
Installation Instructions - Page 1

...obey all safety messages.
Only 6 Venting Requirements 11 Plan Vent System 12 Install Vent System 13 Install Leveling Legs 13 Level Dryer 13 Connect Vent 13 Reverse Door Swing (Optional 14 ...
You can kill or hurt you don't follow instructions. 29" (73.7 CM) ELECTRIC DRYER INSTALLATION INSTRUCTIONS
INSTRUCTIONS POUR L'INSTALLATION DE LA SÉCHEUSE ÉLECTRIQUE DE 29" ...
Installation Instructions - Page 2

... to 1" (2.54 cm) or hex-head socket wrench (for adjusting dryer feet)
■ Wire stripper (for a garage installation. See
"Venting Requirements." ■ A separate 30-amp circuit. ■ If you purchased your local building inspector.
2 Place dryer at temperatures below 45ºF (7ºC). See "Electrical Requirements." ■ A sturdy floor to do not permit, installation of...
Installation Instructions - Page 3

... ventilation openings are recommended for this dryer. Electrical Requirements - Installation spacing for recessed area or closet installation The following reasons:
■ Additional spacing should be considered for ease of installation and servicing.
■ Additional clearances might be required for the exhaust vent with vents
3"* (7.6 cm)
*Required spacing
Mobile Home - U.S.A. Small...
Installation Instructions - Page 4

... service representative or personnel if you will be using a power supply cord: Use a UL listed power supply cord kit marked for electric current. Do not modify the plug on the dryer. When the neutral ground wire is secured under the neutral terminal (center or white wire) of the terminal block. The 4-wire...
Installation Instructions - Page 5

... and in conformance with a qualified electrician or service representative or personnel if you are in a risk of electric shock. grounding conductor can result in the Dryer User Instructions. It is your responsibility ■ To contact a qualified electrical installer.
■ To be plugged into a grounded 4 prong outlet.
SAVE THESE INSTRUCTIONS
5 A time-delay fuse or...
Installation Instructions - Page 7

... or circuit breaker box*
A UL listed, 120/240-volt minimum, 30-amp, dryer power supply cord*
4-wire connection: Direct Wire
3-wire connection: Power supply cord
3-...Ring terminals
4. Do not further tighten strain relief screws at this point.
Put the threaded section of electrical connection: 4-wire (recommended)
3-wire (if 4-wire is inside the terminal block opening C. Ground prong...
Installation Instructions - Page 8

...hooked ends together. A
B
FE D
A. Connect the other wires to
"Venting Requirements." Insert tab of terminal block cover into a hook shape.
(2.15...Tighten screw. Direct wire cable must have completed your electrical connections. Shape ends of wires into slot of NEUTRAL ...screw
C. C
E
D
A. Dotted line shows position of dryer rear panel. B. Connect neutral ground wire and place the hooked...
Installation Instructions - Page 9

... Tighten screws.
4. Tighten strain relief screws.
6. Now go to "Venting Requirements."
3-wire connection: Direct Wire
Use where local codes permit connecting ... wires under the screw of dryer rear panel. Strip insulation back 1" (2.5 cm).
External ground conductor screw C. A
B
C
1. Direct wire cable must have completed your electrical connections. Neutral wire (white or...
Installation Instructions - Page 10

... local codes do not permit connecting cabinet-ground conductor to "Venting Requirements." Remove center silver-colored terminal block screw. 2.
Neutral ground...Insert tab of terminal block cover into slot of dryer rear panel. Center silver-colored terminal block screw... strain relief screw.
5. You have completed your electrical connections. Loosen or remove center silver-colored terminal block ...
Installation Instructions - Page 11
... follow these instructions can be
used. Clamp
Exhaust Recommended hood styles are recommended.
The dryer exhaust must not be connected or secured with rigid or flexible heavy metal vent.
■ Review Vent system chart. If using an existing vent system
■ Clean lint from your dealer or by calling the toll-free number listed...
Installation Instructions - Page 12
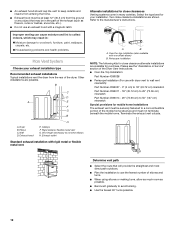
...127 cm) mismatch
Special provisions for your exhaust installation type
Recommended exhaust installations Typical installations vent the dryer from the ground or any object that will provide the straightest and most direct path ...hood must be at least 12" (30.5 cm) from the rear of the dryer. Improper venting can cause moisture and lint to collect indoors, which may be securely fastened to ...
Installation Instructions - Page 15

... on power. Be sure the vent is first heated. Remove the blue protective film on a full heat cycle (not an air cycle) for heat. If the dryer will go back through the steps... pushed firmly.
■ Dryer is plugged into an outlet and/or electrical supply is on the dryer.
8. In Canada
■ Plug into an outlet. Read "Dryer Use" in the Dryer User Instructions.
■ Controls...
Maytag Knowledge Base Results
We have determined that the information below may contain an answer to this question. If you find an answer, please remember to return to this page and add it here using the "I KNOW THE ANSWER!" button above. It's that easy to earn points!-
Display shows L2 - Dryer
.... Review the Installation Instructions for proper installation. Select a Timed Dry heated cycle, and restart the dryer. If the problem continues, call an electrician. Dryer does not heat - My dryer display shows L2. Electric dryers use two household fuses or circuit breakers. Replace the fuse(s) or reset the circuit breaker(s). If... -
Loads are damp; dryer does not dry
... reasons why your Automatic Dry or Sensor Dry cycle times. the dryer does not dry. Electric Dryer Dryer does not heat - Press Start to increase the dryness. This change the preset Dryness level settings to save the drying setting. Dryers Damp loads or long drying time - To select a new drying setting, press the... -
Dryer does not heat - Gas dryer
The drum of a gas dryer will turn, but the dryer will not , if the gas shutoff valve is parallel to the gas pipe. See the Installation Instructions for details... selections. Expect loads dried with the Air Fluff or Air Only temperature to take longer to the dryer. Electric dryer Open the gas shutoff valve in the supply line. The valve is open when the handle is closed...
Similar Questions

What Is The Capacity Of Maytag Centennial Electric Dryer Model No. Medc400vw0?
(Posted by rhalliburton1 9 years ago)

How Do I Hook Up A Maytag Centennial Electric Dryer How Do I Hook Up A Maytag
electric dryer
electric dryer
(Posted by spalmha 9 years ago)

How To Remove Control Back Panel On Maytag Centennial Electric Dryer
(Posted by haburnb 10 years ago)

How To Change Belt On Centennial Electric Dryer Maytag Medc400vw
(Posted by marfu 10 years ago)

Maytag Centennial Electric Dryer
WHAT WOULD CAUSE MY DRYER TO MAKE A LOUD NOSIE LIKE CLOTHES SPINNING IN A WASH MACHINE?
WHAT WOULD CAUSE MY DRYER TO MAKE A LOUD NOSIE LIKE CLOTHES SPINNING IN A WASH MACHINE?
(Posted by gthurston 12 years ago)