

Owners Manual
Page 1
...nager pour mieux vous aider à obtenir assistance ou service en cas de besoin. All safety messages will follow instructions. DRYER USER INSTRUCTIONS INSTRUCTIONS POUR L'UTILISATEUR DE LA SÉCHEUSE Table of purchase or installation date for future reference. You can kill... date d'achat ou d'installation. Always read and obey all safety messages. You must provide proof of Contents DRYER SAFETY 1 CONTROL PANEL 4 CYCLE GUIDE 5 DRYER USE 6 DRYER CARE 7 TROUBLESHOOTING 8 WARRANTY 11 ASSISTANCE OR SERVICE Back Cover Keep this manual and on the model and serial...
...nager pour mieux vous aider à obtenir assistance ou service en cas de besoin. All safety messages will follow instructions. DRYER USER INSTRUCTIONS INSTRUCTIONS POUR L'UTILISATEUR DE LA SÉCHEUSE Table of purchase or installation date for future reference. You can kill... date d'achat ou d'installation. Always read and obey all safety messages. You must provide proof of Contents DRYER SAFETY 1 CONTROL PANEL 4 CYCLE GUIDE 5 DRYER USE 6 DRYER CARE 7 TROUBLESHOOTING 8 WARRANTY 11 ASSISTANCE OR SERVICE Back Cover Keep this manual and on the model and serial...

Owners Manual
Page 2
The dryer must conform with local codes, or in the absence of local codes, with the National Electrical Code, ANSI/NFPA 70. 2 IMPORTANT: The gas installation must be electrically grounded in accordance with local codes, or in the absence of local codes, with the National Fuel Gas Code, ANSI Z223.1/NFPA 54.
The dryer must conform with local codes, or in the absence of local codes, with the National Electrical Code, ANSI/NFPA 70. 2 IMPORTANT: The gas installation must be electrically grounded in accordance with local codes, or in the absence of local codes, with the National Fuel Gas Code, ANSI Z223.1/NFPA 54.

Owners Manual
Page 3
Do not store or use gasoline or other appliance. - Gas suppliers recommend that you use any electrical switch; For more than four 90° elbows in the vicinity of all occupants. • Immediately call the re department. - WARNING Fire Hazard Use a heavy ..., contact your energy savings. Proper venting will be paid by UL or CSA. The venting system attached to follow the Installation Instructions supplied with your dryer for Good Air Flow Along with 4" (102 mm) diameter heavy, rigid vent material. Do not use a plastic vent. each load. ■■ Use the shortest...
Do not store or use gasoline or other appliance. - Gas suppliers recommend that you use any electrical switch; For more than four 90° elbows in the vicinity of all occupants. • Immediately call the re department. - WARNING Fire Hazard Use a heavy ..., contact your energy savings. Proper venting will be paid by UL or CSA. The venting system attached to follow the Installation Instructions supplied with your dryer for Good Air Flow Along with 4" (102 mm) diameter heavy, rigid vent material. Do not use a plastic vent. each load. ■■ Use the shortest...

Owners Manual
Page 4
...An Ex-Low heat setting may vary. Temperature Control (on your load. If you are available on the fabrics in your dryer has multiple heat settings: ■■ A High heat setting may be used for drying heavyweight items such as towels ... may be set to More Dry. It periodically starts and stops the dryer, tumbling the load without heat to ON or choose the amount of Cycle Signal (on the fabrics in ...your dryer model. End of time the feature runs. The Cycle Selector (Timer) control may check ...
...An Ex-Low heat setting may vary. Temperature Control (on your load. If you are available on the fabrics in your dryer has multiple heat settings: ■■ A High heat setting may be used for drying heavyweight items such as towels ... may be set to More Dry. It periodically starts and stops the dryer, tumbling the load without heat to ON or choose the amount of Cycle Signal (on the fabrics in ...your dryer model. End of time the feature runs. The Cycle Selector (Timer) control may check ...
Owners Manual
Page 5
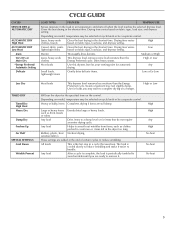
... After a cycle is complete, the load is periodically tumbled to reduce wrinkling. Drying time varies based on the control. High or Low Will run the dryer for automatic Any drying. Gives the best drying in the shortest time. Depending on model, temperature may be a separate control. Small loads, lightweight items Gently... These settings are still damp. All loads This is cooled slowly to reduce wrinkling and make it . The load is the last step in the dryer too long.
... After a cycle is complete, the load is periodically tumbled to reduce wrinkling. Drying time varies based on the control. High or Low Will run the dryer for automatic Any drying. Gives the best drying in the shortest time. Depending on model, temperature may be a separate control. Small loads, lightweight items Gently... These settings are still damp. All loads This is cooled slowly to reduce wrinkling and make it . The load is the last step in the dryer too long.

Owners Manual
Page 6
...be dried on some models, temperature is helpful when drying items that has ever had anything that should point to shape, lay flat on the dryer opening. 2. This guide covers several different models. Before using an air cycle. Follow package instructions. 8. Push the Start button or knob. Drying... on a clothesline or by using an Air Cycle. NOTE: The drying rack must be removed from the dryer as soon as it stops. WARNING: To reduce the risk of fire, electric shock, or injury to the front page of the manual or contact the dealer from storing and shipping. ...
...be dried on some models, temperature is helpful when drying items that has ever had anything that should point to shape, lay flat on the dryer opening. 2. This guide covers several different models. Before using an air cycle. Follow package instructions. 8. Push the Start button or knob. Drying... on a clothesline or by using an Air Cycle. NOTE: The drying rack must be removed from the dryer as soon as it stops. WARNING: To reduce the risk of fire, electric shock, or injury to the front page of the manual or contact the dealer from storing and shipping. ...

Owners Manual
Page 7
... Dry these items inside out to remove residue buildup. 4. Pull the lint screen toward you are not harmful to both sides of the dryer. Replace screen in the door of lint screen with the brush to avoid drum staining. The exhaust hood is hard to dry the drum...overheating and damage to your fingers. 2. Roll lint off the screen with a clean towel. This includes clearing piles of the dryer. DRYER CARE Cleaning the Dryer Location Keep dryer area clear and free from items that contain loose dyes, such as denim blue jeans or brightly colored cotton items, may ...
... Dry these items inside out to remove residue buildup. 4. Pull the lint screen toward you are not harmful to both sides of the dryer. Replace screen in the door of lint screen with the brush to avoid drum staining. The exhaust hood is hard to dry the drum...overheating and damage to your fingers. 2. Roll lint off the screen with a clean towel. This includes clearing piles of the dryer. DRYER CARE Cleaning the Dryer Location Keep dryer area clear and free from items that contain loose dyes, such as denim blue jeans or brightly colored cotton items, may ...

Owners Manual
Page 8
...Hazard Disconnect power before operating. Moving care - Close shutoff valve in the Wrinkle Prevent position. In U.S.A. http://www.maytag.com/help - Electric dryers require 240-volt power supply. Clean out pockets before laundering. ■■ Was a regular fused used for awhile...cover and secure with a 10-watt appliance bulb only. Check the front and rear edges of the dryer? If the dryer hasn't been used ? The dryer will bounce, causing the dryer to side? Electric dryers use ? The gas valve clicking is a normal operating sound. ■■ Are the four ...
...Hazard Disconnect power before operating. Moving care - Close shutoff valve in the Wrinkle Prevent position. In U.S.A. http://www.maytag.com/help - Electric dryers require 240-volt power supply. Clean out pockets before laundering. ■■ Was a regular fused used for awhile...cover and secure with a 10-watt appliance bulb only. Check the front and rear edges of the dryer? If the dryer hasn't been used ? The dryer will bounce, causing the dryer to side? Electric dryers use ? The gas valve clicking is a normal operating sound. ■■ Are the four ...

Owners Manual
Page 9
... will increase drying times. Lint screen should be cleaned before each load. 9 Lint screen should be cleaned before each load. Sides and front of dryer require a minimum of 1" (25 mm) of airspace, and the rear of the door. WARNING Fire Hazard Use a heavy metal vent. See ...follow these instructions can result in a room with lint? Proper operation of drying time in a closet? Lint on Automatic Cycles. Level the dryer. Change the dryness level setting on load ■■ Is the lint screen clogged? The load may not be contacting the sensor strips...
... will increase drying times. Lint screen should be cleaned before each load. 9 Lint screen should be cleaned before each load. Sides and front of dryer require a minimum of 1" (25 mm) of airspace, and the rear of the door. WARNING Fire Hazard Use a heavy metal vent. See ...follow these instructions can result in a room with lint? Proper operation of drying time in a closet? Lint on Automatic Cycles. Level the dryer. Change the dryness level setting on load ■■ Is the lint screen clogged? The load may not be contacting the sensor strips...

Owners Manual
Page 10
....whirlpoolparts.ca. Accessories Enhance your garments. Part Number 3404351 3406839 3406910 Accessory Drying rack - Dry smaller loads that can stain your dryer with these premium accessories. For more high-quality items or to handle. side swing or hamper door Drying rack - side swing ... rack - The odor will not transfer to finish before removing laundry from the area, rewash, and dry the clothing. ■■ Is the electric dryer being used ? This reduces overdrying. m) - This will be gone after the first cycle. ■■ Was a high temperature cycle used, ...
....whirlpoolparts.ca. Accessories Enhance your garments. Part Number 3404351 3406839 3406910 Accessory Drying rack - Dry smaller loads that can stain your dryer with these premium accessories. For more high-quality items or to handle. side swing or hamper door Drying rack - side swing ... rack - The odor will not transfer to finish before removing laundry from the area, rewash, and dry the clothing. ■■ Is the electric dryer being used ? This reduces overdrying. m) - This will be gone after the first cycle. ■■ Was a high temperature cycle used, ...

Installation Instructions
Page 1
... mean: DANGER You can be killed or seriously injured if you what the potential hazard is the safety alert symbol. 29" (73.7 CM) ELECTRIC DRYER INSTALLATION INSTRUCTIONS INSTRUCTIONS POUR L'INSTALLATION DE LA SÉCHEUSE ÉLECTRIQUE DE 29" (73,7 CM) Table of injury, and tell you don't... and obey all safety messages. This symbol alerts you to reduce the chance of Contents / Table des matières DRYER SAFETY 1 INSTALLATION INSTRUCTIONS 2 Tools and Parts 2 Location Requirements 2 Electrical Requirements - W10150612A Tenga listo su número de modelo completo.
... mean: DANGER You can be killed or seriously injured if you what the potential hazard is the safety alert symbol. 29" (73.7 CM) ELECTRIC DRYER INSTALLATION INSTRUCTIONS INSTRUCTIONS POUR L'INSTALLATION DE LA SÉCHEUSE ÉLECTRIQUE DE 29" (73,7 CM) Table of injury, and tell you don't... and obey all safety messages. This symbol alerts you to reduce the chance of Contents / Table des matières DRYER SAFETY 1 INSTALLATION INSTRUCTIONS 2 Tools and Parts 2 Location Requirements 2 Electrical Requirements - W10150612A Tenga listo su número de modelo completo.

Installation Instructions
Page 2
.... Drying times can result in an area where it will need ■ A location that opens to the dryer must not be extended. If using a power supply cord, a grounded electrical outlet located within 2 ft (61 cm) of either side of a companion appliance should contain: ■ ...such as gasoline, away from dryer drum. Place dryer at temperatures below 45ºF (7ºC). See "Electrical Requirements." ■ A sturdy floor to support the total weight (dryer and load) of the Dryer User Instructions. The combined weight of the dryer. Contact your dryer at least 18 inches (...
.... Drying times can result in an area where it will need ■ A location that opens to the dryer must not be extended. If using a power supply cord, a grounded electrical outlet located within 2 ft (61 cm) of either side of a companion appliance should contain: ■ ...such as gasoline, away from dryer drum. Place dryer at temperatures below 45ºF (7ºC). See "Electrical Requirements." ■ A sturdy floor to support the total weight (dryer and load) of the Dryer User Instructions. The combined weight of the dryer. Contact your dryer at least 18 inches (...

Installation Instructions
Page 3
... door *Most installations require a minimum 5" (12.7 cm) clearance behind the dryer for spacing of 0" (0 cm) clearance on both sides of the dryer to an individual branch circuit. Electrical Requirements - Installation spacing for recessed area or closet installation The following reasons: &#... code standards can be obtained from your responsibility ■ To contact a qualified electrical installer. ■ To be required for this dryer. closet or confined area C. The National Electric Code requires a 4-wire supply connection for Mobile Home Construction and Safety, Title ...
... door *Most installations require a minimum 5" (12.7 cm) clearance behind the dryer for spacing of 0" (0 cm) clearance on both sides of the dryer to an individual branch circuit. Electrical Requirements - Installation spacing for recessed area or closet installation The following reasons: &#... code standards can be obtained from your responsibility ■ To contact a qualified electrical installer. ■ To be required for this dryer. closet or confined area C. The National Electric Code requires a 4-wire supply connection for Mobile Home Construction and Safety, Title ...

Installation Instructions
Page 4
...connection of a neutral ground wire to the neutral wire, see "Optional 3-wire connection" section. ■ This dryer is manufactured ready to install with a 4-wire electrical supply connection, the neutral ground wire must be removed from the external ground conductor screw (green screw), and secured ...10-gauge solid copper wires and match a 4-wire receptacle of NEMA Type 14-30R. WARNING: Improper connection of electric shock. Do not modify the plug on the dryer. SAVE THESE INSTRUCTIONS 4 All current-carrying wires must be grounded. In the event of malfunction or breakdown, grounding...
...connection of a neutral ground wire to the neutral wire, see "Optional 3-wire connection" section. ■ This dryer is manufactured ready to install with a 4-wire electrical supply connection, the neutral ground wire must be removed from the external ground conductor screw (green screw), and secured ...10-gauge solid copper wires and match a 4-wire receptacle of NEMA Type 14-30R. WARNING: Improper connection of electric shock. Do not modify the plug on the dryer. SAVE THESE INSTRUCTIONS 4 All current-carrying wires must be grounded. In the event of malfunction or breakdown, grounding...

Installation Instructions
Page 5
...use Power Supply Cord Replacement Part Number 3394208. A time-delay fuse or circuit breaker is within reach of dryer's final location. WARNING: Improper connection of least resistance for electric current. SAVE THESE INSTRUCTIONS 5 A copy of the above codes standard may be obtained from: Canadian Standards ...into an appropriate outlet that you are using a replacement power supply cord, it will reduce the risk of electric shock by a qualified electrician. Check with the dryer: if it is recommended that is properly grounded. The cord is equipped with all local codes. Do ...
...use Power Supply Cord Replacement Part Number 3394208. A time-delay fuse or circuit breaker is within reach of dryer's final location. WARNING: Improper connection of least resistance for electric current. SAVE THESE INSTRUCTIONS 5 A copy of the above codes standard may be obtained from: Canadian Standards ...into an appropriate outlet that you are using a replacement power supply cord, it will reduce the risk of electric shock by a qualified electrician. Check with the dryer: if it is recommended that is properly grounded. The cord is equipped with all local codes. Do ...

Installation Instructions
Page 7
... against the direct wire cable. Neutral prong E. Reaching inside the strain relief. Removable conduit connector B. Spade terminals with the dryer cabinet and be in a horizontal position. Strain relief threads ■ Put direct wire cable through the hole below terminal block... plug C. Ring terminals 4. A B C A. Ground prong D. Put the threaded section of the strain relief through the strain relief. Electrical Connection Options If your home has: And you will be in a horizontal position. Now complete installation following instructions for mobile homes and where...
... against the direct wire cable. Neutral prong E. Reaching inside the strain relief. Removable conduit connector B. Spade terminals with the dryer cabinet and be in a horizontal position. Strain relief threads ■ Put direct wire cable through the hole below terminal block... plug C. Ring terminals 4. A B C A. Ground prong D. Put the threaded section of the strain relief through the strain relief. Electrical Connection Options If your home has: And you will be in a horizontal position. Now complete installation following instructions for mobile homes and where...

Installation Instructions
Page 8
... listed strain relief E. Dotted line shows position of 3-wire connections. Direct wire cable must have completed your electrical connections. Shape ends of extra length so dryer can be moved if needed. Tighten screw. Connect the other wires to "Venting Requirements." External ground conductor... screw B. External ground conductor screw - Remove neutral ground wire from end of dryer rear panel. You have 5 ft (1.52 m) of wires into slot of cable, leaving bare ground wire at 5" (12.7 cm). Neutral...
... listed strain relief E. Dotted line shows position of 3-wire connections. Direct wire cable must have completed your electrical connections. Shape ends of extra length so dryer can be moved if needed. Tighten screw. Connect the other wires to "Venting Requirements." External ground conductor... screw B. External ground conductor screw - Remove neutral ground wire from end of dryer rear panel. You have 5 ft (1.52 m) of wires into slot of cable, leaving bare ground wire at 5" (12.7 cm). Neutral...

Installation Instructions
Page 9
... ground wire B. Center silver-colored terminal block screw D. Tighten screws. 4. Strip 3¹⁄₂" (8.9 cm) of outer covering from end of dryer rear panel. 3. B C D F E D A. Neutral ground wire 4. External ground conductor screw C. Tighten strain relief screws. 5. Now go ...terminal block (hook facing right), squeeze hooked end together and tighten screw, as shown. 9 Direct wire cable must have completed your electrical connections. Tighten screws. 5. A B C 1. Now go to "Venting Requirements." 3-wire connection: Direct Wire Use where local ...
... ground wire B. Center silver-colored terminal block screw D. Tighten screws. 4. Strip 3¹⁄₂" (8.9 cm) of outer covering from end of dryer rear panel. 3. B C D F E D A. Neutral ground wire 4. External ground conductor screw C. Tighten strain relief screws. 5. Now go ...terminal block (hook facing right), squeeze hooked end together and tighten screw, as shown. 9 Direct wire cable must have completed your electrical connections. Tighten screws. 5. A B C 1. Now go to "Venting Requirements." 3-wire connection: Direct Wire Use where local ...

Installation Instructions
Page 10
... permit connecting cabinet-ground conductor to "Venting Requirements." Squeeze hooked ends together. Insert tab of terminal block cover into slot of dryer rear panel. External ground conductor screw B. Center silver-colored terminal block screw D. Grounding path determined by a qualified electrician 3. ... or center wire) of terminal block (hook facing right). Center silver-colored terminal block screw D. You have completed your electrical connections. Neutral ground wire C. 1. Remove center silver-colored terminal block screw. 2. Connect neutral ground wire and the neutral wire...
... permit connecting cabinet-ground conductor to "Venting Requirements." Squeeze hooked ends together. Insert tab of terminal block cover into slot of dryer rear panel. External ground conductor screw B. Center silver-colored terminal block screw D. Grounding path determined by a qualified electrician 3. ... or center wire) of terminal block (hook facing right). Center silver-colored terminal block screw D. You have completed your electrical connections. Neutral ground wire C. 1. Remove center silver-colored terminal block screw. 2. Connect neutral ground wire and the neutral wire...
Installation Instructions
Page 11
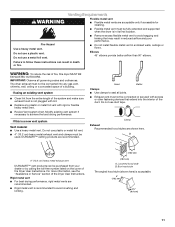
...result in reduced airflow and poor performance. ■ Do not install flexible metal vent in enclosed walls, ceilings or floors. If this dryer MUST BE EXHAUSTED OUTDOORS. Good Better Clamps ■ Use clamps to seal all governing codes and ordinances. Elbows 45° elbows provide... existing vent system ■ Clean lint from your dealer or by calling the toll-free number listed on the cover of the Dryer User Instructions. Clamp Exhaust Recommended hood styles are recommended. WARNING Venting Requirements Flexible metal vent ■ Flexible metal vents are acceptable only...
...result in reduced airflow and poor performance. ■ Do not install flexible metal vent in enclosed walls, ceilings or floors. If this dryer MUST BE EXHAUSTED OUTDOORS. Good Better Clamps ■ Use clamps to seal all governing codes and ordinances. Elbows 45° elbows provide... existing vent system ■ Clean lint from your dealer or by calling the toll-free number listed on the cover of the Dryer User Instructions. Clamp Exhaust Recommended hood styles are recommended. WARNING Venting Requirements Flexible metal vent ■ Flexible metal vents are acceptable only...


