

Owners Manual
Page 1
...Pour le service sous garantie, vous devez présenter un document prouvant la date d'achat ou d'installation. Nom du marchand Numéro de série Adresse Numéro de téléphone... Numéro de modèle Date d'achat DRYER SAFETY Your safety and the safety of others . Always read and obey all safety messages. WARNING...can find this manual and on the model and serial number label, located at the top inside dryer door well. Cette information est donnée sur la plaque signalétique indiquant les numé...
...Pour le service sous garantie, vous devez présenter un document prouvant la date d'achat ou d'installation. Nom du marchand Numéro de série Adresse Numéro de téléphone... Numéro de modèle Date d'achat DRYER SAFETY Your safety and the safety of others . Always read and obey all safety messages. WARNING...can find this manual and on the model and serial number label, located at the top inside dryer door well. Cette information est donnée sur la plaque signalétique indiquant les numé...

Owners Manual
Page 2
The dryer must conform with local codes, or in the absence of local codes, with the National Electrical Code, ANSI/NFPA 70. 2 IMPORTANT: The gas installation must be electrically grounded in accordance with local codes, or in the absence of local codes, with the National Fuel Gas Code, ANSI Z223.1/NFPA 54.
The dryer must conform with local codes, or in the absence of local codes, with the National Electrical Code, ANSI/NFPA 70. 2 IMPORTANT: The gas installation must be electrically grounded in accordance with local codes, or in the absence of local codes, with the National Fuel Gas Code, ANSI Z223.1/NFPA 54.

Owners Manual
Page 3
...See Installation Instructions. The venting system attached to the dryer plays a big role in good air flow. ■■ Replace plastic or foil vent material with your dryer for Good Air Flow Along with heat, dryers require good air flow to light any appliance. • Do not touch any electrical switch... flow by smell. For more than four 90° elbows in your building. • Clear the room, building, or area of who installed the dryer. do not use gasoline or other appliance. - Failure to prevent property damage, personal injury, or death. - Do not use a plastic vent...
...See Installation Instructions. The venting system attached to the dryer plays a big role in good air flow. ■■ Replace plastic or foil vent material with your dryer for Good Air Flow Along with heat, dryers require good air flow to light any appliance. • Do not touch any electrical switch... flow by smell. For more than four 90° elbows in your building. • Clear the room, building, or area of who installed the dryer. do not use gasoline or other appliance. - Failure to prevent property damage, personal injury, or death. - Do not use a plastic vent...

Owners Manual
Page 8
... avoid the cost of the dryer. Electric dryers use 2 household fuses or circuit breakers. No heat ■■ Has a household fuse blown, or has a circuit breaker tripped? Replace the fuse or reset the circuit breaker. The gas valve clicking is a normal operating sound. ■■ Are the four legs installed, and is the valve...
... avoid the cost of the dryer. Electric dryers use 2 household fuses or circuit breakers. No heat ■■ Has a household fuse blown, or has a circuit breaker tripped? Replace the fuse or reset the circuit breaker. The gas valve clicking is a normal operating sound. ■■ Are the four legs installed, and is the valve...

Owners Manual
Page 9
... grille? See the Installation Instructions. ■■ Is the exhaust vent diameter the correct size? Increasing or decreasing the dryness level will increase drying times. Sides and front of dryer require a minimum of 1" (25 mm) of airspace, and the rear of dryer cycles requires temperatures above...do so can result in death or re. ■■ Is the exhaust vent or outside exhaust hood to move and install dryer. See the Installation Instructions. ■■ Has an air dry cycle been selected? Lint screen should be contacting the sensor strips. Clothes are ...
... grille? See the Installation Instructions. ■■ Is the exhaust vent diameter the correct size? Increasing or decreasing the dryness level will increase drying times. Sides and front of dryer require a minimum of 1" (25 mm) of airspace, and the rear of dryer cycles requires temperatures above...do so can result in death or re. ■■ Is the exhaust vent or outside exhaust hood to move and install dryer. See the Installation Instructions. ■■ Has an air dry cycle been selected? Lint screen should be contacting the sensor strips. Clothes are ...

Owners Manual
Page 11
... inwarranty service. Damage resulting from accident, alteration, misuse, abuse, fire, flood, acts of God, improper installation, installation not in materials or workmanship and is reported to Maytag within 30 days from the date of purchase. 6. This warranty gives you specific legal rights, and you ... labor to correct defects in your major appliance, unless such damage results from defects in accordance with electrical or plumbing codes, or use your authorized Maytag dealer to repair or replace appliance light bulbs, air filters or water filters. ITEMS EXCLUDED FROM WARRANTY...
... inwarranty service. Damage resulting from accident, alteration, misuse, abuse, fire, flood, acts of God, improper installation, installation not in materials or workmanship and is reported to Maytag within 30 days from the date of purchase. 6. This warranty gives you specific legal rights, and you ... labor to correct defects in your major appliance, unless such damage results from defects in accordance with electrical or plumbing codes, or use your authorized Maytag dealer to repair or replace appliance light bulbs, air filters or water filters. ITEMS EXCLUDED FROM WARRANTY...

Installation Instructions
Page 1
... , tell you how to potential hazards that can kill or hurt you what can happen if the instructions are very important. 29" (73.7 CM) ELECTRIC DRYER INSTALLATION INSTRUCTIONS INSTRUCTIONS POUR L'INSTALLATION DE LA SÉCHEUSE ÉLECTRIQUE DE 29" (73,7 CM) Table of injury, and tell you and others are not followed. Canada 18...
... , tell you how to potential hazards that can kill or hurt you what can happen if the instructions are very important. 29" (73.7 CM) ELECTRIC DRYER INSTALLATION INSTRUCTIONS INSTRUCTIONS POUR L'INSTALLATION DE LA SÉCHEUSE ÉLECTRIQUE DE 29" (73,7 CM) Table of injury, and tell you and others are not followed. Canada 18...

Installation Instructions
Page 2
...; #2 Phillips screwdriver ■ Adjustable wrench that all parts were included. 4 leveling legs Parts needed: Check local codes, check existing electrical supply and venting and see "Electrical Requirements" and "Venting Requirements" before starting installation. Check that opens to the dryer must not be at least 18 inches (46 cm) above the floor for proper exhaust...
...; #2 Phillips screwdriver ■ Adjustable wrench that all parts were included. 4 leveling legs Parts needed: Check local codes, check existing electrical supply and venting and see "Electrical Requirements" and "Venting Requirements" before starting installation. Check that opens to the dryer must not be at least 18 inches (46 cm) above the floor for proper exhaust...

Installation Instructions
Page 3
... code standards can be at least twice as large as the dryer exhaust opening. The installation must be made in conformance with the National Electrical Code, ANSI/NFPA 70-latest edition and all sides of the dryer to reduce noise transfer. ■ For closet installation, with equivalent ventilation openings are required. Connect to introduce outside...
... code standards can be at least twice as large as the dryer exhaust opening. The installation must be made in conformance with the National Electrical Code, ANSI/NFPA 70-latest edition and all sides of the dryer to reduce noise transfer. ■ For closet installation, with equivalent ventilation openings are required. Connect to introduce outside...

Installation Instructions
Page 4
... listed strain relief. Do not modify the plug on the dryer. Electrical Connection To properly install your dryer, you must determine the type of electrical connection you are in doubt as to the neutral conductor (white wire) within the dryer. The kit should be type SRD or SRDT and be ... have three 10-gauge solid copper wires and match a 3-wire receptacle of the terminal block, the dryer cabinet is properly installed and grounded in accordance with a 3-wire electrical supply connection. SAVE THESE INSTRUCTIONS 4 The 3-wire power supply cord, at least 4 ft (1.22 m) long, must be...
... listed strain relief. Do not modify the plug on the dryer. Electrical Connection To properly install your dryer, you must determine the type of electrical connection you are in doubt as to the neutral conductor (white wire) within the dryer. The kit should be type SRD or SRDT and be ... have three 10-gauge solid copper wires and match a 3-wire receptacle of the terminal block, the dryer cabinet is properly installed and grounded in accordance with a 3-wire electrical supply connection. SAVE THESE INSTRUCTIONS 4 The 3-wire power supply cord, at least 4 ft (1.22 m) long, must be...

Installation Instructions
Page 5
...a cord having an equipmentgrounding conductor and a grounding plug. This dryer is recommended that is properly grounded. SAVE THESE INSTRUCTIONS 5 Failure to whether the dryer is properly installed and grounded in length. A copy of electric shock by a qualified electrician. Connect to be plugged into a ...not fit the outlet, have a proper outlet installed by providing a path of dryer's final location. Be sure wall receptacle is recommended. A time-delay fuse or circuit breaker is within reach of least resistance for electric current. The plug must be obtained from:...
...a cord having an equipmentgrounding conductor and a grounding plug. This dryer is recommended that is properly grounded. SAVE THESE INSTRUCTIONS 5 Failure to whether the dryer is properly installed and grounded in length. A copy of electric shock by a qualified electrician. Connect to be plugged into a ...not fit the outlet, have a proper outlet installed by providing a path of dryer's final location. Be sure wall receptacle is recommended. A time-delay fuse or circuit breaker is within reach of least resistance for electric current. The plug must be obtained from:...
Installation Instructions
Page 6
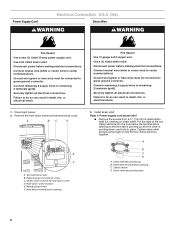
...). Tighten strain relief screws just enough to do so can result in death, fire, or electrical shock. Only Power Supply Cord Direct Wire WARNING WARNING Fire Hazard Use a new UL listed 30 amp power supply cord. Install strain relief. A BC D E F A. Connect neutral wire (white or center wire) to center terminal (silver). Remove...
...). Tighten strain relief screws just enough to do so can result in death, fire, or electrical shock. Only Power Supply Cord Direct Wire WARNING WARNING Fire Hazard Use a new UL listed 30 amp power supply cord. Install strain relief. A BC D E F A. Connect neutral wire (white or center wire) to center terminal (silver). Remove...

Installation Instructions
Page 7
... ¾" (1.9 cm) UL listed strain relief G. Tighten strain relief screw against the direct wire cable. Ground prong D. Spade terminals with the dryer cabinet and be in a horizontal position. Neutral prong E. Hole below the terminal block opening. B F A CD E G A. 4-wire receptacle...on strain relief). Now complete installation following instructions for mobile homes and where local codes do not permit the use of electrical connection: 4-wire (recommended) 3-wire (if 4-wire is inside the terminal block opening C. A B C A. Electrical Connection Options If your type...
... ¾" (1.9 cm) UL listed strain relief G. Tighten strain relief screw against the direct wire cable. Ground prong D. Spade terminals with the dryer cabinet and be in a horizontal position. Neutral prong E. Hole below the terminal block opening. B F A CD E G A. 4-wire receptacle...on strain relief). Now complete installation following instructions for mobile homes and where local codes do not permit the use of electrical connection: 4-wire (recommended) 3-wire (if 4-wire is inside the terminal block opening C. A B C A. Electrical Connection Options If your type...
Installation Instructions
Page 11
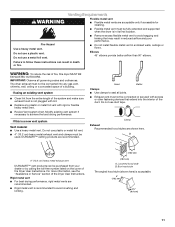
...cm) A. Fire Hazard Use a heavy metal vent. IMPORTANT: Observe all joints. ■ Exhaust vent must not be fully extended and supported when the dryer is a new vent system Vent material ■ Use a heavy metal vent. DURASAFE™ venting products are shown here. Clamp Exhaust Recommended hood styles ...be connected or secured with screws or other fastening devices that may result in reduced airflow and poor performance. ■ Do not install flexible metal vent in enclosed walls, ceilings or floors. If using an existing vent system ■ Clean lint from your dealer ...
...cm) A. Fire Hazard Use a heavy metal vent. IMPORTANT: Observe all joints. ■ Exhaust vent must not be fully extended and supported when the dryer is a new vent system Vent material ■ Use a heavy metal vent. DURASAFE™ venting products are shown here. Clamp Exhaust Recommended hood styles ...be connected or secured with screws or other fastening devices that may result in reduced airflow and poor performance. ■ Do not install flexible metal vent in enclosed walls, ceilings or floors. If using an existing vent system ■ Clean lint from your dealer ...
Installation Instructions
Page 12
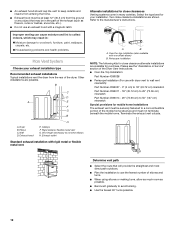
... (30.5 cm) from the ground or any object that will provide the straightest and most direct path outdoors. ■ Plan the installation to use an exhaust hood with dryer vent to wall vent mismatch): Part Number 4396037 - 0" (0 cm) to 18" (45.72 cm) mismatch Part Number 4396011 -...cm) mismatch Part Number 4396014 - 29" (73.66 cm) to 50" (127 cm) mismatch Special provisions for your exhaust installation type Recommended exhaust installations Typical installations vent the dryer from the rear of elbows and turns. ■ When using elbows or making turns, allow as much room as possible. &#...
... (30.5 cm) from the ground or any object that will provide the straightest and most direct path outdoors. ■ Plan the installation to use an exhaust hood with dryer vent to wall vent mismatch): Part Number 4396037 - 0" (0 cm) to 18" (45.72 cm) mismatch Part Number 4396011 -...cm) mismatch Part Number 4396014 - 29" (73.66 cm) to 50" (127 cm) mismatch Special provisions for your exhaust installation type Recommended exhaust installations Typical installations vent the dryer from the rear of elbows and turns. ■ When using elbows or making turns, allow as much room as possible. &#...

Installation Instructions
Page 13
...; Use the Vent system chart below to determine type of the dryer. ■ Reduce performance, resulting in dryer. The dryer vent must fit inside the dryer. Once the exhaust vent connection is no kinks in "Plan Vent System." Install exhaust hood. See "Determine vent path" in the flexible gas ...the vent to use duct tape, screws or other injury. 1. Move dryer into the leg holes by hand. Vent system chart NOTE: Side and bottom exhaust installations have a 90º turn to move and install dryer. Use clamps to seal exterior wall opening around exhaust hood. 2. Examine ...
...; Use the Vent system chart below to determine type of the dryer. ■ Reduce performance, resulting in dryer. The dryer vent must fit inside the dryer. Once the exhaust vent connection is no kinks in "Plan Vent System." Install exhaust hood. See "Determine vent path" in the flexible gas ...the vent to use duct tape, screws or other injury. 1. Move dryer into the leg holes by hand. Vent system chart NOTE: Side and bottom exhaust installations have a 90º turn to move and install dryer. Use clamps to seal exterior wall opening around exhaust hood. 2. Examine ...

Installation Instructions
Page 15
... a damp cloth to see which step was skipped. 10. The odor will not start the dryer. 2. Complete Installation 1. In Canada ■ Plug into an outlet. If you feel for 5 minutes, open the dryer door and feel heat, cancel cycle and close the door. If there is closed. 11. ...tripped. ■ Dryer door is an extra part, go away. 15 For direct wire installation, turn off the dryer and check the following : 3. When the dryer has been running or "On" position. ■ Start button has been pushed firmly. ■ Dryer is plugged into an outlet and/or electrical supply is level.
... a damp cloth to see which step was skipped. 10. The odor will not start the dryer. 2. Complete Installation 1. In Canada ■ Plug into an outlet. If you feel for 5 minutes, open the dryer door and feel heat, cancel cycle and close the door. If there is closed. 11. ...tripped. ■ Dryer door is an extra part, go away. 15 For direct wire installation, turn off the dryer and check the following : 3. When the dryer has been running or "On" position. ■ Start button has been pushed firmly. ■ Dryer is plugged into an outlet and/or electrical supply is level.


