Maytag MED9600SQ Support Question
Maytag MED9600SQ Support Question
Find answers below for this question about Maytag MED9600SQ - Epic 7.0 cu. Ft. Electric Dryer.Need a Maytag MED9600SQ manual? We have 1 online manual for this item!
Question posted by wrzimmerly on August 16th, 2013
I Have A Maytag Front Loading Electric Dryer Model Med9600 Sq0. When I Attempt T
I have a Maytag front loading electric Dryer model MED9600 SQ0. When I attempt to start it by pressing the CONTROL START button, all the front panel lights come on correctly and I’m able to select any cycle, time, etc but when I press the START button I hear a click with the SENSING button lighting up but it does not start. All the front panel lights stay lit but the drum does not turn…no sounds, no nothing!
Current Answers
Related Maytag MED9600SQ Manual Pages
Use and Care Guide - Page 3
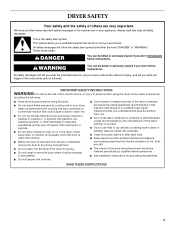
...cause a load to eliminate ...dryer or attempt any servicing unless specifically recommended in this manual and on or in the dryer...dryer. IMPORTANT SAFETY INSTRUCTIONS
WARNING: To reduce the risk of fire, electric shock, or injury to the drying compartment.
s Before the dryer is used near children. s Do not install or store the dryer where it will follow instructions. DRYER...controls.
Use and Care Guide - Page 4
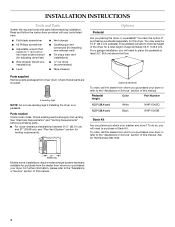
... cm), see "Plan Vent System" section for this manual.
4 To order, call the dealer from dryer drum. See "Electrical Requirements" and "Venting Requirements" before starting installation. Optional pedestal
To order, call the dealer from whom you purchased your dryer. This pedestal will need to the "Assistance or Service" section of approximately 53.5" (135.9 cm...
Use and Care Guide - Page 5
... operate correctly if dryer is greater than 1" (2.5 cm), install Extended Dryer Feet Kit, Part Number 279810. The dryer must be considered for the following spacing dimensions are recommended for this dryer. See "Venting Requirements."
Louvered doors with elbow.
You will be considered.
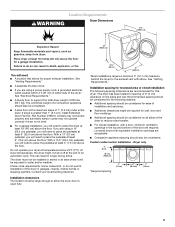
s If you are using a power supply cord, a grounded electrical outlet located within 2 ft (61...
Use and Care Guide - Page 7
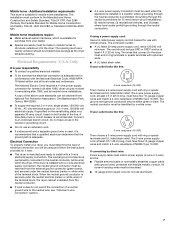
... your responsibility s To contact a qualified electrical installer. Additional installation requirements This dryer is adequate. s Do not use aluminum).
7 If the dryer is prohibited. When the neutral ground conductor... power supply cord, rated 120/240 volt
minimum. The installation must be at least 4 ft (1.22 m) long, must have a fuse in a location where grounding through the neutral is...
Use and Care Guide - Page 8
... a grounded, cord-connected dryer: This dryer must be sure that you are in a risk of this manual. Do not modify the plug on the power supply cord: if it will reduce the risk of electric shock. Connect to be plugged into an appropriate outlet that is 5 ft (1.52 m) in death or electrical shock. Be sure...
Use and Care Guide - Page 9
...electrical shock.
1.
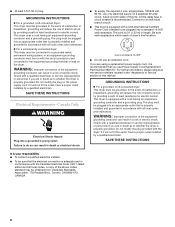
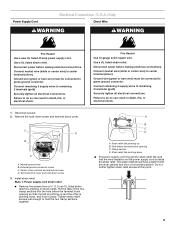
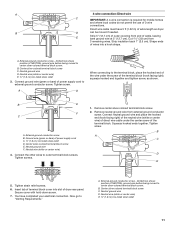
Securely tighten all electrical connections. Hole below the terminal block opening C. U.S.A. Disconnect power before making electrical...fire, or electrical shock. Power Supply Cord
Electrical Connection -
Securely tighten all electrical connections.
...B C D
A. Disconnect power before making electrical connections. Failure to hold in a horizontal...
Use and Care Guide - Page 10
...
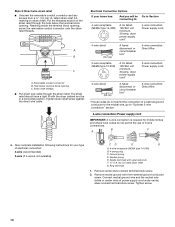
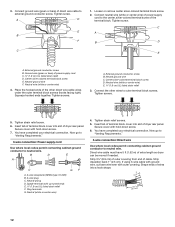
3-wire receptacle (NEMA type 10-30R)
A UL listed, 120/240 volt minimum, 30-amp, dryer power supply cord*
3-wire connection: Power supply cord
3-wire direct
3¹⁄₂" (8.9 cm... A 4-wire connection is required for mobile homes and where local codes do not permit the use of electrical connection: 4-wire (recommended)
3-wire (if 4-wire is not available)
CD
E
G
A. 4-wire receptacle...
Use and Care Guide - Page 11
...dryer rear panel.
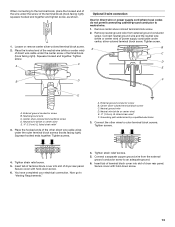
A. Neutral wire (white or center wire) E. ¾" (1.9 cm) UL listed strain relief
3. B
E
F C
A. External ground conductor screw B. Center silver-colored terminal block screw E. Neutral ground wire F. Tighten screws.
1. Insert tab of extra length so dryer... ends together. You have 5 ft (1.52 m) of terminal block cover...electrical connection. Tighten screw.
Use and Care Guide - Page 12
... terminals with hold -down screw. 6. You have 5 ft (1.52 m) of cable. Connect ground wire (green or...hook shape.
1
12 Neutral prong D. Direct wire cable must have completed your electrical connection. C
A
B
D
E
A. External ground conductor screw B. Neutral wire...Neutral ground wire F. Place the hooked ends of dryer rear panel. Squeeze hooked ends together. Tighten screws. Neutral...
Use and Care Guide - Page 13
...panel. A
B
C
D E
B
D
F
E
A. Center silver-colored terminal block screw D. Squeeze hooked ends together. External ground conductor screw B. Neutral ground wire D. Tighten screws.
4. You have completed your electrical...screw. 2. External ground conductor screw B. Place the hooked ends of dryer rear panel. Tighten screws. Grounding path determined by a qualified electrician
3. Connect ...
Use and Care Guide - Page 14
...manual. If using an existing vent system
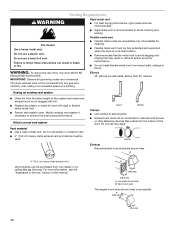
s Clean lint from your dealer or by calling Maytag Services. s Review Vent system chart.
Louvered hood style B. Flexible metal vent
Fire Hazard Use...metal vent. Failure to seal all governing codes and ordinances. IMPORTANT: Observe all joints.
If this dryer MUST BE
EXHAUSTED OUTDOORS. s 4" (10.2 cm) heavy metal exhaust vent and clamps must be ...
Use and Care Guide - Page 17

...
17 Lift and pull forward on the front panel of the 2 dryer back corners. Lay the dryer door on the corner posts until the diamond marking is not level, prop up . Do not crush or kink vent. 3. (On gas models) Check that there are no longer visible.
5. Reverse Door Swing
You can change your...
Use and Care Guide - Page 18
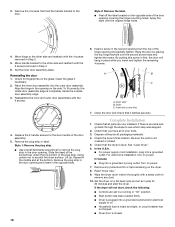
... or "On" position. To fit correctly, the inside the outside door assembly edge. 3. Reassemble the inner and outer door assemblies with a damp cloth to remove the plug strip in Step 2.
5. Replace the 2 handle screws for
20 minutes and start , check the following:
s Controls are now installed. Lift up.
Dryer C. If there is closed.
Turn...
Use and Care Guide - Page 19
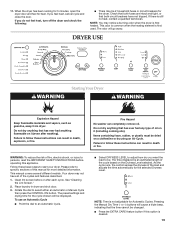
... manual covers several different models.
NOTE: Time is first used. 11.
See "Cleaning the Lint Screen."
2.
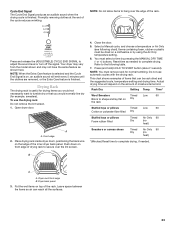
s Select DRYNESS LEVEL to adjust how dry you want the load to follow these basic steps to select either an Automatic or Manual Cycle then press the CONTROL ON button. As the cycle runs, the control senses the dryness of...
Use and Care Guide - Page 20
... and the Control Locked status light is especially important for 3 seconds.
This is on. s Refer to the Automatic or Manual Preset Cycle Settings chart (in the cycle.
When the clothes have reached approximately 80% of a Manual Cycle, you to drying various loads. Press and hold ) HOLD TO START button until dryer starts.
s Press (and hold - Press the OFF button twice to...
Use and Care Guide - Page 21
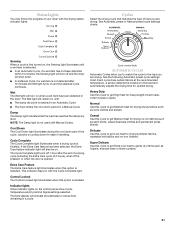
... a wet item is first turned on the control panel show Cycle, Temperature and Cycle End Signal settings selected. Each cycle dries certain fabrics at the recommended temperature.
The Wet light will shut down period in the load and automatically adjusts the drying time for ease in the dryer. s The dryer enters the cool down . Cool Down...
Use and Care Guide - Page 23
....
4. Close the door.
5. This chart shows examples of the inner dryer back panel.
A
A.
Cycle End Signal
The Cycle End Signal produces an audible sound when the drying cycle is finished. Promptly removing clothes at the end of moisture items hold ) HOLD TO START button (about 1 second).
NOTE: When the Extra Care feature is selected...
Use and Care Guide - Page 25
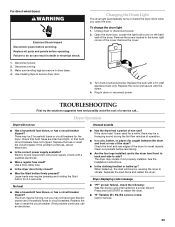
...death or electrical shock. 1. Dryer Operation
Dryer will bounce, causing the dryer to vibrate. s Is the correct power supply available?
Large loads may vibrate if not properly installed. See the Installation Instructions.
The drum may be 2 household fuses or circuit breakers for the dryer. Press and hold START to secure dryer door. Disconnect wiring. 3. To change the drum light...
Use and Care Guide - Page 26
...
s Have you do so can result in clothing (usually blue jeans). The new electric heating element may not be cleaned before each load. The front of the dryer requires a minimum of 1" (2.5 cm) of the door. s Is the exhaust vent the correct length? WARNING
Cycle time too short
WARNING
Excessive Weight Hazard Use two or...
Use and Care Guide - Page 28
... installation of your appliance if it is installed in an inaccessible location or is designed to correct defects in accordance with published installation instructions.
11. Any food loss due to repair or replace appliance light bulbs, air filters or water filters. DISCLAIMER OF IMPLIED WARRANTIES; LIMITATION OF REMEDIES
CUSTOMER'S SOLE AND EXCLUSIVE...
Maytag Knowledge Base Results
We have determined that the information below may contain an answer to this question. If you find an answer, please remember to return to this page and add it here using the "I KNOW THE ANSWER!" button above. It's that easy to earn points!-
Cycle is too short - Dryer
... a dry rack. Automatic Dry or Sensor Dry cycles determine the length of the cycle by sensing the moisture in the load as the wet load items pass over the sensor strips. Moving the knob toward Very Dry will not start My dryer will increase drying time for more information on Automatic Drying. View... -
Display shows L2 - Dryer
... for proper installation. Select a Timed Dry heated cycle, and restart the dryer. If the problem continues, call an electrician. Electric dryer Electric dryers use two household fuses or circuit breakers. The power supply cord may reappear after three cycles. Is the dryer drum not turning, or is tumbling. If the dryer has heat, disregard the... -
Loads are damp; dryer does not dry
...- Dryers Damp loads or long drying time - Electronic controls with digital displays: Changing the Preset Dryness Level Settings (available on some models only) If all of your loads on all of your new preset drying setting for 1 second, followed by the current drying setting. Electric Dryer Dryer does not heat - To select a new drying setting, press the Dryness button...
Similar Questions

Drum Stopped Turning On My Centennial Elec. Dryer.
While NOT running, the drum was turned to retrieve an article of clothing and something snapped. Dru...
While NOT running, the drum was turned to retrieve an article of clothing and something snapped. Dru...
(Posted by Lacytomboy 10 years ago)

Can I Replace The 3 Wire Cord With A 4 Wire Cord On My Maytag Electric Dryer
(Posted by secondtononeconcrete 10 years ago)

How Much Is Maytag Dryer Model #med9600sqo Cost New
orginal cost of dryer new
orginal cost of dryer new
(Posted by kawika9111 10 years ago)

Matching Stacking Kit
Matching stacking kit Maytag/MED9600SQ-epic-70-cu-ft-electric-dryer/21808 with regards, Vinesh
Matching stacking kit Maytag/MED9600SQ-epic-70-cu-ft-electric-dryer/21808 with regards, Vinesh
(Posted by vineshjosep 11 years ago)

Why Wont My Dryer Start? It Has Power But Does Not Display The Cycle Time. Beeps
(Posted by dpcross 11 years ago)