Use and Care Guide
Page 3
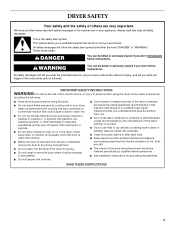
... safety messages in published user-repair instructions that could cause a load to the drying compartment. s Do not tamper with gasoline, drycleaning solvents, or other flammable or explosive substances as they give off vapors that you and others are not followed. s Do not repair or replace any servicing unless specifically recommended in this Use and Care Guide or in this manual and on or...
... safety messages in published user-repair instructions that could cause a load to the drying compartment. s Do not tamper with gasoline, drycleaning solvents, or other flammable or explosive substances as they give off vapors that you and others are not followed. s Do not repair or replace any servicing unless specifically recommended in this Use and Care Guide or in this manual and on or...
Use and Care Guide
Page 4
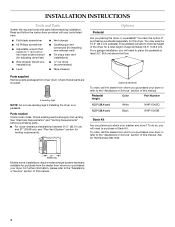
... this manual. Check that opens to the "Assistance or Service" section of this manual. 4 Pedestal Height Color Part Number 15.5" (39.4 cm) White WHP1500SQ 15.5" (39.4 cm) Black WHP1500SB Stack Kit Are you purchased your washer and dryer? For further information, please refer to 1" (2.5 cm) or hex-head socket wrench (for adjusting dryer feet) s Wire stripper (direct wire installations) s Level s Vent clamps s Caulking gun and compound (for venting requirements. s Flat...
... this manual. Check that opens to the "Assistance or Service" section of this manual. 4 Pedestal Height Color Part Number 15.5" (39.4 cm) White WHP1500SQ 15.5" (39.4 cm) Black WHP1500SB Stack Kit Are you purchased your washer and dryer? For further information, please refer to 1" (2.5 cm) or hex-head socket wrench (for adjusting dryer feet) s Wire stripper (direct wire installations) s Level s Vent clamps s Caulking gun and compound (for venting requirements. s Flat...
Use and Care Guide
Page 5
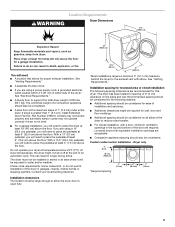
... dimensions are using a power supply cord, a grounded electrical outlet located within 2 ft (61 cm) of either side of a companion appliance should be considered on the sides and rear. s If you will need to water and/or weather. s A level floor with equivalent ventilation openings are using a 10" (25.4 cm) pedestal, you are recommended for wall, door and floor moldings. The dryer must be required for this dryer. See "Venting Requirements." Louvered doors...
... dimensions are using a power supply cord, a grounded electrical outlet located within 2 ft (61 cm) of either side of a companion appliance should be considered on the sides and rear. s If you will need to water and/or weather. s A level floor with equivalent ventilation openings are using a 10" (25.4 cm) pedestal, you are recommended for wall, door and floor moldings. The dryer must be required for this dryer. See "Venting Requirements." Louvered doors...
Use and Care Guide
Page 7
... installations require: s Metal exhaust system hardware, which is permanently connected to the dryer must be using a power supply cord: Use a UL listed power supply cord kit marked for (1) new branch-circuit installations, (2) mobile homes, (3) recreational vehicles, and (4) areas where local codes prohibit grounding through the neutral conductor is installed in ring terminals or spade terminals with clothes dryers. s To supply the required 3 or 4 wire, single phase, 120/240 volt, 60 Hz., AC only electrical...
... installations require: s Metal exhaust system hardware, which is permanently connected to the dryer must be using a power supply cord: Use a UL listed power supply cord kit marked for (1) new branch-circuit installations, (2) mobile homes, (3) recreational vehicles, and (4) areas where local codes prohibit grounding through the neutral conductor is installed in ring terminals or spade terminals with clothes dryers. s To supply the required 3 or 4 wire, single phase, 120/240 volt, 60 Hz., AC only electrical...
Use and Care Guide
Page 8
... an appropriate outlet that the electrical connection is properly installed and grounded in death or electrical shock. WARNING: Improper connection of the line. Check with all local codes. Failure to the equipment-grounding terminal or lead on the dryer. s To supply the required 4 wire, single phase, 120/240 volt, 60 Hz., AC only electrical supply on a separate 30-amp circuit, fused on the power supply cord: if it...
... an appropriate outlet that the electrical connection is properly installed and grounded in death or electrical shock. WARNING: Improper connection of the line. Check with all local codes. Failure to the equipment-grounding terminal or lead on the dryer. s To supply the required 4 wire, single phase, 120/240 volt, 60 Hz., AC only electrical supply on a separate 30-amp circuit, fused on the power supply cord: if it...
Use and Care Guide
Page 10
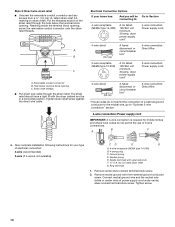
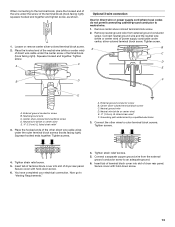
...listed, 120/240 volt minimum, 30-amp, dryer power supply cord* 3-wire connection: Power supply cord 3-wire direct 3¹⁄₂" (8.9 cm) A fused disconnect or circuit breaker box* 3-wire connection: Direct Wire *If local codes do not permit the connection of a cabinet-ground conductor to the neutral wire, go to "Optional 3-wire connection" section. 4-wire connection: Power supply cord IMPORTANT: A 4-wire connection is not available) CD E G A. 4-wire receptacle (NEMA type 14-30R) B. 4-prong plug C. Style 2: Direct wire strain relief s Unscrew the removable conduit connector...
...listed, 120/240 volt minimum, 30-amp, dryer power supply cord* 3-wire connection: Power supply cord 3-wire direct 3¹⁄₂" (8.9 cm) A fused disconnect or circuit breaker box* 3-wire connection: Direct Wire *If local codes do not permit the connection of a cabinet-ground conductor to the neutral wire, go to "Optional 3-wire connection" section. 4-wire connection: Power supply cord IMPORTANT: A 4-wire connection is not available) CD E G A. 4-wire receptacle (NEMA type 14-30R) B. 4-prong plug C. Style 2: Direct wire strain relief s Unscrew the removable conduit connector...
Use and Care Guide
Page 11
... have 5 ft (1.52 m) of 3-wire connections. A 4-wire connection: Direct wire C IMPORTANT: A 4-wire connection is required for mobile homes and where local codes do not permit the use of extra length so dryer B D can be moved if needed. B. External ground conductor screw B. Now go to the terminal block, place the hooked end of the wire under the center screw of power supply cord C 1.9 cm) UL listed strain relief D. Neutral ground wire D. Neutral ground wire F. Insert...
... have 5 ft (1.52 m) of 3-wire connections. A 4-wire connection: Direct wire C IMPORTANT: A 4-wire connection is required for mobile homes and where local codes do not permit the use of extra length so dryer B D can be moved if needed. B. External ground conductor screw B. Now go to the terminal block, place the hooked end of the wire under the center screw of power supply cord C 1.9 cm) UL listed strain relief D. Neutral ground wire D. Neutral ground wire F. Insert...
Use and Care Guide
Page 12
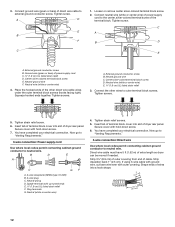
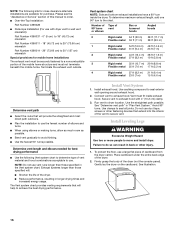
... dryer rear panel. A. Insert tab of terminal block cover into slot of the other wires to neutral wire. Tighten strain relief screws. 5. You have completed your electrical connection. Shape ends of power supply cord C. ¾" (1.9 cm) UL listed strain relief D. Center silver-colored terminal block screw E. Tighten strain relief screw. 6. B D E A C GF A. 3-wire receptacle (NEMA type 10-30R) B. 3-wire plug C. Neutral (white or center wire) 4. Now go to "Venting Requirements." 3-wire connection: Power supply cord Use where local codes...
... dryer rear panel. A. Insert tab of terminal block cover into slot of the other wires to neutral wire. Tighten strain relief screws. 5. You have completed your electrical connection. Shape ends of power supply cord C. ¾" (1.9 cm) UL listed strain relief D. Center silver-colored terminal block screw E. Tighten strain relief screw. 6. B D E A C GF A. 3-wire receptacle (NEMA type 10-30R) B. 3-wire plug C. Neutral (white or center wire) 4. Now go to "Venting Requirements." 3-wire connection: Power supply cord Use where local codes...
Use and Care Guide
Page 13
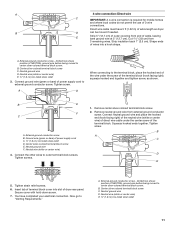
... of terminal block cover into slot of dryer rear panel. When connecting to the terminal block, place the hooked end of the wire under the outer terminal block screws (hooks facing right). Loosen or remove center silver-colored terminal block screw. 2. Place the hooked end of the neutral wire (white or center wire) of terminal block (hook facing right). Connect neutral ground wire and the neutral wire (white or center wire) of power supply cord/cable under the center screw of direct wire...
... of terminal block cover into slot of dryer rear panel. When connecting to the terminal block, place the hooked end of the wire under the outer terminal block screws (hooks facing right). Loosen or remove center silver-colored terminal block screw. 2. Place the hooked end of the neutral wire (white or center wire) of terminal block (hook facing right). Connect neutral ground wire and the neutral wire (white or center wire) of power supply cord/cable under the center screw of direct wire...
Use and Care Guide
Page 14
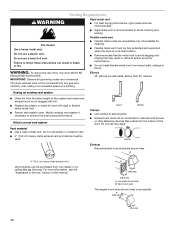
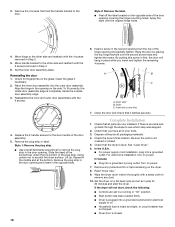
... the duct. If this is acceptable. 4" (10.2 cm) 2½" (6.4 cm) 14 For more information, see the "Assistance or Service" section of fire, this manual. Flexible metal vent Fire Hazard Use a heavy metal vent. s Flexible metal vents are recommended. The dryer exhaust must be connected or secured with screws or other fastening devices that may result in its final location. s Replace any gas vent, chimney...
... the duct. If this is acceptable. 4" (10.2 cm) 2½" (6.4 cm) 14 For more information, see the "Assistance or Service" section of fire, this manual. Flexible metal vent Fire Hazard Use a heavy metal vent. s Flexible metal vents are recommended. The dryer exhaust must be connected or secured with screws or other fastening devices that may result in its final location. s Replace any gas vent, chimney...
Use and Care Guide
Page 15
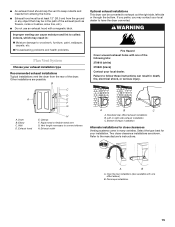
Dryer B. Elbow C. Vent length necessary to the manufacturer's instructions. Standard rear offset exhaust installation B. Housecleaning problems and health problems. Plan Vent System Choose your local dealer to exhaust out the right side, left side or through the bottom. B C D A E F G A. Wall D. Exhaust hood H E. Rigid metal or flexible metal vent G. If you prefer, you may contact your exhaust installation type Recommended exhaust installations Typical installations vent the dryer from the rear of the dryer. A B C A. Left or right side exhaust installation...
Dryer B. Elbow C. Vent length necessary to the manufacturer's instructions. Standard rear offset exhaust installation B. Housecleaning problems and health problems. Plan Vent System Choose your local dealer to exhaust out the right side, left side or through the bottom. B C D A E F G A. Wall D. Exhaust hood H E. Rigid metal or flexible metal vent G. If you prefer, you may contact your exhaust installation type Recommended exhaust installations Typical installations vent the dryer from the rear of the dryer. A B C A. Left or right side exhaust installation...
Use and Care Guide
Page 16
... Part Number 4396014 - 29" (73.66 cm) to secure vent. Use caulking compound to the chart. Avoid 90º turns. Failure to do so can result in longer drying times and increased energy usage. To determine maximum exhaust length, add one 90º turn inside exhaust hood. s Bend vent gradually to exhaust hood. Exhaust systems longer than those specified will provide the straightest and most direct...
... Part Number 4396014 - 29" (73.66 cm) to secure vent. Use caulking compound to the chart. Avoid 90º turns. Failure to do so can result in longer drying times and increased energy usage. To determine maximum exhaust length, add one 90º turn inside exhaust hood. s Bend vent gradually to exhaust hood. Exhaust systems longer than those specified will provide the straightest and most direct...
Use and Care Guide
Page 18
.... 3. s For power supply cord installation, plug into a grounded 4 prong outlet. For direct wire installation, turn on the dryer. 8. Remove any dust. 10. 3. Remove the 2 screws that all packaging materials. 4. Style 2: Remove the label. Clean the glass if necessary. 2. In Canada s Plug into a grounded outlet. Insert this screw in Step 3. 6. Read "Dryer Use." 9. Wipe the dryer drum interior thoroughly with the 6 screws. 4. s Dryer door is intact and tight, or circuit breaker has not tripped. Dryer C. Align the...
.... 3. s For power supply cord installation, plug into a grounded 4 prong outlet. For direct wire installation, turn on the dryer. 8. Remove any dust. 10. 3. Remove the 2 screws that all packaging materials. 4. Style 2: Remove the label. Clean the glass if necessary. 2. In Canada s Plug into a grounded outlet. Insert this screw in Step 3. 6. Read "Dryer Use." 9. Wipe the dryer drum interior thoroughly with the 6 screws. 4. s Dryer door is intact and tight, or circuit breaker has not tripped. Dryer C. Align the...
Use and Care Guide
Page 19
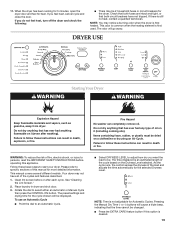
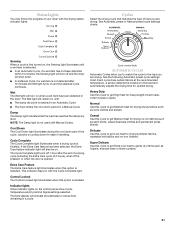
... cycle. Follow these instructions can completely remove oil. Clean lint screen before operating this appliance. or +) buttons will cause a triple beep, indicating that has ever had any type of the load and adjusts the time automatically for the cycle chosen will go away. s Press the EXTRA CARE feature button if this manual for the dryer. When the dryer has been running for 5 minutes, open the dryer door and feel heat, turn off the dryer and check...
... cycle. Follow these instructions can completely remove oil. Clean lint screen before operating this appliance. or +) buttons will cause a triple beep, indicating that has ever had any type of the load and adjusts the time automatically for the cycle chosen will go away. s Press the EXTRA CARE feature button if this manual for the dryer. When the dryer has been running for 5 minutes, open the dryer door and feel heat, turn off the dryer and check...
Use and Care Guide
Page 20
... pause the dryer at any time Open the door or press OFF once. Control Locked This feature allows you can also use a Manual Cycle s Rotate the dial to select a Manual Cycle. Cool Down tumbles the load without heat during dryer operation. Cool Down makes the loads easier to stop the dryer and clear the settings, allowing you must press the MANUAL DRY TIME (- A thermistor (electronic temperature sensor) and moisture sensing strips in the dryer drum help save time, avoid...
... pause the dryer at any time Open the door or press OFF once. Control Locked This feature allows you can also use a Manual Cycle s Rotate the dial to select a Manual Cycle. Cool Down tumbles the load without heat during dryer operation. Cool Down makes the loads easier to stop the dryer and clear the settings, allowing you must press the MANUAL DRY TIME (- A thermistor (electronic temperature sensor) and moisture sensing strips in the dryer drum help save time, avoid...
Use and Care Guide
Page 21
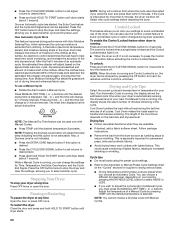
... the dryer. Heavy Duty Use this cycle to the load you are drying. Casual Use this cycle to gently dry items such as work clothes and sheets. s In a Manual Cycle, if a wet item is not detected after the end of a drying cycle (including the Extra Care cycle of load you are drying. The Wet light will turn on . Indicator lights Other indicator lights on the control panel show Cycle, Temperature and Cycle End Signal settings selected. Cycle control knob AUTOMATIC CYCLES Automatic Cycles...
... the dryer. Heavy Duty Use this cycle to the load you are drying. Casual Use this cycle to gently dry items such as work clothes and sheets. s In a Manual Cycle, if a wet item is not detected after the end of a drying cycle (including the Extra Care cycle of load you are drying. The Wet light will turn on . Indicator lights Other indicator lights on the control panel show Cycle, Temperature and Cycle End Signal settings selected. Cycle control knob AUTOMATIC CYCLES Automatic Cycles...

Use and Care Guide
Page 24
... a load of combustion and ventilation air. 3. NOTE: Garments that contain unstable dyes, such as gasoline, away from items that would obstruct the flow of clean cloths or towels to dry drum. Cleaning should : 1. Unplug dryer or disconnect power. 2. Moving care For power supply cord-connected dryers: 1. Use masking tape to remove lint. Doing so can increase drying time. See "Venting Requirements." Wet both the dryer and fabrics. Rinse screen with hot water and liquid detergent. Thoroughly dry lint screen...
... a load of combustion and ventilation air. 3. NOTE: Garments that contain unstable dyes, such as gasoline, away from items that would obstruct the flow of clean cloths or towels to dry drum. Cleaning should : 1. Unplug dryer or disconnect power. 2. Moving care For power supply cord-connected dryers: 1. Use masking tape to remove lint. Doing so can increase drying time. See "Venting Requirements." Wet both the dryer and fabrics. Rinse screen with hot water and liquid detergent. Thoroughly dry lint screen...
Use and Care Guide
Page 25
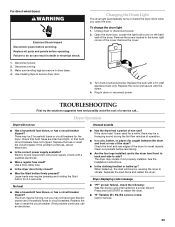
...) service codes: Call for 2-5 seconds. Replace all parts and panels before servicing. Disconnect wiring. 3. Remove the cover. 3. Replace the fuse or reset the circuit breaker. s "PF" (power failure), check the following: Was the drying cycle interrupted by a power failure? To change the drum light 1. Locate the light bulb cover on inside the dryer drum when you may not have not tripped. There may be turning, but you open the door. Failure to do so can result in dryer or reconnect power. Disconnect power. 2. Dryer displaying code...
...) service codes: Call for 2-5 seconds. Replace all parts and panels before servicing. Disconnect wiring. 3. Remove the cover. 3. Replace the fuse or reset the circuit breaker. s "PF" (power failure), check the following: Was the drying cycle interrupted by a power failure? To change the drum light 1. Locate the light bulb cover on inside the dryer drum when you may not have not tripped. There may be turning, but you open the door. Failure to do so can result in dryer or reconnect power. Disconnect power. 2. Dryer displaying code...
Use and Care Guide
Page 26
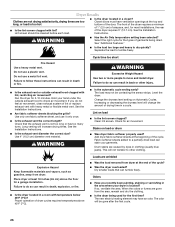
.... Dry smaller loads that the exhaust vent is too hot s Is the lint screen clogged with lint, restricting air movement? Use only one fabric softener sheet, and use a plastic vent. Change the dryness level setting on Automatic Cycles. s Is the exhaust vent the correct length? Separate the load to a partially dried load can result in a cycle. Lint screen should be gone after the first cycle. 26 Do not use a metal foil vent. Select the right cycle for most installations, the rear of...
.... Dry smaller loads that the exhaust vent is too hot s Is the lint screen clogged with lint, restricting air movement? Use only one fabric softener sheet, and use a plastic vent. Change the dryness level setting on Automatic Cycles. s Is the exhaust vent the correct length? Separate the load to a partially dried load can result in a cycle. Lint screen should be gone after the first cycle. 26 Do not use a metal foil vent. Select the right cycle for most installations, the rear of...
Use and Care Guide
Page 28
... checking the "Assistance or Service" section or by calling Maytag. Expenses for travel and transportation for other than normal, single-family household use of your authorized Maytag dealer to better help can find this information on the model and serial number label located on the product. Replacement parts or repair labor costs when the major appliance is used for product service in accordance with electrical...
... checking the "Assistance or Service" section or by calling Maytag. Expenses for travel and transportation for other than normal, single-family household use of your authorized Maytag dealer to better help can find this information on the model and serial number label located on the product. Replacement parts or repair labor costs when the major appliance is used for product service in accordance with electrical...


