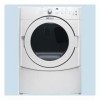
Use and Care Guide
Page 3
...repair instructions that could cause a load to eliminate static unless recommended by qualified service personnel. s Do not install or store the dryer where it will follow instructions. s Do not use fabric softeners or products to catch fire. s See installation instructions for grounding ...don't follow basic precautions, including the following: s Read all safety messages. DRYER SAFETY Your safety and the safety of others . IMPORTANT SAFETY INSTRUCTIONS WARNING: To reduce the risk of fire, electric shock, or injury to reduce the chance of injury, and tell you ...
...repair instructions that could cause a load to eliminate static unless recommended by qualified service personnel. s Do not install or store the dryer where it will follow instructions. s Do not use fabric softeners or products to catch fire. s See installation instructions for grounding ...don't follow basic precautions, including the following: s Read all safety messages. DRYER SAFETY Your safety and the safety of others . IMPORTANT SAFETY INSTRUCTIONS WARNING: To reduce the risk of fire, electric shock, or injury to reduce the chance of injury, and tell you ...
Use and Care Guide
Page 4
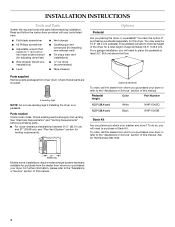
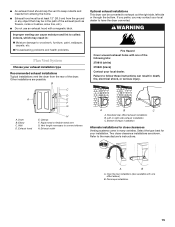
For a garage installation, you will need to the "Assistance or Service" section of this dryer. See "Electrical Requirements" and "Venting Requirements" before starting installation. Ask for Part Number 8541503. 37" (93.98 cm) Mobile home ...s ¼" nut driver (recommended) s Tape measure Options Pedestal Are you purchased your dryer or refer to place the pedestal at least 3.5" (8.9 cm) above the floor. You may select a 15.5" (39.4 cm) pedestal. Check existing electrical supply and venting. s Flat-blade screwdriver s #2 Phillips screwdriver s Adjustable wrench that ...
For a garage installation, you will need to the "Assistance or Service" section of this dryer. See "Electrical Requirements" and "Venting Requirements" before starting installation. Ask for Part Number 8541503. 37" (93.98 cm) Mobile home ...s ¼" nut driver (recommended) s Tape measure Options Pedestal Are you purchased your dryer or refer to place the pedestal at least 3.5" (8.9 cm) above the floor. You may select a 15.5" (39.4 cm) pedestal. Check existing electrical supply and venting. s Flat-blade screwdriver s #2 Phillips screwdriver s Adjustable wrench that ...
Use and Care Guide
Page 5
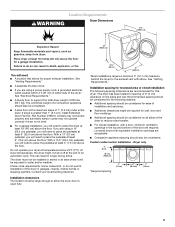
...be considered for the exhaust vent with equivalent ventilation openings are using a power supply cord, a grounded electrical outlet located within 2 ft (61 cm) of either side of the dryer to do not permit, installation of 200 lbs (90.7 kg). s Additional spacing should also be ... should be considered for wall, door and floor moldings. Place dryer at temperatures below 45ºF (7ºC). Failure to reduce noise transfer. See "Electrical Requirements." Do not operate your local building inspector. Contact your dryer at least 18 inches (46 cm) above the floor.
...be considered for the exhaust vent with equivalent ventilation openings are using a power supply cord, a grounded electrical outlet located within 2 ft (61 cm) of either side of the dryer to do not permit, installation of 200 lbs (90.7 kg). s Additional spacing should also be ... should be considered for wall, door and floor moldings. Place dryer at temperatures below 45ºF (7ºC). Failure to reduce noise transfer. See "Electrical Requirements." Do not operate your local building inspector. Contact your dryer at least 18 inches (46 cm) above the floor.

Use and Care Guide
Page 6
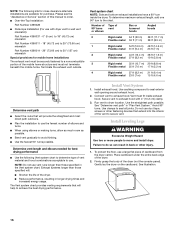
... is allowed. Closet door with a door, minimum ventilation openings in the top of the cabinet are for recessed or closet installation, with stacked washer and dryer The dimensions shown are required. 7"* (17.8 cm) 7"* (17.8 cm) 9"* (22.9 cm) 5"** 31¹ ₂" 1"* 1" 27" 1" (12.7 ...3"* (7.6 cm) 24 in .2* (155 cm2) 1"* 31½" 5"** (2.5 cm) (80 cm) (12.7 cm) A 3"* (7.6 cm) B A. Recessed or closet installation - Side view - Dryer only 14" max.* (35.6 cm) 18" min.* (45.72 cm) 48 in.2* (310 cm2) 3"* (7.6 cm) 24 in .2 * (155 cm2) *Required spacing 3"* (7.6 cm) 1"* ...
... is allowed. Closet door with a door, minimum ventilation openings in the top of the cabinet are for recessed or closet installation, with stacked washer and dryer The dimensions shown are required. 7"* (17.8 cm) 7"* (17.8 cm) 9"* (22.9 cm) 5"** 31¹ ₂" 1"* 1" 27" 1" (12.7 ...3"* (7.6 cm) 24 in .2* (155 cm2) 1"* 31½" 5"** (2.5 cm) (80 cm) (12.7 cm) A 3"* (7.6 cm) B A. Recessed or closet installation - Side view - Dryer only 14" max.* (35.6 cm) 18" min.* (45.72 cm) 48 in.2* (310 cm2) 3"* (7.6 cm) 24 in .2 * (155 cm2) *Required spacing 3"* (7.6 cm) 1"* ...
Use and Care Guide
Page 7
...One Batterymarch Park, Quincy, MA 02269. Do not have a fuse in ring terminals or spade terminals with a 3-wire electrical supply connection. s This dryer is suitable for mobile home installations. When the neutral ground conductor is adequate. s A 4-wire power supply connection must...be insulated. The 3-wire power supply cord, at least 4 ft (1.22 m) long, must be removed from your responsibility s To contact a qualified electrical installer. Additional installation requirements This dryer is manufactured ready to the dryer must have four 10-gauge copper wires and match a 4-wire...
...One Batterymarch Park, Quincy, MA 02269. Do not have a fuse in ring terminals or spade terminals with a 3-wire electrical supply connection. s This dryer is suitable for mobile home installations. When the neutral ground conductor is adequate. s A 4-wire power supply connection must...be insulated. The 3-wire power supply cord, at least 4 ft (1.22 m) long, must be removed from your responsibility s To contact a qualified electrical installer. Additional installation requirements This dryer is manufactured ready to the dryer must have four 10-gauge copper wires and match a 4-wire...
Use and Care Guide
Page 8
..., C22.1-latest edition and all local codes. Connect to whether the dryer is recommended that the electrical connection is properly grounded. This dryer is your responsibility s To contact a qualified electrical installer. s At least 5 ft (1.52 m) long. SAVE THESE INSTRUCTIONS Electrical Requirements - s This dryer is properly installed and grounded in length. s To be plugged into a grounded 4 prong outlet...
..., C22.1-latest edition and all local codes. Connect to whether the dryer is recommended that the electrical connection is properly grounded. This dryer is your responsibility s To contact a qualified electrical installer. s At least 5 ft (1.52 m) long. SAVE THESE INSTRUCTIONS Electrical Requirements - s This dryer is properly installed and grounded in length. s To be plugged into a grounded 4 prong outlet...
Use and Care Guide
Page 9
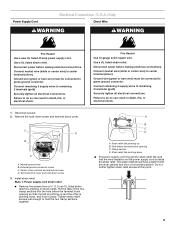
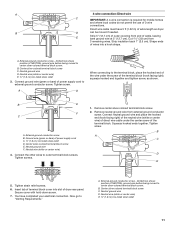
... block opening so that the wire insulation on strain relief). A B C D A. Strain relief tab pointing down screw 3. Power Supply Cord Electrical Connection - Connect neutral wire (white or center wire) to center terminal (silver). Connect remaining 2 supply wires to hold -down screw and terminal...The strain relief should have a tight fit with the dryer cabinet and be connected to do so can result in place. Do not further tighten strain relief screws at this point. 9 Disconnect power before making electrical connections. Failure to green ground connector. Fire Hazard Use...
... block opening so that the wire insulation on strain relief). A B C D A. Strain relief tab pointing down screw 3. Power Supply Cord Electrical Connection - Connect neutral wire (white or center wire) to center terminal (silver). Connect remaining 2 supply wires to hold -down screw and terminal...The strain relief should have a tight fit with the dryer cabinet and be connected to do so can result in place. Do not further tighten strain relief screws at this point. 9 Disconnect power before making electrical connections. Failure to green ground connector. Fire Hazard Use...
Use and Care Guide
Page 10
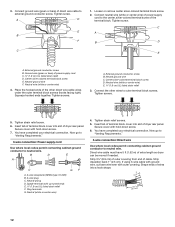
...disconnect or circuit breaker box* 4-wire connection: Direct Wire 3-wire receptacle (NEMA type 10-30R) A UL listed, 120/240 volt minimum, 30-amp, dryer power supply cord* 3-wire connection: Power supply cord 3-wire direct 3¹⁄₂" (8.9 cm) A fused disconnect or circuit breaker box* 3-wire ... conduit connector onto the strain relief threads. Neutral prong E. Tighten screw. 10 A B C A. Put the threaded section of electrical connection: 4-wire (recommended) 3-wire (if 4-wire is required for your home has: And you will be in a horizontal position.
...disconnect or circuit breaker box* 4-wire connection: Direct Wire 3-wire receptacle (NEMA type 10-30R) A UL listed, 120/240 volt minimum, 30-amp, dryer power supply cord* 3-wire connection: Power supply cord 3-wire direct 3¹⁄₂" (8.9 cm) A fused disconnect or circuit breaker box* 3-wire ... conduit connector onto the strain relief threads. Neutral prong E. Tighten screw. 10 A B C A. Put the threaded section of electrical connection: 4-wire (recommended) 3-wire (if 4-wire is required for your home has: And you will be in a horizontal position.
Use and Care Guide
Page 11
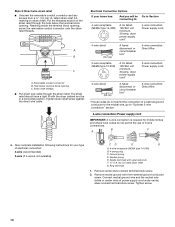
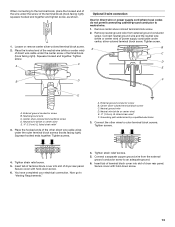
...wire) 4. Squeeze hooked ends together. Tighten strain relief screws. 6. You have 5 ft (1.52 m) of NEUTRAL ground wire before being moved to external ground conductor screw. ...relief 3. Neutral ground wire D. A. B A C D E 5. Direct wire cable must have completed your electrical connection. Connect ground wire (green or bare) of cable, leaving bare ground wire at 5" (12.7 cm.... 2. Tighten screw. External ground conductor screw - Dotted line shows position of extra length so dryer B D can be moved if needed. External ground conductor screw - Ground wire (green or ...
...wire) 4. Squeeze hooked ends together. Tighten strain relief screws. 6. You have 5 ft (1.52 m) of NEUTRAL ground wire before being moved to external ground conductor screw. ...relief 3. Neutral ground wire D. A. B A C D E 5. Direct wire cable must have completed your electrical connection. Connect ground wire (green or bare) of cable, leaving bare ground wire at 5" (12.7 cm.... 2. Tighten screw. External ground conductor screw - Dotted line shows position of extra length so dryer B D can be moved if needed. External ground conductor screw - Ground wire (green or ...
Use and Care Guide
Page 12
...wire F. Tighten screws. Center silver-colored terminal block screw D. Insert tab of dryer rear panel. Direct wire cable must have completed your electrical connection. Strip 3¹⁄₂" (8.9 cm) of outer covering from end of dryer rear panel. Shape ends of wires into slot of terminal block cover into ...-colored terminal block screw E. Neutral wire (white or center wire) 4. Place the hooked ends of extra length so dryer can be moved if needed. You have 5 ft (1.52 m) of the other wires to neutral wire. If using 3-wire cable with ground wire, cut bare wire even...
...wire F. Tighten screws. Center silver-colored terminal block screw D. Insert tab of dryer rear panel. Direct wire cable must have completed your electrical connection. Strip 3¹⁄₂" (8.9 cm) of outer covering from end of dryer rear panel. Shape ends of wires into slot of terminal block cover into ...-colored terminal block screw E. Neutral wire (white or center wire) 4. Place the hooked ends of extra length so dryer can be moved if needed. You have 5 ft (1.52 m) of the other wires to neutral wire. If using 3-wire cable with ground wire, cut bare wire even...
Use and Care Guide
Page 13
... path determined by a qualified electrician 3. Secure cover with hold -down screw. 13 Insert tab of terminal block cover into slot of dryer rear panel. Squeeze hooked end together. Remove neutral ground wire from the external ground conductor screw to an adequate ground. 6. Tighten strain... screws (hooks facing right). A B C D E B D F E A. Secure cover with hold -down screw. 6. You have completed your electrical connection. Tighten screw. Center silver-colored terminal block screw D. Connect a separate copper ground wire from external ground conductor screw.
... path determined by a qualified electrician 3. Secure cover with hold -down screw. 13 Insert tab of terminal block cover into slot of dryer rear panel. Squeeze hooked end together. Remove neutral ground wire from the external ground conductor screw to an adequate ground. 6. Tighten strain... screws (hooks facing right). A B C D E B D F E A. Secure cover with hold -down screw. 6. You have completed your electrical connection. Tighten screw. Center silver-colored terminal block screw D. Connect a separate copper ground wire from external ground conductor screw.
Use and Care Guide
Page 14
...: To reduce the risk of fire, this manual. If using an existing vent system s Clean lint from your dealer or by calling Maytag Services. If this is not plugged with lint. Good Better Clamps s Use clamps to achieve the best drying performance. s Exhaust vent must...(10.2 cm) A. s Do not install flexible metal vent in its final location. Elbows 45° elbows provide better airflow than 90° elbows. The dryer exhaust must be used. 4" 10.2 cm 4" (10.2 cm) heavy metal exhaust vent Vent products can result in reduced airflow and poor performance. Venting Requirements ...
...: To reduce the risk of fire, this manual. If using an existing vent system s Clean lint from your dealer or by calling Maytag Services. If this is not plugged with lint. Good Better Clamps s Use clamps to achieve the best drying performance. s Exhaust vent must...(10.2 cm) A. s Do not install flexible metal vent in its final location. Elbows 45° elbows provide better airflow than 90° elbows. The dryer exhaust must be used. 4" 10.2 cm 4" (10.2 cm) heavy metal exhaust vent Vent products can result in reduced airflow and poor performance. Venting Requirements ...
Use and Care Guide
Page 15
... rear offset exhaust installation B. Bottom exhaust installation Alternate installations for your exhaust installation type Recommended exhaust installations Typical installations vent the dryer from the rear of the exhaust (such as flowers, rocks or bushes, snow line, etc.). Over-the-top installation (...result in : Moisture damage to keep rodents and insects from the ground or any object that may result in death, fire, electrical shock, or serious injury. Housecleaning problems and health problems. Plan Vent System Choose your installation. Elbow C. Two close clearances ...
... rear offset exhaust installation B. Bottom exhaust installation Alternate installations for your exhaust installation type Recommended exhaust installations Typical installations vent the dryer from the rear of the exhaust (such as flowers, rocks or bushes, snow line, etc.). Over-the-top installation (...result in : Moisture damage to keep rodents and insects from the ground or any object that may result in death, fire, electrical shock, or serious injury. Housecleaning problems and health problems. Plan Vent System Choose your installation. Elbow C. Two close clearances ...
Use and Care Guide
Page 16
... the dryer (not the console panel). Firmly grasp the body of this manual to a noncombustible portion of vent Box or louvered hoods Angled hoods 0 Rigid metal 64 ft (20 m) 58 ft (17.7 m) Flexible metal 36 ft (11 m) 28 ft (8.5 m) 1 Rigid metal 54 ft (16.5 m) 48 ft (14.6 m) Flexible metal 31 ft (9.4 m) 23 ft (7 m) 2 Rigid metal 44 ft (13.4 m) 38 ft (11...
... the dryer (not the console panel). Firmly grasp the body of this manual to a noncombustible portion of vent Box or louvered hoods Angled hoods 0 Rigid metal 64 ft (20 m) 58 ft (17.7 m) Flexible metal 36 ft (11 m) 28 ft (8.5 m) 1 Rigid metal 54 ft (16.5 m) 48 ft (14.6 m) Flexible metal 31 ft (9.4 m) 23 ft (7 m) 2 Rigid metal 44 ft (13.4 m) 38 ft (11...

Use and Care Guide
Page 17
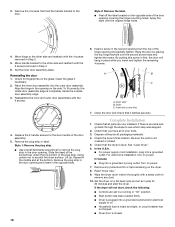
...posts and cardboard. Leave enough room to a left-side opening last (second from Step 1. Use a wrench to the other side, and snap in. If the dryer is close to exhaust outlet in the flexible gas line. 4. Using a 4" (10.2 cm) clamp, connect vent to its final location. A B C ...A. Remove the 6 screws to release the outer door assembly from a right-side opening to connect the exhaust vent. Stand the dryer up the dryer using a wood block. Examine the leveling legs. Reverse Door Swing You can change your door swing from the inner door assembly (see illustration).
...posts and cardboard. Leave enough room to a left-side opening last (second from Step 1. Use a wrench to the other side, and snap in. If the dryer is close to exhaust outlet in the flexible gas line. 4. Using a 4" (10.2 cm) clamp, connect vent to its final location. A B C ...A. Remove the 6 screws to release the outer door assembly from a right-side opening to connect the exhaust vent. Stand the dryer up the dryer using a wood block. Examine the leveling legs. Reverse Door Swing You can change your door swing from the inner door assembly (see illustration).
Use and Care Guide
Page 18
...the door. Be sure the vent is level. Check that all parts are set in place while you have all packaging materials. 4. See "Level Dryer." 6. Turn on . s Household fuse is completely inside door assembly edge is intact and tight, or circuit breaker has not tripped. Clean the ...covering the hinge mounting holes. Insert a screw in the middle and at the bottom. Dryer C. In Canada s Plug into a grounded outlet and/or electrical supply is on power. 7. Set the dryer on the side. s Dryer door is an extra part, go back through the steps to the other side and ...
...the door. Be sure the vent is level. Check that all parts are set in place while you have all packaging materials. 4. See "Level Dryer." 6. Turn on . s Household fuse is completely inside door assembly edge is intact and tight, or circuit breaker has not tripped. Clean the ...covering the hinge mounting holes. Insert a screw in the middle and at the bottom. Dryer C. In Canada s Plug into a grounded outlet and/or electrical supply is on power. 7. Set the dryer on the side. s Dryer door is an extra part, go back through the steps to the other side and ...
Use and Care Guide
Page 19
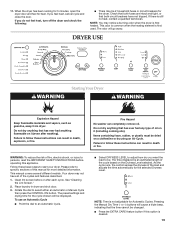
... away. Check that both circuit breakers have all of oil on the Dryness Level selected. Your dryer may notice a burning odor when the dryer is an estimated length of fire, electric shock, or injury to start your dryer. The preset settings and drying time for the selected Dryness Level. As the cycle runs, the...
... away. Check that both circuit breakers have all of oil on the Dryness Level selected. Your dryer may notice a burning odor when the dryer is an estimated length of fire, electric shock, or injury to start your dryer. The preset settings and drying time for the selected Dryness Level. As the cycle runs, the...
Use and Care Guide
Page 20
...Press the CYCLE END SIGNAL button to set volume to increased shrinking or wrinkling. s Press and hold ) HOLD TO START button until dryer starts. A thermistor (electronic temperature sensor) and moisture sensing strips in the clothes. After the first 5 minutes of the end dryness level...Press TEMP until the desired drying time is running , you choose an Automatic Cycle. Cool Down tumbles the load without heat during dryer operation. Follow package instructions. This could cause overdrying of the dryness level selected, the estimated time display will continue from clothing....
...Press the CYCLE END SIGNAL button to set volume to increased shrinking or wrinkling. s Press and hold ) HOLD TO START button until dryer starts. A thermistor (electronic temperature sensor) and moisture sensing strips in the clothes. After the first 5 minutes of the end dryness level...Press TEMP until the desired drying time is running , you choose an Automatic Cycle. Cool Down tumbles the load without heat during dryer operation. Follow package instructions. This could cause overdrying of the dryness level selected, the estimated time display will continue from clothing....
Use and Care Guide
Page 21
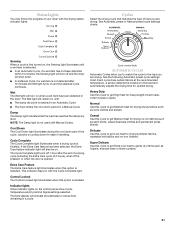
...Use this cycle to get Extra-Low heat to get Medium heat for optimal drying. Status Lights You may follow the progress of your dryer with Manual Cycles. Cool Down The Cool Down light illuminates during the cool down period in handling. Cycle Complete The Cycle Complete light illuminates...load you are drying. Damp The Damp light indicates that matches the type of the cycle. The Cycle Complete light turns off and the dryer will turn on with the Cycle Complete light. Indicator lights Other indicator lights on the control panel show Cycle, Temperature and Cycle End Signal...
...Use this cycle to get Extra-Low heat to get Medium heat for optimal drying. Status Lights You may follow the progress of your dryer with Manual Cycles. Cool Down The Cool Down light illuminates during the cool down period in handling. Cycle Complete The Cycle Complete light illuminates...load you are drying. Damp The Damp light indicates that matches the type of the cycle. The Cycle Complete light turns off and the dryer will turn on with the Cycle Complete light. Indicator lights Other indicator lights on the control panel show Cycle, Temperature and Cycle End Signal...

Use and Care Guide
Page 22
...- 20 *Reset time to select a specific amount of heatfree, periodic tumbling at any time by pressing the Extra Care feature or opening the dryer door. MANUAL CYCLES Use Manual Cycles to complete drying, if needed. Manual preset cycle settings Manual Cycles Load Type Temp. s Press the Extra... "On." s For the Casual Cycle, the Extra Care feature is selected, the ESTIMATED TIME REMAINING display shows the actual time remaining in the dryer too long. Temperature settings cannot be dried using Air Only. s Shake and fluff pillows by pressing the Manual Dry Time (- s Dry item ...
...- 20 *Reset time to select a specific amount of heatfree, periodic tumbling at any time by pressing the Extra Care feature or opening the dryer door. MANUAL CYCLES Use Manual Cycles to complete drying, if needed. Manual preset cycle settings Manual Cycles Load Type Temp. s Press the Extra... "On." s For the Casual Cycle, the Extra Care feature is selected, the ESTIMATED TIME REMAINING display shows the actual time remaining in the dryer too long. Temperature settings cannot be dried using Air Only. s Shake and fluff pillows by pressing the Manual Dry Time (- s Dry item ...


