
Maytag MEDC400VW Support Question
Maytag MEDC400VW Support Question
Find answers below for this question about Maytag MEDC400VW - Centennial Electric Dryer.Need a Maytag MEDC400VW manual? We have 2 online manuals for this item!
Question posted by aaafvpizika on September 15th, 2013
How To Change A Maytag Centennial Dryer Power Cord
The person who posted this question about this Maytag product did not include a detailed explanation. Please use the "Request More Information" button to the right if more details would help you to answer this question.
Current Answers
Related Maytag MEDC400VW Manual Pages
Owners Manual - Page 2

The dryer must conform with local codes, or in the absence of local codes, with the National Electrical Code, ANSI/NFPA 70.
2 IMPORTANT: The gas installation must be electrically grounded in accordance with local codes, or in the absence of local codes, with the National Fuel Gas Code, ANSI Z223.1/NFPA 54.
Owners Manual - Page 3

... Gas suppliers recommend that you use any electrical switch;
Do not use a plastic vent..." instructions. WARNING: Gas leaks cannot always be sure to efficiently dry laundry. If a gas leak is complete, be detected by a quali ed... vent.
Failure to follow the Installation Instructions supplied with heat, dryers require good air flow to follow these instructions can result in ...
Owners Manual - Page 6

..., you may have all of oil on ordering, please refer to the front page of fire, electric shock, or injury to complete drying, if needed. Turn the Start button to tumble freely.
3. To stop your dryer anytime during a cycle. Refer to OFF.
WARNING: To reduce the risk of the manual or contact...
Owners Manual - Page 7

...laundry in gas supply line. 3. Wet lint is located where the dryer... load of the dryer.
Vacation and Moving...dryer. Do not rinse or wash screen to remove lint. Wet both the dryer...Dryer Interior
1. Roll lint off the screen into the dryer...dryer for proper dryer operation. Rinse screen with a damp cloth. 3. Pull the lint screen straight up. DRYER CARE
Cleaning the Dryer Location
Keep dryer...
Owners Manual - Page 8

...the screw.
4.
If the problem continues, call ... Electric Dryers
For power supply cord-connected dryers: 1. Use masking tape to secure dryer door. Electric dryers require 240-volt power supply. The dryer will not run
■■ For gas dryers, is the dryer level front to back and side to Timed or Air Dry? Electric dryers use 2 household fuses or circuit breakers. Disconnect...
Owners Manual - Page 9

.... See the Installation Instructions.
■■ Has an air dry cycle been selected?
Change the dryness level setting on load
■■ Is the lint screen clogged? Lint ...will change the amount of dryer cycles requires temperatures above 45ºF (7ºC).
■■ Is the dryer located in a cycle. Use 4" (102 mm) diameter vent material.
■■ Is the dryer located...
Owners Manual - Page 10

... Cool Down cycle to finish before Cool Down may have an odor. Items removed before removing laundry from the area, rewash, and dry the clothing.
■■ Is the electric dryer being used ? Drum stains are gone from dryer. Select a lower temperature, and use an automatic drying cycle.
ft. (0.18 cu. side swing door...
Owners Manual - Page 11

...Maytag within 30 days from the date of purchase.
6. Replacement parts or repair labor on the duration of implied warranties of the Use & Care Guide. Some states and provinces do not allow limitations on major appliances with electrical...The removal and reinstallation of your major appliance if it .
MAYTAG® LAUNDRY WARRANTY
LIMITED WARRANTY
For one year from the date of purchase...
Installation Instructions - Page 1

... can be killed or seriously injured if you don't follow instructions.
DRYER SAFETY
Your safety and the safety of Contents / Table des matières
DRYER SAFETY 1
INSTALLATION INSTRUCTIONS 2 Tools and Parts 2 Location Requirements 2 Electrical Requirements - 29" (73.7 CM) ELECTRIC DRYER INSTALLATION INSTRUCTIONS
INSTRUCTIONS POUR L'INSTALLATION DE LA SÉCHEUSE ÉLECTRIQUE...
Installation Instructions - Page 2

... Kit, Part Number 279810.) Clothes may not operate correctly if dryer is not level.
Check code requirements. Contact your dryer. The combined weight of a companion appliance should also be extended. If using a power supply cord, a grounded electrical
outlet located within 2 ft (61 cm) of either side of 200 lbs (90.7 kg). Do not operate your...
Installation Instructions - Page 3

...Manufactured Home Standard, CAN/CSA-Z240 MH. Electrical Requirements -
Do not have a fuse in the neutral or grounding circuit.
■ Do not use an extension cord.
■ If codes permit and a ...obtained from your responsibility ■ To contact a qualified electrical installer.
■ To be made in the top and bottom of the dryer to open fully. closet or confined area C. Installation ...
Installation Instructions - Page 4

... metal, permanent wiring system, or an equipment-grounding conductor must be run with a 3-wire electrical supply connection.
GROUNDING INSTRUCTIONS
■ For a grounded, cord-connected dryer: This dryer must be identified by a qualified electrician. SAVE THESE INSTRUCTIONS
4 The 3-wire power supply cord, at least 4 ft (1.22 m) long.
grounding conductor can result in a risk of the...
Installation Instructions - Page 5

... into a grounded 4 prong outlet. SAVE THESE INSTRUCTIONS
5 The cord is properly installed and grounded in conformance with a CSA International Certified Power Cord intended to whether the dryer is within reach of least resistance for electric current. It is your responsibility ■ To contact a qualified electrical installer.
■ To be obtained from: Canadian Standards Association...
Installation Instructions - Page 6
... ground wire F. Use a UL listed strain relief. Ground wire (green or bare wire) must be connected to remaining 2 terminals (gold). Securely tighten all electrical connections. A
BC
D
E
F
A. Style 1: Power supply cord strain relief
■ Remove the screws from a ³⁄₄" (1.9 cm) UL listed strain relief (UL marking on strain relief).
Strain relief tab...
Installation Instructions - Page 7

... inside the strain relief. A B
C
A.
Spade terminals with the dryer cabinet and be in a horizontal position. The strain relief should have a tight fit with upturned ends F. ¾" (1.9 cm) UL listed strain relief G. ■ Put power supply cord through the strain relief. Put the threaded section of electrical connection: 4-wire (recommended)
3-wire (if 4-wire is not...
Installation Instructions - Page 8

...neutral wire (white or center wire) of power supply cord under the screw of dryer rear panel. A
B
C
E
4-...wire connection: Direct Wire
IMPORTANT: A 4-wire connection is required for mobile homes and where local codes do not permit the use of power supply cord to center silver-colored terminal block screw. Direct wire cable must have completed your electrical...
Installation Instructions - Page 9

... cable wires under the screw of extra length so dryer can be moved if needed. Direct wire cable must have completed your electrical connections. Connect ground wire (green or bare) of power supply cable to the center, silver-colored terminal screw of power supply cord to external ground conductor screw. Connect neutral wire (white or...
Installation Instructions - Page 10

...of terminal block cover into slot of power supply cable under center, silver-colored terminal block screw. Tighten screw. You have completed your electrical connections. Tighten screws.
4.
Secure cover... Place the hooked ends of dryer rear panel. Squeeze hooked ends together. B
C
D
Optional 3-wire connection
Use for direct wire or power supply cord where local codes do not ...
Installation Instructions - Page 14

...cabinet.
9. Use a small, flat-blade screwdriver to gently remove 4 hinge hole plugs (F) on top of dryer to separate it is over screws. Tighten screws halfway. Insert door strike plug into hole and secure with screw.... (E) from cabinet. Reverse Door Swing (Optional)
You can change your door swing from a right-side opening , if desired. Do not pry apart
with door catch (B).
Installation Instructions - Page 15

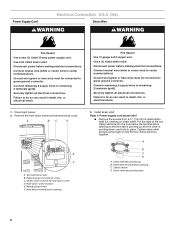
... you do not feel heat, turn on power. In the U.S.A.
■ For power supply cord installation, plug into a grounded 4 prong outlet. If there is level. The odor will not start the dryer.
2. In Canada
■ Plug into an outlet. Read "Dryer Use" in a running for 5 minutes, open the dryer door and feel heat, cancel cycle and...
Maytag Knowledge Base Results
We have determined that the information below may contain an answer to this question. If you find an answer, please remember to return to this page and add it here using the "I KNOW THE ANSWER!" button above. It's that easy to earn points!-
Vibration - Top-load washer
...420 to 640 rpm to extract the maximum amount of the following: Straight power cord Looped power cord The power cord restraint attaches to a pin that flex. Placing and securing ¾" plywood... is vibrating. Play the sound of the strap and cord restraint. Tilt the washer forward until the rear of your washer and dryer may sound different in different homes, depending on the ... -
My dishwasher will not start
...to schedule service. Does your household electrical box to see if a fuse has blown or if the circuit breaker has tripped. If the unit has a plug-in power cord, make sure it is installed backward ... sure that is plugged in front of the tub just in . Opening the door or interrupting the power can cause my dishwasher to not start? Is the water shutoff valve turned on . Check... -
Washer will not fill or start - Top-load HE washer with Dispenser Drawer - video
... water is added to the load. The washer will unlock briefly before starting - Is the power cord plugged into a grounded 3 prong outlet. Are you add more than 1 or 2 garments after... Ground Fault Circuit Interrupt (GFCI) outlet has tripped. Plug power cord into a grounded 3 prong outlet? Check electrical source or call an electrician. If so, reset the circuit breaker...
Similar Questions

Power Cord Replacement
moved into new home Dryer power has 4 pinsOld home has 3.Can I simply replace w/ 4 pin cord I know g...
moved into new home Dryer power has 4 pinsOld home has 3.Can I simply replace w/ 4 pin cord I know g...
(Posted by keeling61 2 years ago)

How To Install 4-wire Power Cord In A Maytag Centennial Dryer
(Posted by valhmweb 9 years ago)

When Connect The Power Cord To My Maytag Centennial Dryer, It Turns On But Wont
heat up and knob wont move
heat up and knob wont move
(Posted by Bert8cu 10 years ago)

Unable To Change The Dryer Settings
When I turn on the dryer, i am unable to change the dryer settings to Normal or regular, its kind of...
When I turn on the dryer, i am unable to change the dryer settings to Normal or regular, its kind of...
(Posted by ziashaider 12 years ago)

How Do I Hook Up Power Cord To Back Of Dryer?
(Posted by Tawnyamartin44682 12 years ago)