
Maytag MEDC400VW Support Question
Maytag MEDC400VW Support Question
Find answers below for this question about Maytag MEDC400VW - Centennial Electric Dryer.Need a Maytag MEDC400VW manual? We have 2 online manuals for this item!
Question posted by Tawnyamartin44682 on February 29th, 2012
How Do I Hook Up Power Cord To Back Of Dryer?
Current Answers
Answer #1: Posted by Friction on March 6th, 2012 12:42 PM

Member since:
March 6th, 2012 Points: 5,550

First and foremost: It is always better to let a licensed electrician do any electrical work at your house, especially if you are a novice.
Now if you are set on doing this yourself, it's actually a pretty easy procedure.
Step 1: Identify what type of dryer recepticle you have in your home. There are 2 types of recepticles and power cords (pigtails). There is a recepticle with 3 slots and one with 4. Just as well, there are pigtails with 3 prongs and 4 prongs. 4 wire plugs/pigtails are newer. They are better because they seperate the neutral from the ground.
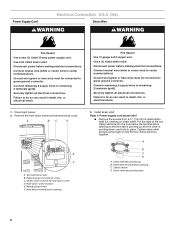
Step 2: (3 wire application) - If you have a 3 wire dryer recepticle and a 3 wire pigtail: Take the cover off the back of the dryer where the power cord goes. Attach the center wire on the power cord to the center terminal of the dryer. This is the neutral, and it is always in the middle. Next attach the 2 remaining wires to either of the outside 2 terminals(L1 and L2). I would prefer to do it neatly by hooking up left to left and right to right, but it actually does not matter. They are both 120 volts and combined equal 240 volts, which is what is required to run a dryer. Now, attach the strain relief cord connector to the dryer. Slide one half of the clamp into the connection hole under the cord wire. This will be the half with the smaller holes. The clamp is bent at a 90 degree angle, so you'll have to twist it into place with the holes facing up. install the larger-holed clamp half in the same manner. Squeeze the two halves together with pliers and insert the two screws into the holes. Using a screw driver or drill with a screw head, tighten the two screws equally until snug. Always attach the strain-relief collar onto a cord and secure it to the cabinet where the cord exits. Since dryers are moved around more than other appliances for cleaning, etc., the cord needs to be safely fastened. Put dryer electrical cover back on and you are done.
Step 2: (4 wire application) - If you have a 4 wire dryer cord and a 4 wire dryer recepticle: Take the cover off. Locate the center neutral terminal. Remove the ground wire or strap that goes from the neutral terminal to the case of the dryer or green ground screw(In a 3 wire application, the ground and neutral are connected, that's why we use 4 wire applications now, so we can seperate them, and if you do not remove the wire/strap between the 2, you might as well have a 3 wire application). Now hook up the white wire to the middle neutral terminal, the black and red wire to each outside terminal(L1 and L2). Again in this case, the red and black hot wires can be flipped flopped either way because they are both just 120v meeting up to make 240volts, the amount it takes to operate a dryer. Green wire goes to the green ground screw on the case of the dryer. Now, attach the strain relief cord connector to the dryer. Slide one half of the clamp into the connection hole under the cord wire. This will be the half with the smaller holes. The clamp is bent at a 90 degree angle, so you'll have to twist it into place with the holes facing up. install the larger-holed clamp half in the same manner. Squeeze the two halves together with pliers and insert the two screws into the holes. Using a screw driver or drill with a screw head, tighten the two screws equally until snug. Always attach the strain-relief collar onto a cord and secure it to the cabinet where the cord exits. Since dryers are moved around more than other appliances for cleaning, etc., the cord needs to be safely fastened. Put dryer electrical cover back on and you are done.
I could have possibly made it simpler, but I wanted to be thurough to make sure you got it right. Hope this helps.
-Friction
~Get busy child~
Related Maytag MEDC400VW Manual Pages


Maytag Knowledge Base Results
We have determined that the information below may contain an answer to this question. If you find an answer, please remember to return to this page and add it here using the "I KNOW THE ANSWER!" button above. It's that easy to earn points!-
Vibration - Top-load washer
...agitator and basket movement feels rigid, look like one of the following: Straight power cord Looped power cord The power cord restraint attaches to a pin that must be removed from the washer and eliminate the noise... strap still in washer. (8 seconds, 130 KB) The rear of your washer and dryer may sound during the final spin portion of the cycle is still in the washer, hold ... -
My dishwasher will not start
...option activated? To cancel the delay and cycle, press Start/Cancel twice. Does your household electrical box to open or unlatched? Check your dishwasher have a rotary timer knob? The cycle ...;start? The serial label is turned on the inside left of the tub just in power cord, make sure it is installed backward will also cause incomplete door closure. Lights flashing on... -
Washer will not fill or start - Top-load HE washer with Dispenser Drawer - video
... amount of water. Is the washer in a normal pause in heaps around the basket wall. Is the power cord plugged into a grounded 3 prong outlet. Are both faucets for leaks. Turn on ? Straighten the hoses... will not fill or start - Washer will not fill or start - Check electrical source or call an electrician. Is the Delay Wash status light on the lid lock. Did you ...
Similar Questions

moved into new home Dryer power has 4 pinsOld home has 3.Can I simply replace w/ 4 pin cord I know g...

electric dryer

