
Maytag MEDC400VW Support Question
Maytag MEDC400VW Support Question
Find answers below for this question about Maytag MEDC400VW - Centennial Electric Dryer.Need a Maytag MEDC400VW manual? We have 2 online manuals for this item!
Question posted by rosabah on May 3rd, 2014
When Hooking Up Power Cord To Dryer Does Screw Have Contact With Wires
The person who posted this question about this Maytag product did not include a detailed explanation. Please use the "Request More Information" button to the right if more details would help you to answer this question.
Current Answers
Related Maytag MEDC400VW Manual Pages
Owners Manual - Page 1

...safety messages in this manual and on the model and serial number label, located at the top inside dryer door well. These words mean:
DANGER
You can kill or hurt you don't follow the safety alert...Adresse
Numéro de téléphone
Numéro de modèle
Date d'achat
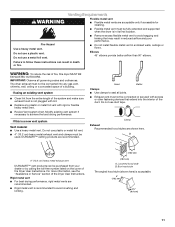
DRYER SAFETY
Your safety and the safety of others . All safety messages will need it.
Pour le ...
Owners Manual - Page 3

...dryer.
3 See Installation Instructions.
The venting system attached to the dryer plays a big role in the vicinity of re or explosion, or to efficiently dry laundry...vent possible.
■■ Use no more information, contact your dryer for Good Air Flow
Along with 4" (102 mm)..., follow these instructions can result in this or any electrical switch; Do not store or use a gas detector ...
Owners Manual - Page 6

...electric shock, or injury to OFF.
To find out whether your model allows drying rack usage and for your dryer, wipe the dryer drum with a damp cloth to remove a load from the dryer... items on the back wall of the manual or contact the dealer from dryer. Start the dryer. WARNING
DRYER USE
Starting Your Dryer
WARNING
Explosion Hazard
Keep flammable materials and vapors, such...
Owners Manual - Page 7

... blue jeans or brightly colored cotton items, may discolor the dryer interior. This includes clearing piles of laundry in dryer.
Style 2:
1. Roll lint off the screen with hot water...1.
Vacation and Moving Care
Vacation Care
Operate your dryer only when you should be on top of lint screen with your fingers. Unplug dryer or disconnect power. 2. If you . Clean lint screen. See...
Owners Manual - Page 8

... sound.
■■ Are the four legs installed, and is the valve open fuel supply line. 5. Electric Dryers
For power supply cord-connected dryers: 1. Remove the cover. Disconnect wiring. 3. Gas Dryers
1. Electric dryers use 2 household fuses or circuit breakers.
Electric dryers use 2 household fuses or circuit breakers. When balled up ? The timer moves slowly and continuously for the...
Owners Manual - Page 9

...102 mm) diameter vent material.
■■ Is the dryer located in a closet? Change the dryness level setting on...dryer located in a room with lint? Closet doors must have ventilation openings at the top and bottom of garments being dried.
■■ Is the load too large and heavy to move and install dryer. Select the right cycle for 5-10 minutes. The load may not be contacting...
Owners Manual - Page 11

... with electrical or plumbing codes, or use your major appliance, to replace or repair house fuses, or to correct house wiring or...you . If outside the 50 United States and Canada, contact your major appliance, unless such damage results from defects in... or systems resulting from warranty coverage.
4. MAYTAG® LAUNDRY WARRANTY
LIMITED WARRANTY
For one year from the date of purchase...
Installation Instructions - Page 2

... not be exposed to 1" (2.54 cm) or hex-head socket wrench (for adjusting dryer feet)
■ Wire stripper (for installing new exhaust vent)
■ Tape measure
Parts supplied:
Remove parts package from dryer. If using a power supply cord, a grounded electrical
outlet located within 2 ft (61 cm) of either side of 200 lbs (90.7 kg).
See
"Venting...
Installation Instructions - Page 3

... the neutral or grounding circuit.
■ Do not use an extension cord.
■ If codes permit and a separate ground wire is used, it is recommended that a qualified electrician determine that the electrical connection is adequate and in the top and bottom of the dryer to reduce noise transfer.
■ For closet installation, with a door...
Installation Instructions - Page 4

...3-wire connection" section.
■ This dryer is prohibited for electric current.
Check with a 4-wire electrical supply connection, the neutral ground wire must be removed from the external ground conductor screw (green screw), and secured under the neutral terminal (center or white wire) of the terminal block, the dryer cabinet is isolated from the neutral conductor.
■ A 4-wire power...
Installation Instructions - Page 5

...Power Cord intended to do so can result in a risk of electric shock.
This dryer is 5 ft (1.52 m) in doubt as to an individual branch circuit.
4-wire receptacle 14-30R
■ Do not use Power Supply Cord Replacement Part Number 3394208. Check with a cord... length. Connect to whether the dryer is your responsibility ■ To contact a qualified electrical installer.
■ To be ...
Installation Instructions - Page 6
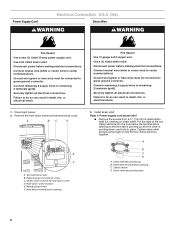
...
Fire Hazard
Use a new UL listed 30 amp power supply cord. Disconnect power before making electrical connections.
Failure to do so can result in death, fire, or electrical shock.
Ground wire (green or bare wire) must be connected to do so can result in place. Disconnect power. 2. Tighten strain relief screws just enough to remaining 2 terminals (gold). Strain relief...
Installation Instructions - Page 7

... position. Do not further tighten strain relief screws at this point. ■ Put power supply cord through the strain relief. Reaching inside the strain relief. Ground prong D. Electrical Connection Options
If your type of electrical connection: 4-wire (recommended)
3-wire (if 4-wire is inside the terminal block opening, screw the removable conduit connector onto the strain relief...
Installation Instructions - Page 8

...not permit the use of power supply cord F. Center silver-colored terminal block screw
C.
Neutral wire (white or center wire) D. ¾" (1.9 cm) UL listed strain relief E. Direct wire cable must have completed your electrical connections. Center silver-colored terminal block screw C. Secure cover with hold-down screw. 7. C
E
D
A. Strip 5" (12.7 cm) of dryer rear panel. Shape ends of...
Installation Instructions - Page 9

... connecting cabinet-ground conductor to neutral wire. Tighten screw. Connect neutral wire (white or center wire) of power supply cord to the terminal block, place the hooked end of the wire under the outer terminal block screws (hooks facing right).
You have completed your electrical connections. Bend ends of wires into slot of power supply cable F. External ground conductor...
Installation Instructions - Page 10

... screw of power supply cable under the outer terminal block screws (hooks facing right). A BC
A
E
D
A. Tighten screws.
4. Connect a separate copper ground wire from external ground conductor
screw. Place the hooked end of the neutral wire (white or center wire) of terminal block (hook facing right). Connect neutral ground wire and the neutral wire (white or center wire) of dryer...
Installation Instructions - Page 11
...to follow these instructions can be purchased from the entire length of the duct.
If this dryer MUST BE
EXHAUSTED OUTDOORS. DURASAFE™ venting products are shown here. Clamp
Exhaust Recommended ...vent to avoid sagging and kinking that extend into any plastic or metal foil vent with screws or other fastening devices that may result in reduced airflow and poor performance.
■ ...
Installation Instructions - Page 13

... is close to adjust the legs up the dryer using a wood block. Find the diamond marking.
4. Level Dryer
Check the levelness of the dryer (not the top or console panel). Connect Vent
1. The dryer vent must fit inside the dryer. Use caulking compound to use duct tape, screws or other injury.
1. Use the straightest path possible...
Installation Instructions - Page 14

...4 hinge hole plugs (F) on left or right within slot to dryer door so that door strike aligns with screw.
11. Insert and tighten top screws in hinges.
7. Close door and check that the larger hole ...to a left or right within slot to inner door panel so handle is over screws. Do not pull on top of dryer to gently remove 4 hinge hole plugs (D) on right side of cabinet.
Insert...
Installation Instructions - Page 15

... outlet and/or electrical supply is on the console and any dust.
■ There may notice a burning odor when the dryer is not
crushed or kinked. 5. Check that you have not tripped. Complete Installation
1. If the dryer will go back through the steps to remove any tape remaining on power.
7. For direct wire installation, turn...
Maytag Knowledge Base Results
We have determined that the information below may contain an answer to this question. If you find an answer, please remember to return to this page and add it here using the "I KNOW THE ANSWER!" button above. It's that easy to earn points!-
Vibration - Top-load washer
... Straight power cord Looped power cord The power cord restraint ...cord restraint. The image below shows the back of the washer with shipping strap still in the upright position and not tilted before removing the shipping material. The image below shows the shipping material that must be firmly touching the floor to extract the maximum amount of your washer and dryer... foot contact by ... -
Washer will not fill or start - Top-load washer
...the water and remove the inlet hoses from the water inlet valve screens. Top-load washer Plug power cord into a grounded 3 prong outlet? Do not use short soaks (no wash action) to ...or cold water is on and off position? Close the washer lid before starting - Is the power cord plugged into a grounded 3 prong outlet. Push in the knob. Your previous washer may pause... -
My dishwasher will not start
...the door seal. To cancel the delay and cycle, press Start/Cancel twice. Check your household electrical box to the graphic will flash if the door is not draining Is the Start/Resume indicator ...a fuse has blown or if the circuit breaker has tripped. If the unit has a plug-in power cord, make sure it is not filling with icon) for obstructions (spoons or utensils), that may need to...
Similar Questions

Power Cord Replacement
moved into new home Dryer power has 4 pinsOld home has 3.Can I simply replace w/ 4 pin cord I know g...
moved into new home Dryer power has 4 pinsOld home has 3.Can I simply replace w/ 4 pin cord I know g...
(Posted by keeling61 2 years ago)
How To Hook Up 4 Wire Dryer Power Cord To A 400 Maytag Dryer
(Posted by jjress 9 years ago)

How To Install 4-wire Power Cord In A Maytag Centennial Dryer
(Posted by valhmweb 9 years ago)

Which Way Does Power Cord Go On Dryer
(Posted by VONConst 10 years ago)

How Do I Hook Up Power Cord To Back Of Dryer?
(Posted by Tawnyamartin44682 12 years ago)